Important Safety Information
Please read this entire manual before installation and assembly. If you have any questions regarding the instructions or warnings, please contact your local distributor for assistance. Keep this manual for future reference.
- Weight Capacity: Do not exceed the maximum weight capacity of 66 lbs (30 kg). This mount is designed for use with specified maximum weights. Exceeding the maximum weight can result in instability, causing possible injury.
- Screen Size: This mount is designed for 14-42 inch TVs.
- Wall Type: This product is designed for installation on single wood studs, solid concrete walls, or brick walls. DO NOT mount on drywall alone.
- Anchors: On wooden studs, NEVER use anchors. Secure directly with provided wood screws. Anchors are for concrete/brick walls only.
- Installation: Ensure the mounting surface will safely support the combined weight of the equipment and all attached hardware and components. Use a stud finder to locate wood studs accurately.
- Tools: Use appropriate tools for installation. Power tools should be used with caution.
- Children: Keep children away from the work area during installation.
Package Contents
Verify that all components are present and undamaged before installation. If any parts are missing or defective, contact customer service.
- Wall Plate
- TV Brackets (2 pieces)
- Mounting Hardware Kit (screws, washers, spacers, anchors, bubble level)
- Instruction Manual

Figure 1: Illustration of the wall mount components and the three-step installation process. This image displays the TV brackets, wall plate, and the sequence of mounting.
Specifications
| Feature | Detail |
|---|---|
| Brand | IWORKBOARD |
| Model Number | XFS903-1-IW |
| Mounting Type | Wall Mount |
| Movement Type | Fixed |
| Compatible TV Sizes | 14-42 inches |
| Maximum Weight Capacity | 66 lbs (30 kg) |
| VESA Compatibility (Max) | 200x200mm |
| VESA Compatibility (Min) | 50x50mm |
| Profile from Wall | 0.6 inches (1.5 cm) |
| Material | Metal |
| Color | Black |
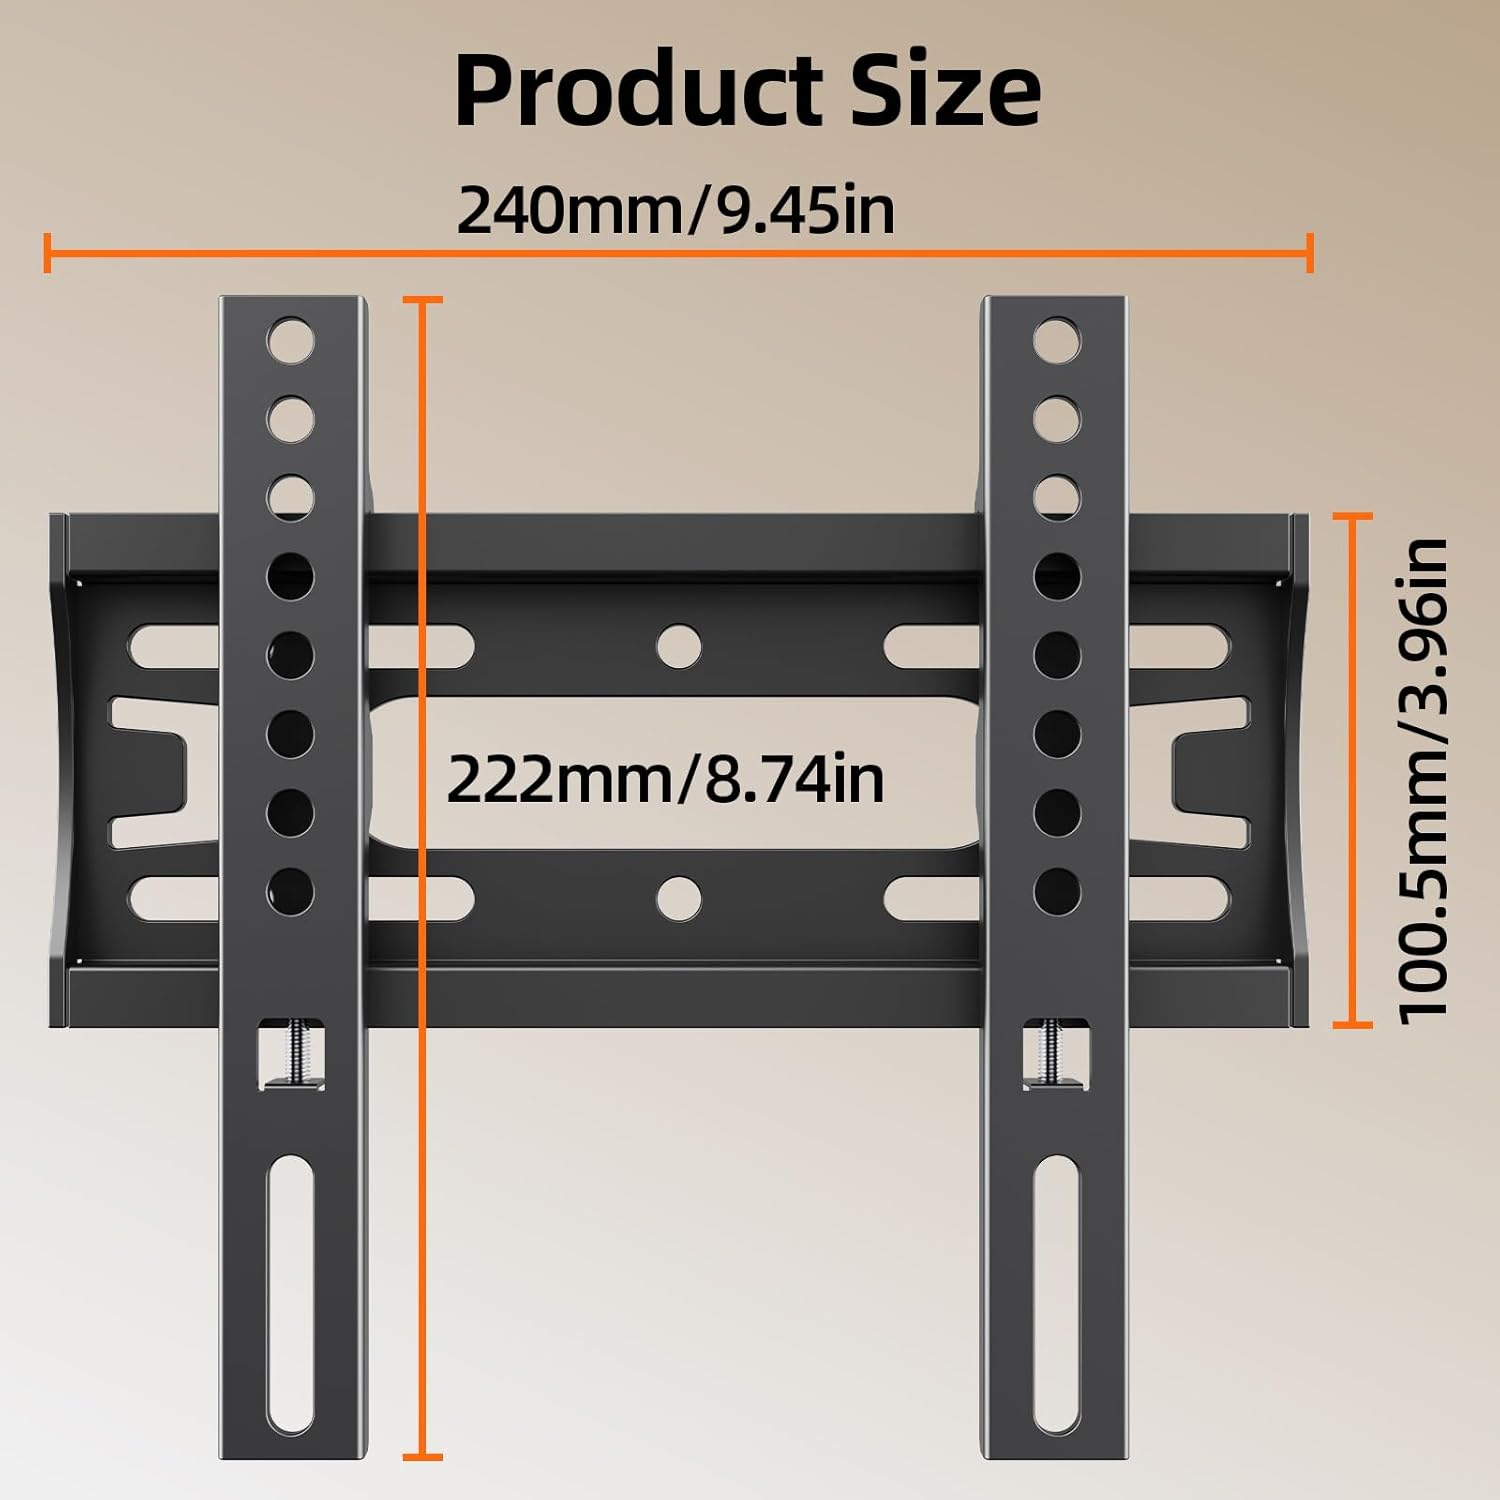
Figure 2: Detailed product dimensions for the wall mount, including width and height measurements.

Figure 3: Explanation of VESA mounting patterns, showing horizontal and vertical hole distances on a TV back panel.
Installation Guide
Follow these steps carefully to install your IWORKBOARD Fixed TV Wall Mount.
Step 1: Determine VESA Pattern and Wall Type
- Measure the horizontal and vertical distance between the mounting holes on the back of your TV to determine its VESA pattern. Ensure it falls within the 50x50mm to 200x200mm range.
- Identify your wall type: single wood stud, solid concrete, or brick. Do not install on drywall alone.

Figure 4: Visual guide for compatible TV sizes (14-42 inches) and maximum weight capacity (66 lbs).

Figure 5: Illustration of compatible wall types for installation, emphasizing the requirement for structural support.
Step 2: Mount TV Brackets to TV
- Carefully place your TV face down on a soft, clean surface to prevent screen damage.
- Attach the two TV brackets to the back of your TV using the appropriate screws, washers, and spacers from the hardware kit. Ensure the brackets are centered and securely fastened.

Figure 6: Step 1 of installation: Attaching the TV brackets to the television's VESA mounting points.
Step 3: Install Wall Plate
- Mark the desired mounting height on the wall. Use a stud finder to locate the center of a wood stud if mounting on wood.
- Hold the wall plate against the wall at the marked height and use the included bubble level to ensure it is perfectly horizontal.
- Mark the drilling locations through the holes on the wall plate.
- Drill pilot holes. For wood studs, drill directly. For concrete/brick, use a masonry drill bit and insert anchors before screwing.
- Secure the wall plate to the wall using the appropriate screws. Ensure it is firmly attached.
Figure 7: Step 2 of installation: Securing the wall plate to the wall using a wrench, ensuring it is level.
Step 4: Hang Your TV
- With assistance, carefully lift the TV and align the TV brackets with the wall plate.
- Hook the TV brackets onto the wall plate. Ensure both sides are securely engaged.
- Locate the safety screws on the bottom of the TV brackets and tighten them to prevent accidental dislodging of the TV.
Figure 8: Step 3 of installation: Carefully hanging the TV onto the wall plate, ensuring proper engagement.

Figure 9: Detail of the mount's safety features: sturdy dual hooks for secure hanging, an anti-slip baffle, and a safety screw to prevent accidental removal.
Operating Instructions
This is a fixed TV wall mount, designed to hold your TV securely in a stationary position. No adjustments for tilt, swivel, or extension are available with this model.
- Once installed, your TV will sit approximately 0.6 inches from the wall.
- Ensure all cables are connected before hanging the TV, as access behind the TV will be limited.

Figure 10: The low-profile design keeps the TV close to the wall, minimizing space usage.
Maintenance
- Periodically check all screws and connections to ensure they remain tight and secure.
- Clean the mount with a soft, dry cloth. Avoid abrasive cleaners or solvents.
- Do not hang additional items on the TV mount.
Troubleshooting
Problem: TV is not level.
Solution: Ensure the wall plate was installed perfectly level using the bubble level. If not, you may need to adjust the wall plate's position. Small adjustments might be possible by slightly loosening and re-tightening the wall plate screws, but for significant tilt, re-installation may be required.
Problem: TV feels unstable after mounting.
Solution: Immediately remove the TV. Re-check all mounting screws on both the TV brackets and the wall plate. Ensure they are tightened securely. Verify that the wall type is appropriate and that the correct anchors (if applicable) and screws were used. Confirm the TV's weight and VESA pattern are within the mount's specifications.
Problem: Cannot attach TV brackets to TV.
Solution: Check if the VESA pattern of your TV matches the mount's compatibility. Ensure you are using the correct size and length of screws from the hardware kit. Spacers may be needed for TVs with irregular back panels.
Warranty and Customer Support
This IWORKBOARD product is backed by a 10-year hassle-free replacement warranty. For any questions, missing parts, or technical support, please contact our dedicated US-based support team.
Contact Information: Please refer to the product packaging or the official IWORKBOARD website for the most current customer service contact details.