1. Introduction
This manual provides detailed instructions for the assembly, operation, and maintenance of your Furologee Rolling Clothing Rack. Designed for versatile storage, this rack features double hanging rods and a 3-tier shelf system, suitable for various living spaces. Please read this manual thoroughly before assembly and use to ensure proper setup and safe operation.

Image 1.1: Fully assembled Furologee Rolling Clothing Rack with double rods and three shelves, showcasing its storage capacity for garments, accessories, and footwear.
2. Safety Information
- Ensure all components are securely fastened before use.
- Do not exceed the maximum weight capacity of the hanging rods or shelves. Overloading can cause instability and damage.
- Keep small parts away from children during assembly to prevent choking hazards.
- Place the rack on a flat, stable surface. If using wheels, ensure they are locked when the rack is stationary.
- Avoid climbing on or hanging from the rack.
- Regularly inspect the rack for any loose connections or damage. Tighten or replace parts as needed.
3. Package Contents
Verify that all parts are present before beginning assembly. If any parts are missing or damaged, please contact customer support.

Image 3.1: Overview of all individual components included in the package, arranged on a floor for easy identification prior to assembly.
List of Components:
- Top Curved Rod (1)
- Lower Curved Rod (1)
- Vertical Support Poles (4)
- Side Hooks (2)
- Bottom Frame Bars (2)
- Shelf Panels (3)
- Casters (Wheels) with Locks (4)
- Adjustable Leveling Feet (4) - Optional alternative to casters
- Assembly Hardware (screws, connectors)
4. Assembly Instructions
This clothing rack is designed for tool-free assembly. Follow these steps carefully.
Step 1: Prepare the Base
Decide whether to use the casters (wheels) for mobility or the adjustable leveling feet for stationary placement. Attach your chosen components to the bottom frame bars. Ensure they are securely tightened by hand.
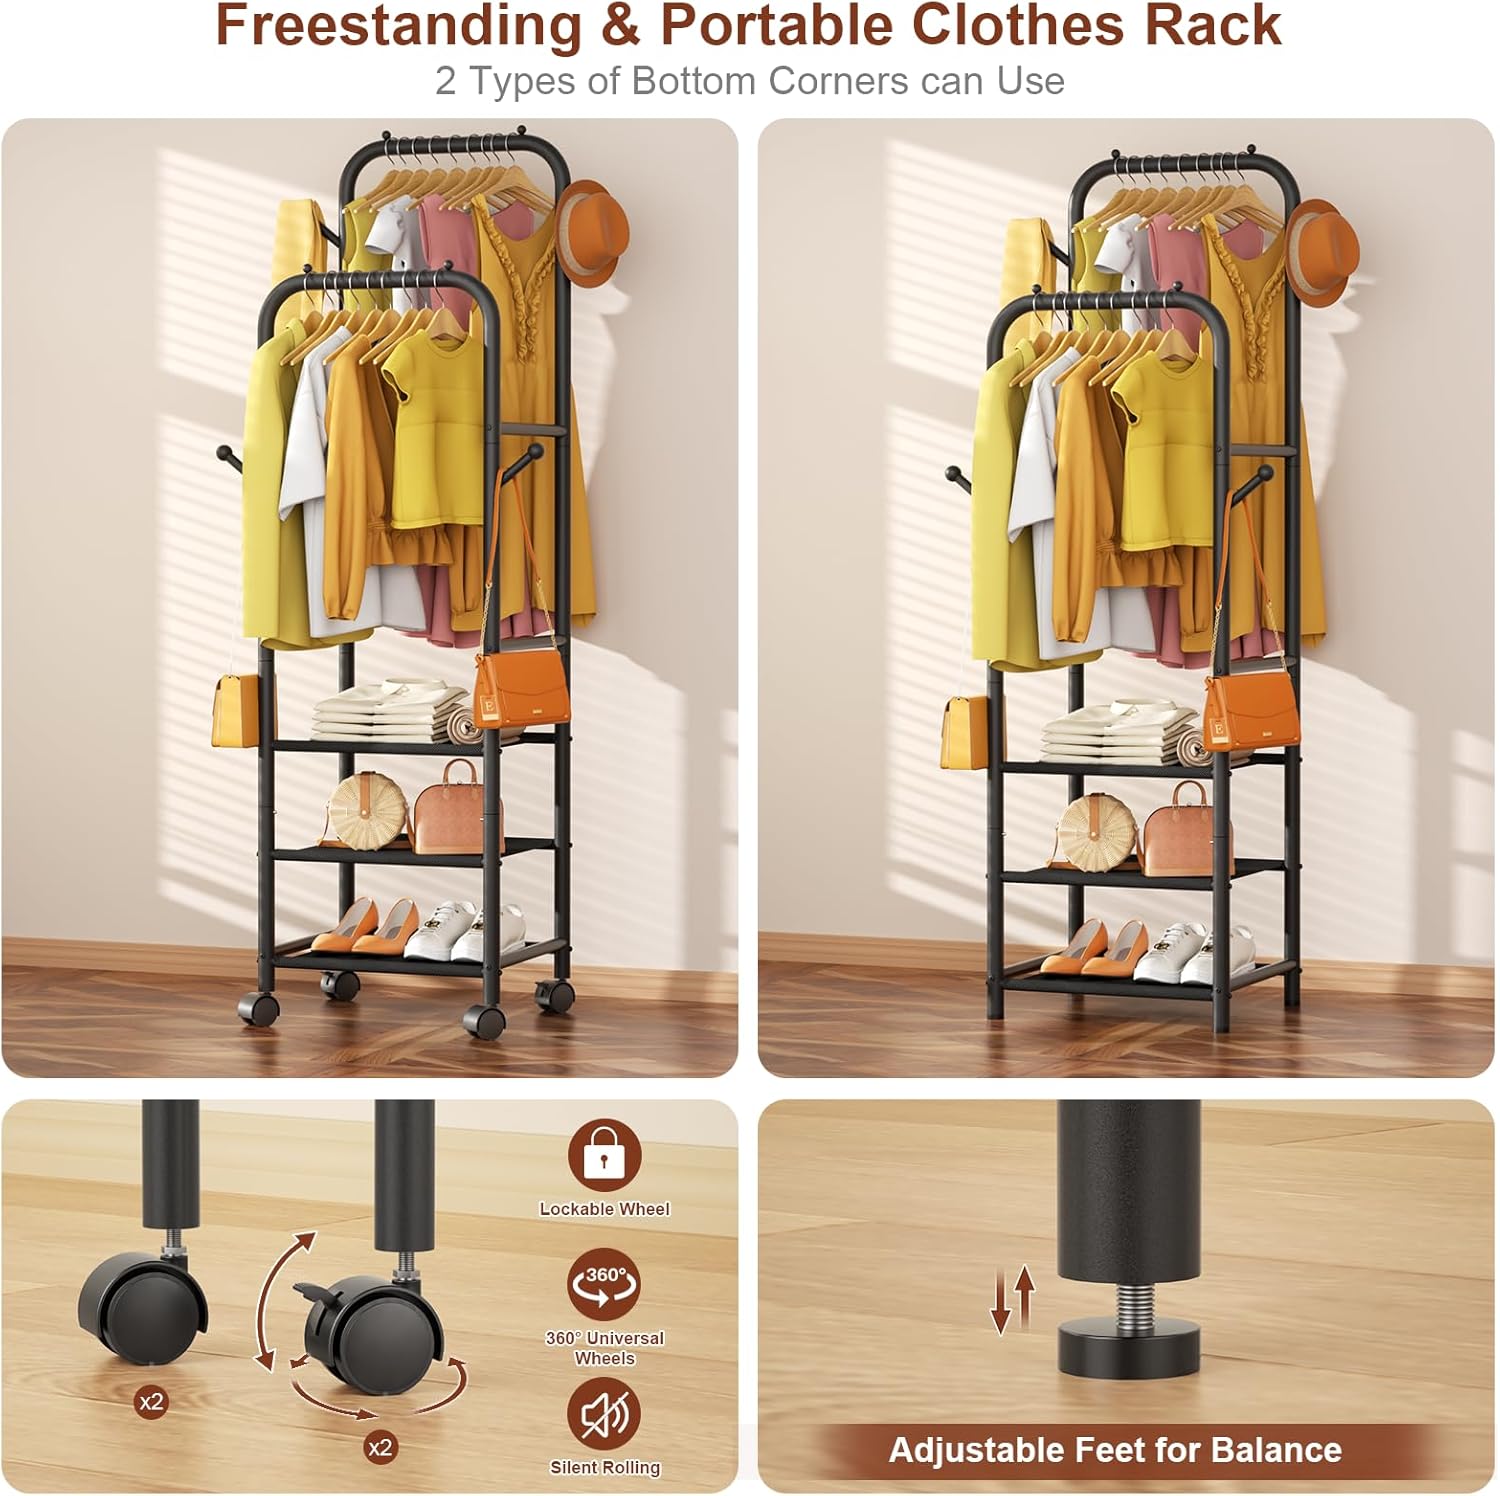
Image 4.1: Illustration of the two base options: 360-degree lockable wheels for portability and adjustable feet for stability on uneven surfaces.
Step 2: Assemble the Vertical Frame
Connect the vertical support poles to the assembled base. Ensure the connection points click into place or are securely fastened with the provided hardware.
Step 3: Install the Shelves
Slide the three shelf panels into their designated slots on the vertical support poles. Ensure each shelf is level and fully seated. The shelves can be adjusted to different heights to accommodate various items.
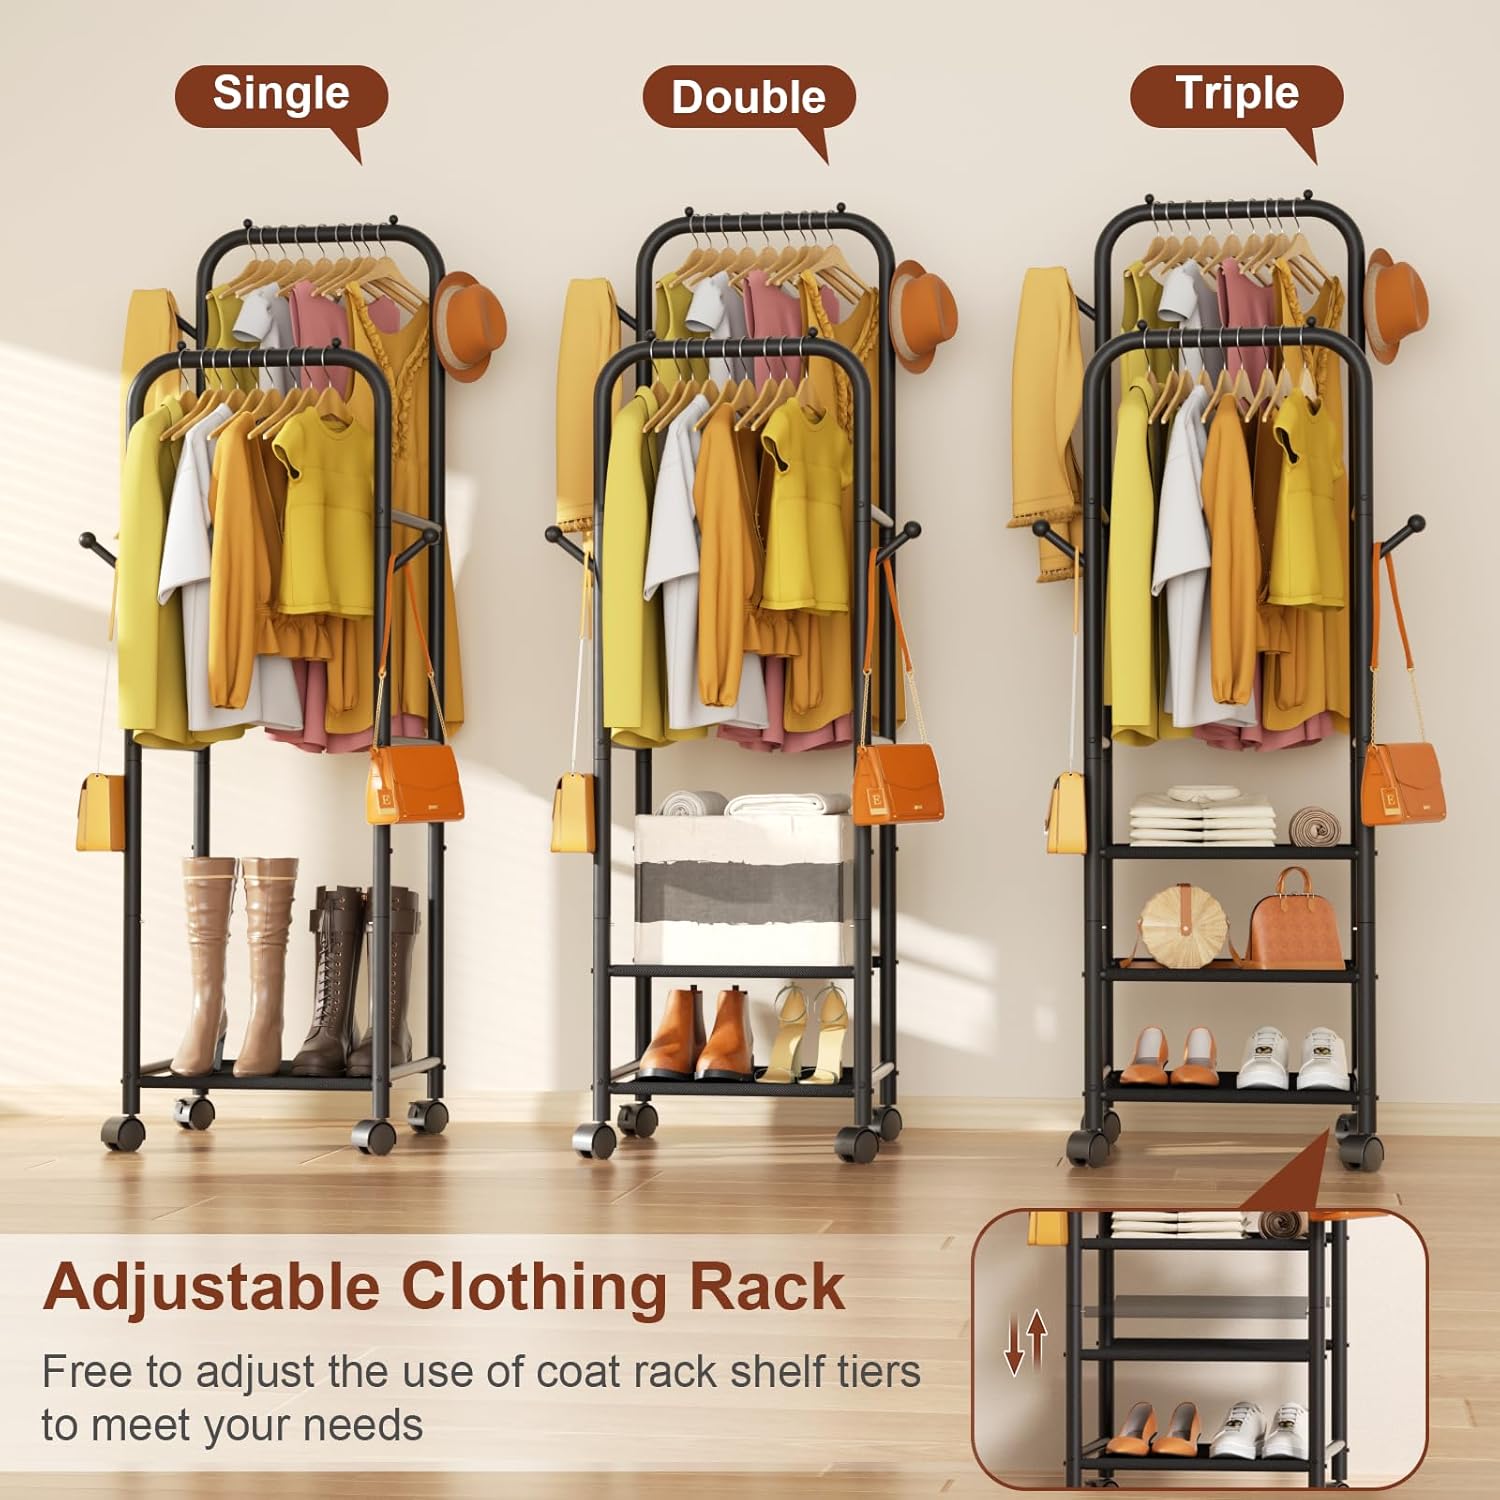
Image 4.2: Visual representation of the adjustable shelf tiers, allowing for single, double, or triple shelf configurations based on storage needs.
Step 4: Attach Hanging Rods and Side Hooks
Attach the lower curved rod to the upper section of the vertical poles. Then, attach the top curved rod to the highest points of the vertical poles. Finally, insert the two side hooks into the designated holes on the outer vertical poles.

Image 4.3: A partially assembled rack, illustrating the connection method for the vertical poles and the lower hanging rod.
Once all components are assembled, gently shake the rack to ensure stability. If any part feels loose, re-check the connections.
5. Operating Instructions
5.1 Hanging Clothes
- Utilize the double hanging rods for organizing various garments. The upper rod provides approximately 67 inches of hanging height, suitable for longer items like maxi dresses and coats. The lower rod is ideal for shirts, jackets, and shorter garments.
- The side hooks are designed for hanging accessories such as hats, scarves, belts, or bags.
5.2 Using the Shelves
- The 3-tier shelves at the bottom provide storage for folded clothes, shoes, storage boxes, or other accessories.
- Adjust the height of the shelves as needed to accommodate different item sizes.
5.3 Mobility and Stability
- If equipped with casters, the rack can be easily moved. Engage the locks on the wheels when the rack is in its desired position to prevent unintended movement.
- If using adjustable feet, rotate them to level the rack on uneven surfaces, ensuring maximum stability.

Image 5.1: Detailed view of the rack's functional features, including double hanging rods, three storage shelves, side hooks, and lockable wheels.
6. Maintenance
- Cleaning: Wipe the metal frame and shelves with a soft, damp cloth. Avoid abrasive cleaners that may damage the finish.
- Inspection: Periodically check all connections to ensure they remain tight. Re-tighten any loose screws or connectors.
- Weight Distribution: Distribute weight evenly across the hanging rods and shelves to maintain stability and prevent warping.
7. Troubleshooting
7.1 Rack is Unstable
- Solution: Ensure all assembly connections are fully tightened. If using adjustable feet, rotate them to level the rack on uneven flooring. If using wheels, ensure they are locked when stationary. Avoid overloading one side of the rack.
7.2 Wheels Not Rolling Smoothly or Locking
- Solution: Check for any debris or hair caught in the wheels. Ensure the locking mechanism is fully engaged or disengaged as intended.
7.3 Clothes are Too Crowded on Rods
- Solution: While the rack offers ample space, consider reducing the number of items or utilizing the shelves for folded garments to prevent overcrowding and maintain garment shape.
8. Specifications

Image 8.1: Product dimensions diagram, indicating height, width, and depth measurements.
- Brand: Furologee
- Model Number: CTHK-GR-011V1-N-2-1-B
- Type: Rolling Clothing Rack with Double Rods and 3-Tier Shelf
- Material: Metal
- Overall Dimensions (Approximate):
- Width: 20.08 inches (51 cm)
- Depth: 15.74 inches (40 cm)
- Height: 67.32 inches (171 cm)
- Lower Rod Height: 53.15 inches (135 cm)
- Shelf Clearance: Approximately 8.66 inches (22 cm) between shelves
- Installation Type: Free Standing
- Special Features: Portable (with wheels), Adjustable Shelf Tiers, Side Hooks
- Item Weight: Approximately 8.56 pounds (3.89 kg)
9. Warranty and Support
Furologee is committed to customer satisfaction. This product comes with a Lifetime Support Guarantee. If you encounter any issues, require technical assistance, or have questions regarding your product, please contact Furologee customer service. Our team is available to provide prompt solutions and ensure your complete satisfaction.
For support, please refer to the contact information provided with your purchase or visit the official Furologee website.