1. Introduction
Thank you for choosing the XAUCY V320 Digital Display Car Diagnostic Tool. This OBD2 scanner is designed to provide comprehensive vehicle diagnostics, allowing you to read and clear fault codes, monitor live data, check I/M readiness, and perform battery health checks. This manual provides detailed instructions for the proper setup, operation, and maintenance of your device to ensure accurate and efficient vehicle analysis.
The V320 features a user-friendly interface with a 2.8-inch color display, making it suitable for both professional mechanics and DIY enthusiasts.
2. Safety Information
Please read all safety instructions carefully before using the device. Failure to follow these instructions may result in injury or damage to the device or vehicle.
- Always perform automotive testing in a safe environment.
- Wear appropriate eye protection and clothing.
- Keep the device away from moisture, dust, and extreme temperatures.
- Do not attempt to disassemble or modify the device.
- Ensure the vehicle's ignition is off before connecting or disconnecting the scanner, unless instructed otherwise for specific tests.
- Be aware of moving parts and hot engine components when working on a vehicle.
3. Product Overview
The XAUCY V320 OBD2 Scanner is a handheld device designed for ease of use. It features a clear display and intuitive button layout for navigation and function selection.

Figure 3.1: Front view of the XAUCY V320 OBD2 Scanner, showing its display and control buttons. This image displays the XAUCY V320 OBD2 Scanner from the front, highlighting its color display screen with various menu icons (OBD/EOBD, Data Stream, DTC Lib, I/M, Voltage, Setup) and the physical control buttons (DAT, DTC, ESC, OK, and directional arrows). The attached OBD-II connector cable is also visible.

Figure 3.2: XAUCY V320 OBD2 Scanner with labeled parts. This diagram provides a detailed overview of the XAUCY V320 OBD2 Scanner's components. It points out the 2.8-inch color display screen, the 'DAT' button for data stream, the 'DTC' button for reading codes, the directional keys for navigation, the 'ESC' button to return, the 'OK' button to confirm, and the OBD interface connector. It also indicates the power status and fault detection indicators.
3.1. Device Components
- 2.8-inch Color Display: Shows diagnostic data, menus, and results.
- OBD/EOBD Menu: Accesses standard diagnostic functions.
- Data Stream: Displays live sensor data.
- DTC Lib (DTC Lookup): Provides definitions for diagnostic trouble codes.
- I/M Readiness: Checks emissions system monitors.
- Voltage: Monitors battery voltage.
- Setup: Configures device settings.
- DAT Button: Accesses data stream functions.
- DTC Button: Reads diagnostic trouble codes.
- ESC Button: Returns to the previous screen or cancels an operation.
- OK Button: Confirms selections or enters menus.
- Directional Keys (Up, Down, Left, Right): Navigates through menus and data.
- OBD Interface: 16-pin connector for vehicle communication.
4. Setup
To begin using your XAUCY V320 scanner, follow these steps to connect it to your vehicle.
4.1. Connecting to the Vehicle
- Locate the vehicle's 16-pin Data Link Connector (DLC). This port is typically found under the dashboard on the driver's side, but its exact location can vary by vehicle model. Refer to your vehicle's owner's manual if you cannot find it.
- Ensure the vehicle's ignition is in the 'OFF' position.
- Plug the XAUCY V320's OBD-II connector cable firmly into the vehicle's DLC.
- Turn the vehicle's ignition to the 'ON' position (engine off). The scanner will automatically power on and establish communication with the vehicle.

Figure 4.1: Common OBD-II port locations. This image illustrates typical locations for the 16-pin OBD-II diagnostic port within a vehicle's interior. Red dots indicate common positions such as under the dashboard on the driver's side (A, B), near the center console (C), or on the passenger side (D). A close-up inset shows the standard 16-pin OBD-II connector.
5. Operating Instructions
Once connected, the V320 will display the main menu. Use the directional keys to navigate and the 'OK' button to select options.
5.1. Reading and Clearing Fault Codes
This function allows you to identify and clear Diagnostic Trouble Codes (DTCs) that illuminate the Check Engine Light (MIL).
- From the main menu, select 'OBD/EOBD' or press the 'DTC' button directly.
- Choose 'Read Codes' to display current, pending, and permanent DTCs.
- To clear codes, select 'Erase Codes'. Confirm the action when prompted. Warning: Clearing codes will erase all diagnostic data and may reset vehicle monitors. Ensure you have addressed the underlying issue before clearing codes.
- Use the 'DTC Lib' option from the main menu to look up definitions for specific fault codes.
5.2. Live Data Stream Analysis
Monitor real-time sensor data from the vehicle's engine control unit (ECU).
- From the main menu, select 'Data Stream' or press the 'DAT' button.
- You can view various parameters such as engine RPM, vehicle speed, coolant temperature, oxygen sensor readings, and more.
- Use the directional keys to scroll through the data. The device also supports data stream playback for reviewing recorded data.

Figure 5.1: Comprehensive Car Inspection Data. This image depicts the XAUCY V320's display interface presenting a comprehensive car inspection. It shows real-time data stream values like fuel system status, engine load, engine coolant temperature, and short-term fuel trim. Also visible are O2 sensor readings, vehicle identification information, current battery voltage (12.1V), and EVAP system parameters.
5.3. I/M Readiness Status
Check the status of the vehicle's emissions-related monitors to determine if they are ready for an emissions test.
- From the main menu, select 'I/M'.
- The screen will display the status of various monitors (e.g., Misfire, Fuel System, Catalyst, EVAP). 'OK' or 'Complete' indicates the monitor has run its diagnostic cycle, while 'INC' or 'Incomplete' means it has not.
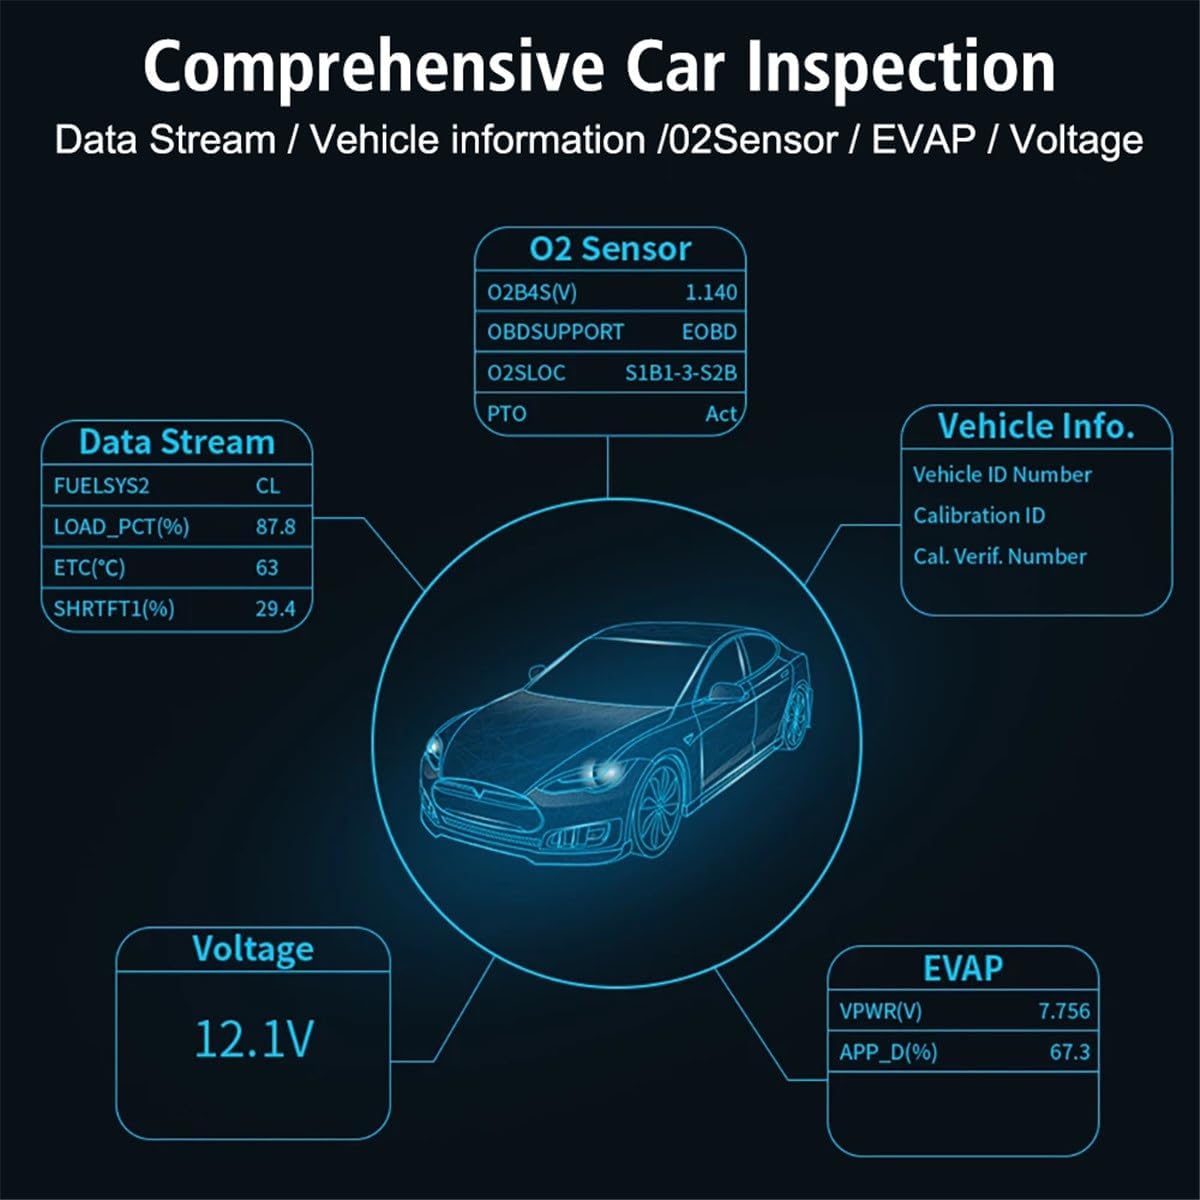
Figure 5.2: I/M Ready Status Display. This image illustrates the I/M Ready Status screen on the XAUCY V320, which is used to check the operational status of a vehicle's emissions systems. It displays the readiness of various monitors including Misfire, Fuel System, Component, Catalyst, EVAP System, and Secondary Air System, indicating whether they have completed their diagnostic cycles.
5.4. Battery Health Check / Voltage Diagnosis
Monitor the vehicle's battery voltage to assess its health.
- From the main menu, select 'Voltage'.
- The screen will display the current battery voltage. This helps in identifying potential issues with the vehicle's charging system or battery.
5.5. Performance Test
The V320 can perform various performance tests to evaluate vehicle dynamics.
- Navigate to the 'Performance Test' option (if available in your firmware version).
- Follow the on-screen prompts to conduct acceleration, braking, or distance tests.
- Review the results displayed on the screen.

Figure 5.3: Performance Test Results. This image shows the Performance Test results screen of the XAUCY V320. It presents data from acceleration, braking, and distance tests, including total time, max speed, max acceleration, and max RPM. Additionally, it displays meter data such as engine load percentage, engine coolant temperature, odometer reading, and instant fuel consumption.
5.6. Other Diagnostic Functions
The V320 also supports additional diagnostic functions:
- Freeze Frame Data: Captures a snapshot of sensor values when a fault code is set.
- Vehicle Information: Displays vehicle identification number (VIN), calibration ID, and calibration verification numbers (CVN).
- Oxygen Sensor Test: Monitors the results of oxygen sensor tests.
- EVAP System Test (Mode 8): Initiates a test of the evaporative emission control system.
6. Maintenance
Proper care and maintenance will extend the life of your XAUCY V320 scanner.
- Cleaning: Use a soft, damp cloth to clean the device. Do not use abrasive cleaners or solvents.
- Storage: Store the device in a dry, cool place, away from direct sunlight and extreme temperatures.
- Cable Care: Avoid bending or crimping the OBD-II cable excessively.
- Software Updates: Check the manufacturer's website periodically for any available firmware updates to ensure optimal performance and compatibility.
7. Troubleshooting
If you encounter issues with your XAUCY V320, refer to the following common problems and solutions.
- Device does not power on:
- Ensure the OBD-II connector is securely plugged into the vehicle's DLC.
- Verify the vehicle's ignition is in the 'ON' position.
- Check the vehicle's fuse for the OBD-II port (consult your vehicle's manual).
- Communication error:
- Confirm the vehicle supports OBD-II protocols (most vehicles from 1996 onwards).
- Ensure the connection is secure.
- Try connecting to a different OBD-II compliant vehicle to rule out a vehicle-specific issue.
- Incorrect data or readings:
- Ensure the vehicle's engine is running (for live data) or ignition is on (for codes).
- Verify the device's firmware is up to date.
8. Specifications
Technical specifications for the XAUCY V320 Digital Display Car Diagnostic Tool.
| Feature | Specification |
|---|---|
| Model | V320 |
| Display | 2.8-inch Color Display |
| Dimensions | 195.00 x 100.00 x 30.00 mm (7.68 x 3.94 x 1.18 inches) |
| Material | ABS |
| Working Voltage | DC 9~16V |
| Working Current | About 46~69mA |
| Usage Environment | -20~60℃ |
| Storage Temperature | -20~60℃ |
| Supported Languages | English, German, Italian, Dutch, French, Spanish, Chinese, Russian |
| Supported Protocols |
|
9. Warranty and Support
For warranty information or technical support, please refer to the documentation included with your purchase or contact XAUCY customer service. Keep your purchase receipt as proof of purchase.