1. Introduction
This manual provides essential information for the safe and efficient operation of your Generic EV-IEC-AC16-PV Type 2 Electric Car Charger. This portable charger is designed to offer a reliable and flexible charging solution for your electric vehicle, whether at home or during travel. It features a charging capacity of up to 3.5 kW, adjustable current settings from 8A to 16A, and a clear digital display for monitoring the charging process.
Please read this manual thoroughly before using the charger to ensure proper function and to prevent damage or injury. Keep this manual for future reference.
2. Safety Information
Important Safety Instructions:
- Always connect the charger to a properly grounded power outlet.
- Do not use the charger if the cable or plug is damaged.
- Ensure the charging cable is not kinked, twisted, or run over by vehicles.
- Keep children and pets away from the charging area.
- Do not immerse the charger or its components in water.
- Avoid touching the charging plug with wet hands.
- Do not attempt to open, disassemble, or modify the charger. Refer all servicing to qualified personnel.
- Operate the charger within the specified temperature range (-30°C to +50°C).
- Disconnect the charger from the power source before cleaning or maintenance.
- This charger is equipped with advanced protection systems against over-current, overheating, electrical leaks, unstable voltage, and short circuits. However, always exercise caution.
3. Package Contents
Verify that all items are present in the package:
- 1 x Portable EV Charging Device (Control Box with Type 2 Cable and EU Plug)
- 1 x User Manual (this document)

Image: The charger unit, cable, Type 2 connector, and a carrying bag, as typically included in the package.
4. Product Overview
The Generic EV-IEC-AC16-PV charger consists of a control box, a Type 2 charging cable, and an EU standard power plug. Key components include:
- Control Box: Houses the intelligent control system and digital display.
- LED Display: Shows real-time charging data such as current, voltage, power, temperature, and charge time.
- Single Key Switch: Used to initiate charging and adjust current settings.
- Type 2 Connector: Compatible with most European and Asian electric vehicles.
- EU Type Plug: European standard 16A plug for power connection.
- TPU Material Cable: Wear-resistant and heat-resistant cable, typically 5 meters in length.

Image: Main view of the portable EV charger, highlighting the control box with its display, the coiled charging cable, and the Type 2 vehicle connector.
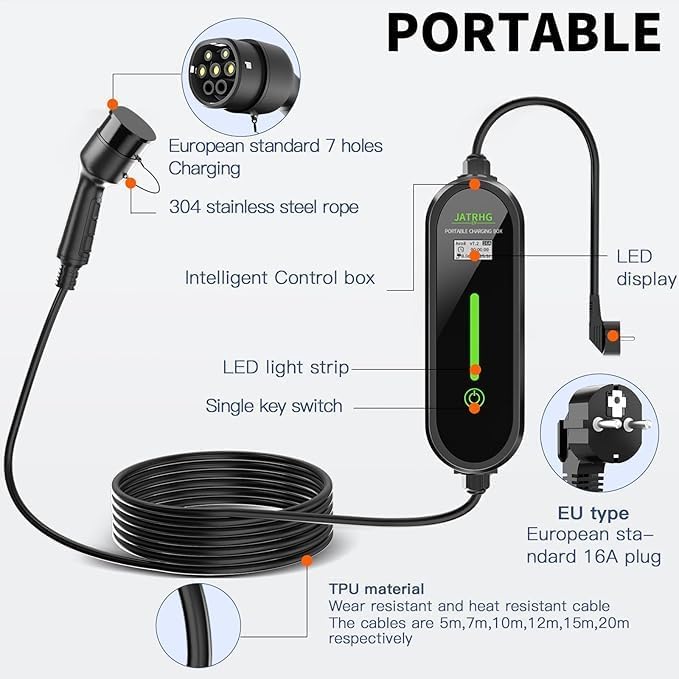
Image: Detailed diagram illustrating the various components of the charger, such as the LED display, intelligent control box, Type 2 connector, EU plug, and the durable TPU cable material.
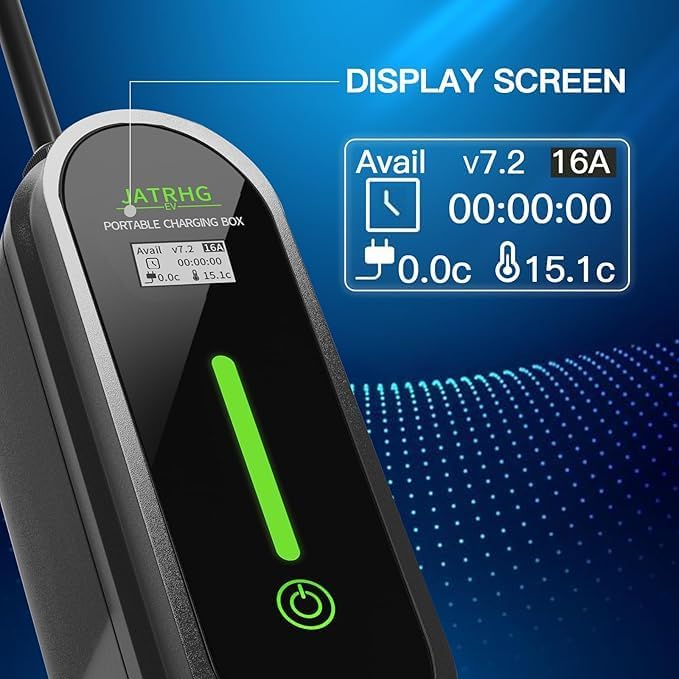
Image: A close-up view of the charger's digital LED display, clearly showing real-time charging data including available current, voltage, charging time, and temperature.
5. Specifications
| Feature | Detail |
|---|---|
| Model Number | EV-IEC-AC16-PV |
| Brand | Generic |
| Charging Capacity | Up to 3.5 KW |
| Input Voltage | 220V |
| Adjustable Current | 8A - 16A |
| Connector Type (Vehicle) | Type 2 |
| Power Plug Type | Type C/EF - 2 pin (Europlug/FR-DE Hybrid) |
| Cable Length | 5 Meters (other lengths may be available) |
| Operating Temperature | -30°C to +50°C |
| Protection Features | Over-current, Overheat, Electric Leaks, Unstable Voltage, Short Circuit |
| Item Weight | 4 kg |
| Color | Black |
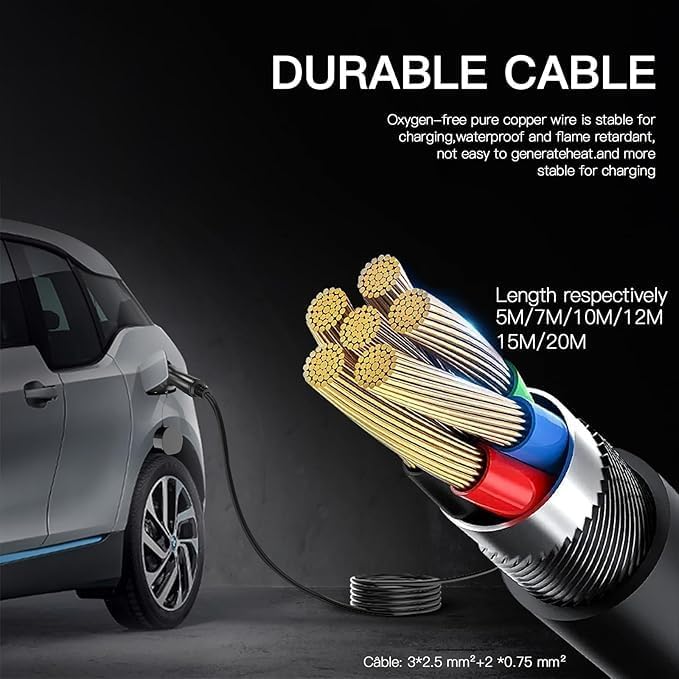
Image: A cross-section diagram illustrating the robust construction of the oxygen-free pure copper wire cable, emphasizing its durability and resistance to heat and water. It also indicates various available cable lengths.
6. Setup Instructions
The Generic EV-IEC-AC16-PV charger is designed for ease of use with no complex setup or app requirements.
- Connect to Power: Plug the EU standard power plug into a suitable, properly grounded 220V wall outlet. Ensure the outlet is capable of handling the charger's maximum current (16A). The charger's display should illuminate.
- Prepare Vehicle: Ensure your electric vehicle is turned off and ready for charging. Open the charging port cover on your vehicle.
- Connect to Vehicle: Insert the Type 2 connector firmly into your vehicle's charging port. You should hear a click indicating it is securely locked.
- Start Charging: Press the "Start" button on the charger's control box. The display will show charging data, and the LED light strip will indicate active charging.
Note: Do not connect the Type 2 cable to the electric vehicle before plugging the charger into the power supply.
7. Operating Instructions
Once connected and powered on, you can monitor and adjust the charging process.
7.1. Monitoring Charging Status
The LED digital display on the control box provides real-time information:
- Current (A): Displays the charging amperage.
- Voltage (V): Shows the current voltage.
- Power (KW): Indicates the charging power.
- Temperature (°C): Shows the internal temperature of the charger.
- Charge Time: Tracks the duration of the current charging session.
7.2. Adjusting Charging Current (8A-16A)
The charger allows you to select the charging current to suit your electrical network conditions or vehicle battery needs.
- Enter Current Selection Mode: With the charger plugged into the power supply (but not yet connected to the car, or if connected, ensure charging is paused), press and hold the single key switch button for approximately 3 seconds. The display will enter the current selection menu.
- Select Current: Briefly press the single key switch button to cycle through the available current options (e.g., 8A, 10A, 13A, 16A).
- Confirm Selection: Once your desired current is displayed, press and hold the single key switch button again for approximately 2 seconds to confirm and exit the selection mode. The charger will now operate at the selected current.

Image: Visual guide demonstrating the steps to select the charging current. It shows how to power the charger, enter the current selection menu by holding the button, and then choose between different amperage settings like 8A or 16A.
7.3. Stopping Charging
- Stop Charging on Charger: Press the single key switch button on the control box to pause or stop the charging process.
- Disconnect from Vehicle: Unlock and remove the Type 2 connector from your vehicle's charging port.
- Disconnect from Power: Unplug the EU standard power plug from the wall outlet.
8. Maintenance
Regular maintenance ensures the longevity and safe operation of your charger.
- Cleaning: Disconnect the charger from all power sources before cleaning. Use a soft, dry cloth to wipe the control box and cables. Do not use abrasive cleaners, solvents, or immerse any part in water.
- Cable Inspection: Periodically inspect the charging cable and connectors for any signs of damage, wear, cracks, or discoloration. If any damage is found, discontinue use immediately and contact support.
- Storage: When not in use, store the charger in a dry, cool place, away from direct sunlight and extreme temperatures. Coil the cable neatly to prevent kinks or damage.
- Environmental Resistance: The charger is designed to be resistant to moisture and dust and operates efficiently between -30°C and +50°C. However, prolonged exposure to harsh conditions should be avoided.
9. Troubleshooting
If you encounter issues with your charger, refer to the following common problems and solutions:
| Problem | Possible Cause | Solution |
|---|---|---|
| Charger display is off / No power | No power from outlet; Loose connection; Faulty outlet. | Check wall outlet power; Ensure plug is fully inserted; Try a different outlet. |
| Charging does not start | Vehicle not ready; Type 2 connector not fully inserted; Charger not activated. | Ensure vehicle is ready to charge; Re-insert Type 2 connector firmly; Press the "Start" button on the control box. |
| Charging stops unexpectedly | Overheat protection; Over-current protection; Vehicle fault; Power fluctuation. | Check charger and vehicle for overheating; Reduce selected current if possible; Consult vehicle manual; Check power supply stability. |
| Error message on display | Internal fault; Connection issue. | Disconnect and reconnect the charger. If the error persists, contact customer support. |
| Cannot change charging current | Incorrect procedure. | Refer to Section 7.2 for correct current adjustment steps. Ensure you hold the button for 3 seconds to enter selection mode. |
If the problem persists after attempting these solutions, please contact customer support for further assistance.
10. Warranty and Support
For warranty information and customer support, please refer to the documentation provided at the point of purchase or contact your retailer. Keep your purchase receipt as proof of purchase.
For technical assistance or inquiries, please visit the manufacturer's website or contact their support channels.