1. Introduction
This manual provides detailed instructions for the assembly, operation, and maintenance of your Teenpull Garden Shed, Model 1. Please read this manual thoroughly before beginning assembly or using the product to ensure safe and correct usage. Keep this manual for future reference.
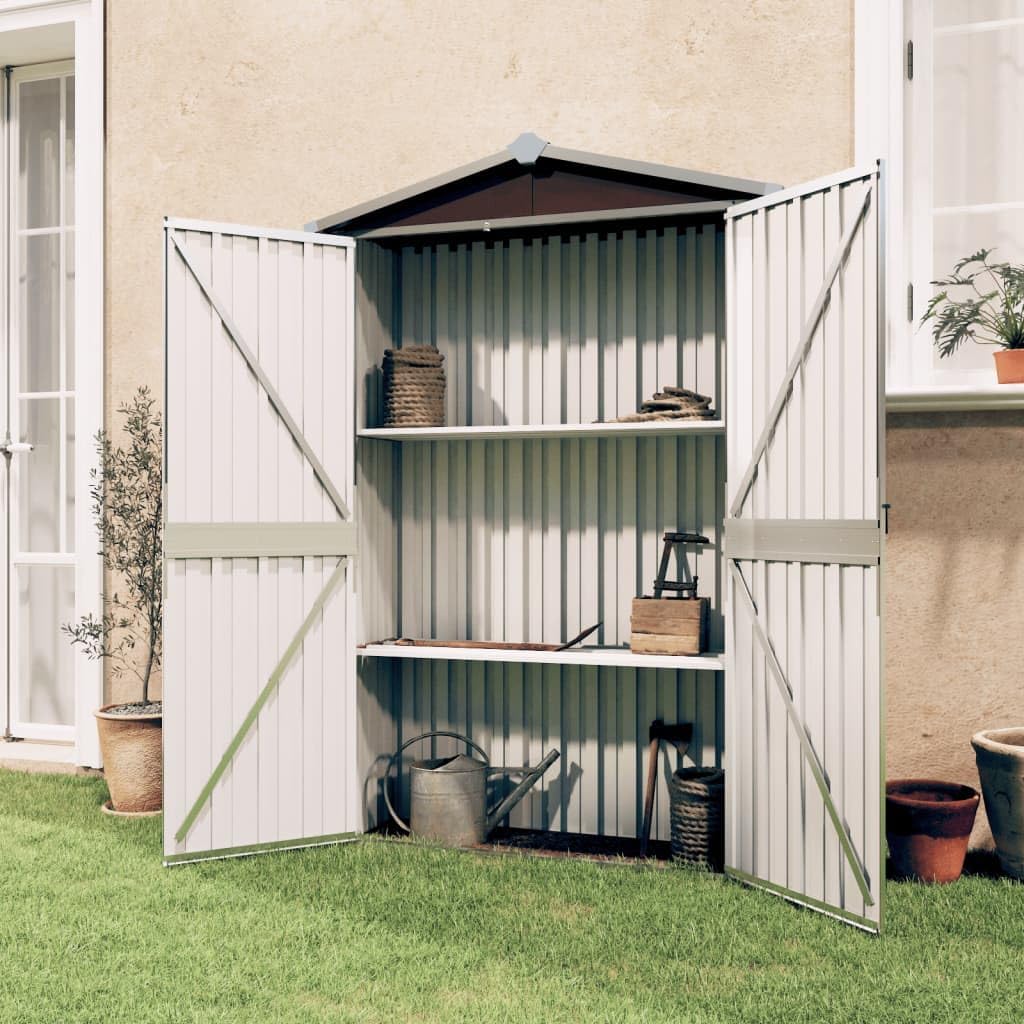
Image 1.1: Front view of the assembled Teenpull Garden Shed.
2. Safety Information
Always follow these safety guidelines to prevent injury or damage to the shed.
- Read All Instructions: Ensure you understand all assembly steps before starting.
- Two-Person Assembly: Assembly requires a minimum of two people for safety and ease.
- Wear Protective Gear: Gloves and eye protection are recommended during assembly to prevent cuts or scrapes from metal edges.
- Choose a Level Surface: Install the shed on a firm, level surface to ensure stability and proper door operation.
- Secure the Shed: Anchor the shed to the ground to prevent it from being moved by strong winds. Anchoring hardware may be sold separately.
- Keep Children Away: Do not allow children to play inside or around the shed during assembly or unsupervised.
- Ventilation: Ensure adequate ventilation if storing items that may emit fumes.
- Weight Distribution: Distribute stored items evenly to maintain the shed's balance.
3. Package Contents
Before beginning assembly, verify that all components are present. If any parts are missing or damaged, contact Teenpull customer support.
- Wall panels (galvanized steel)
- Roof panels
- Door panels and hardware
- Frame components (steel)
- Shelving components (if included)
- Fasteners (screws, nuts, bolts)
- Assembly instructions
4. Setup and Assembly
Assembly requires a screwdriver and two people. Follow these steps carefully.
4.1 Site Preparation
- Select a flat, level, and dry area for the shed.
- Clear the area of any debris, rocks, or vegetation.
- Consider a foundation (e.g., concrete slab, wooden platform) for added stability and moisture protection.
4.2 Frame Assembly
- Unpack all components and lay them out.
- Assemble the base frame according to the diagrams in the included assembly instructions. Ensure all corners are square.
- Attach the vertical frame supports to the base.
4.3 Wall Panel Installation
- Carefully attach the wall panels to the vertical frame supports using the provided fasteners.
- Work systematically around the shed, ensuring panels are aligned and securely fastened.
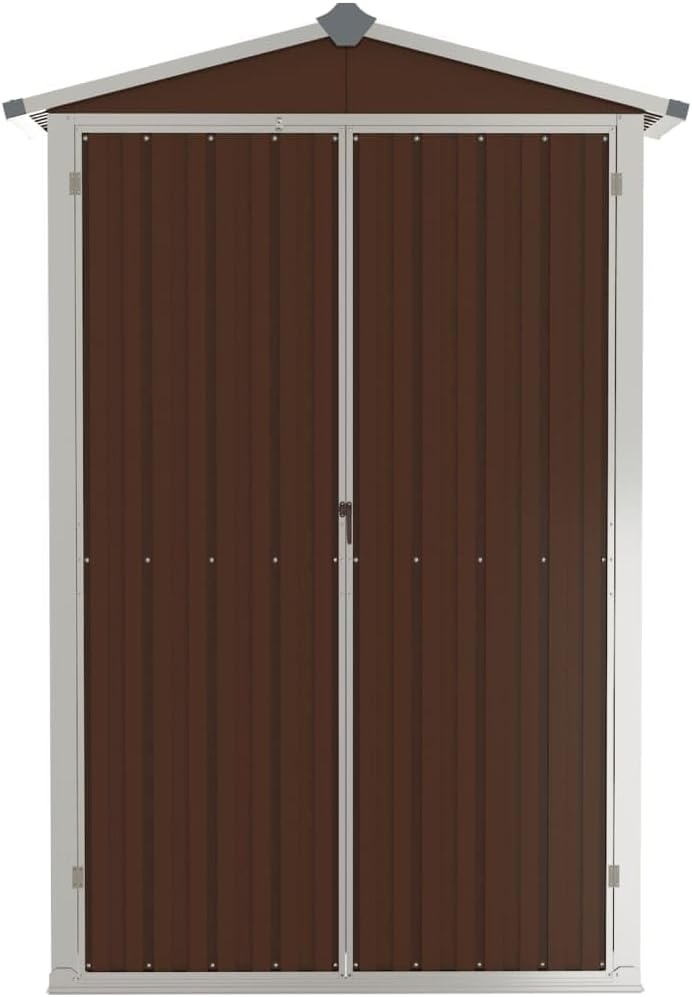
Image 4.1: Front view of the shed during wall panel installation.
4.4 Roof Assembly
- Assemble the roof frame and attach the roof panels.
- Ensure all roof panels overlap correctly to provide waterproof protection.
- Secure the roof to the top of the wall panels.
4.5 Door Installation
- Attach the door hinges to the door panels and the shed frame.
- Install the door handle and latch mechanism.
- Test the doors to ensure they open and close smoothly and latch securely.

Image 4.2: Detail of the door handle and latch mechanism.
4.6 Shelf Installation (Optional)
- If your shed includes shelves, install them at desired heights using the provided brackets and fasteners.
- Ensure shelves are level and securely attached before placing items on them.

Image 4.3: Interior view showing customizable shelves.
5. Operating Instructions
Using your Teenpull Garden Shed is straightforward.
- Opening/Closing Doors: Use the integrated handle to open and close the double doors. Ensure the latch engages fully when closing to secure the shed.
- Storage: Utilize the ample interior space and customizable shelves for organizing tools, gardening equipment, and other outdoor items. Avoid overloading shelves beyond their capacity.
- Security: For enhanced security, a padlock (not included) can be added to the door latch.
6. Maintenance
Regular maintenance will extend the life of your garden shed.
- Cleaning: Clean the exterior of the shed periodically with mild soap and water. Rinse thoroughly and allow to air dry. Avoid abrasive cleaners or harsh chemicals that could damage the powder-coated finish.
- Inspection: Annually inspect all fasteners (screws, bolts) for tightness. Tighten any loose connections. Check for any signs of rust or damage to the panels.
- Door Functionality: Lubricate door hinges if they become stiff or squeaky. Ensure the doors remain properly aligned.
- Drainage: Ensure the area around the shed has good drainage to prevent water accumulation at the base.
- Weather Protection: The shed is designed to be weather-resistant. However, during extreme weather conditions (e.g., heavy snow, hurricanes), consider additional measures to secure the shed and protect its contents.
7. Troubleshooting
Refer to this section for common issues and their solutions.
- Doors do not close properly:
- Check if the shed is on a level surface. Uneven ground can cause the frame to twist.
- Inspect hinges for damage or misalignment. Adjust as necessary.
- Ensure no debris is obstructing the door's path.
- Water leakage:
- Verify all roof and wall panels are securely fastened and overlapping correctly.
- Check for any gaps or damaged seals. Apply silicone sealant if necessary.
- Ensure proper drainage around the shed to prevent water from pooling at the base.
- Shed feels unstable:
- Confirm the shed is anchored to the ground.
- Tighten all frame and panel fasteners.
- Ensure the foundation is stable and level.
8. Specifications
| Feature | Detail |
|---|---|
| Model | 1 |
| Brand | Teenpull |
| Material | Galvanized Steel, Powder-Coated |
| Color | Brown |
| Dimensions (W x L x H) | 45.7 x 42.3 x 68.9 inches (116 x 107.4 x 175 cm) |
| Assembly Required | Yes |
| Recommended Assembly Persons | 2 |

Image 8.1: Dimensional diagram of the garden shed.
9. Warranty and Support
For warranty information or technical support, please contact Teenpull customer service through the retailer where the product was purchased or visit the official Teenpull website. Please have your model number (Model 1) and purchase details ready when contacting support.