Aeitto M20-BLK
Aeitto Nugget Ice Maker M20-BLK User Manual
Model: M20-BLK
1. Introduction
Thank you for choosing the Aeitto Nugget Ice Maker. This manual provides essential information for the safe and efficient operation, maintenance, and troubleshooting of your new ice maker. Please read it thoroughly before first use and retain it for future reference.

Image: The Aeitto Nugget Ice Maker showcasing its design and key features.
2. Important Safety Instructions
To reduce the risk of fire, electric shock, or injury, always follow basic safety precautions when using this appliance:
- Read all instructions before use.
- Do not touch cold surfaces, such as the ice evaporator, when the unit is operating.
- Do not immerse the appliance, power cord, or plug in water or other liquids.
- Supervise children when the appliance is in use.
- Unplug the ice maker from the outlet before cleaning or when not in use.
- Do not operate any appliance with a damaged cord or plug, or after the appliance malfunctions or has been damaged in any manner.
- Use only attachments recommended by the manufacturer.
- Do not use outdoors.
- Ensure the power cord is not draped over the edge of a table or counter, or touching hot surfaces.
- Do not place on or near a hot gas or electric burner, or in a heated oven.
- Always attach the plug to the appliance first, then plug the cord into the wall outlet. To disconnect, turn any control to “off,” then remove the plug from the wall outlet.
- Do not use the appliance for other than its intended use.
- Ensure the ice maker is placed on a stable, level surface.
- Do not block any ventilation openings.
3. Product Overview
Included Components:
- Ice Maker x 1
- Ice Scoop x 1
- Ice Basket x 1
- Drip Tray x 1
Key Features:
- Produces up to 40 lbs of nugget ice per day.
- First batch of ice ready in approximately 5 minutes.
- One-click operation for ease of use.
- Automatic self-cleaning function.
- Compact design suitable for various spaces.
- Equipped with an ice basket, ice scoop, and drip tray.
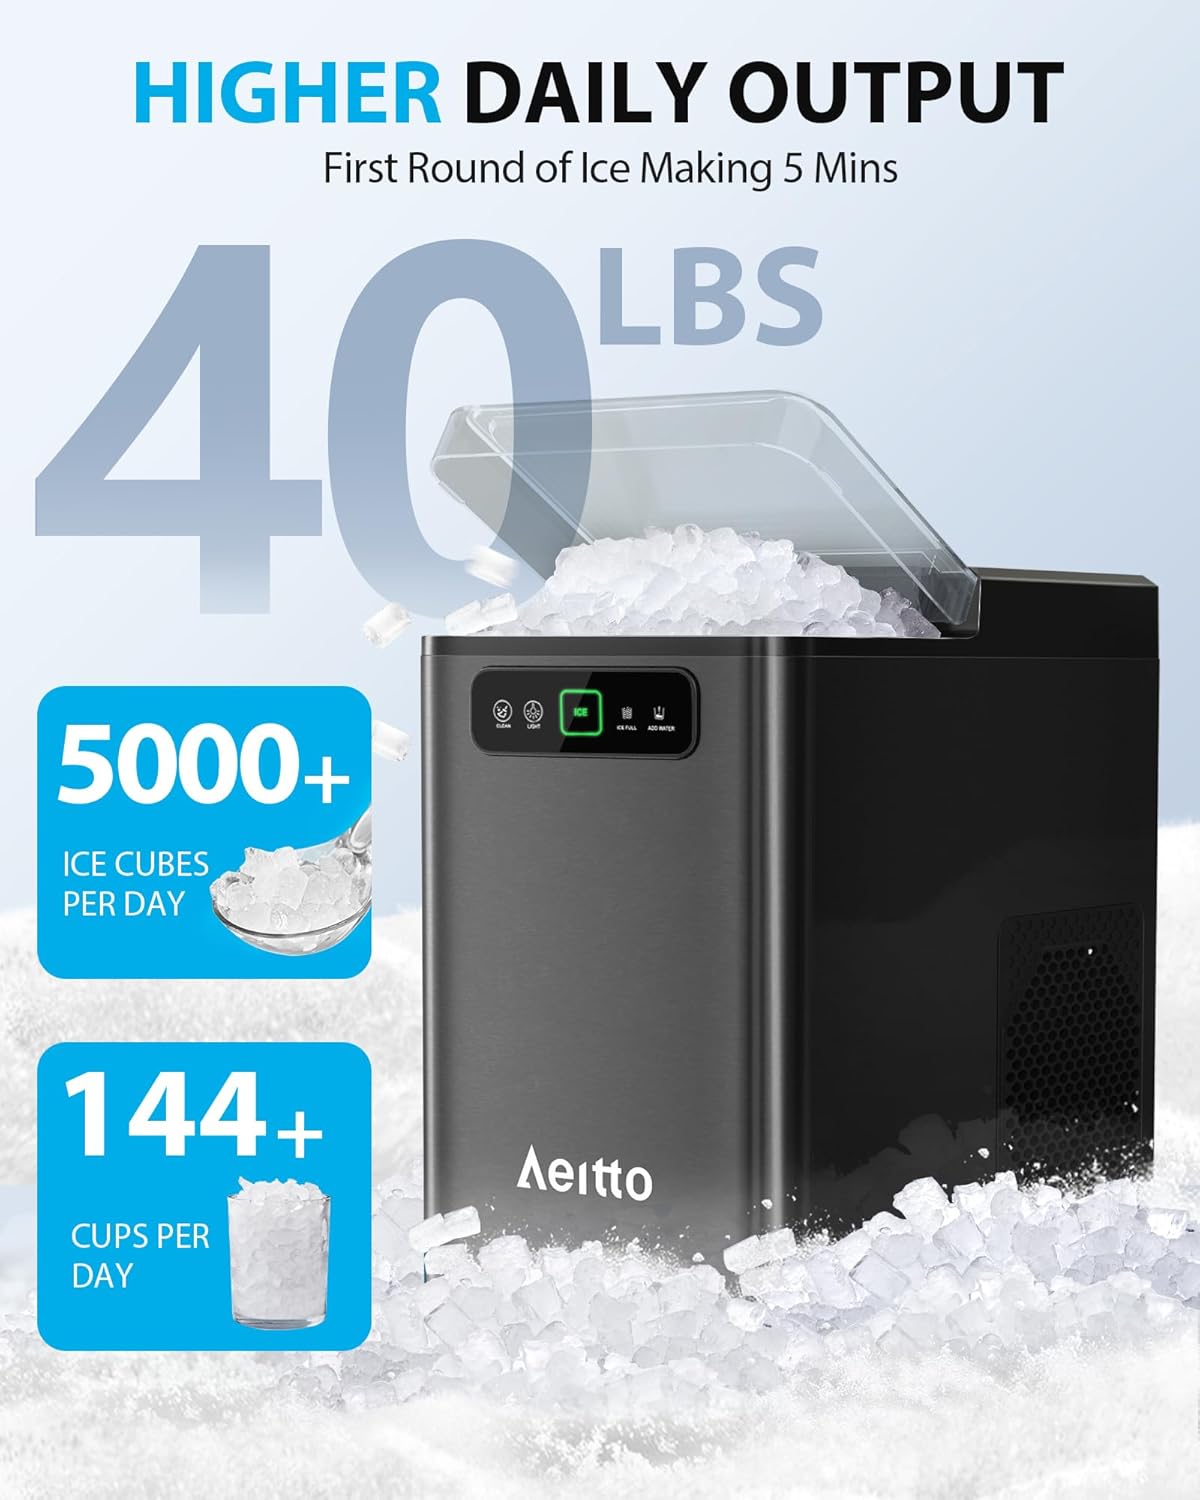
Image: The ice maker with its dimensions and included accessories (ice scoop, ice basket, drip tray).
4. Setup
Unpacking and Placement:
- Remove all packaging materials and inspect the ice maker for any damage.
- Place the ice maker on a flat, stable, and level surface, away from direct sunlight and heat sources. Ensure there is adequate ventilation around the unit (at least 5 inches of space on all sides).
- Allow the unit to stand upright for at least 2 hours before plugging it in, especially if it was transported horizontally. This allows the refrigerant to settle.
Initial Cleaning:
Before first use, it is recommended to clean the ice maker. Refer to the 'Cleaning and Maintenance' section for detailed instructions on using the self-cleaning function.
Adding Water:
- Open the top lid of the ice maker.
- Fill the water reservoir with clean, potable water up to the MAX fill line. Do not overfill.

Image: Step 1 of ice making, showing water being added to the reservoir.
5. Operation
Making Ice:
- Ensure the ice maker is plugged into a grounded electrical outlet.
- Add water to the reservoir as described in the 'Setup' section.
- Press the 'ICE' button on the control panel. The ice making indicator light will illuminate.
- The ice maker will begin producing nugget ice. The first batch typically takes about 5 minutes.
- When the ice basket is full, the 'ICE FULL' indicator light will turn on, and the machine will automatically pause ice production. Remove ice from the basket to resume production.
- If the water level is low, the 'ADD WATER' indicator light will turn on. Add more water to the reservoir to continue ice production.

Image: The control panel showing the 'ICE' button and the ice full reminder feature.
6. Cleaning and Maintenance
Automatic Self-Cleaning Function:
- Ensure the water reservoir is filled with clean water.
- Press and hold the 'CLEAN' button on the control panel for a few seconds. The self-cleaning cycle will begin, typically lasting about 15 minutes.
- Once the cycle is complete, drain the water from the unit using the drainage hose.
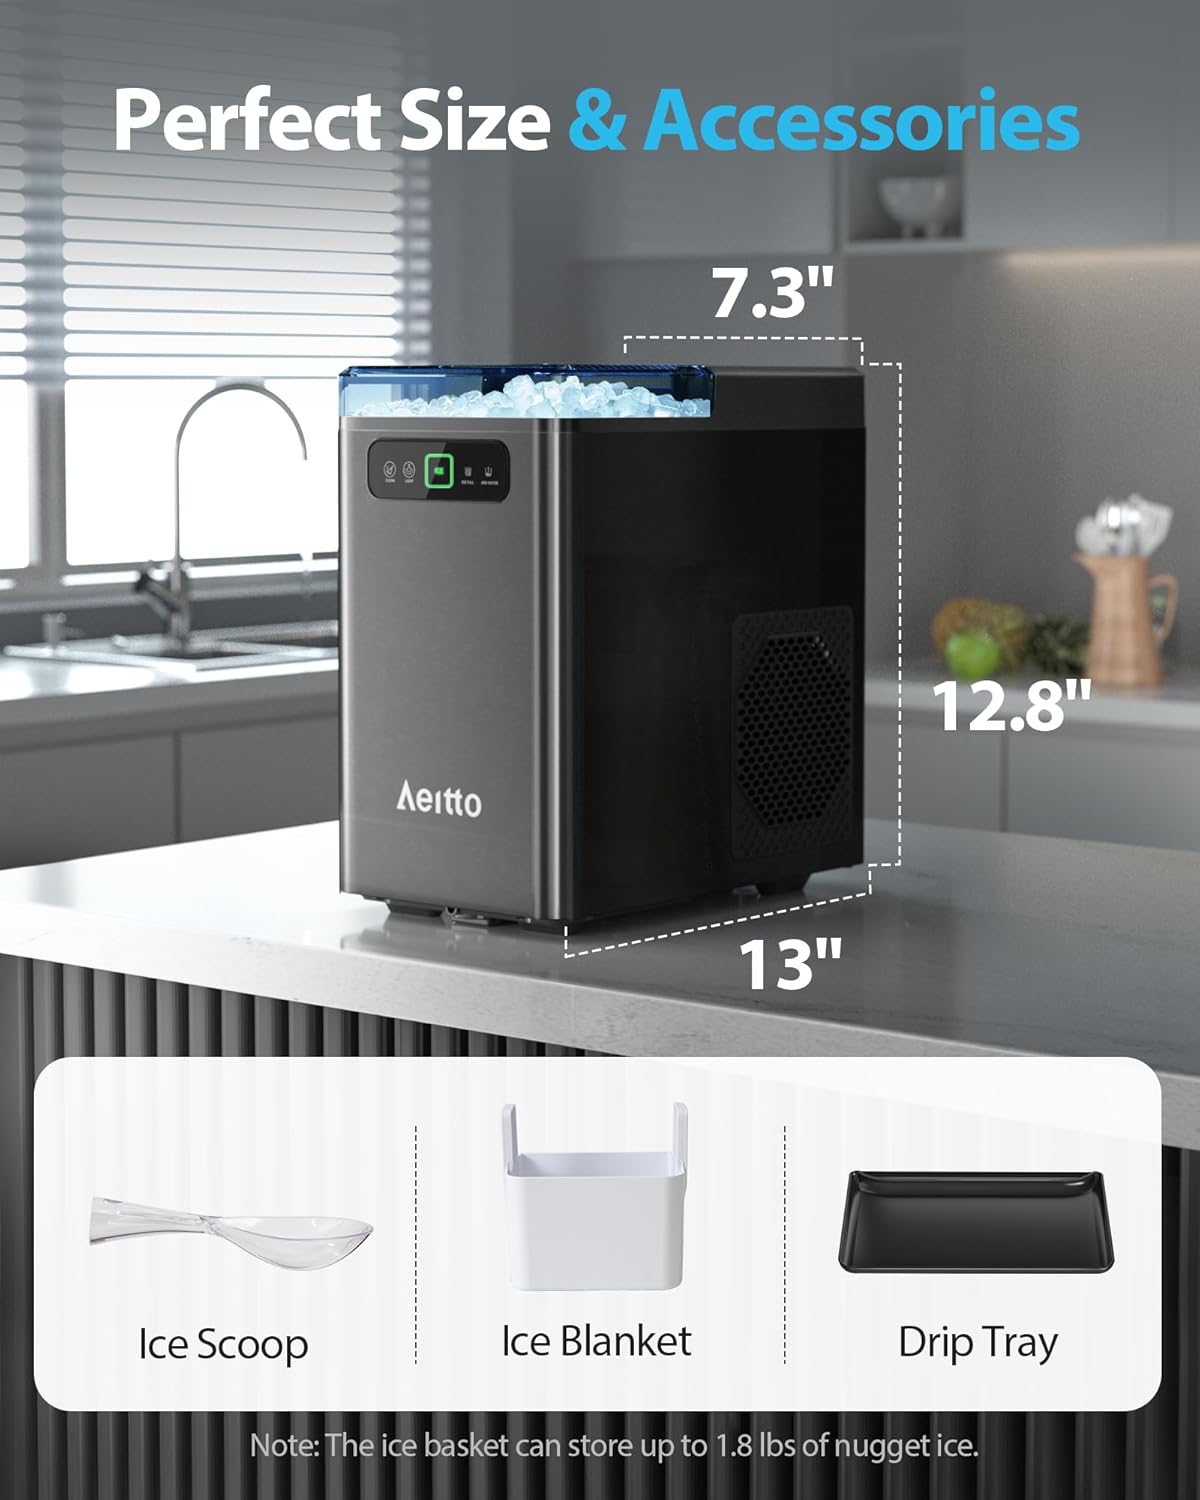
Image: The internal mechanism of the ice maker during the self-cleaning process.
Regular Cleaning:
- Exterior: Wipe the exterior with a soft, damp cloth. Do not use harsh chemicals or abrasive cleaners.
- Ice Basket and Scoop: Wash with mild soap and warm water, then rinse thoroughly and dry.
- Water Reservoir: Periodically clean the water reservoir with a soft cloth and a mild detergent solution. Rinse thoroughly to remove any residue.
Descaling:
Mineral deposits from hard water can affect the performance and lifespan of your ice maker. Descale the unit regularly, especially in hard water areas.
- Moderately Hard Water Areas: Descale once a month.
- Hard to Very Hard Water Areas: Descale every two to three weeks.
To descale, use a descaling solution suitable for ice makers or a mixture of water and white vinegar. Follow the instructions for the self-cleaning cycle, but use the descaling solution instead of plain water. After descaling, run several self-cleaning cycles with fresh water to rinse thoroughly.

Image: Information on how hard water can affect the ice maker and recommended descaling frequency based on water hardness.
Drainage:
The ice maker features a drainage hose for convenient water discharge. Ensure the hose is properly positioned to prevent leaks during draining.
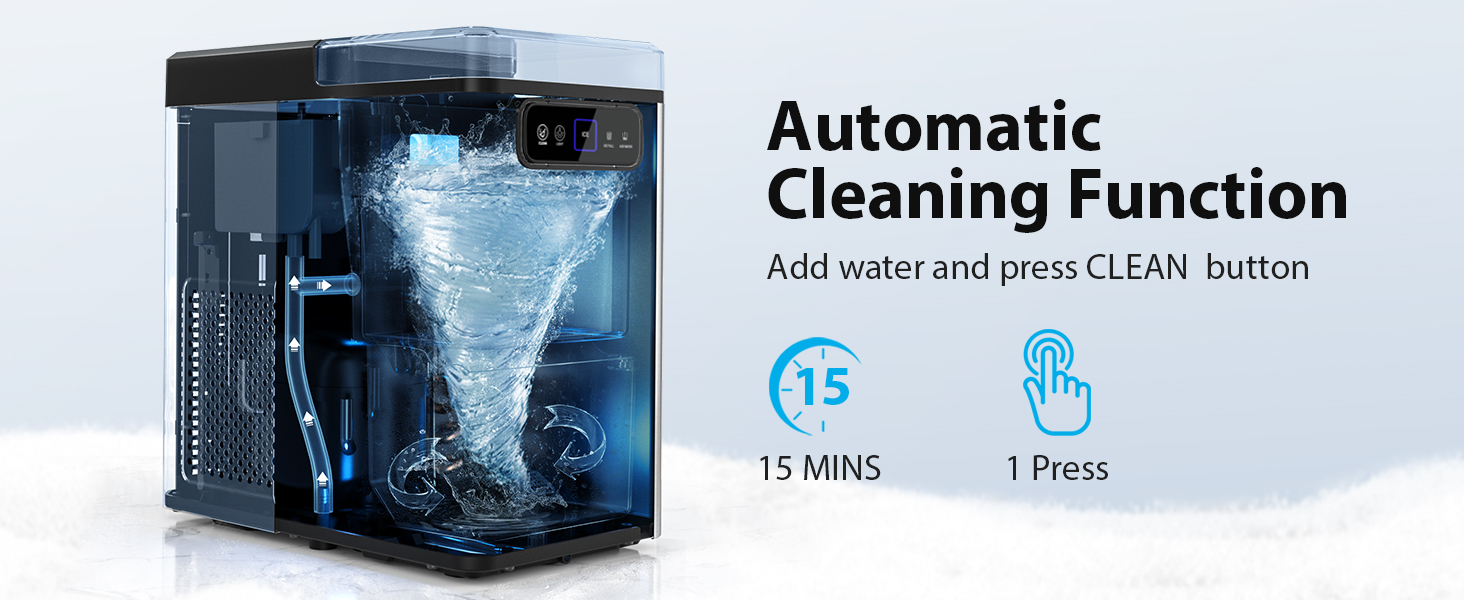
Image: The unique water outlet design for efficient drainage.
7. Troubleshooting
| Problem | Possible Cause | Solution |
|---|---|---|
| Ice maker not producing ice. | No water in reservoir. Power supply issue. Ambient temperature too high. | Add water to the MAX line. Check power connection and outlet. Ensure the unit is in a cool, well-ventilated area. |
| Ice production is slow. | High ambient temperature. Poor ventilation. Mineral buildup. | Move to a cooler location. Ensure adequate space around the unit. Perform a descaling cycle. |
| 'ADD WATER' indicator light is on. | Water level is low. | Refill the water reservoir. |
| 'ICE FULL' indicator light is on. | Ice basket is full. | Remove ice from the basket. |
| Unusual noise during operation. | Normal compressor operation. Unit not level. Loose parts. | Some noise is normal. Ensure the unit is on a level surface. If noise is excessive or unusual, contact support. |
| Ice tastes strange or has an odor. | Unit needs cleaning. Stale water. | Perform a thorough cleaning and descaling. Use fresh, clean water. |
8. Specifications
| Specification | Detail |
|---|---|
| Brand | Aeitto |
| Model Name | Nugget |
| Model Number | M20-BLK |
| Product Dimensions (D x W x H) | 12.99" x 7.29" x 12.79" |
| Ice Production per Day | 40 Pounds |
| Wattage | 110 watts |
| Item Weight | 19.84 Pounds |
| Material Type | Stainless Steel |
| Refrigerant | R600a |
9. Warranty and Support
For warranty information and customer support, please refer to the documentation included with your purchase or contact Aeitto customer service directly. Keep your purchase receipt as proof of purchase for warranty claims.
Aeitto is committed to providing quality products and support. If you encounter any issues not covered in this manual, please reach out to our support team for assistance.
Related Documents - M20-BLK
 |
Aeitto 8168MTB Blender Instruction Manual Comprehensive instruction manual for the Aeitto 8168MTB countertop blender, covering safety precautions, parts, control panel operation, blending techniques, care, maintenance, troubleshooting, and warranty information. |
 |
Aeitto Recipes: The Healthy Diet - Wholesome Juices for Energy & Wellness Explore Aeitto's comprehensive guide to healthy juice recipes designed for energy, skin health, heart protection, weight loss, and body cleansing. Learn how to maximize nutrients with your Aeitto Slow Juicer and create delicious vegan beverages at home. |
 |
Aeitto Healthy Juice Recipes for a Balanced Diet Discover a collection of healthy juice recipes from Aeitto, designed to boost energy, support detox, and provide essential nutrients. This guide features beginner-friendly recipes, cleanse programs, and specialized juices for various health goals, optimized for use with Aeitto slow juicers. |
 |
Aeitto SJ-041 Slow Juicer User Manual: Operation, Safety, and Maintenance Guide Official user manual for the Aeitto SJ-041 Slow Juicer. Find detailed instructions on assembly, operation, cleaning, safety, maintenance, and troubleshooting for your Aeitto cold press juicer. |
 |
Aeitto Air Fryer Oven Quick Start Guide A concise guide to operating your Aeitto Air Fryer Oven, including setup, cooking instructions, and troubleshooting common issues like smoke. Learn how to use the controls and maintain your appliance. |
 |
Aeitto 30 Litre Digital Air Fryer Toaster Oven BAF-803 User Manual Comprehensive user manual for the Aeitto 30 Litre Digital Air Fryer Toaster Oven BAF-803, covering important safeguards, main components, features, technical specifications, control panel operation, cooking guides (air fry, toast, rotisserie, dual cook), cleaning, storage, and troubleshooting. |
Ask a question about this manual
Ask about setup, troubleshooting, compatibility, parts, safety, or missing instructions. Manuals+ will review the question and use this page’s manual context to help answer it.