PFF010
Generic Automatic Pet Feeder PFF010 User Manual
Model: PFF010
1. Introduction
This manual provides detailed instructions for the setup, operation, and maintenance of your Generic Automatic Pet Feeder PFF010. This device is designed to assist in maintaining a consistent feeding schedule for your pet, offering convenience and peace of mind.
The feeder features a 4-liter food capacity, allowing for up to four daily meals with customizable portion control. It operates with a dual power supply system, utilizing both an AC adapter and a battery backup, ensuring continuous functionality.

Image 1.1: The Generic Automatic Pet Feeder PFF010, showing its main components and a full food bowl.
2. Product Overview
2.1. Components
The Automatic Pet Feeder PFF010 consists of several key components:
- Top Cover: Secures the food and maintains freshness.
- Grain Bucket (Food Storage Container): Holds up to 4 liters of dry pet food.
- Silicone Stopper: Prevents food from dispensing prematurely.
- Push Block: Mechanism for dispensing food.
- Control Panel: Features an LCD display and buttons for programming.
- Motor: Drives the dispensing mechanism.
- Stainless Steel Feeding Basin: The primary bowl for dispensed food.
- Plastic Feeding Basin: An alternative or secondary bowl.
- Battery Cover: Protects the battery compartment.
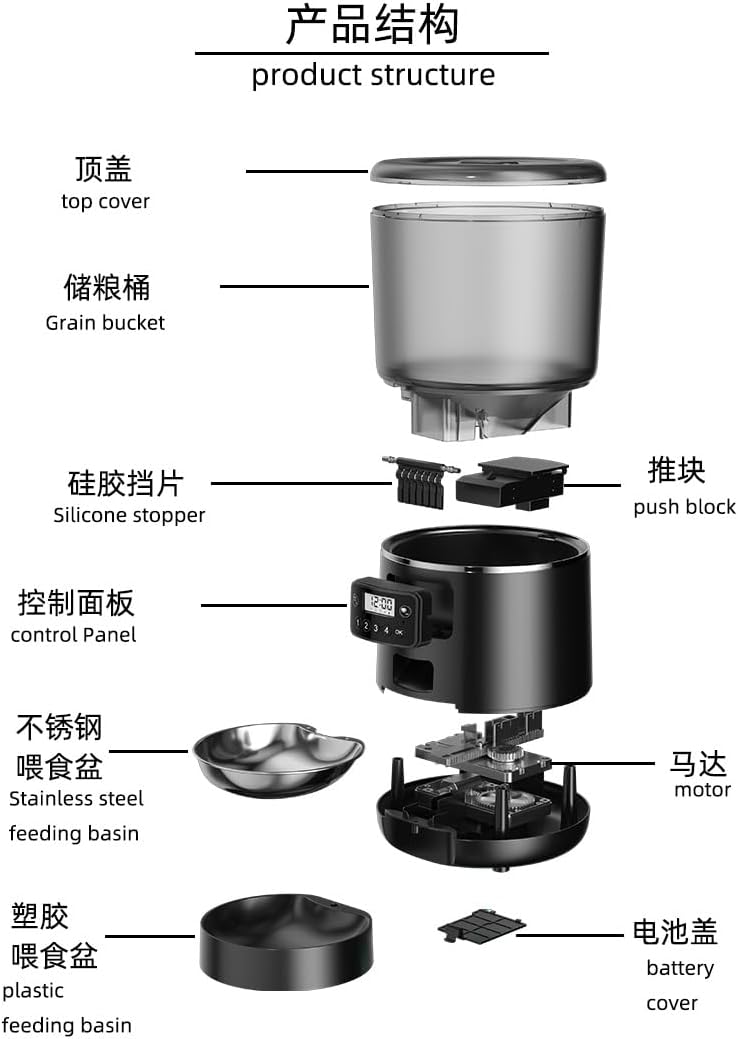
Image 2.1: Exploded view illustrating the various components of the pet feeder, including the top cover, grain bucket, control panel, and feeding basins.
2.2. Included Accessories
Check the package contents to ensure all accessories are present:
- AC Adapter
- Anti-bite Cable
- Cleaning Brush
- Stainless Steel Bowl
- Plastic Feeding Tray
- Quick Start Guide (this manual)

Image 2.2: A visual representation of the accessories included with the pet feeder, such as the power adapter, cable, cleaning brush, and two types of feeding bowls.
3. Setup
3.1. Assembly
- Place the main feeder unit on a flat, stable surface.
- Attach the desired feeding basin (stainless steel or plastic) to the base of the feeder. Ensure it is securely seated.
- Remove the top cover from the grain bucket.
- Fill the grain bucket with dry pet food. The feeder is suitable for pet food up to 0.71 inches in size.
- Replace the top cover, ensuring it is firmly closed to maintain food freshness.
3.2. Power Supply
The feeder supports a dual power supply system for reliable operation.
- AC Adapter: Connect the AC adapter to the power port on the feeder and plug it into a wall outlet. This is the primary power source.
- Battery Backup: For uninterrupted operation during power outages, install three (3) AA batteries into the battery compartment located at the bottom of the feeder. Ensure correct polarity. The feeder prioritizes AC adapter power when available.

Image 3.1: Illustration of the dual power supply system, detailing the external power supply connection and the battery compartment for 3 AA dry batteries.
4. Operating Instructions
4.1. Setting Current Time
- Press and hold the 'SET' button until the hour digit flashes on the LCD display.
- Use the 'UP' and 'DOWN' buttons to adjust the hour.
- Press 'SET' again to move to the minute digit and adjust using 'UP'/'DOWN'.
- Press 'SET' to confirm the time setting.
4.2. Programming Meal Times and Portions
The feeder allows for up to 4 daily meals. Each meal can have a customized portion size.

Image 4.1: Example of a programmed feeding schedule, showing four meals at different times with varying portion sizes.
- Press the 'MEAL' button to enter meal programming mode. The first meal (M1) time will flash.
- Use 'UP'/'DOWN' to set the desired hour for M1, then press 'MEAL'.
- Use 'UP'/'DOWN' to set the desired minute for M1, then press 'MEAL'.
- The portion size for M1 will flash. Use 'UP'/'DOWN' to select the number of portions (e.g., 1-2 portions per feeding). Press 'MEAL' to confirm.
- Repeat steps 2-4 for M2, M3, and M4 if desired. If a meal is not needed, set its time to '00:00'.
- After programming all desired meals, press 'SET' to exit programming mode.
4.3. Voice Recording
You can record a short voice message (up to 10 seconds) that will play at each scheduled meal time to call your pet.
- Press and hold the 'REC' button. The microphone icon will appear on the display.
- Speak clearly into the microphone.
- Release the 'REC' button when finished.
- To play back the recording, press the 'PLAY' button.
- To delete the recording, press and hold 'REC' until the microphone icon disappears.
5. Maintenance
5.1. Cleaning
Regular cleaning ensures hygiene and proper functioning of the feeder.
- Food Container and Bowls: These parts are removable and can be washed with mild soap and water. Rinse thoroughly and dry completely before reassembling.
- Main Unit: Wipe the main unit with a damp cloth. Do not immerse the main unit in water. Ensure the battery compartment remains dry.
- Use the provided cleaning brush to clear any food residue from the dispensing mechanism.
5.2. Food Refilling
Monitor the food level through the transparent grain bucket. Refill as needed to ensure your pet does not miss meals.
5.3. Battery Replacement
If using battery backup, replace the 3 AA batteries when the low battery indicator appears on the LCD display or if the feeder fails to operate during a power outage. Always replace all three batteries at once.
6. Troubleshooting
| Problem | Possible Cause | Solution |
|---|---|---|
| Feeder not dispensing food. | Food level is too low. Food jam in dispensing mechanism. Incorrect programming. | Refill the food container. Clear any obstructions using the cleaning brush. Ensure food size is appropriate (max 0.71 inches). Verify meal times and portion settings. |
| Feeder has no power. | AC adapter unplugged or faulty. Batteries are dead or incorrectly installed. | Check AC adapter connection and wall outlet. Try a different outlet. Replace batteries with new ones, ensuring correct polarity. |
| Incorrect feeding times or portions. | Programming error. | Refer to Section 4.2 to reprogram meal times and portion sizes. |
| Voice recording not playing. | No recording saved or recording deleted. | Refer to Section 4.3 to record a new voice message. |

Image 6.1: The internal 45-degree steep slope design, engineered to ensure smooth food delivery and prevent jamming.
7. Specifications
| Feature | Detail |
|---|---|
| Model Number | PFF010 |
| Brand | Generic |
| Capacity | 4 Liters |
| Daily Meals | Up to 4 programmable meals |
| Power Supply | AC Adapter (5V/1A) and 3x AA Battery Backup |
| Material | ABS Plastic, Stainless Steel |
| Product Dimensions (L x W x H) | 11.8 x 7.2 x 11.6 inches (30 x 18.3 x 29.5 cm) |
| Item Weight | 3.3 pounds (1.5 kg) |
| Max Food Size | 0.71 inches |
| Target Species | Cat, Small and Medium-sized Dogs |
| Special Features | LCD Display, Programmable Timer, Voice Recorder |
8. Warranty and Support
For warranty information or technical support, please refer to the contact details provided with your purchase documentation or contact the retailer directly. Keep your purchase receipt as proof of purchase.
Ask a question about this manual
Ask about setup, troubleshooting, compatibility, parts, safety, or missing instructions. Manuals+ will review the question and use this page’s manual context to help answer it.