shinic RQ602-15R
Shinic RQ602-15R Electric Garage Heater Instruction Manual
Model: RQ602-15R | Brand: Shinic
1. Introduction
Thank you for choosing the Shinic Electric Garage Heater. This manual provides essential information for the safe and efficient operation of your new radiant quartz heater. Please read all instructions carefully before installation and use, and retain this manual for future reference.
2. Important Safety Information
To reduce the risk of fire, electric shock, or injury, observe the following:
- Read all instructions before using this heater.
- This heater is hot when in use. To avoid burns, do not let bare skin touch hot surfaces. Keep combustible materials, such as furniture, pillows, bedding, papers, clothes, and curtains, at least 3 feet (0.9 m) from the front of the heater and keep them away from the sides and rear.
- Extreme caution is necessary when any heater is used by or near children or invalids and whenever the heater is left operating unattended.
- Always unplug the heater when not in use.
- Do not operate any heater with a damaged cord or plug or after the heater malfunctions, has been dropped, or damaged in any manner. Return heater to authorized service facility for examination, electrical or mechanical adjustment, or repair.
- Do not use outdoors. This heater is intended for indoor use only.
- Do not run cord under carpeting. Do not cover cord with throw rugs, runners, or similar coverings. Arrange cord away from traffic area and where it will not be tripped over.
- To disconnect heater, turn controls to off, then remove plug from outlet.
- Do not insert or allow foreign objects to enter any ventilation or exhaust opening as this may cause an electric shock or fire, or damage the heater.
- To prevent a possible fire, do not block air intakes or exhaust in any manner. Do not use on soft surfaces, like a bed, where openings may become blocked.
- A heater has hot and arcing or sparking parts inside. Do not use it in areas where gasoline, paint, or flammable vapors or liquids are used or stored.
- Use this heater only as described in this manual. Any other use not recommended by the manufacturer may cause fire, electric shock, or injury to persons.
- This heater includes an Overheat Auto-Off safety feature. If the heater overheats, it will automatically shut off.
- Equipped with a 120-volt, 3-prong grounded safety plug for enhanced protection.
- The metal housing provides increased durability and safety.
- ETL Listed for safety compliance.
3. Package Contents
Verify that all items are present and in good condition upon opening the package:
- 2 x Shinic Electric Garage Heaters
- 2 x Remote Controls
- Mounting Brackets and Hardware
- 1 x User's Manual (this document)

4. Setup and Installation
The Shinic Electric Garage Heater is designed for ceiling mounting to save valuable floor or desk space. Follow these steps for proper installation:
- Select Mounting Location: Choose a sturdy wooden beam or joist on the ceiling. Ensure the location allows for the heater to be at least 3 feet (0.9 m) away from any combustible materials (e.g., furniture, papers, clothes, curtains) from the front, sides, and rear.
- Attach Mounting Brackets: Position the mounting bracket against the chosen ceiling surface. Mark the pilot holes. Drill pilot holes using an appropriate drill bit. Secure the bracket using the provided screws, leaving about a quarter-inch of the screw exposed initially.
- Mount the Heater: Carefully lift the heater and align the keyholes on the heater's handle with the exposed screws on the mounting bracket. Slide the heater onto the screws. Once in place, tighten the screws completely to secure the heater firmly to the bracket.
- Adjust Angle: The heater features a 90° adjustable heating angle. Loosen the side bolts on the heater's bracket, adjust the heater to direct warmth to the desired area, and then re-tighten the bolts to secure the angle.
- Power Connection: Plug the 3-prong grounded safety plug into a compatible 120-volt electrical outlet. Ensure the power cord is routed safely and does not come into contact with the hot surfaces of the heater or any other heat sources.

5. Operating Instructions
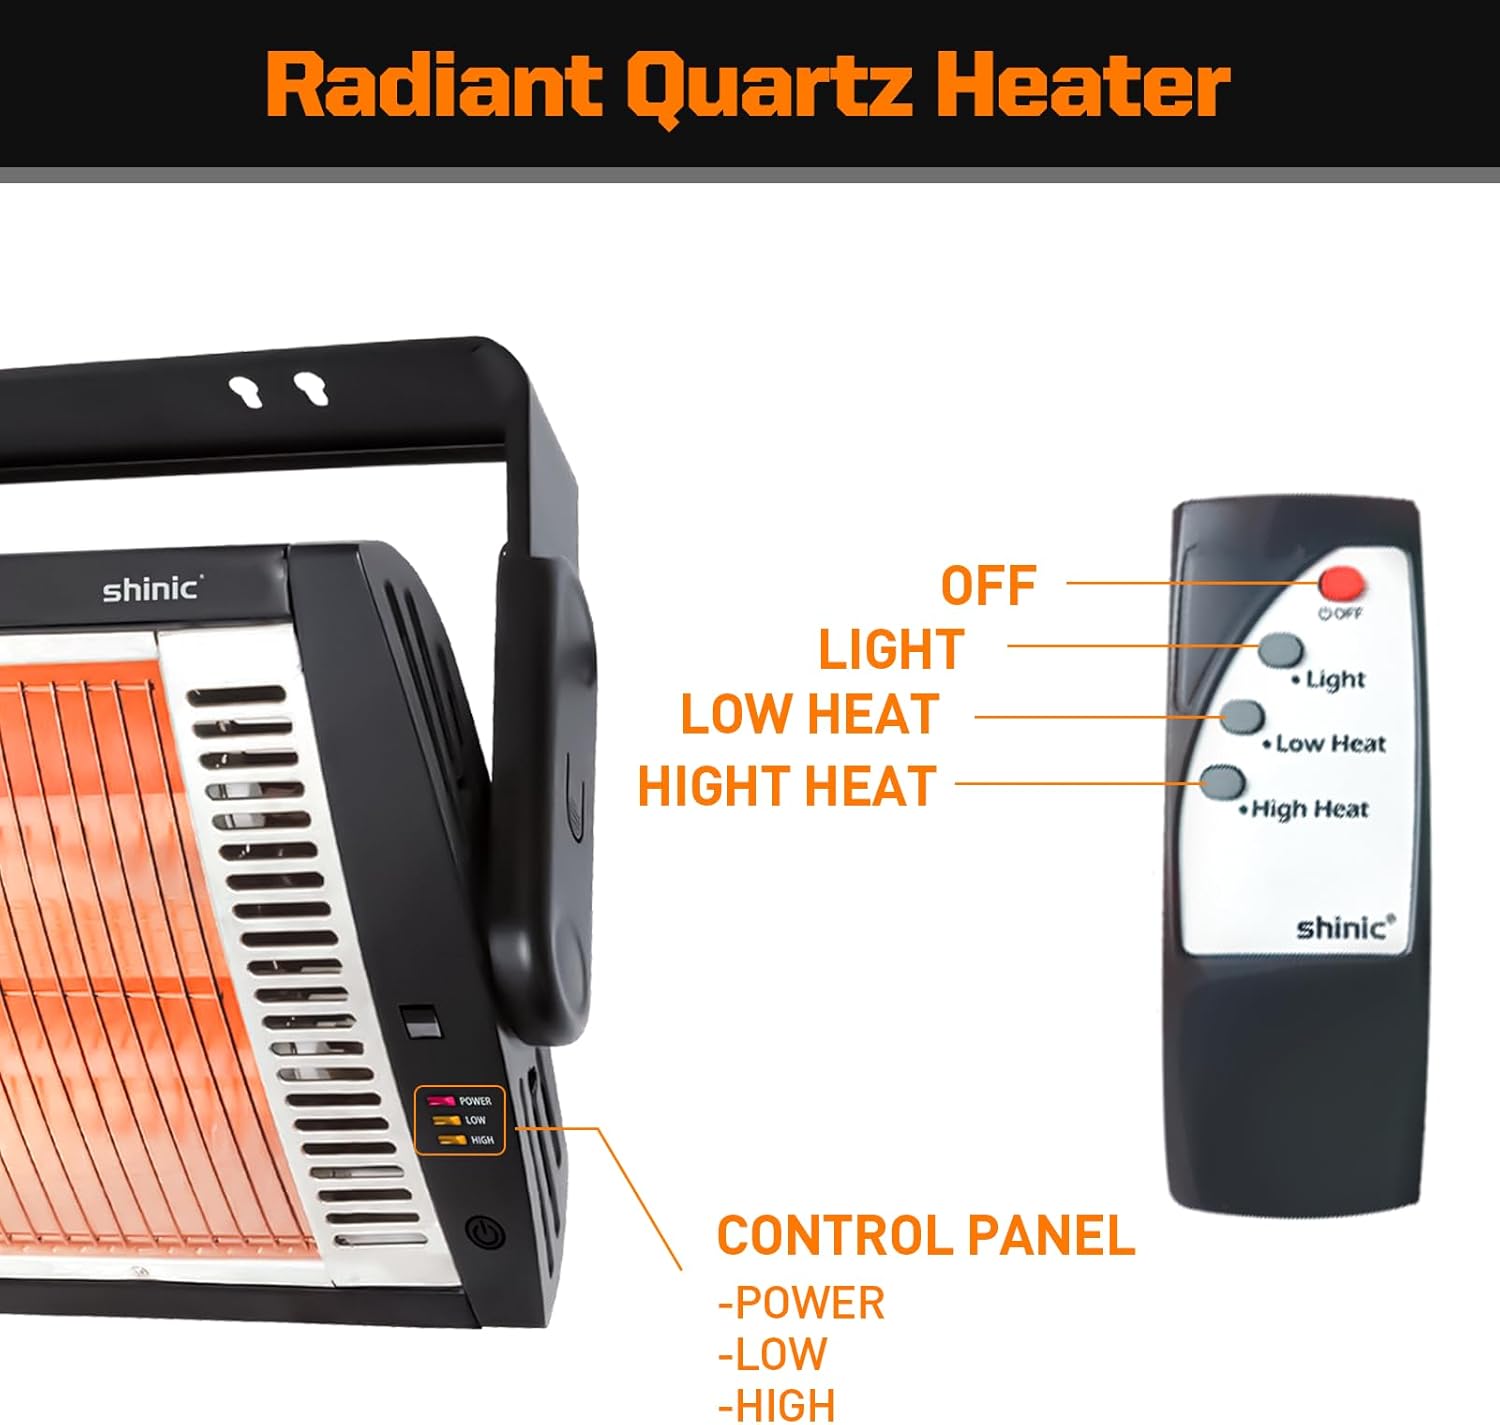
Your Shinic Electric Garage Heater can be operated using the included remote control or the control panel on the unit.
5.1 Remote Control Functions
- ON/OFF Button: Press to turn the heater on or off.
- Light Button: Activates or deactivates the built-in halogen work light.
- Low Heat Button: Selects the 750W low heat setting.
- High Heat Button: Selects the 1500W high heat setting.
5.2 Control Panel
The control panel on the side of the heater features indicator lights for Power, Low Heat, and High Heat, along with a manual power button to cycle through modes.
5.3 Heat Settings and Modes
The heater offers 5 mode settings, combining heat levels and the work light:
- Mode I: 750W Heat Only
- Mode II: 1500W Heat Only
- Mode III: 750W Heat + Work Light
- Mode IV: 1500W Heat + Work Light
- Mode V: Work Light Only

6. Maintenance
Regular maintenance ensures optimal performance and longevity of your heater.
6.1 Cleaning
- Always unplug the heater and allow it to cool completely before cleaning.
- Use a soft, damp cloth to wipe the exterior surfaces of the heater. Do not use abrasive cleaners or solvents.
- Ensure no water or liquids enter the interior of the heater.
- Do not attempt to clean the heating elements directly.
6.2 Storage
When not in use, store the heater in a cool, dry place, away from direct sunlight and moisture. If storing for extended periods, it is recommended to cover the heater to protect it from dust.
7. Troubleshooting
If your heater is not operating correctly, consult the following common issues and solutions:
| Problem | Possible Cause | Solution |
|---|---|---|
| Heater does not turn on. | No power supply. Overheat protection activated. Remote control battery low. | Ensure the heater is properly plugged into a working 120V outlet. Unplug the heater, allow it to cool for 10-15 minutes, then plug it back in. Replace the remote control batteries. |
| Heater produces low heat. | Low heat setting selected. Insufficient power for the area. | Select the 'High Heat' setting on the remote or control panel. Ensure the heater is appropriate for the size of the area to be heated (150-200 sq.ft. recommended). |
| Work light does not turn on. | Light function not activated. Bulb failure. | Press the 'Light' button on the remote or cycle through modes on the control panel. Contact customer support for bulb replacement options. |
| Remote control is unresponsive. | Batteries are dead or incorrectly inserted. Obstruction between remote and heater. | Replace batteries and ensure correct polarity. Ensure a clear line of sight between the remote and the heater's sensor. |
8. Specifications
| Feature | Detail |
|---|---|
| Brand | Shinic |
| Model Number | RQ602-15R |
| Type | Radiant Quartz Heater |
| Power Settings | 750W / 1500W (5 Mode Settings) |
| Voltage | 120 Volts |
| Amperage | 12.5 Amps |
| Heating Coverage | 150-200 sq.ft. |
| Mounting Type | Ceiling Mount (with adjustable angle) |
| Special Features | Adjustable Angle Halogen Light, Durable Metal Housing, ETL Listed, Overheat Protection |
| Product Dimensions | 5.5"D x 6.3"W x 9.3"H |
| Item Weight | 16.37 pounds (per unit) |
| Indoor/Outdoor Usage | Indoor (Recommended for Garage, Shop, Patio) |
9. Warranty and Customer Support
For warranty information, product registration, or technical support, please refer to the manufacturer's official website or contact Shinic customer service directly. Contact details are typically found on the product packaging or the manufacturer's website.