Introduction
This manual provides detailed instructions for the setup, operation, and troubleshooting of your JCHICI 8K@60Hz DisplayPort KVM Switch. This device allows you to control up to four computers using a single keyboard, mouse, and two DisplayPort monitors, enhancing productivity and workspace efficiency.
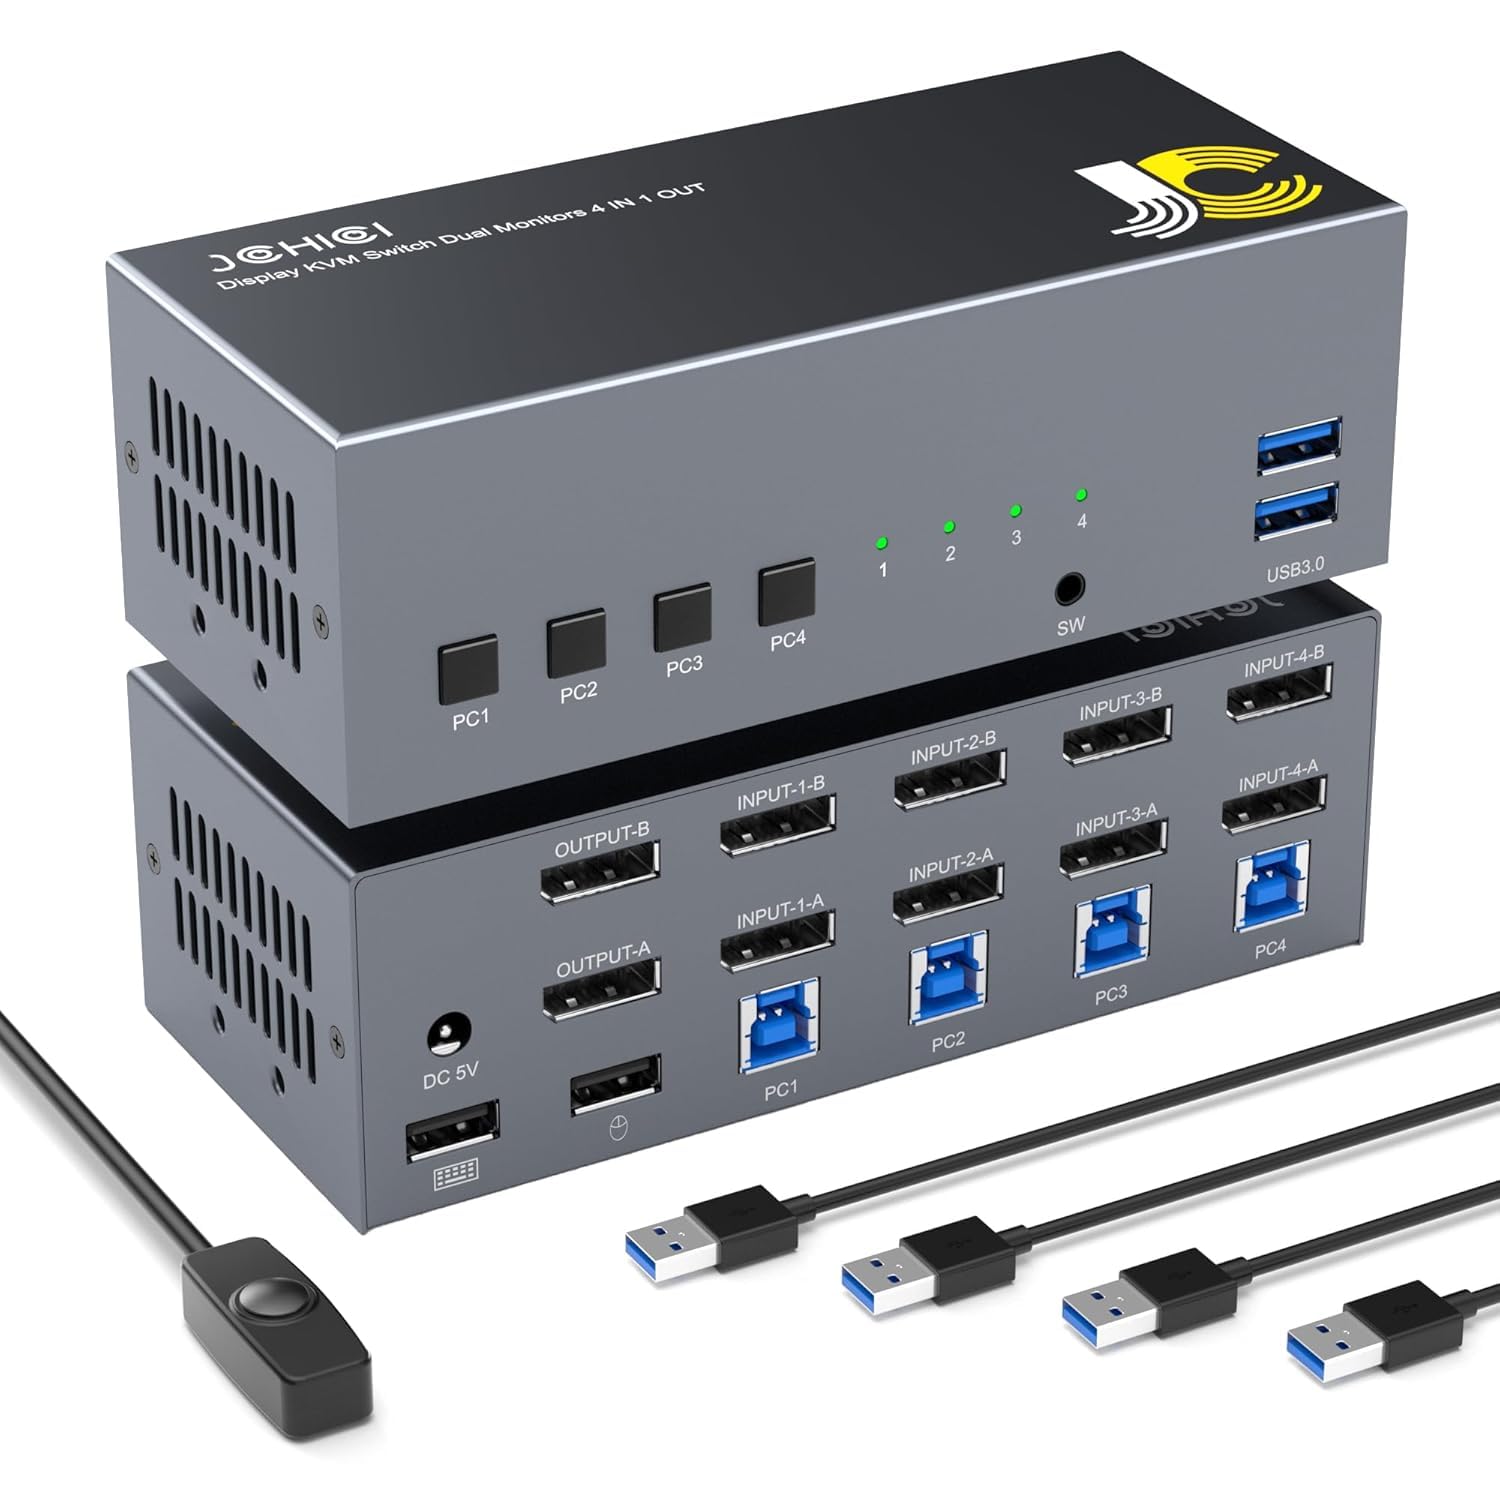
Image: Front and rear view of the JCHICI DisplayPort KVM Switch, showcasing its compact design and various ports.
Package Contents
Please verify that all items are present in your package:
- 1 x JCHICI 4x1 DisplayPort KVM Switch
- 1 x Power Adapter
- 1 x Wired Remote Controller (1.5m / 59-inch)
- 4 x USB 3.0 A to B Cables
- 1 x User Manual (this document)
Image: Visual representation of the KVM switch and its included accessories, such as cables, power adapter, and remote controller.
Key Features
- 4-Port Dual Monitor KVM: Control four computers with one keyboard, mouse, and two DisplayPort monitors.
- High Resolution Support: Supports resolutions up to 8K@60Hz and 4K@120Hz (DisplayPort 1.4 standard), backward compatible with lower resolutions.
- USB 3.0 Hub: Two integrated USB 3.0 ports (5Gbps) for sharing peripherals like printers, flash drives, and hard drives.
- Multiple Switching Methods: Switch between computers using front panel buttons, keyboard hotkeys, or the included wired remote controller.
- Dual Display Modes: Supports both mirror and extended display modes for enhanced multitasking.
Setup Instructions
Follow these steps to connect your JCHICI KVM Switch:
- Power Off Devices: Ensure all computers and monitors are powered off before beginning the connection process.
- Connect Monitors: Connect your two DisplayPort monitors to the KVM switch's OUTPUT-A and OUTPUT-B ports using DisplayPort cables.
- Connect Computers (Video): For each computer (PC1, PC2, PC3, PC4), connect its two DisplayPort outputs to the corresponding INPUT-X-A and INPUT-X-B ports on the KVM switch (e.g., PC1's outputs to INPUT-1-A and INPUT-1-B). Note: Each computer must have two DisplayPort outputs and support extended display for dual monitor functionality. Adapters (HDMI/VGA/DVI/USB-C to DP) may be used if necessary.
- Connect Computers (USB): For each computer, connect one end of the provided USB 3.0 A to B cable to the computer's USB 3.0 port and the other end to the corresponding PCX USB-B port on the KVM switch (e.g., PC1's USB to PC1 USB-B port). This enables keyboard, mouse, and USB peripheral sharing.
- Connect Keyboard and Mouse: Connect your USB keyboard and mouse to the dedicated USB ports on the front panel of the KVM switch.
- Connect USB Peripherals: Connect any additional USB 3.0 devices (e.g., printer, flash drive, external HDD) to the two USB 3.0 ports on the front panel.
- Connect Wired Remote (Optional): If desired, connect the wired remote controller to the designated port on the KVM switch.
- Power On: Connect the power adapter to the KVM switch and then plug it into a power outlet. Power on your monitors and then your computers.
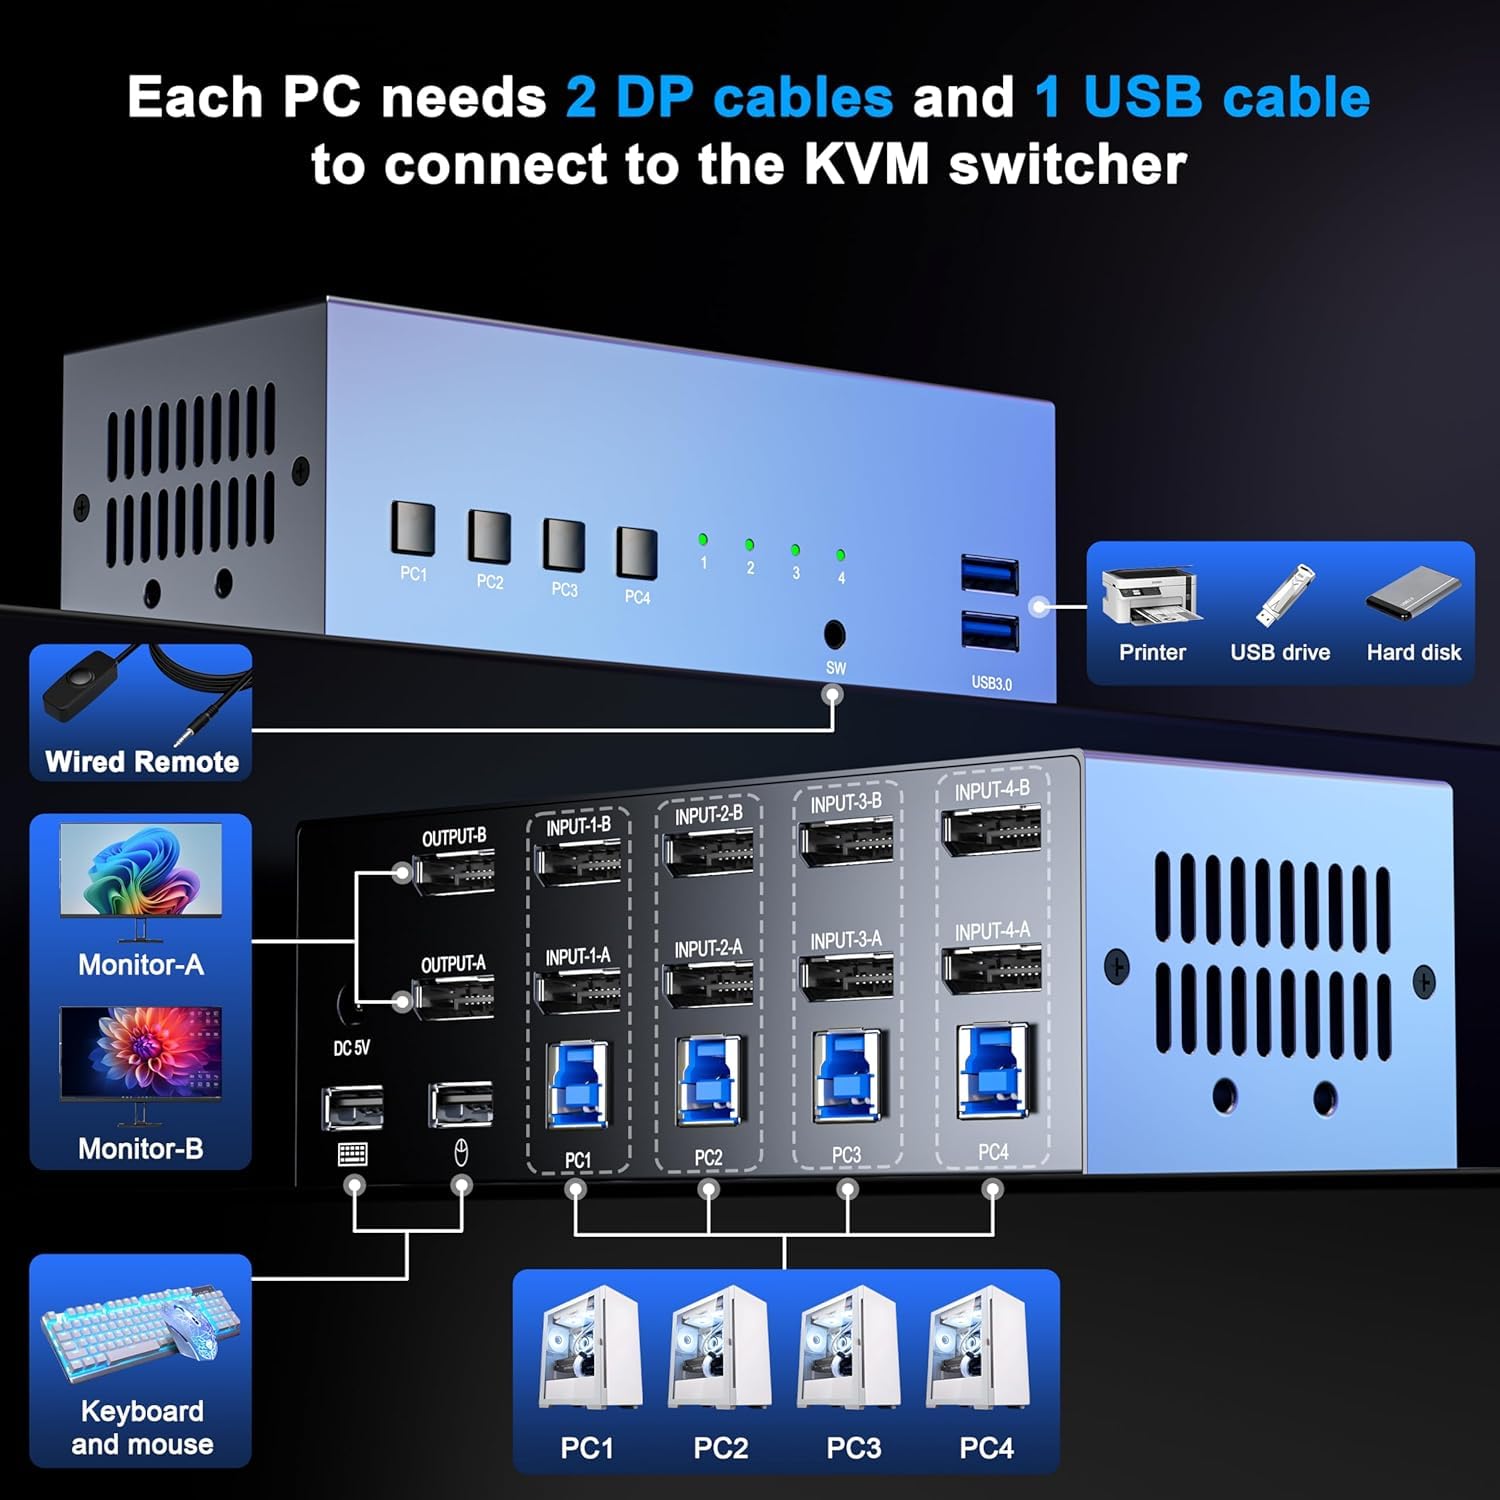
Image: A detailed diagram illustrating how to connect computers, monitors, keyboard, mouse, and USB peripherals to the KVM switch.
Operating Instructions
Switching Between Computers
The KVM switch offers three methods for switching between connected computers:
- Front Panel Buttons: Press the corresponding PC1, PC2, PC3, or PC4 button on the front of the KVM switch to select the desired computer. LED indicators will show the active computer.
- Wired Remote Controller: Use the included wired remote to switch between computers. This is convenient for KVM placement under a desk.
- Keyboard Hotkeys: Utilize specific keyboard combinations for quick switching. The default hotkey is Scroll Lock + Scroll Lock + [1-4]. Other hotkey modes include Caps Lock + Caps Lock + [1-4] and Num Lock + Num Lock + [1-4]. To change the hotkey mode, press Ctrl + Shift + K. The KVM also supports auto-cycling through computers.

Image: Visual representation of the three switching methods: front panel buttons, wired remote controller, and keyboard hotkeys.
Dual Display Modes
The KVM switch supports both mirror and extended display modes, depending on your computer's settings and requirements.
- Mirror Mode: Both monitors display the same content, useful for presentations or sharing your screen.
- Extended Mode: Your desktop is extended across both monitors, providing more screen real estate for multitasking.

Image: Illustration showing a dual monitor setup in both mirror mode (duplicate display) and extended mode (desktop spread across two screens).
USB 3.0 Hub Functionality
The two USB 3.0 ports on the front panel allow you to share USB peripherals among all connected computers. When you switch to a different computer, the connected USB devices will automatically switch to that computer.

Image: Graphic comparing the data transfer speeds of USB 2.0 (480Mbps) and USB 3.0 (5Gbps), highlighting the faster performance of USB 3.0.
Troubleshooting
- Only One Monitor Works: If only one monitor displays content, press Win + P on your keyboard and select the desired display mode (e.g., Extend or Duplicate). Ensure your computer's graphics card supports dual DisplayPort outputs.
- Incorrect Monitor Arrangement: To adjust the left/right positioning of your monitors, go to your operating system's "Display Settings" and drag the monitor icons (Display 1 & 2) to your preferred arrangement.
- No Display/Flickering:
- Ensure all DisplayPort cables are securely connected and are DP 1.4 compliant for 8K/4K resolutions.
- Verify that your graphics card drivers are up to date.
- Try restarting the KVM switch and connected computers.
- USB Devices Not Recognized:
- Ensure the USB 3.0 A to B cables are securely connected between each computer and the KVM switch.
- Try connecting the USB device directly to the computer to confirm it functions correctly.
- Some high-power USB devices may require external power or a powered USB hub.
- Hotkey Switching Not Working:
- Ensure your keyboard is connected to the dedicated keyboard USB port on the KVM switch.
- Verify the active hotkey mode (Scroll Lock, Caps Lock, or Num Lock).
- Some specialized keyboards may not fully support hotkey functions.
Specifications
| Feature | Specification |
|---|---|
| Model | B0FB3513P1 |
| Brand | JCHICI |
| Input Ports | 4 x DisplayPort 1.4 (Dual per PC), 4 x USB 3.0 Type-B |
| Output Ports | 2 x DisplayPort 1.4, 2 x USB 3.0 Type-A, 2 x USB 2.0 Type-A (for K/M) |
| Video Resolution | Up to 8K@60Hz, 4K@120Hz (DP 1.4 with DSC) |
| USB Data Transfer Rate | 5Gbps (USB 3.0) |
| Switching Methods | Front Panel Buttons, Keyboard Hotkeys, Wired Remote Controller |
| Material | Metal |
| Product Dimensions | 6 x 3 x 2 inches |
| Weight | 2.07 Pounds |
Maintenance
To ensure optimal performance and longevity of your KVM switch:
- Keep the device in a cool, dry, and well-ventilated area.
- Avoid exposing the device to extreme temperatures, humidity, or direct sunlight.
- Clean the exterior with a soft, dry cloth. Do not use liquid cleaners or aerosols.
- Ensure all cables are securely connected and not under strain.
Warranty and Support
Your JCHICI KVM Switch is backed by an 18-month warranty for replacement. For technical assistance or warranty claims, please contact JCHICI customer support. Our engineering team provides lifetime technical support to ensure a hassle-free experience.
For support, please refer to the contact information provided on the product packaging or the official JCHICI website.
Safety Information
- Do not attempt to open or modify the device. Unauthorized modifications may void the warranty and pose safety risks.
- Use only the provided power adapter. Using an incorrect power adapter may damage the device.
- Keep the device away from water, fire, and corrosive substances.
- This device is intended for indoor use only.