Introduction
This manual provides detailed instructions for the installation, operation, and maintenance of your QueenFun 24x32 Lighted Medicine Cabinet Mirror. Please read thoroughly before installation and use to ensure proper function and safety.
Safety Information
- Ensure power is disconnected at the circuit breaker before any installation, maintenance, or cleaning procedures.
- All electrical work should be performed by a qualified electrician in accordance with local electrical codes.
- Do not expose the mirror to excessive moisture or direct water spray. This product is designed for bathroom environments but should not be submerged.
- The product is ETL certified, and all electronic components are UL and FCC certified, ensuring compliance with safety standards.
- Do not hang heavy objects on the cabinet doors or shelves beyond their specified weight limits.
Package Contents
- Mirrored Cabinet
- Mounting Hardware (screws, anchors, bracket)
- Adjustable Tempered Glass Shelves (3 pieces)
- User Manual
- Note: Side decorative mirrors are not included and may be purchased separately for surface-mounting if a tri-view effect is desired.
Setup and Installation
The QueenFun Lighted Medicine Cabinet Mirror supports both recessed and surface mounting. The cabinet is pre-assembled for your convenience.
Surface Mount Installation
Follow these steps for surface mounting. Ensure the wall is structurally sound to support the cabinet's weight.
- Prepare the Wall: Mark the desired height and location for the mounting bracket. Use a level to ensure accuracy.
- Install the Mounting Bracket: Secure the heavy-duty aluminum bracket to the wall using the included screws and anchors. Ensure it is level and firmly attached to wall studs or appropriate blocking.
- Hang the Cabinet: Carefully lift the medicine cabinet and hang it onto the installed bracket.
- Secure the Bottom: Install the bottom reinforced screw to prevent movement and ensure stability.
- Electrical Connection: Choose between hardwired or plug-in power options. If hardwiring, ensure power is off and connect the wires according to local electrical codes. If using the plug-in option, plug the cabinet into a suitable 120V outlet.

This image illustrates the dimensions and methods for both surface and recessed installation. For surface mounting, the cabinet can be hardwired or plugged into an outlet.

This diagram shows how to install optional side mirrors for a tri-view effect when surface mounting the cabinet. Side mirrors are sold separately.
Recessed Installation
For recessed installation, a wall cutout is required. Refer to the "Cutout Dimension Reference" table in the Specifications section for precise measurements.
- Prepare Wall Opening: Create a cutout in the wall according to the specified dimensions for your cabinet size. Ensure the opening is clean and free of debris.
- Electrical Connection: Hardwire the cabinet's electrical connection within the wall cavity. Ensure power is off before making connections.
- Insert Cabinet: Carefully slide the cabinet into the prepared opening.
- Secure Cabinet: Secure the cabinet to the wall studs or blocking using appropriate fasteners.
Video Guide: Installation
This video demonstrates the installation process for the QueenFun Acrylic LED Medicine Cabinet Mirror, including mounting and electrical connections.
This video specifically shows the recessed installation of the QueenFun Aura LED Mirror Cabinet.
This video demonstrates the surface-mount installation of the QueenFun Aura LED Mirror Cabinet.
Operating Instructions
Main Light Control
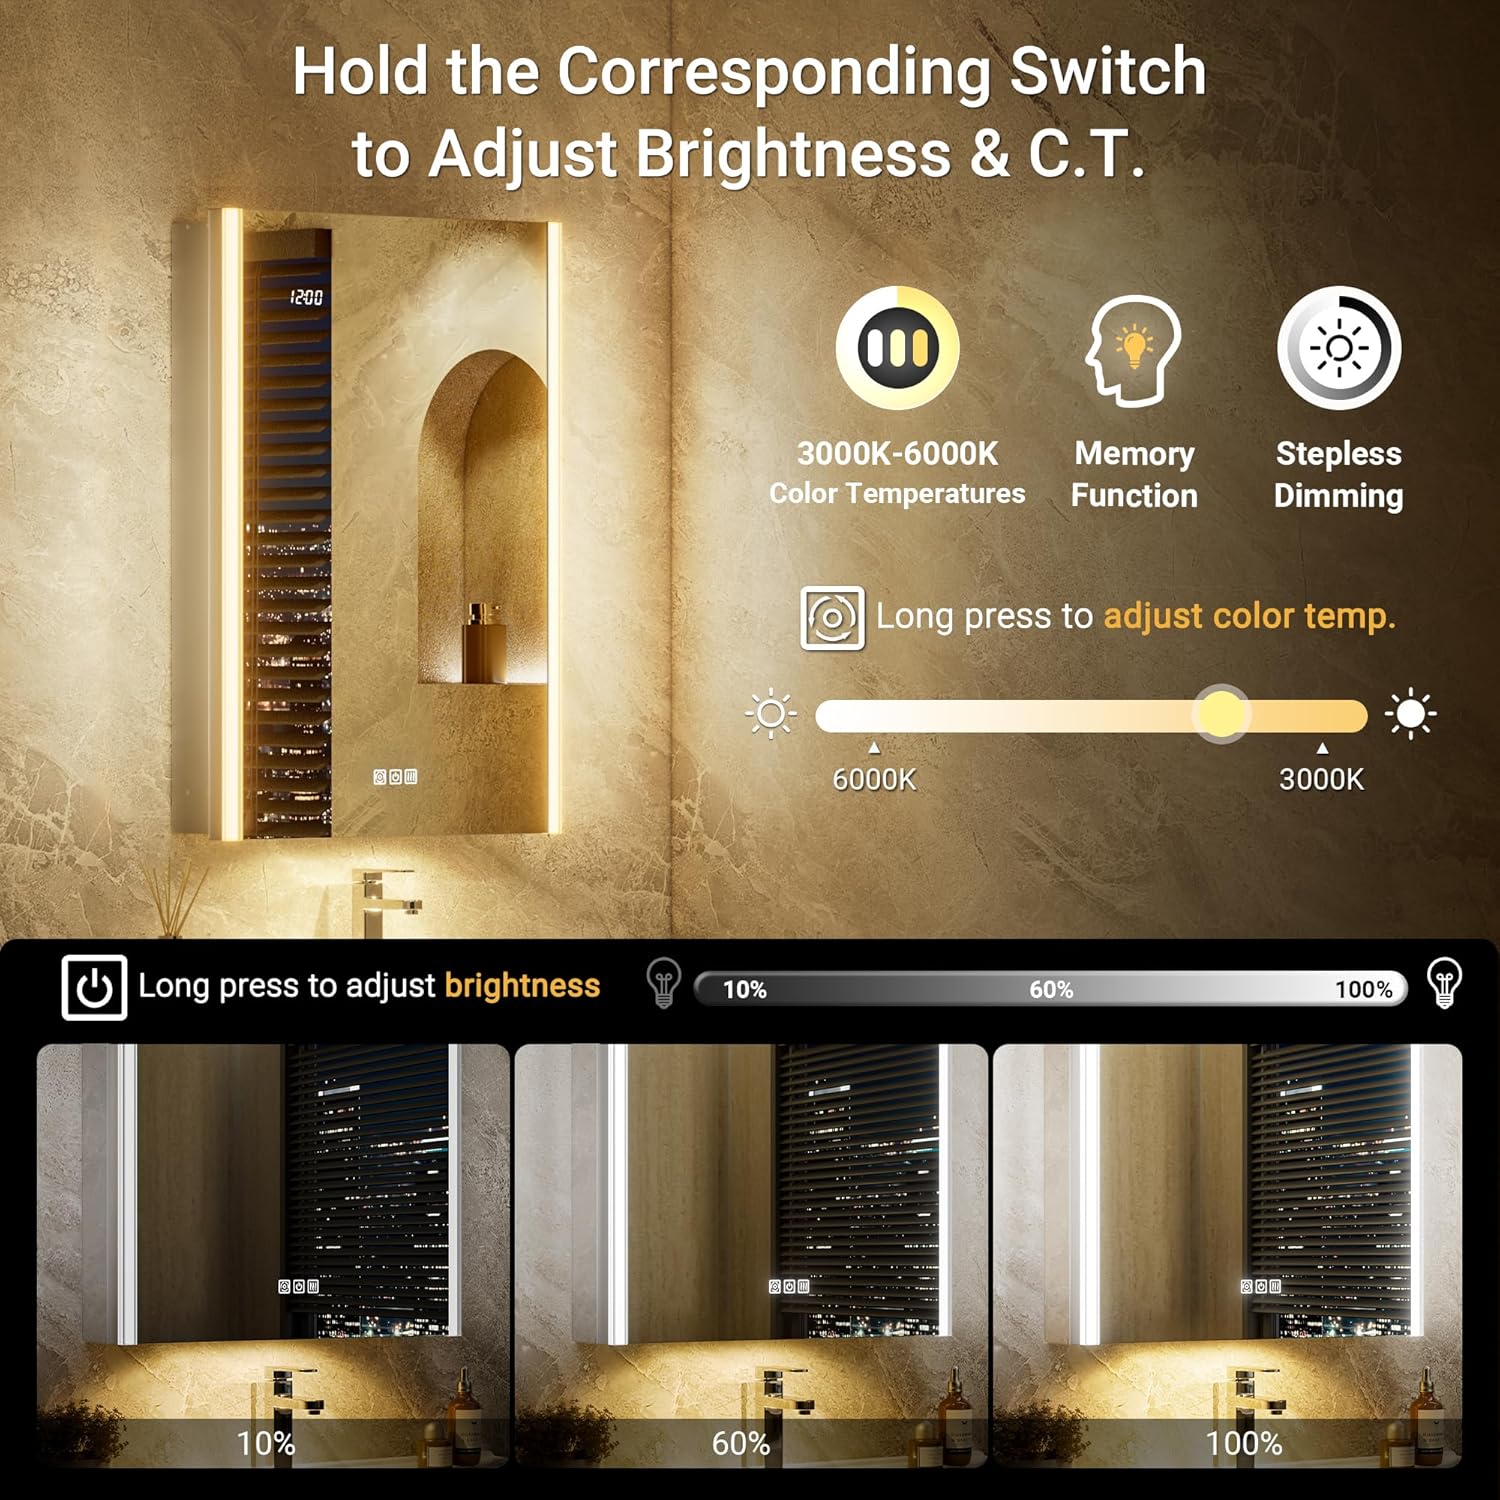
The main front light features stepless adjustment for color temperature (C.T.) and brightness.
- Power On/Off: Press the power button (usually a circular icon) on the mirror surface to turn the lights on or off.
- Brightness Adjustment: Long press the power button to adjust brightness from 10% to 100%. Release when desired brightness is reached.
- Color Temperature Adjustment: Long press the color temperature button (often depicted as a sun icon) to cycle through color temperatures from 3000K (warm white) to 6000K (cool white). Release when desired temperature is reached.
- Memory Function: The mirror remembers your last brightness and color temperature settings.

This image shows the touch controls for adjusting the main light's brightness (10-100%) and color temperature (3000K-6000K), highlighting the memory function.
Smart Night Lamp
The auto-ambient smart night lamp located at the bottom of the cabinet provides soft illumination.
- Automatic Activation: The night lamp automatically turns on in low-light conditions.
- Manual Control: The night lamp can be manually turned off via its dedicated touch control if not desired.
This image highlights the smart night lamp feature, which provides ambient lighting and can automatically activate in low light.
Anti-Fog Function
An integrated heating film quickly removes fog from the mirror surface.
- Activation: Tap the defog switch (often depicted as a steam icon) on the mirror surface to activate the anti-fog function.
- Automatic Shut-off: The defogger automatically turns off after 60 minutes to conserve energy.
- Manual Shut-off: Tap the defog switch again to manually turn it off.
This image demonstrates the effectiveness of the anti-fog function, showing a clear mirror surface after activation. It also indicates the 1-hour auto-off feature.
Time Display
The mirror includes a digital time display.
- On/Off: While the main lights are off, hold the power button to turn the clock display on or off.
- Setting Time: Long press the clock setting button (often a circular arrow icon) for 5 seconds to enter time setting mode. Use the power button (+) and color temperature button (-) to adjust the time.
- 12/24H Format: The time display can be switched between 12-hour and 24-hour formats.
Internal Features
The cabinet interior offers convenient storage and charging options.
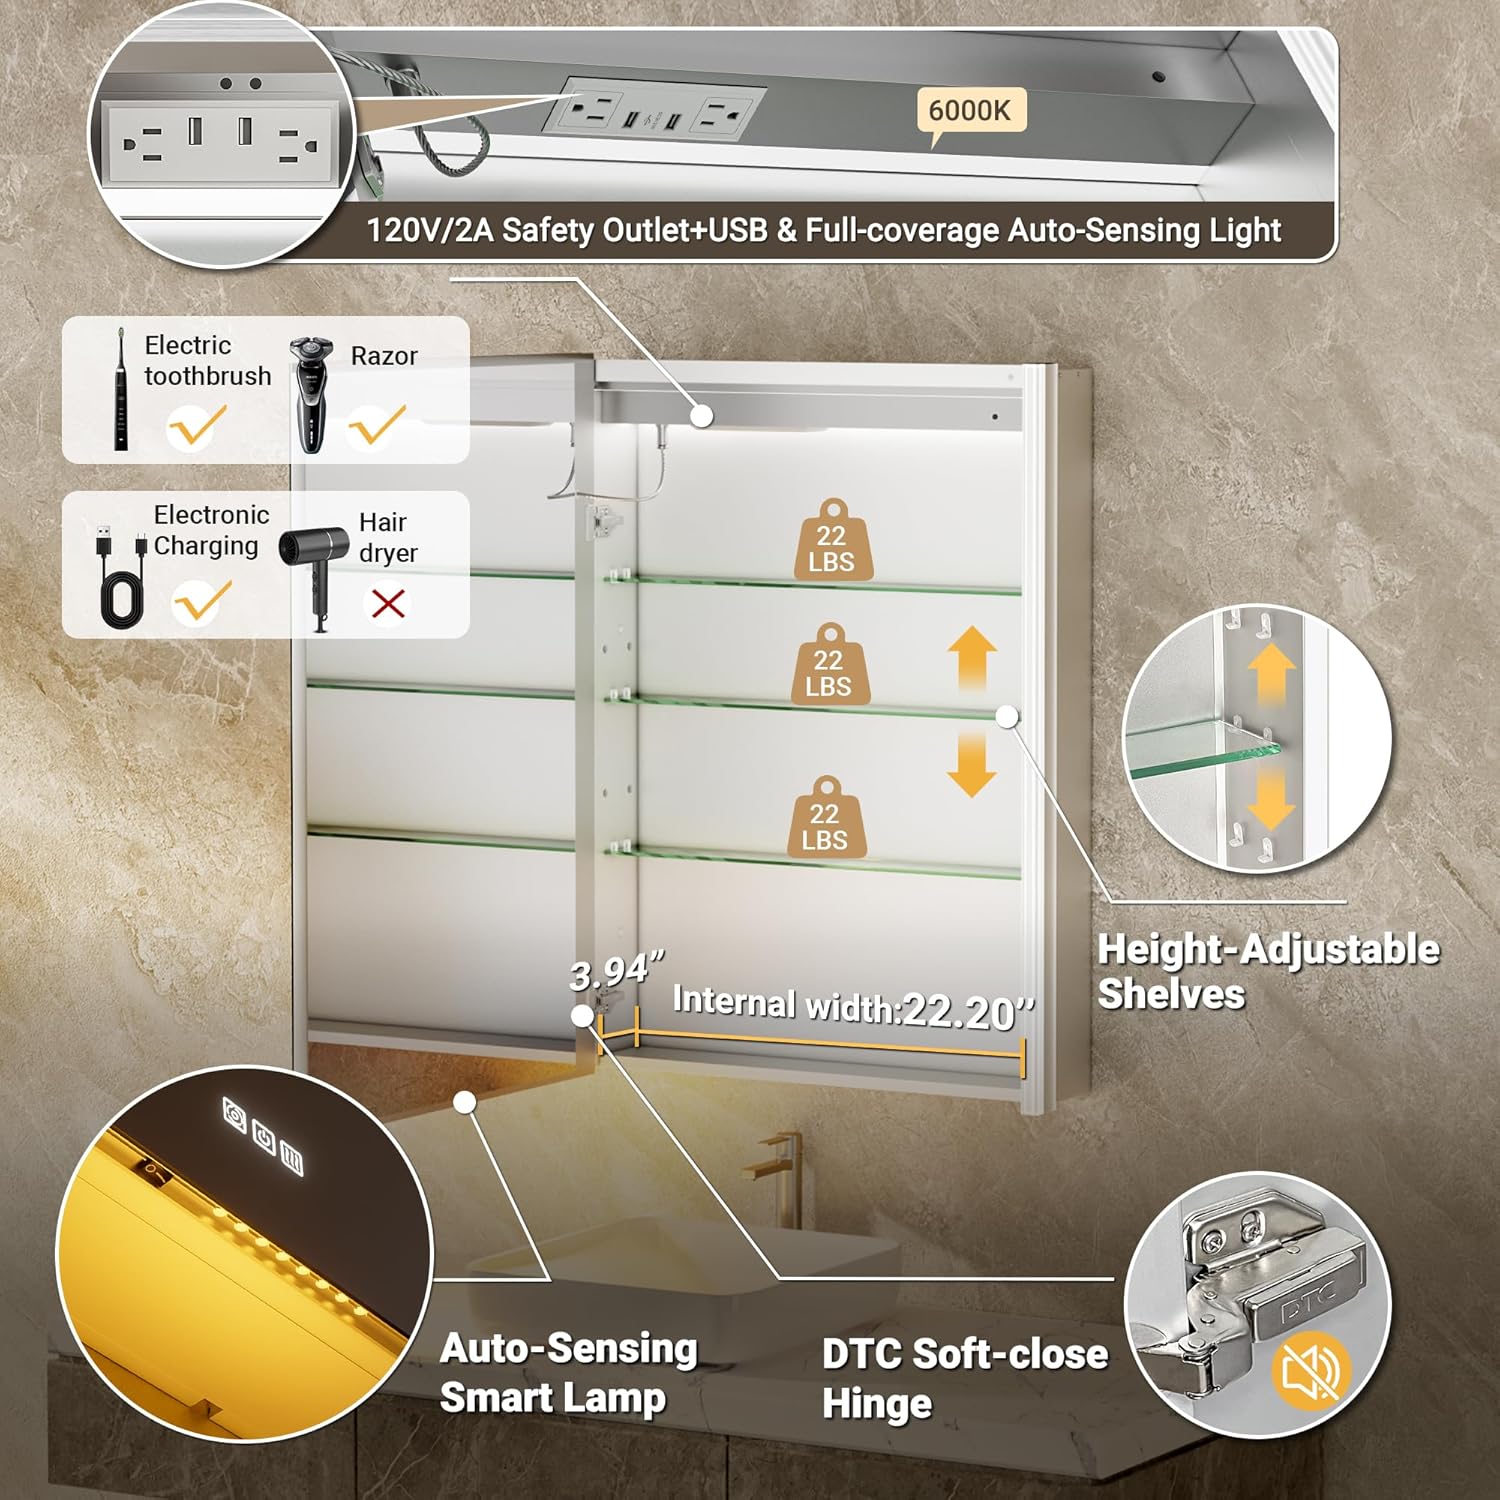
- Adjustable Shelves: The tempered glass shelves are height-adjustable to accommodate items of various sizes.
- Power Outlets & USB Ports: The top of the cabinet includes two 120V/2A charging stations and two USB ports for charging devices like electric toothbrushes and shavers.
- Motion-Sensing Interior Light: A full-coverage motion-sensing light illuminates the interior when the door is opened.
- Soft-Close Hinges: The doors are equipped with DTC soft-close hinges for quiet and gentle closing.

This image details the interior features, including adjustable glass shelves, dual USB ports, 120V/2A outlets, a full-coverage auto-sensing light, and DTC soft-close hinges.
Video Guide: Features Overview
This video provides an overview of the QueenFun Acrylic LED Mirrored Cabinet's smart features, including lighting, anti-fog, and internal storage.
Maintenance
- Cleaning the Mirror Surface: Use a soft, damp cloth and a mild, non-abrasive glass cleaner. Spray cleaner onto the cloth, not directly onto the mirror, to prevent liquid from seeping into the edges. Avoid harsh chemicals or abrasive materials that could damage the mirror or frame.
- Cleaning the Cabinet Interior: Wipe the interior surfaces and glass shelves with a damp cloth. Ensure all surfaces are dry before closing the cabinet doors.
- Electrical Components: Do not spray water directly onto electrical components, outlets, or USB ports. Ensure the cabinet is completely dry before using any electrical features.
- Hinge Care: Periodically check the soft-close hinges for smooth operation. If needed, gently wipe away any dust or debris.
Troubleshooting
- Lights Not Working:
- Check if the power supply is connected and the wall switch (if applicable) is on.
- Ensure the touch control button on the mirror surface is pressed correctly.
- Verify the hardwire connection if applicable, or that the plug is securely in the outlet.
- Anti-Fog Not Activating:
- Ensure the defogger touch button is pressed.
- Allow a few minutes for the heating film to warm up and clear the fog.
- Clock Not Displaying/Incorrect Time:
- Check if the clock display is turned on (hold the power button when main lights are off).
- Follow the time setting instructions in the "Operating Instructions" section to adjust the time.
- Night Lamp Not Working:
- Check ambient light conditions; the lamp activates automatically in low light.
- Ensure it hasn't been manually turned off via its dedicated control.
- Internal Outlets/USB Ports Not Working:
- Verify the main power supply to the cabinet.
- Ensure devices are properly plugged into the ports.
Specifications
| Feature | Detail |
|---|---|
| Brand | QueenFun |
| Model Number | MCAL |
| Dimensions (D x W x H) | 5.24"D x 24"W x 32"H |
| Material | Aluminum (Frame), Tempered Glass (Shelves) |
| Installation Type | Recessed or Wall Mount |
| Lighting | Dimmable LED (3000K-6000K C.T.), Smart Night Lamp, Motion-Sensing Interior Light |
| Features | Anti-Fog, Time Display, 2x 120V/2A Outlets, 2x USB Ports, Soft-Close Hinges, Adjustable Shelves |
| Certifications | ETL, UL, FCC |
| Item Weight | 16.8 Pounds |
Cutout Dimension Reference (for Recessed Installation)
The following table provides recommended cutout dimensions for various cabinet sizes. For the 24x32 model, refer to the corresponding row.

This image displays a table with recommended width, height, and depth for wall cutouts when installing different sizes of QueenFun medicine cabinets in a recessed manner.
Warranty and Support
For any issues or questions regarding your QueenFun Lighted Medicine Cabinet Mirror, please contact QueenFun customer service. Refer to your purchase documentation for specific warranty details and contact information. We are committed to providing excellent support for our products.