1. Introduction
This manual provides detailed instructions for the installation, setup, and operation of your RODOT Ewelink 30A High Power WiFi Smart Switch. This device is designed to integrate high-power electrical loads into your smart home system, offering remote control, timing functions, and voice control capabilities.
Key Features:
- High Power Support: Equipped with a 30A relay, capable of handling up to 3000W resistive load and 800W inductive load, suitable for water heaters, pumps, and other high-power appliances (110-240V).
- Timing Automation: Supports fixed time, countdown, and cycle timing modes for automated control of connected devices.
- Intelligent Scene Linkage: Create custom smart scenes and group devices for integrated control.
- Remote Control: Manage your devices from anywhere using the eWeLink app on iOS and Android.
- Voice Control: Compatible with Amazon Alexa and Google Assistant for hands-free operation.
2. Important Safety Information
WARNING: Risk of electric shock. Installation should only be performed by qualified personnel. Always disconnect power before installation or maintenance.
- Ensure the main power supply is turned off at the circuit breaker before wiring.
- Verify all wire connections are secure and correct to prevent short circuits or damage.
- Do not exceed the maximum load rating of 30A.
- This device requires a 2.4GHz Wi-Fi network. 5GHz Wi-Fi is not supported.
- Keep the device away from water and high humidity environments.
3. Package Contents
- 1 x RODOT Ewelink 30A High Power WiFi Smart Switch Receiver
- 1 x User Manual
4. Product Overview
The RODOT Ewelink 30A Smart Switch is a compact device designed for high-power applications. It features clear input and output terminals, a Wi-Fi indicator, and a pairing button.

Image 4.1: Front view of the RODOT Ewelink 30A High Power WiFi Smart Switch, showing the Wi-Fi indicator, 'SMART SWITCH' label, Wi-Fi specifications, input/output terminals (L and N), and max load of 30A.
Product Parameters:
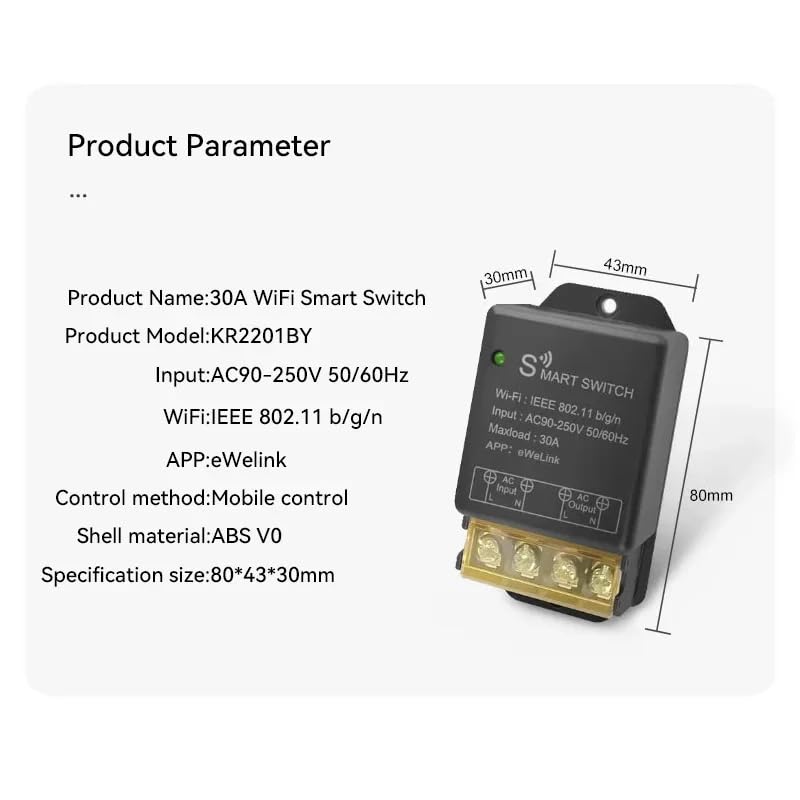
Image 4.2: Diagram illustrating the dimensions and key parameters of the smart switch.
- Product Name: 30A WiFi Smart Switch
- Product Model: KR2201BY
- Input: AC90-250V 50/60Hz
- WiFi: IEEE 802.11 b/g/n
- Maxload: 30A
- APP: eWeLink
- Control Method: Mobile control
- Shell Material: ABS V0
- Specification Size: 80*43*30mm
5. Installation and Setup
5.1 Before Installation
- Ensure your phone is connected to a 2.4GHz Wi-Fi network.
- Your phone system version needs to be Android 5.0/iOS 10 or higher.
- Your router needs to support the 2.4GHz band (5GHz Wi-Fi is not supported).
- Disable MAC address filtering on your router if enabled.
- Always turn off the main power supply before proceeding with wiring.
5.2 Wiring Instructions
Carefully follow the wiring diagrams below. Incorrect wiring can cause damage to the device or connected appliances, and poses a safety risk.

Image 5.1: Basic wiring diagram showing AC input (L and N) connected to the smart switch, and AC output (L and N) connected to a light bulb. Ensure Live (L) and Neutral (N) connections are correct.
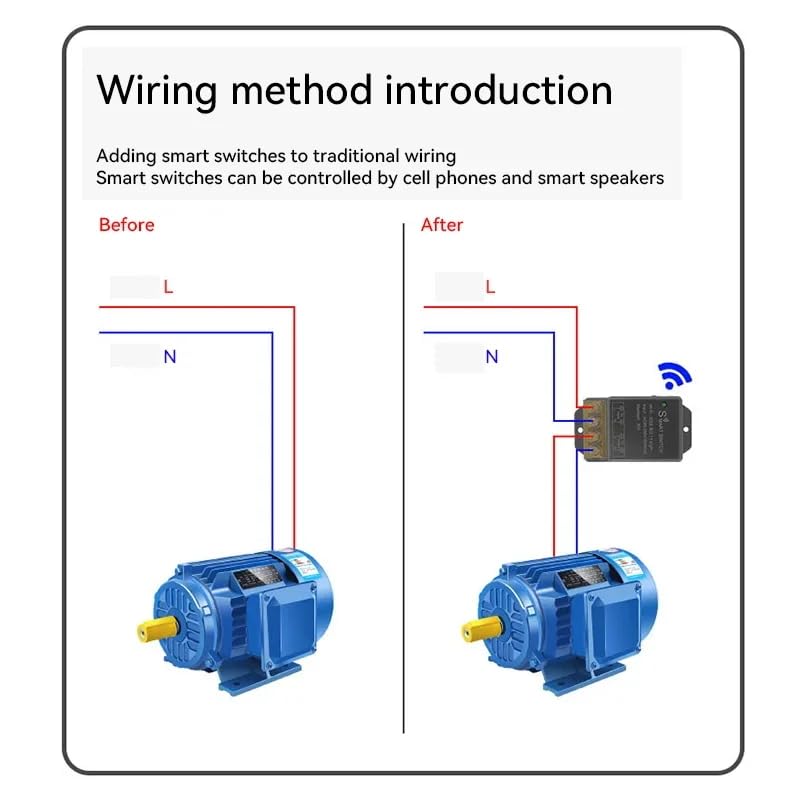
Image 5.2: Illustration of adding the smart switch to a traditional wiring setup for a motor. The smart switch is inserted between the power source and the motor, controlling the Live (L) and Neutral (N) lines.
- Identify the Live (L) and Neutral (N) wires from your AC power source.
- Connect the Live (L) wire from the power source to the 'AC Input L' terminal on the smart switch.
- Connect the Neutral (N) wire from the power source to the 'AC Input N' terminal on the smart switch.
- Connect the Live (L) wire of your appliance (e.g., light, motor) to the 'AC Output L' terminal on the smart switch.
- Connect the Neutral (N) wire of your appliance to the 'AC Output N' terminal on the smart switch.
- Ensure all screw terminals are tightened securely.
5.3 eWeLink App Installation
The eWeLink app is required for controlling your smart switch. You can download it from your device's app store.

Image 5.3: Section of the manual showing eWeLink app download options and initial pairing screen.
- Download the eWeLink app from the App Store (iOS) or Google Play Store (Android). Alternatively, scan the QR code provided in the manual or visit http://app.coolkit.cc/dl.html.
- Register an account and log in to the eWeLink app.
5.4 Device Pairing
After installing the app and wiring the device, you need to pair the smart switch with your eWeLink account.

Image 5.4: Section of the manual detailing compatible pairing mode and RM2.4G remote control pairing.
- Ensure the smart switch is powered on. The Wi-Fi LED indicator should be blinking.
- Open the eWeLink app, tap the '+' icon at the bottom of the screen, and select 'Bluetooth Pairing'.
- The app will automatically scan for nearby devices. Select your device (e.g., 'ck_10015d6292') from the discovered list and tap 'Connect'.
- Confirm the relevant Wi-Fi information, enter your 2.4GHz Wi-Fi password, and tap 'Next'.
- Wait for the device to connect. Once successfully added, you can rename the device and tap 'Complete'.
Compatible Pairing Mode (if Bluetooth Pairing fails):
- Long press the pairing button on the smart switch for 5 seconds until the Wi-Fi LED indicator changes to a cycle of two short flashes and one long flash, then release.
- In the eWeLink app, tap '+' and select 'Compatible Pairing Mode'.
- Select your 2.4GHz Wi-Fi SSID and enter the password.
- Follow the on-screen prompts to complete the pairing process.
6. Operating Your Smart Switch
6.1 Remote Control via eWeLink App
Once paired, you can control your smart switch from anywhere using the eWeLink app.

Image 6.1: Screenshot of the eWeLink app interface showing a device (living room lamp) with an on/off toggle and options for Schedule, Timer, and Loop Timer.
- Open the eWeLink app and select your smart switch from the device list.
- Tap the power icon to turn the connected appliance on or off.
- Monitor the real-time status of your device within the app.
6.2 Timing Functions
The eWeLink app offers various timing options to automate your devices.

Image 6.2: Screenshots of the eWeLink app showing interfaces for Loop Timer, Schedule, and Countdown Timer settings.
- Loop Timer: Set a device to turn on/off repeatedly at specified intervals.
- Schedule: Create fixed schedules for your device to turn on or off at specific times on chosen days.
- Countdown Timer: Set a countdown for the device to turn on or off after a set duration.
6.3 Voice Control
Integrate your smart switch with Amazon Alexa or Google Assistant for convenient voice control.

Image 6.3: Illustration of a user controlling a light with voice commands via a smart speaker, compatible with Amazon Alexa and Google Home.
- Ensure your smart switch is successfully paired with the eWeLink app.
- Open the Amazon Alexa or Google Home app.
- Enable the 'eWeLink Smart Home' skill/service.
- Link your eWeLink account with Alexa/Google Home.
- Discover devices. Your smart switch should appear.
- You can now use voice commands such as:
- "Alexa, turn on [Device Name]"
- "Hey Google, turn off [Device Name]"
7. Maintenance
The RODOT Ewelink Smart Switch requires minimal maintenance.
- Ensure the device is kept in a dry environment, away from direct sunlight and extreme temperatures.
- Periodically check wiring connections to ensure they remain secure.
- Clean the exterior of the device with a soft, dry cloth. Do not use liquid cleaners or solvents.
8. Troubleshooting
If you encounter issues with your smart switch, refer to the following table for common problems and solutions.
| Issue | Possible Cause | Solution |
|---|---|---|
| Device not connecting to Wi-Fi. | Incorrect Wi-Fi band (5GHz), weak signal, incorrect password, MAC filtering. | Ensure your router is broadcasting a 2.4GHz Wi-Fi signal. Check Wi-Fi signal strength near the device. Verify Wi-Fi password. Disable MAC filtering on your router. Try 'Compatible Pairing Mode'. |
| Device not responding to app commands. | No power, device offline, app issue. | Check if the device has power. Verify your phone has internet access. Restart the eWeLink app. Re-pair the device if necessary. |
| Voice control not working. | Skill not enabled, account not linked, incorrect device name. | Ensure 'eWeLink Smart Home' skill is enabled and linked in your Alexa/Google Home app. Try rediscovering devices. Use the exact device name configured in eWeLink. |
| Device remains partially powered off (e.g., lights flicker). | Wiring issue, residual current. | Double-check all wiring connections, especially Live and Neutral. Consult a qualified electrician if the issue persists. |
| eWeLink app trial expired / cloud cost. | Subscription required for certain advanced features. | Contact eWeLink support or check their website for information regarding app features and potential subscription requirements for cloud services. |
9. Product Specifications
| Specification | Value |
|---|---|
| Item Model Number | KR2201BY |
| Operation Mode | Automatic |
| Current Rating | 30000 Milliamps (30A) |
| Operating Voltage | 90-250 Volts AC |
| Contact Type | Normally Open |
| Connector Type | Screw |
| Brand | RODOT |
| Terminal | Screw |
| Circuit Type | 1-way |
| Actuator Type | Push Button |
| Contact Material | Copper |
| Package Dimensions | 4.41 x 3.27 x 1.46 inches |
| Weight | 3.21 ounces |
10. Warranty and Customer Support
For warranty information, technical support, or any inquiries regarding your RODOT Ewelink 30A High Power WiFi Smart Switch, please contact the manufacturer or your retailer. Refer to the product packaging or purchase documentation for specific contact details.


