Introduction
This manual provides essential information for the installation, operation, maintenance, and troubleshooting of your GSPUSA replacement dishwasher detergent dispenser. This dispenser is designed to be compatible with various Kenmore dishwasher models, replacing original part numbers W10195172, W10195173, W10195174, and CKD195174X. Please read these instructions carefully before proceeding with installation or use to ensure proper function and safety.
Important Safety Information
- Disconnect Power: Always disconnect power to the dishwasher at the circuit breaker or fuse box before attempting any installation, repair, or maintenance. Failure to do so can result in electric shock or injury.
- Wear Protective Gear: Use appropriate personal protective equipment, such as gloves, to prevent injury during installation.
- Professional Assistance: If you are unsure about any step of the installation process, consult a qualified appliance technician.
- Original Appliance Manual: Refer to your dishwasher's original instruction manual for specific disassembly and reassembly procedures, as these can vary by model.
Product Overview
The GSPUSA replacement detergent dispenser is a crucial component for your dishwasher, responsible for releasing detergent and rinse aid at the appropriate times during a wash cycle. This unit is manufactured to meet original equipment specifications, ensuring a reliable fit and performance for compatible Kenmore models.

Image: The GSPUSA dishwasher detergent dispenser in its closed position, ready for installation or use. It features a gray housing with a red dial for rinse aid adjustment and a main detergent compartment door.

Image: The GSPUSA dishwasher detergent dispenser with its main wash compartment door open. Visible compartments include 'MAIN WASH' and 'PRE-WASH', along with the rinse aid reservoir and its 'Full' and 'Add' indicators. The text 'RINSE AID IMPROVES DRYING' is also visible.
Model Compatibility
IMPORTANT: This part is NOT universal. It is crucial to compare your existing part or dishwasher model number before ordering to ensure compatibility and avoid incorrect fitment.
To determine if this dispenser is compatible with your dishwasher, locate your dishwasher's model number. This number is typically found:
- Inside the dishwasher door frame.
- On the tub sidewalls.
- Behind the bottom kick plate.
- Some models may also have it on the top or side edges of the door.
If you cannot find the model number, consult your dishwasher's user manual or purchase documents.
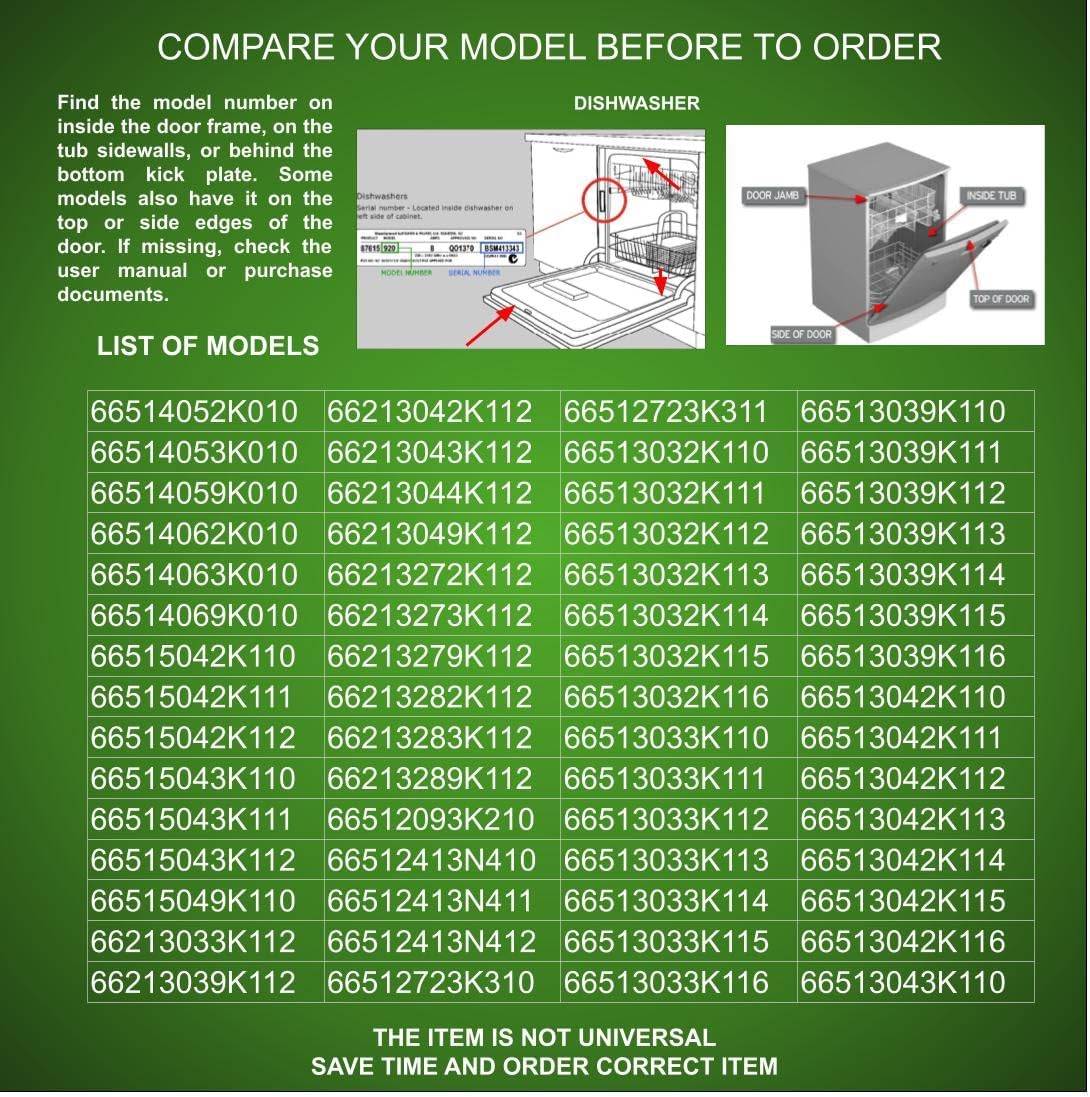
Image: A diagram illustrating common locations for a dishwasher's model number (door jamb, inside tub, top/side of door). Below the diagram is a partial list of compatible Kenmore dishwasher model numbers, including 66513123K702, 66513102K900, WDT770PAYM0, and others.

Image: A continuation of the list of compatible Kenmore dishwasher model numbers, featuring models such as 66513139K701, 66513113K700, WDT710PAYE2, and many more.

Image: A further continuation of the list of compatible Kenmore dishwasher model numbers, including models like 66514052K010, 66213042K112, 66512723K311, and others.
Visual Comparison:
Even if your model number is listed, it is recommended to visually compare your old dispenser with the images provided, paying close attention to connectors, size, and internal components. Minor variations can exist between seemingly similar parts.

Image: A side-by-side comparison showing a 'CORRECT' dispenser on the left and an 'INCORRECT - WRONG ITEM - NOT FITS' dispenser on the right. Red circles highlight subtle differences in the latch mechanism and the shape of the main wash compartment, emphasizing the need for careful visual comparison.

Image: A comparison illustrating that dispensers can have the 'SAME OUTSIDE DIFFERENT INSIDE and SIZE'. Two dispenser units are shown, with red circles highlighting differences in connectors, size, and voltage requirements, reinforcing that external appearance alone is not sufficient for compatibility.
Setup and Installation
Replacing a dishwasher detergent dispenser typically involves accessing the inner door panel of your dishwasher. The exact steps may vary by dishwasher model. Always refer to your dishwasher's service manual for detailed instructions.
General Installation Steps:
- Disconnect Power: Ensure the dishwasher's power supply is completely disconnected.
- Access Door Panel: Open the dishwasher door and remove the screws securing the inner door panel. Carefully separate the inner and outer door panels.
- Disconnect Wiring: Locate the existing detergent dispenser. Disconnect any electrical wiring harnesses connected to the dispenser. Take a photo before disconnecting to aid reassembly.
- Remove Old Dispenser: Unclip or unscrew the old dispenser from the door panel. Note how it is seated and sealed.
- Install New Dispenser: Carefully insert the new GSPUSA dispenser into the opening, ensuring it seats correctly and forms a proper seal.
- Reconnect Wiring: Reconnect the electrical wiring harnesses to the new dispenser.
- Reassemble Door: Reattach the inner door panel to the outer door panel, securing all screws.
- Restore Power: Once fully reassembled, restore power to the dishwasher.
- Test Functionality: Run a short wash cycle without dishes to check for proper dispenser operation and any leaks.
Operating Instructions
Once installed, operating the detergent dispenser is straightforward and integrated with your dishwasher's normal use.
Loading Detergent:
- Main Wash Compartment: Open the dispenser door. Add the recommended amount of powdered, liquid, or gel dishwasher detergent to the large 'MAIN WASH' compartment. Close the dispenser door firmly until it latches.
- Pre-Wash Compartment: If your dishwasher cycle includes a pre-wash, add a small amount of detergent to the 'PRE-WASH' compartment. This compartment typically does not have a separate door and is designed for a smaller dose.
Adding Rinse Aid:
- Locate Rinse Aid Dispenser: The rinse aid dispenser is usually located next to the detergent compartments and has a cap or dial.
- Fill Rinse Aid: Twist or pull open the rinse aid cap. Carefully pour liquid rinse aid into the reservoir until the indicator shows 'Full'. Avoid overfilling.
- Adjust Rinse Aid Release (if applicable): Some dispensers have an adjustable dial to control the amount of rinse aid released per cycle. Adjust according to water hardness and desired drying performance.
- Close Cap: Securely close the rinse aid cap.
The dispenser will automatically open during the wash cycle to release detergent and rinse aid at the appropriate times.
Maintenance
Regular maintenance helps ensure the longevity and proper function of your detergent dispenser.
- Clean Regularly: Periodically wipe down the dispenser compartments and surrounding areas with a damp cloth to remove any detergent residue or buildup.
- Check for Clogs: Ensure the dispenser opening and rinse aid nozzle are free from obstructions. Hard water deposits or undissolved detergent can sometimes cause blockages.
- Inspect Seals: Check the rubber seals around the dispenser door for any signs of wear, cracking, or damage that could lead to leaks.
- Use Quality Detergent: Using high-quality dishwasher detergent and rinse aid can prevent residue buildup and improve dispenser performance.
Troubleshooting
If you encounter issues with your detergent dispenser, consider the following common problems and solutions:
Dispenser Door Not Opening:
- Obstruction: Ensure no dishes or utensils are blocking the dispenser door from opening.
- Detergent Buildup: Clean any hardened detergent residue around the latch mechanism that might prevent it from releasing.
- Electrical Issue: If the dispenser is not receiving power, it may not open. Check wiring connections and consult your dishwasher's service manual for electrical diagnostics.
Detergent Not Dispensing/Dissolving:
- Water Temperature: Ensure your dishwasher is receiving hot water. Cold water can prevent detergent from dissolving properly.
- Overfilling: Do not overfill the detergent compartment, as this can prevent the door from opening or the detergent from dissolving.
- Old Detergent: Detergent can clump if it's old or exposed to moisture. Use fresh detergent.
- Water Spray Arms: Check that the dishwasher's spray arms are not clogged and are rotating freely, ensuring water reaches the dispenser.
Rinse Aid Not Dispensing:
- Empty Reservoir: Check if the rinse aid reservoir is empty and refill if necessary.
- Clogged Nozzle: Inspect the rinse aid nozzle for any clogs or residue.
- Setting: Ensure the rinse aid release setting (if adjustable) is not set to minimum or off.
For more complex issues or if troubleshooting steps do not resolve the problem, it is recommended to consult a professional appliance repair technician.
Specifications
| Feature | Specification |
|---|---|
| Brand | GSPUSA |
| Model Numbers | W10195172, W10195173, W10195174, CKD195174X |
| Compatible With | Various Kenmore Dishwasher Models (refer to compatibility list) |
| Material | Plastic |
| Item Weight | Approximately 1 pound (16 ounces) |
| Product Dimensions | Approximately 6 x 4 x 4 inches |
| Included Components | Detergent Dispenser |
Warranty and Support
This GSPUSA replacement part is manufactured to high standards. Each item is tested before shipment to ensure functionality.

Image: A composite image illustrating quality control measures. It shows a hand turning a dial on an appliance (representing testing), a 'WARRANTY SEAL' with 'ORIGINAL AUTHENTIC GENUINE' text, and packages being weighed on scales, indicating certified weight and size for shipping.
The product includes a warranty seal and a unique serial tag for authenticity and tracking purposes. Do not remove the warranty seal from the item.

Image: A close-up of a 'SAMPLE UNIQUE SERIAL TAG', a golden holographic sticker with repeating 'ORIGINAL AUTHENTIC GENUINE' text and a unique serial number (e.g., '0259088'). Below it, a pattern of 'VOID' text is visible, indicating what appears if the seal is tampered with.
For specific warranty details or technical support, please contact GSPUSA directly through their official channels or the retailer from whom the product was purchased. When contacting support, please have your product model number and any unique serial numbers available.