1. Important Safety Information
Before operating your URLIFE E20 Electric Bicycle, please read this manual thoroughly. Failure to follow safety instructions can result in serious injury or property damage. Always wear a helmet and appropriate safety gear when riding.
- Pre-Ride Check: Always inspect your bicycle before each ride. Check tire pressure, brake function, battery charge, and ensure all bolts and quick releases are securely fastened.
- Local Regulations: Be aware of and comply with all local laws and regulations regarding electric bicycles in your area.
- Weather Conditions: Exercise caution when riding in wet conditions. Braking distance may increase, and traction may be reduced.
- Weight Limit: Do not exceed the maximum recommended load of 120 kg (265 lbs).
- Age Range: This electric bicycle is designed for adult use.
2. Package Contents
Your URLIFE E20 Electric Bicycle package includes the following items:
- URLIFE E20 Electric Bicycle (partially assembled)
- 48V 13Ah Removable Battery
- Battery Charger
- Tool Kit
- Keys (for battery lock)
- Pedals (Left and Right)
- Front Fender
- Rear Rack
- Seat and Seat Post
- Front Headlight
- Rear Taillight
- Front Reflector
- Bell
- User Manual
3. Assembly Instructions
The URLIFE E20 Electric Bicycle requires some assembly. Please follow these steps carefully. A detailed assembly video is also provided for visual guidance.
3.1. Assembly Video Guide
Video: Step-by-step assembly instructions for the URLIFE E20 Electric Bicycle.
3.2. Unpacking and Initial Setup
- Carefully remove the bicycle and all components from the packaging. Remove all protective wrapping and zip ties.
- Identify all parts as listed in Section 2.
3.3. Handlebar Installation
- Loosen the bolts on the handlebar stem using the provided wrench.
- Insert the handlebar into the stem, ensuring it is centered and aligned.
- Tighten the stem bolts securely.
3.4. Front Fender and Headlight Installation
- Attach the front fender to the front fork using the provided bolts and wrench.
- Mount the front headlight onto the fender bracket and secure it.
3.5. Front Wheel Installation
- Remove the protective cap from the front fork.
- Align the front wheel with the fork dropouts, ensuring the brake rotor slides correctly into the caliper.
- Insert the quick-release skewer through the wheel hub and tighten it securely.
3.6. Rear Rack and Taillight Installation
- Attach the rear rack to the designated mounting points on the bicycle frame using the provided bolts and wrench.
- Mount the rear taillight onto the rear rack and secure it.
3.7. Seat and Seat Post Installation
- Attach the seat to the seat post clamp. Adjust the angle and position as desired, then tighten the bolts.
- Insert the seat post into the bicycle's seat tube. Adjust to a comfortable height and secure with the quick-release lever. Ensure the minimum insertion mark is not visible.
3.8. Pedal Installation
Note: Pedals are marked 'L' for Left and 'R' for Right. The Left pedal has a reverse thread.
- Apply a small amount of grease to the pedal threads.
- Install the 'L' pedal onto the left crank arm by turning counter-clockwise. Tighten with a wrench.
- Install the 'R' pedal onto the right crank arm by turning clockwise. Tighten with a wrench.
3.9. Reflector and Bell Installation
- Attach the front reflector to the handlebar.
- Mount the bell on the handlebar in an easily accessible position.
3.10. Gas Pedal (Throttle) Installation (if applicable)
If your model includes a separate gas pedal (throttle), attach it to the handlebar and connect the corresponding cable. Ensure it is securely fastened and does not interfere with braking or gear shifting.
4. Setup and First Use
4.1. Initial Battery Charge
Before your first ride, fully charge the battery. This ensures optimal battery life and performance.
- Locate the charging port on the battery.
- Connect the charger to the battery, then plug the charger into a power outlet.
- The indicator light on the charger will show charging status (usually red for charging, green for full).
- Charging typically takes 3-5 hours. Do not overcharge.

Image: Detailed view of the 48V 13Ah removable battery, highlighting its features like BMS safety protection, travel range, fast charging, and IP54 waterproof rating.
4.2. Adjusting Seat Height
Proper seat height is crucial for comfort and pedaling efficiency. Adjust the seat so that your leg is slightly bent at the knee when the pedal is at its lowest point.
- Open the quick-release lever on the seat post clamp.
- Raise or lower the seat post to the desired height. Ensure the minimum insertion mark on the seat post remains inside the frame.
- Close the quick-release lever firmly to secure the seat post.
5. Operating Instructions
Familiarize yourself with the controls and functions of your URLIFE E20 Electric Bicycle before riding.
5.1. Powering On/Off
- Insert the key into the battery lock and turn it to the 'ON' position.
- Press and hold the power button on the LCD display to turn on the system.
- To power off, press and hold the power button on the LCD display. Turn the key to 'OFF' and remove it for security.
5.2. LCD Display Functions
The colorful HD LCD display provides essential riding information:
- Battery Indicator: Shows remaining battery charge.
- Speed Mode: Displays current speed (MPH or KM/H).
- PAS Level: Indicates the current Pedal-Assist System level (0-3 or 0-5, depending on model).
- Numerical Display: Shows trip distance, odometer, and other data.

Image: Close-up of the URLIFE E20's colorful HD LCD display on the ergonomic handlebar, showing various ride metrics.
5.3. Riding Modes
The URLIFE E20 offers multiple riding modes:
- Pedal-Assist Mode: The motor provides assistance as you pedal. Adjust the assistance level using the controls on the handlebar.
- Pure Electric Mode (Throttle): If equipped, use the throttle to engage the motor without pedaling.
- Sport Mode (Manual): Ride the bicycle like a traditional bike without motor assistance.
5.4. Gear Shifting
The 7-speed transmission allows you to adapt to various terrains and riding conditions.
- Use the shifter on the handlebar to change gears.
- Shift to lower gears for climbing hills and higher gears for flat terrain or downhill riding.
- Shift smoothly and avoid changing multiple gears at once.
5.5. Braking System
The URLIFE E20 is equipped with reliable disc brakes for effective stopping power.
- The left lever controls the front brake, and the right lever controls the rear brake.
- Apply both brakes simultaneously for optimal stopping performance. Avoid sudden, hard braking, especially the front brake, to prevent skidding.

Image: Detail of the front suspension and disc brake system on the URLIFE E20, designed for a comfortable and controlled ride.
5.6. Lights
The integrated LED headlight and rear reflector ensure visibility.
- Turn on the headlight using the control button on the handlebar or LCD display.
- Ensure the rear reflector is clean and visible at all times.

Image: A composite image showcasing the front and rear lights, ergonomic handlebar, step-through frame, and sturdy rear rack of the URLIFE E20, emphasizing safety and comfort.
6. Maintenance
Regular maintenance will prolong the life of your URLIFE E20 Electric Bicycle and ensure safe operation.
6.1. Battery Care
- Charge the battery regularly, even if not in use, to maintain its health.
- Store the battery in a cool, dry place, away from direct sunlight and extreme temperatures.
- Avoid completely draining the battery.
6.2. Tire Maintenance
The 20x3 inch fat tires provide stability and grip across various terrains.
- Check tire pressure before each ride. Refer to the tire sidewall for recommended PSI.
- Inspect tires for wear, cuts, or punctures.

Image: A detailed view of the 20x3 inch fat tire, emphasizing its robust construction and versatility for various terrains, including city roads, soil, sand, and snow.
6.3. Brake System
- Regularly check brake pads for wear and replace them when necessary.
- Ensure brake levers are firm and responsive. Adjust cable tension if needed.
6.4. Chain and Drivetrain
- Keep the chain clean and lubricated to ensure smooth gear changes and prevent rust.
- Inspect gears and derailleur for proper alignment and function.
6.5. General Cleaning
- Clean the bicycle regularly with a damp cloth. Avoid using high-pressure washers directly on electrical components.
- Do not immerse the bicycle in water.
7. Troubleshooting
Here are some common issues and their potential solutions:
| Problem | Possible Cause | Solution |
|---|---|---|
| Bicycle does not power on | Battery not charged, battery not properly seated, key not in 'ON' position, loose connections. | Charge battery, ensure battery is fully inserted, turn key to 'ON', check all cable connections. |
| Motor not assisting | PAS level is 0, loose motor cable, brake lever engaged. | Increase PAS level on display, check motor cable connection, ensure brake levers are fully released. |
| Brakes feel weak | Worn brake pads, loose brake cable, air in hydraulic system (if applicable). | Inspect and replace brake pads, adjust brake cable tension, consult a professional for hydraulic brake issues. |
| Unusual noises during ride | Loose components, dry chain, misaligned gears. | Check all bolts and fasteners, lubricate chain, adjust derailleur. |
If you encounter issues not listed here or cannot resolve a problem, please contact URLIFE customer support.
8. Specifications
| Feature | Specification |
|---|---|
| Brand | URLIFE |
| Model Number | E20 |
| Motor Power | 250W Brushless Motor |
| Battery | 48V 13Ah Removable Lithium Battery (624 Wh) |
| Max Speed | 25 KM/H |
| Max Range | 80-100 KM (Pedal-Assist Mode) |
| Charging Time | 3-5 Hours |
| Wheel Size | 20 Inches (20*3" Fat Tires) |
| Gears | 7-Speed Transmission |
| Brakes | Dual Disc Brakes |
| Suspension | Front Fork Suspension |
| Frame Material | Carbon Steel |
| Display | Colorful HD LCD Display |
| Max Load Capacity | 120 Kilograms |
| Product Weight | 29 Kilograms |
| Dimensions (L*W*H) | 1630*730*1120MM |
| Special Features | Adjustable Seat, Multi-speeds, Digital Display, Rear Rack |
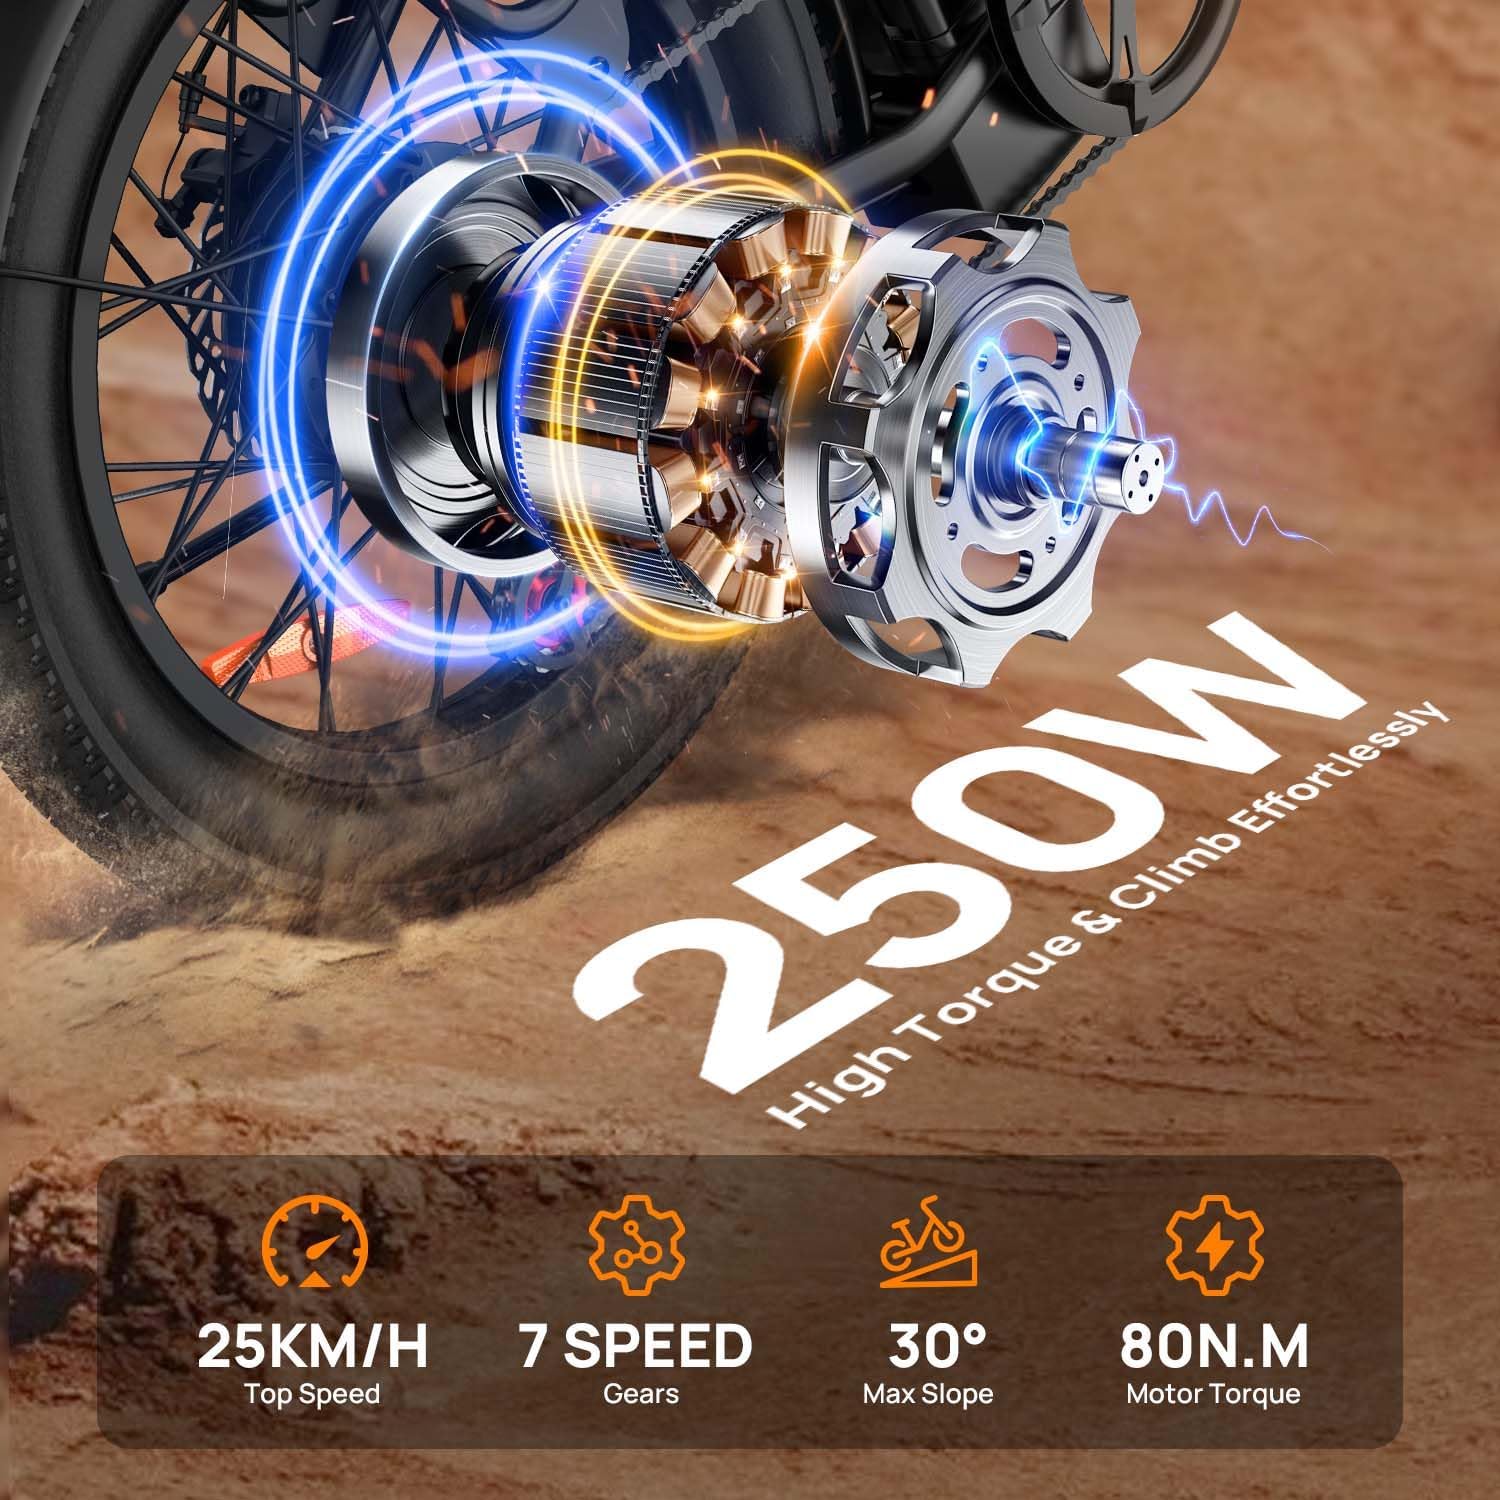
Image: Detailed view of the 250W brushless motor integrated into the rear wheel, showcasing its power and performance metrics.

Image: A comprehensive size diagram of the URLIFE E20 Electric Bicycle, indicating key measurements and recommended user specifications.
9. Warranty and Support
9.1. Warranty Information
The URLIFE E20 Electric Bicycle comes with a one-year warranty from the date of purchase. This warranty covers manufacturing defects in materials and workmanship. It does not cover damage due to misuse, accidents, normal wear and tear, or unauthorized modifications.
9.2. Customer Support
For any questions, repair needs, spare parts, or assembly assistance, please do not hesitate to contact URLIFE customer support. We aim to respond within 24 hours and provide effective solutions.
Contact Information: Please refer to your purchase documentation or the official URLIFE website for the most up-to-date customer service contact details.