moseiny HU-NOWPLA31
moseiny Double Din Car Radio Instruction Manual
For Ford Fusion Mondeo (2013-2016) - Model HU-NOWPLA31
1. Introduction
This manual provides detailed instructions for the installation, setup, and operation of your moseiny Double Din Car Radio, Model HU-NOWPLA31, designed specifically for Ford Fusion and Mondeo models from 2013 to 2016. Please read this manual thoroughly before installation and use to ensure proper functionality and safety.
2. Product Overview
The moseiny Double Din Car Radio is an advanced head unit featuring a 9-inch touch screen, Wireless CarPlay, Android Auto, GPS Navigation, Bluetooth, and WiFi connectivity. It enhances your driving experience with modern infotainment capabilities.
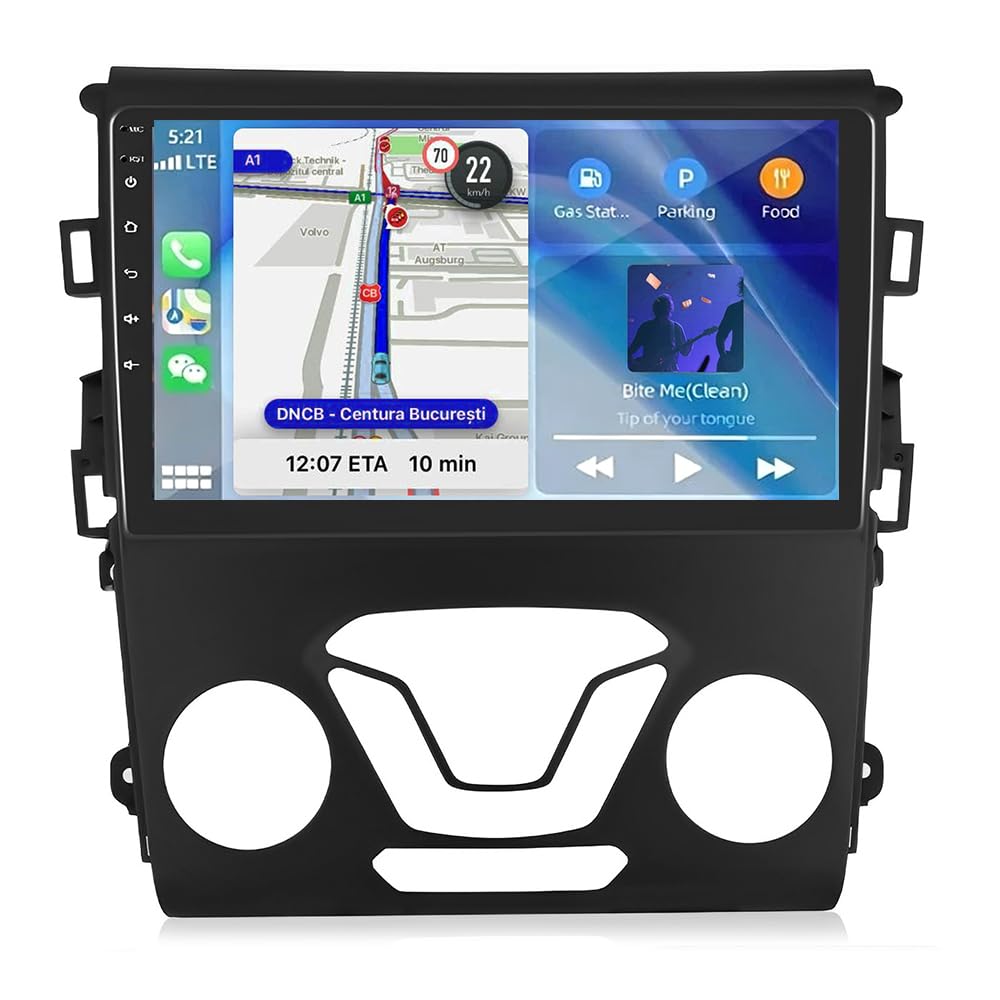
Image: The moseiny Double Din Car Radio installed in a Ford Fusion/Mondeo dashboard, showcasing its 9-inch touch screen interface.
3. Vehicle Compatibility
This head unit is compatible with Ford Fusion and Mondeo models manufactured between 2013 and 2016. Important: This unit is not plug-and-play and requires wire cutting for installation. Please ensure your vehicle's center control matches the compatible configuration shown below.

Image: Visual guide for checking vehicle center control compatibility. Image A shows a compatible dashboard, while Image B shows an incompatible one.

Image: Illustration showing compatibility with manual air conditioning systems (top) and incompatibility with automatic air conditioning systems (bottom) for 2013 Mondeo 1.5L 180 models.
4. What's in the Box
Upon unpacking, please verify that all the following components are included:
- 1 x Car MP5 Player
- 1 x Power Cable
- 1 x GPS Antenna
- 1 x AHD Backup Camera
- 1 x RCA Input and Output Cable
- 1 x External Microphone
- 2 x USB Cables
- 1 x Instruction Manual (this document)

Image: A visual representation of all components included in the product package, such as the head unit, wiring harnesses, GPS antenna, backup camera, and microphone.
5. Installation Guide
Installation requires careful attention to wiring and component placement. It is recommended that installation be performed by a qualified professional. Note: This is NOT plug and play; wire cutting is required.
- Remove Original Unit: Carefully remove the four screws securing the original car radio unit.
- Display Line Extension: Extend the display line as needed for the new unit.
- Load Chassis and Accessories: Install the original chassis and any necessary accessories onto the new head unit.
- Connect Wiring and Install Radiator Fin: After connecting all necessary wiring, install the radiator fin. Ensure all connections are secure before reassembling the dashboard.
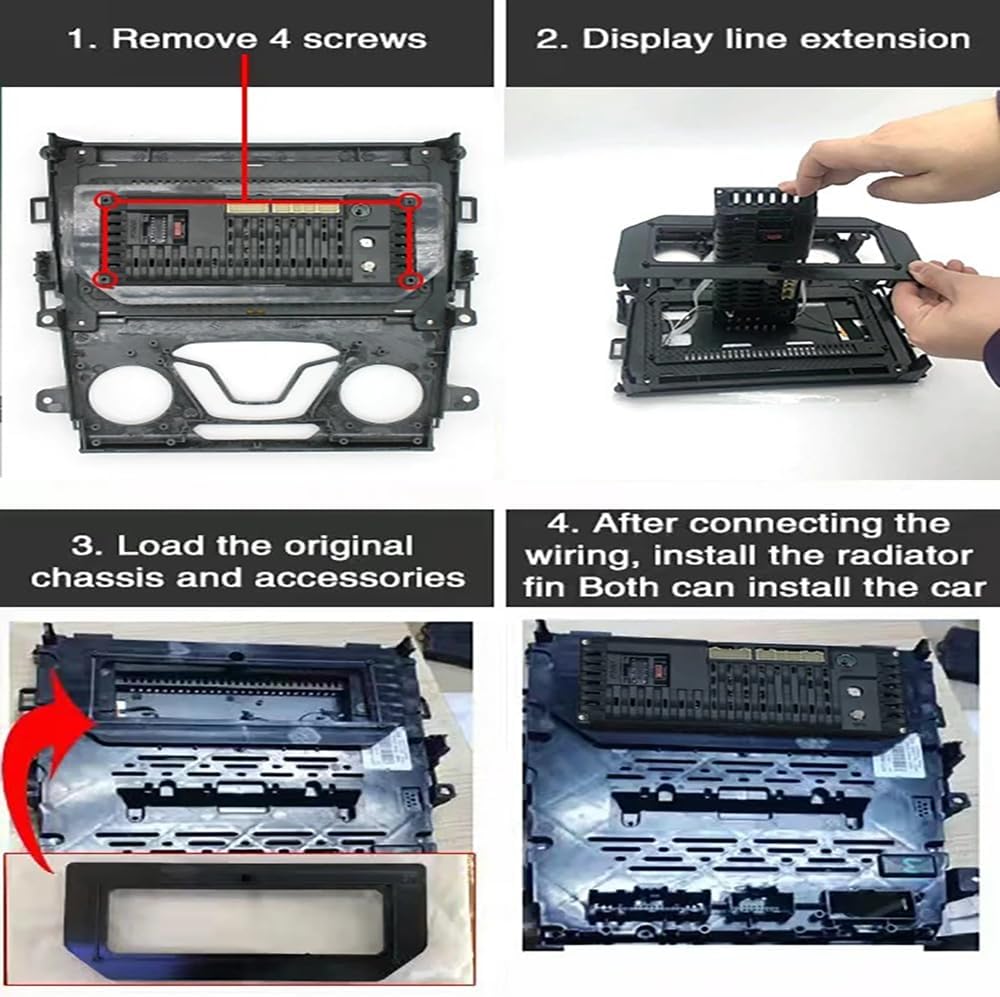
Image: Four-panel illustration detailing the installation steps: 1. Removing screws, 2. Display line extension, 3. Loading chassis and accessories, 4. Connecting wiring and installing the radiator fin.
6. Setup and Connections
6.1. Bluetooth Connection
To connect your smartphone via Bluetooth for calls and audio streaming:
- On the car radio, navigate to the Bluetooth settings.
- On your smartphone, enable Bluetooth and search for available devices.
- Select "CarBT" from the list of devices on your phone.
- Enter the PIN "0000" when prompted on your phone.
- Once paired, the car radio will display "phone audio, music audio" indicating a successful connection. If not, restart Bluetooth on both devices.
6.2. ZLINK Connection (Wireless CarPlay/Android Auto)
ZLINK facilitates Wireless CarPlay and Android Auto. Ensure your phone's Bluetooth is connected first.
- From the car radio's main menu, tap on the "Apps" icon, then select "ZLINK".
- The ZLINK interface will show "Waiting" or "Connecting".
- If the connection is not successful, you may need to manually connect to the car radio's WiFi hotspot.
6.3. Manual WiFi Connection (if ZLINK fails)
If ZLINK does not connect automatically, manually connect your phone to the car radio's WiFi hotspot:
- On the car radio, go to "Settings" > "Android Settings" > "Network & Internet" > "Hotspot & tethering" > "Wi-Fi hotspot".
- Note the "Network name" (e.g., AndroidAP_B442) and "Password".
- On your smartphone, go to WiFi settings, find the car radio's hotspot name, and connect using the password.
- Once connected, the device name will appear under "Connected users" on the car radio's WiFi hotspot settings.
- After manually connecting to the WiFi, delete the history record of the WiFi connection on the car radio, then click ZLINK again. The second connection should automatically connect successfully via Bluetooth.
Video: This video demonstrates how to connect your smartphone to the moseiny car radio via Bluetooth and ZLINK for Wireless CarPlay/Android Auto, including steps for manual WiFi connection if the initial ZLINK connection is unsuccessful.
7. Operating Instructions
7.1. Wireless CarPlay & Android Auto
Once connected via ZLINK, you can access navigation, music, messaging, and other compatible apps directly from the head unit's touch screen. Voice assistant functionality is supported for hands-free operation.
7.2. GPS Navigation
The unit comes with built-in GPS navigation. You can use pre-installed maps or download your preferred navigation apps via WiFi.
7.3. Bluetooth Functionality
Make and receive phone calls hands-free and stream music from your smartphone directly to the head unit after successful Bluetooth pairing.
7.4. Steering Wheel Control (SWC)
Utilize your vehicle's existing steering wheel buttons to control audio functions, calls, and navigation for convenience and safety. Refer to the car settings for SWC configuration.

Image: Diagram illustrating how steering wheel controls can be used to adjust music, calls, and navigation without taking hands off the wheel.
7.5. Backup Camera
The included AHD backup camera provides clear reversing images, assisting with parking, especially at night. The display automatically switches to the camera feed when reversing.

Image: A visual of the backup camera display, highlighting features like dynamic trajectory lines, waterproof design, and a 140-degree viewing angle for parking assistance.
7.6. Split Screen Function
The split-screen feature allows you to run two applications simultaneously on the 9-inch display, such as navigation and music playback.

Image: An example of the split-screen function, displaying a navigation app on one side and a music player on the other.
7.7. WiFi Connectivity
Connect to a WiFi hotspot to access online features, download apps, stream content, and update software.

Image: The WiFi connection screen, showing various applications that can be accessed online, such as navigation, streaming services, and social media.
8. Specifications
| Feature | Detail |
|---|---|
| Model Number | HU-NOWPLA31 |
| Operating System | Android 14 |
| CPU | 4-core |
| Display Size | 9 inches |
| Touch Screen Type | HD Capacitive, 2.5D Tempered Glass |
| Connectivity | Bluetooth, USB, Wi-Fi |
| Special Features | Wireless CarPlay, Android Auto, Mirrorlink, GPS Navigation, SWC, AHD Backup Camera, Split Screen, FM RDS |
| Audio Output Mode | Stereo |
| Item Weight | 4.63 pounds (2100 Grams) |
| Product Dimensions | 16.14 x 12.6 x 5.51 inches |
9. Troubleshooting
If you encounter issues with your moseiny car radio, please refer to the following common solutions:
- No Power: Check all power connections and fuses. Ensure the wiring is correctly installed as per the installation guide.
- Bluetooth/ZLINK Connection Issues:
- Ensure Bluetooth is enabled on both the head unit and your smartphone.
- Try restarting Bluetooth on both devices.
- If ZLINK fails, follow the manual WiFi connection steps outlined in Section 6.3.
- Delete previous pairing records on both devices and attempt to reconnect.
- No Sound: Verify speaker connections. Check audio settings on the head unit.
- GPS Signal Loss: Ensure the GPS antenna is properly installed and has a clear view of the sky.
- Touch Screen Unresponsive: Try restarting the unit. If the issue persists, contact customer support.
For further assistance, please contact moseiny customer support.
10. Warranty and Support
Your moseiny Double Din Car Radio comes with a standard manufacturer's warranty. Please retain your proof of purchase for warranty claims. For technical support, service, or warranty inquiries, please refer to the contact information provided with your purchase or visit the official moseiny website.
Ask a question about this manual
Ask about setup, troubleshooting, compatibility, parts, safety, or missing instructions. Manuals+ will review the question and use this page’s manual context to help answer it.