1. Introduction
This manual provides detailed instructions for the installation, operation, and maintenance of your XTRONS Android 14 Car Stereo GPS, model XTRONS FREELANDER 2. This unit is specifically designed for Land Rover Freelander 2 vehicles manufactured between 2007 and 2012. Please read this manual thoroughly before using the product to ensure proper functionality and to prevent damage.
2. Safety Information
- Professional Installation Recommended: Due to the complexity of car electrical systems, professional installation is highly recommended to avoid damage to the unit or your vehicle.
- Power Supply: Ensure the unit is connected to a 12V DC power supply with negative grounding.
- Wiring: Do not modify or cut any wires unless explicitly instructed. Incorrect wiring can cause damage or fire.
- Driving Safety: Do not operate the unit's complex functions or watch videos while driving. Always prioritize road safety.
- Temperature: Avoid exposing the unit to extreme temperatures or direct sunlight for prolonged periods.
- Moisture: Keep the unit away from water and excessive moisture.
3. Package Contents
Please check the contents of your package against the list below:
- XTRONS Car Stereo Unit
- Wiring Harnesses
- GPS Antenna
- USB Cables
- External Microphone
- User Manual (this document)
- Remote Control (if included)

Figure 3.1: Included components in the XTRONS car stereo package.
4. Product Overview
The XTRONS Android 14 Car Stereo GPS is an advanced infotainment system designed to seamlessly integrate with your Land Rover Freelander 2. It features a powerful Octa-Core CPU, 4GB RAM, and 64GB ROM for smooth performance. Key features include:
- Android 14 Operating System
- Built-in Apple CarPlay and Android Auto (Wireless support)
- Integrated GPS Navigation with GLONASS support
- Wi-Fi and 4G connectivity (SIM slot included)
- Bluetooth 5.0 for hands-free calling and audio streaming
- Digital Sound Processor (DSP) for enhanced audio
- Support for original steering wheel controls
- Multiple UI options
- IPS Display for wide viewing angles
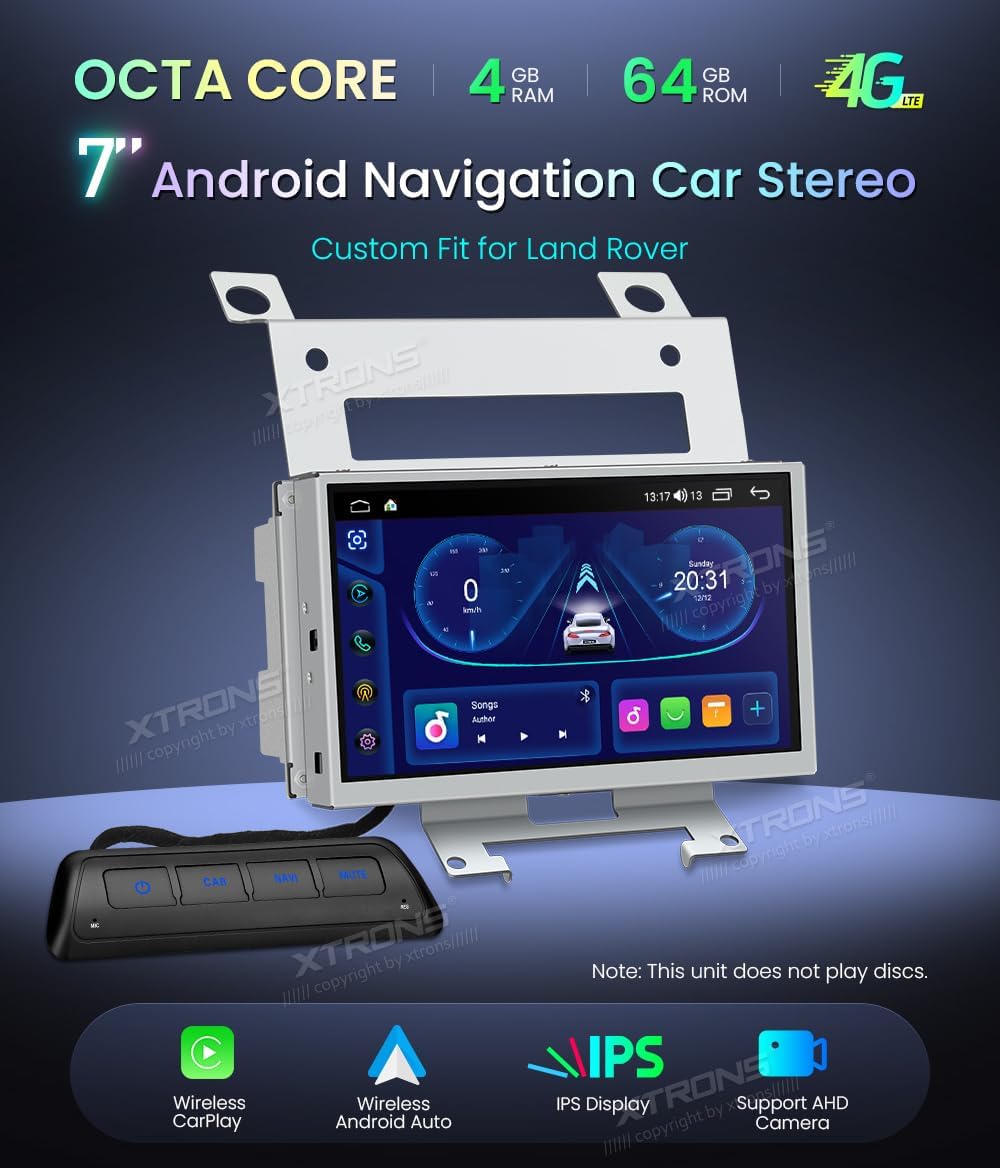
Figure 4.1: XTRONS Car Stereo Unit with key features.

Figure 4.2: Unit installed in a Land Rover Freelander 2 dashboard.
5. Setup and Installation
5.1 Pre-Installation Checks
- Ensure your vehicle is a Land Rover Freelander 2 (2007-2012).
- Disconnect the vehicle's battery before starting installation.
- Verify all package contents are present.
5.2 Installation Steps
- Remove Original Unit: Carefully remove the existing car stereo and trim panels from your dashboard. Refer to your vehicle's service manual for specific instructions.
- Connect Wiring Harnesses: Connect the provided wiring harnesses to the vehicle's existing connectors. Ensure all connections are secure. The XTRONS unit relies on the original radio, which remains installed and functional.
- Connect Peripherals: Connect the GPS antenna, USB cables, and external microphone to the corresponding ports on the XTRONS unit. Position the GPS antenna in a location with a clear view of the sky.
- Mount the Unit: Securely mount the XTRONS unit into the dashboard opening using the provided brackets.
- Reconnect Battery: Once all connections are made and secured, reconnect the vehicle's battery.
- Initial Power-On: Turn on your vehicle's ignition and power on the XTRONS unit. Follow any on-screen prompts for initial setup.

Figure 5.1: Before and After installation comparison.
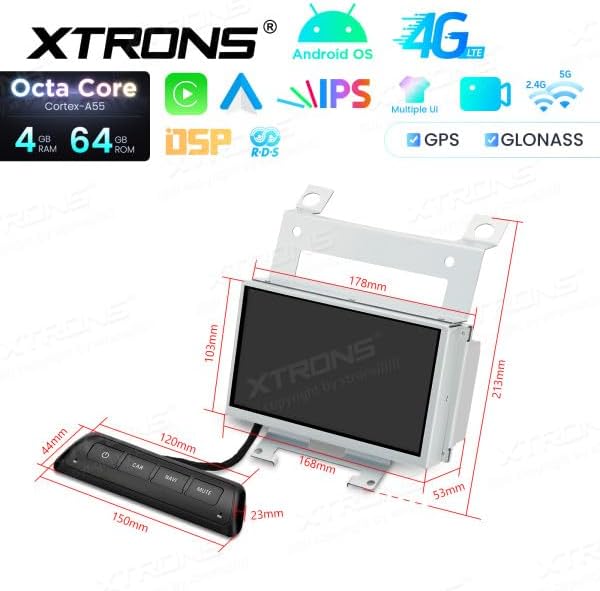
Figure 5.2: Unit dimensions and remote control.
6. Operating Instructions
6.1 User Interface Navigation
The unit features a responsive touchscreen display. Swipe left or right to navigate between home screens, tap icons to open applications, and use the top bar for quick settings and notifications.
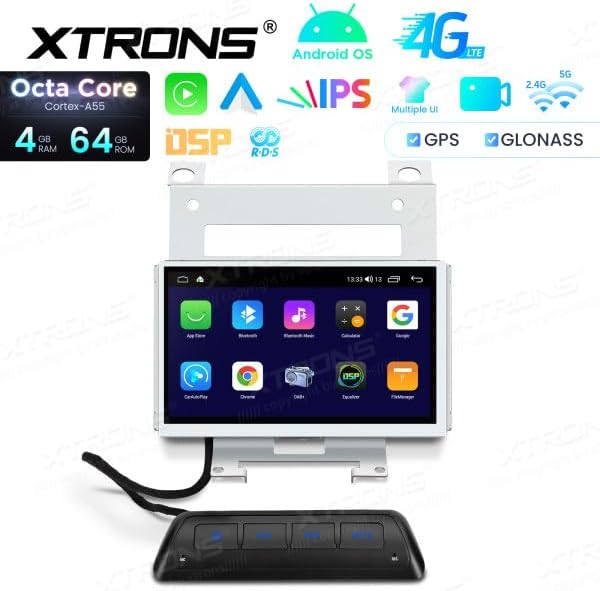
Figure 6.1: Android UI example.
6.2 Apple CarPlay & Android Auto
The unit supports both wireless Apple CarPlay and Android Auto. Connect your compatible smartphone via Bluetooth and Wi-Fi, or a USB cable, to access navigation, music, messages, and more directly on the car stereo display.

Figure 6.2: Apple CarPlay interface.

Figure 6.3: Android Auto interface.
6.3 Bluetooth Connectivity
Pair your mobile phone via Bluetooth for hands-free calling and audio streaming. Go to the Bluetooth settings on the unit, enable Bluetooth, and search for your phone. Follow the pairing instructions on both devices.
6.4 Wi-Fi and 4G Connectivity
Connect to a Wi-Fi hotspot or insert a 4G SIM card into the designated slot to enable internet access. This allows for online navigation, app downloads, and streaming services.
6.5 GPS Navigation
The built-in GPS module provides accurate navigation. Ensure the GPS antenna is properly installed and has a clear view of the sky for optimal signal reception. You can use pre-installed navigation apps or download others from the app store.
6.6 Media Playback
Connect USB drives to the provided USB ports to play audio and video files. The unit supports various formats. Use the built-in media player application to browse and play your content.
6.7 Steering Wheel Controls
The unit supports your vehicle's original steering wheel controls. After installation, you may need to configure these controls in the unit's settings menu to match your vehicle's functions.
6.8 Optional Accessories
The XTRONS unit supports various optional accessories (not included in the standard package):
- DVR Camera: Connect an optional DVR camera for recording driving footage.
- DAB+ Box: Enhance your radio experience with digital audio broadcasting by connecting an optional DAB+ box.
- TPMS Kit: Monitor your tire pressure with an optional TPMS (Tire Pressure Monitoring System) kit.
7. Maintenance
7.1 Cleaning the Unit
Use a soft, dry cloth to clean the display and exterior of the unit. For stubborn smudges, slightly dampen the cloth with water. Avoid using harsh chemicals or abrasive materials, as they can damage the screen or finish.
7.2 Software Updates
Periodically check the XTRONS official website or contact customer support for available software updates. Keeping your unit's software up-to-date ensures optimal performance, new features, and bug fixes. Follow the provided instructions carefully when performing updates.
8. Troubleshooting
If you encounter issues with your XTRONS car stereo, refer to the following common problems and solutions:
- No Power:
- Check all power connections and fuses.
- Ensure the vehicle's battery is charged.
- No Sound:
- Verify speaker connections.
- Check volume levels and mute settings.
- Ensure the correct audio source is selected.
- GPS Signal Loss:
- Ensure the GPS antenna is properly connected and positioned with a clear view of the sky.
- Move the vehicle to an open area away from tall buildings or dense foliage.
- Bluetooth Connection Issues:
- Ensure Bluetooth is enabled on both the unit and your phone.
- Delete previous pairings and try reconnecting.
- Restart both devices.
- Touchscreen Unresponsive:
- Restart the unit.
- Ensure the screen is clean and free of debris.
If the problem persists, please contact XTRONS customer support for further assistance.
9. Specifications
| Feature | Specification |
|---|---|
| Brand | XTRONS |
| Model Number | XTRONS FREELANDER 2 |
| Operating System | Android 14 |
| RAM | 4 GB |
| ROM | 64 GB |
| CPU | Octa-Core |
| Connectivity Technology | Wi-Fi, Bluetooth, 4G, USB |
| Special Features | Android Auto, Apple CarPlay (Wireless) |
| Compatible Devices | Smartphone |
| Total HDMI Ports | 1 |
| Connector Type | USB, Wi-Fi |
| Audio Output Mode | Stereo, Surround |
| Surround Sound Channel Configuration | 5.1 |
| Video Encoding | H.264, H.265/HEVC |
| Output Power | 180 Watts |
| Number of Channels | 2 |
| Internet Application | CarPlay, Android Auto |
| Control Method | Touch |
| Audio Output Type | Bluetooth, Headphone, Speaker |
| Smart Home Compatibility | Not smart home compatible |
| Color | Black |
| ASIN | B0F9YV3YDD |
10. Warranty and Support
For warranty information, technical support, or service inquiries, please refer to the warranty card included with your product or visit the official XTRONS website. Keep your purchase receipt as proof of purchase.