1. Introduction
Thank you for choosing the DEKOPRO 700W Electric Paint Sprayer, Model DKSG70K1. This manual provides essential information for the safe and efficient use of your paint sprayer. Please read all instructions carefully before initial operation to ensure proper setup, usage, and maintenance. This sprayer is designed for various painting projects, including furniture, cabinets, fences, walls, and more.

Image 1.1: The DEKOPRO 700W Electric Paint Sprayer, highlighting its 800ml container, 700W motor, 3 spraying patterns, easy cleaning, and flexible flow control.
2. Safety Information
Important Safety Precautions:
- Always wear appropriate safety gear, including gloves and eye protection, when operating the paint sprayer.
- Keep the sprayer away from heat sources and open flames.
- Never point the sprayer at people or animals.
- Always follow the manufacturer's instructions for proper use, maintenance, and disposal of paint and cleaning solutions.
- Never use the sprayer with flammable materials or solvents that are incompatible with the sprayer's components.
- In case of accidental contact with skin or eyes, rinse immediately with plenty of water and seek medical advice if necessary.
- Ensure adequate ventilation in your work area to prevent inhalation of paint fumes.
3. Package Contents
Verify that all items are present in your package:
- Paint sprayer gun ×1
- Brass nozzles ×4 (1.3mm, 1.8mm, 2.0mm, 2.5mm)
- Filters ×5
- Viscosity cup ×1
- Unclogging needle ×1
- Cleaning brush ×1
- User manual ×1
- Adjustable strap ×1
- Spanner ×1

Image 3.1: Visual representation of all items included in the DEKOPRO paint sprayer package, such as the sprayer, nozzles, viscosity cup, and cleaning tools.
4. Product Overview
Familiarize yourself with the main components of your DEKOPRO paint sprayer:
- Union Nut: Secures the air cap and spray nozzles.
- Air Cap: Directs the airflow for spray pattern formation.
- Spray Nozzles: Interchangeable nozzles for different spray widths and paint viscosities.
- Jog Wheel: Adjusts the spray pattern orientation.
- Trigger Switch: Activates the sprayer.
- Flow Control Knob: Regulates the paint output volume.
- Connecting Latch: Secures the paint container to the sprayer body.
- Paint Container: Holds the paint material (800ml capacity).

Image 4.1: Detailed diagram illustrating the various parts of the DEKOPRO paint sprayer, including the union nut, air cap, nozzles, and paint container.
5. Setup
5.1 Assembly
- Ensure the paint container is empty and clean.
- Attach the paint container to the sprayer body, ensuring the connecting latch is securely fastened.
- Select the appropriate nozzle for your paint and project (refer to Section 5.3). Insert the nozzle into the sprayer head.
- Place the air cap over the nozzle and secure it with the union nut, tightening firmly but not excessively.

Image 5.1: Visual guide for assembling and disassembling the paint sprayer components, emphasizing the tool-free snap-fit structure.
5.2 Paint Preparation and Viscosity Testing
Proper paint viscosity is crucial for optimal spraying results and to prevent clogging. Always dilute paint according to the paint manufacturer's recommendations and test viscosity using the provided cup.
- Stir the paint thoroughly.
- Fill the viscosity cup with paint.
- Measure the time it takes for the paint to completely flow out of the cup.
- If the flow time exceeds the recommended range (see table below), dilute the paint with the appropriate thinner (water for latex, mineral spirits for oil-based, etc.) and re-test.
- Repeat until the desired viscosity is achieved.

Image 5.2: Viscosity testing guidelines table, providing recommended flow times in seconds for various paint types like solvent-based primer, water-based paint, and latex paint.
5.3 Nozzle Selection
The sprayer includes four brass nozzles, each suitable for different paint viscosities and project types:
- 1.3mm Nozzle (10-30 DINs): Ideal for thin materials like stains, sealers, and varnishes, suitable for wood tables and chairs.
- 1.8mm Nozzle (30-40 DINs): Suitable for medium-viscosity paints, such as enamels, for shutters, cabinets, and wooden toys.
- 2.0mm Nozzle (40-70 DINs): For thicker paints like latex and chalk paint, recommended for railings and multi-frame windows.
- 2.5mm Nozzle (70-100 DINs): Best for very thick materials, including some latex paints, for internal walls and wooden piles.

Image 5.3: Guide to selecting the correct nozzle size (1.3mm, 1.8mm, 2.0mm, 2.5mm) based on paint viscosity and application, with examples like wood furniture, cabinets, and walls.
6. Operating Instructions
6.1 Filling the Paint Container
- After diluting and testing the paint, pour it into the 800ml paint container.
- Do not overfill. Ensure the container is securely attached to the sprayer body.
6.2 Adjusting Spray Patterns
The sprayer offers three adjustable spray patterns: horizontal, vertical, and circular. Rotate the air cap to switch between patterns:
- Horizontal (180°): For spraying wider surfaces, moving the sprayer up and down.
- Vertical (90°): For spraying taller surfaces, moving the sprayer side to side.
- Circular (45°): For small areas, corners, or intricate details.

Image 6.1: Visual guide demonstrating how to achieve circular, vertical, and horizontal spray patterns by adjusting the sprayer's air cap.
6.3 Adjusting Flow Control
The flow control knob allows you to regulate the paint output, from 0ml/min to 1000ml/min, for optimal coverage and to minimize waste.
- Turn the flow control knob clockwise to increase paint output.
- Turn the flow control knob counter-clockwise to decrease paint output.
- Test on a scrap piece of material to find the ideal setting for your project.
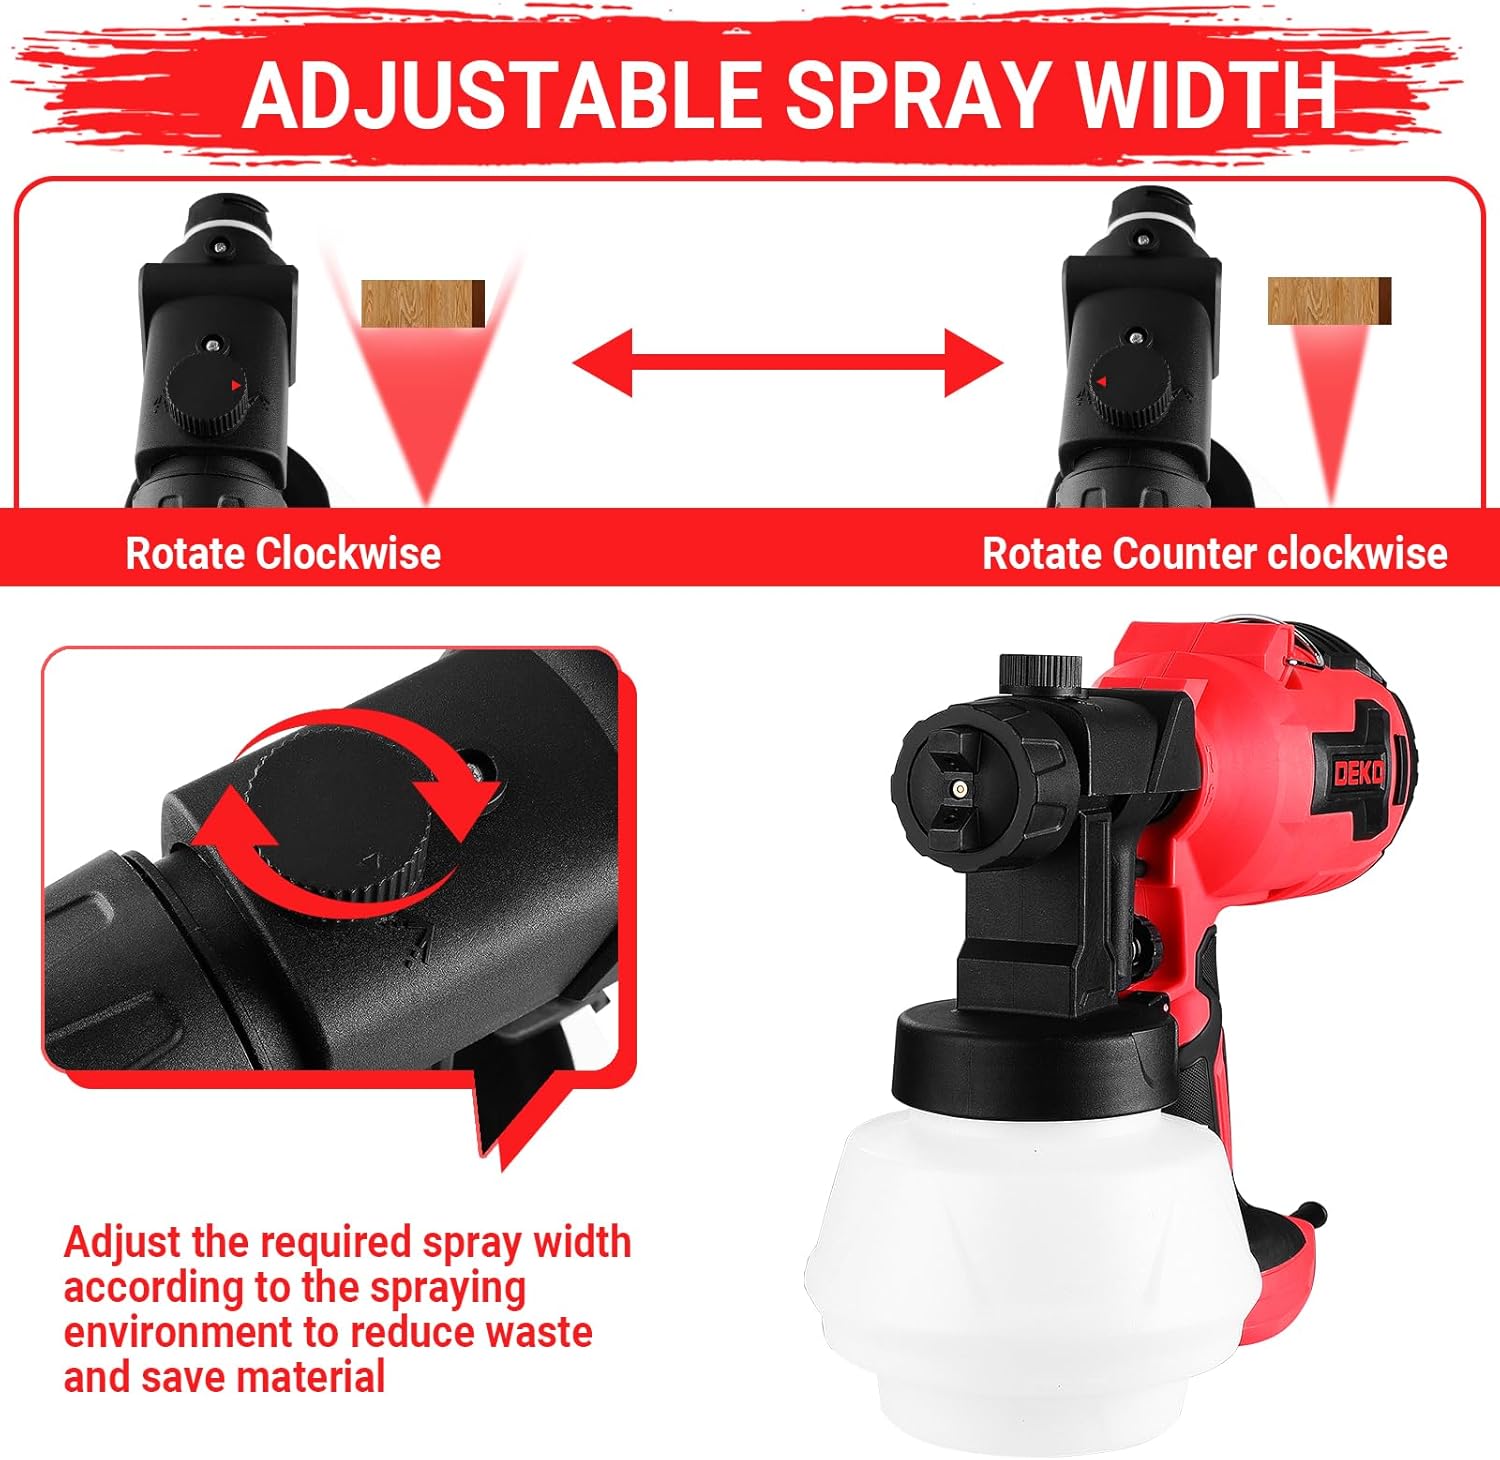
Image 6.2: Illustration of the flow control knob, demonstrating how to adjust paint output from 0ml/min to 1000ml/min for precise application.
6.4 Spraying Technique
- Hold the sprayer approximately 6-12 inches (15-30 cm) from the surface.
- Maintain a consistent distance and speed for even coverage.
- Overlap each pass by about 50% to avoid streaks.
- Release the trigger at the end of each pass to prevent paint buildup.
7. Maintenance and Cleaning
Thorough cleaning after each use is essential to extend the lifespan of your paint sprayer and ensure consistent performance.
- Empty Container: Disconnect the paint container and empty any remaining paint back into its original can.
- Initial Rinse: Add a small amount of appropriate cleaning solution (water for water-based paints, mineral spirits for oil-based paints) to the container.
- Spray Cleaning Solution: Reattach the container and spray the cleaning solution through the sprayer into a waste container until clear.
- Disassemble: Unplug the sprayer. Disassemble the air cap, nozzle, and paint container.
- Thorough Cleaning: Use the provided cleaning brush and unclogging needle to clean all components, especially the nozzle and air cap, removing all paint residue. Rinse thoroughly with clean water.
- Dry Components: Allow all parts to dry completely before reassembling or storing.
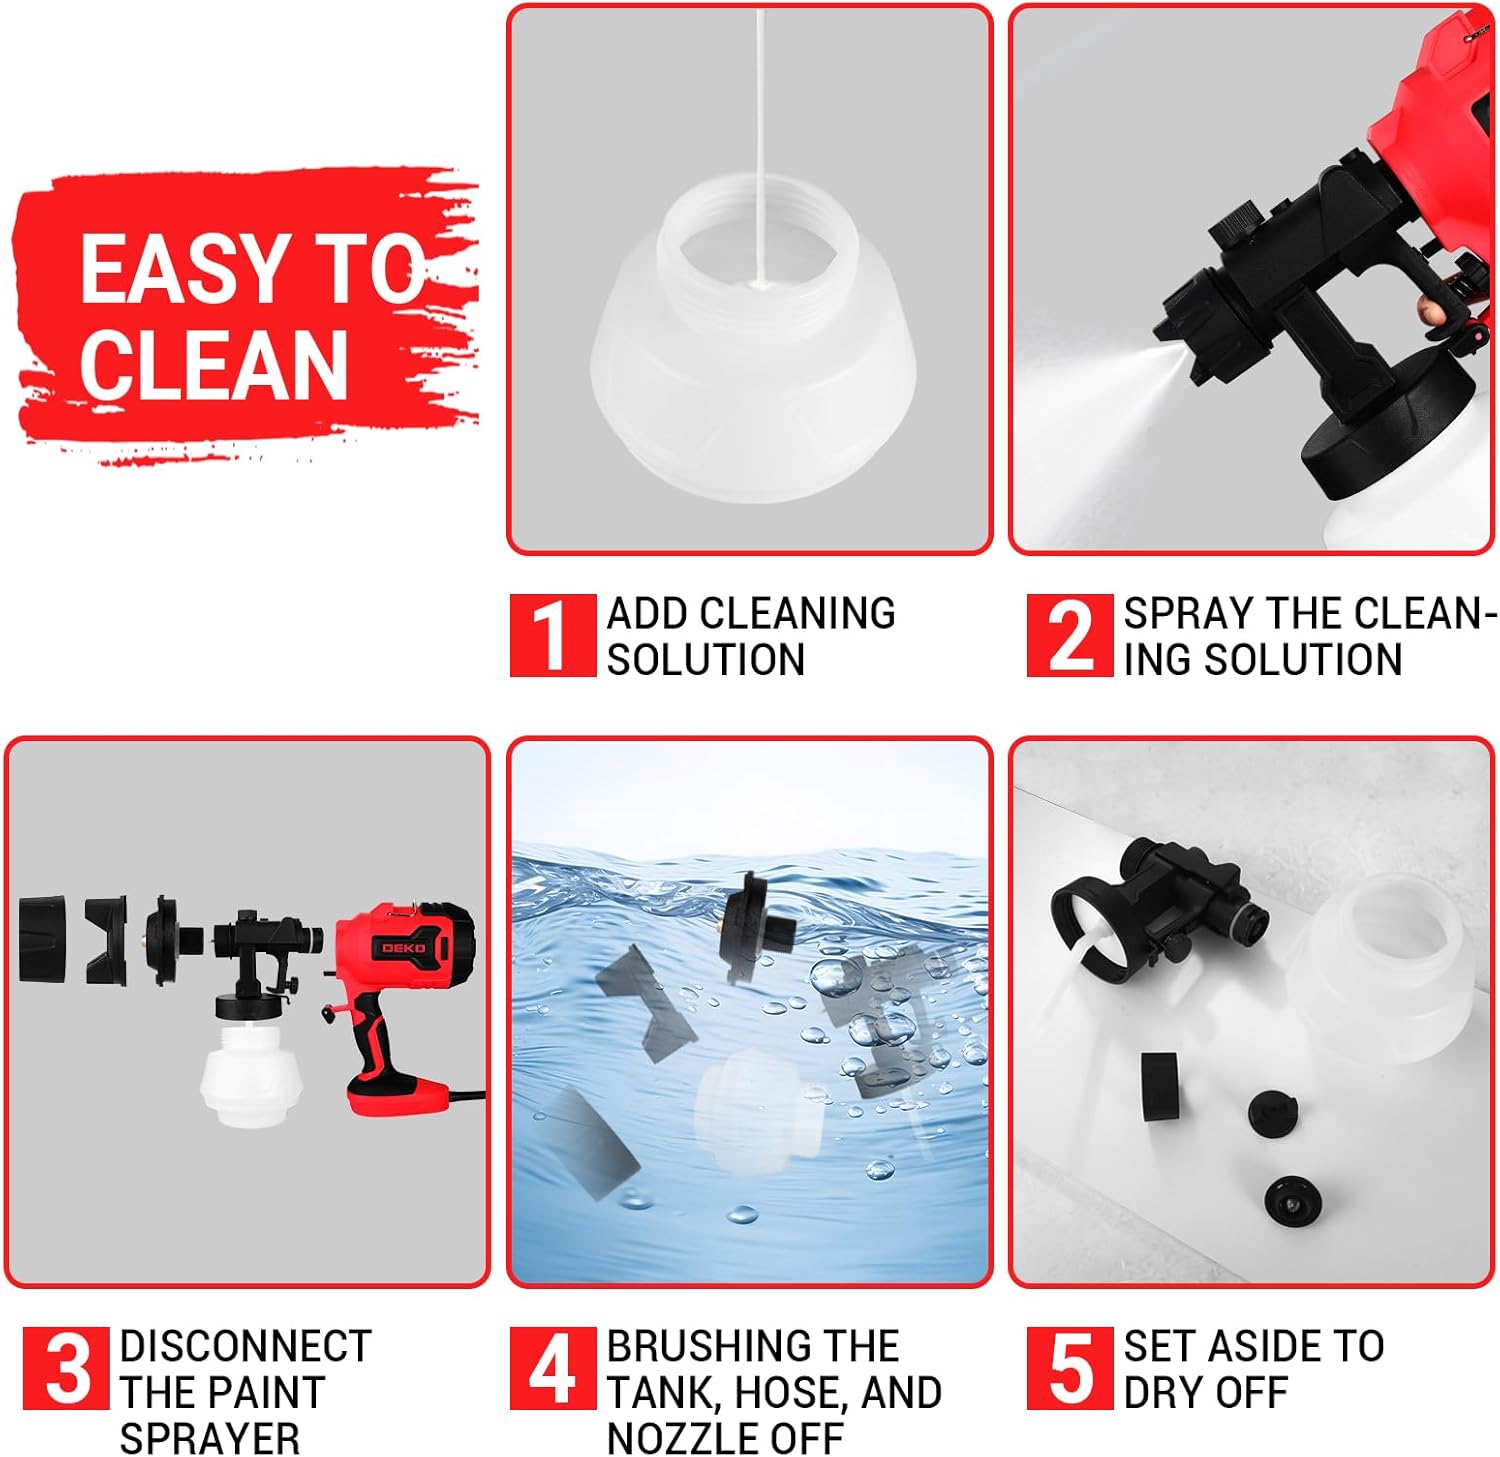
Image 7.1: Visual instructions for cleaning the paint sprayer, including adding cleaning solution, spraying it out, disassembling, brushing parts, and drying.
8. Troubleshooting
Refer to this section for common issues and their solutions:
| Problem | Possible Cause | Solution |
|---|---|---|
| No spray or weak spray | Nozzle clogged; paint too thick; air cap blocked; low paint level. | Clean nozzle and air cap; dilute paint to correct viscosity; refill paint container. |
| Uneven spray pattern | Nozzle partially clogged; incorrect air cap adjustment; inconsistent spraying distance. | Clean nozzle; adjust air cap for desired pattern; maintain consistent distance and speed. |
| Paint leaking | Union nut loose; paint container not seated correctly; damaged seal. | Tighten union nut; ensure paint container is securely latched; inspect seals for damage. |
| Sprayer not turning on | No power; faulty switch. | Check power connection; ensure switch is fully engaged. If problem persists, contact support. |
9. Specifications
Technical specifications for the DEKOPRO 700W Electric Paint Sprayer (Model DKSG70K1):
- Brand: DEKOPRO
- Model Name: DKSG70K1
- Power: 700W
- Tank Volume: 800 Milliliters
- Nozzle Sizes: 1.3mm, 1.8mm, 2.0mm, 2.5mm (Brass)
- Max Viscosity: 100-DIN
- Spray Patterns: Horizontal, Vertical, Circular
- Flow Control: Adjustable (0-1000ml/min)
- Power Source: AC
- Material: Metal, Plastic
- Item Weight: Approximately 4 Pounds (1.81 kg)
- Product Dimensions: 10.9"W x 12.2"H (27.7cm W x 31cm H)
10. Warranty and Support
For warranty information and customer support, please refer to the warranty card included with your product or visit the official DEKOPRO website. Keep your purchase receipt as proof of purchase for any warranty claims.