1. Introduction
This instruction manual provides essential information for the proper setup, operation, and maintenance of your Generic UPA USB Programmer V1.3. This device is designed for advanced automotive electronic applications, specifically for ECU chip tuning and other OBD2 related tasks. Please read this manual thoroughly before using the device to ensure safe and effective operation.
2. Product Overview
The UPA USB Programmer V1.3 is a versatile tool for reading and writing data to various microcontrollers and EEPROMs found in automotive ECUs. It connects to a computer via USB and utilizes specialized software for its functions. The system includes a main programming unit and a comprehensive set of adapters to support a wide range of components.
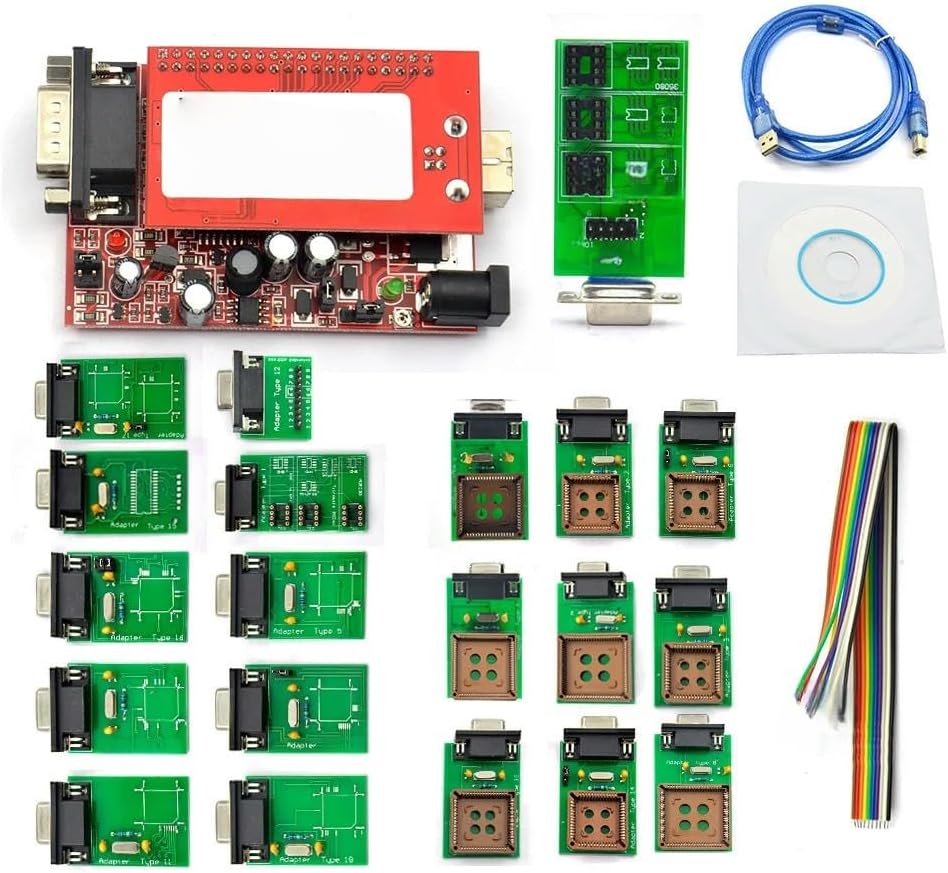
Figure 2.1: Complete UPA USB Programmer V1.3 Kit. This image displays the main red programming unit, a variety of green circuit board adapters for different chip types, a blue USB cable for computer connection, and a software installation CD. Also visible is a multi-colored ribbon cable and a small green adapter board with chip sockets.
3. Package Contents
Verify that all items listed below are present in your package:
- 1x UPA USB Programmer V1.3 Main Unit
- 1x USB Cable
- 1x Software CD
- Multiple Adapters (various types for different chip packages)
- 1x Ribbon Cable (for specific connections)
4. Setup
- Software Installation: Insert the provided software CD into your computer's optical drive. Follow the on-screen instructions to install the UPA USB Programmer software and necessary drivers. Ensure your operating system is compatible with the software.
- Connect Main Unit: Connect one end of the USB cable to the UPA USB Programmer V1.3 main unit and the other end to an available USB port on your computer.
- Driver Verification: After connecting, verify that the drivers are correctly installed. You can usually check this in your computer's Device Manager.
- Adapter Selection: Identify the correct adapter for the specific chip you intend to program. Refer to the software documentation or chip datasheet for guidance on adapter compatibility.
- Adapter Connection: Carefully connect the selected adapter to the main programming unit. Ensure a secure and correct orientation.
Note: Always ensure the device is disconnected from any power source or vehicle before connecting or disconnecting adapters or chips to prevent damage.
5. Operating Instructions
Operating the UPA USB Programmer V1.3 requires familiarity with automotive electronics and the specific software. The following are general steps; always consult the software's help documentation for detailed, chip-specific instructions.
- Launch Software: Open the UPA USB Programmer software on your computer.
- Select Chip Type: Within the software, select the specific microcontroller or EEPROM type you are working with. This step is crucial for correct operation.
- Connect Chip: Carefully place the chip into the appropriate socket on the selected adapter. Ensure correct pin orientation. Some chips may require soldering to the adapter.
- Read Data: Use the software's "Read" function to extract data from the chip. Save the data to a secure location on your computer.
- Modify Data (if applicable): If performing chip tuning or data modification, use appropriate tools to edit the extracted data. Exercise extreme caution during this step, as incorrect modifications can render the ECU inoperable.
- Write Data: Use the software's "Write" function to program the modified or new data back onto the chip. Verify the writing process is successful.
- Verify Data: After writing, it is recommended to perform another "Read" operation and compare the data to ensure it was written correctly.
- Disconnect: Safely remove the chip from the adapter and disconnect the programmer from your computer.
Warning: Incorrect use of this device can lead to permanent damage to automotive electronic control units (ECUs) or other components. Proceed with caution and ensure you have adequate knowledge and experience.
6. Maintenance
- Cleaning: Keep the main unit and adapters clean and free from dust and debris. Use a soft, dry cloth for cleaning. Avoid liquid cleaners.
- Storage: Store the programmer and its adapters in a dry, cool place, away from direct sunlight and extreme temperatures. Use the original packaging or a protective case to prevent physical damage.
- Cable Care: Do not bend or crimp the USB cable excessively. Inspect cables regularly for signs of wear or damage.
- Software Updates: Periodically check for software and driver updates from the manufacturer or vendor to ensure optimal performance and compatibility with new chip types.
7. Troubleshooting
- Device Not Recognized:
- Ensure the USB cable is securely connected to both the programmer and the computer.
- Try a different USB port on your computer.
- Reinstall the USB drivers from the provided software CD or the latest version from the manufacturer's website.
- Restart your computer.
- Software Errors:
- Ensure you are running the latest version of the software.
- Verify that your operating system meets the software's minimum requirements.
- Run the software as an administrator (on Windows).
- Failed Read/Write Operations:
- Confirm that the correct chip type is selected in the software.
- Ensure the chip is correctly seated in the adapter and that the adapter is securely connected to the main unit.
- Check for bent or damaged pins on the chip or adapter.
- Verify that the chip is receiving adequate power (if external power is required for the specific chip).
8. Specifications
| Feature | Detail |
|---|---|
| Brand | Generic |
| Model Number | 772629435838 |
| ASIN | B0F9Y661XS |
| First Available Date | May 27, 2025 |
9. Warranty and Support
Specific warranty terms and direct manufacturer support contact information are not provided in the product details. For any issues or inquiries, please contact the seller or retailer from whom you purchased this product. Retain your proof of purchase for any warranty claims that may be applicable through the seller.