1. Introduction
Welcome to the user manual for your Jumplushion GD01 E-Bike LCD Display Monitor. This manual provides detailed instructions for the installation, operation, maintenance, and troubleshooting of your display. Please read this manual thoroughly before using the product to ensure proper function and safety. This display is designed for use with 24V, 36V, and 48V E-bike systems and is specifically compatible with JN controllers.

Image 1.1: The GD01 E-Bike LCD Display Monitor in an outdoor setting, demonstrating its intended use with an electric bicycle.
2. Safety Information
- Always read and understand this manual before installation and operation.
- Professional installation is recommended to ensure correct wiring and functionality.
- Ensure all connections are secure and properly sealed to prevent water ingress, despite the display's waterproof design.
- Do not attempt to open or modify the display unit, as this may void the warranty and cause damage.
- Keep the display clean and free from obstructions to maintain clear visibility.
- This display is designed for electric bicycles. Do not use it for other applications.
3. Package Contents
Verify that all items are present in your package:
- 1 x Jumplushion GD01 LCD Display
4. Product Overview
The Jumplushion GD01 is an advanced LCD display monitor for electric bicycles, offering comprehensive functionality and a durable design. It features a clear screen for real-time data and intuitive controls.
4.1 Key Features
- Waterproof Design: Advanced construction protects internal circuitry from moisture, ensuring reliable performance in various weather conditions.
- Multi-Voltage Compatibility: Works seamlessly with 24V, 36V, and 48V E-bike systems.
- Comprehensive Functionality: Displays real-time speed, distance tracking (km/miles), smart battery monitoring, and headlight control.
- Adjustable Backlight: Three levels of backlight brightness for optimal visibility in different lighting conditions.
- Secure Compatibility: Specifically designed for use with JN controllers.
4.2 Display Components
The GD01 display consists of the main LCD unit, control buttons, and a waterproof connector cable.

Image 4.1: Overview of the GD01 display unit, showing the screen, control buttons (+, M, -), and the integrated cable with its green 5-pin connector.
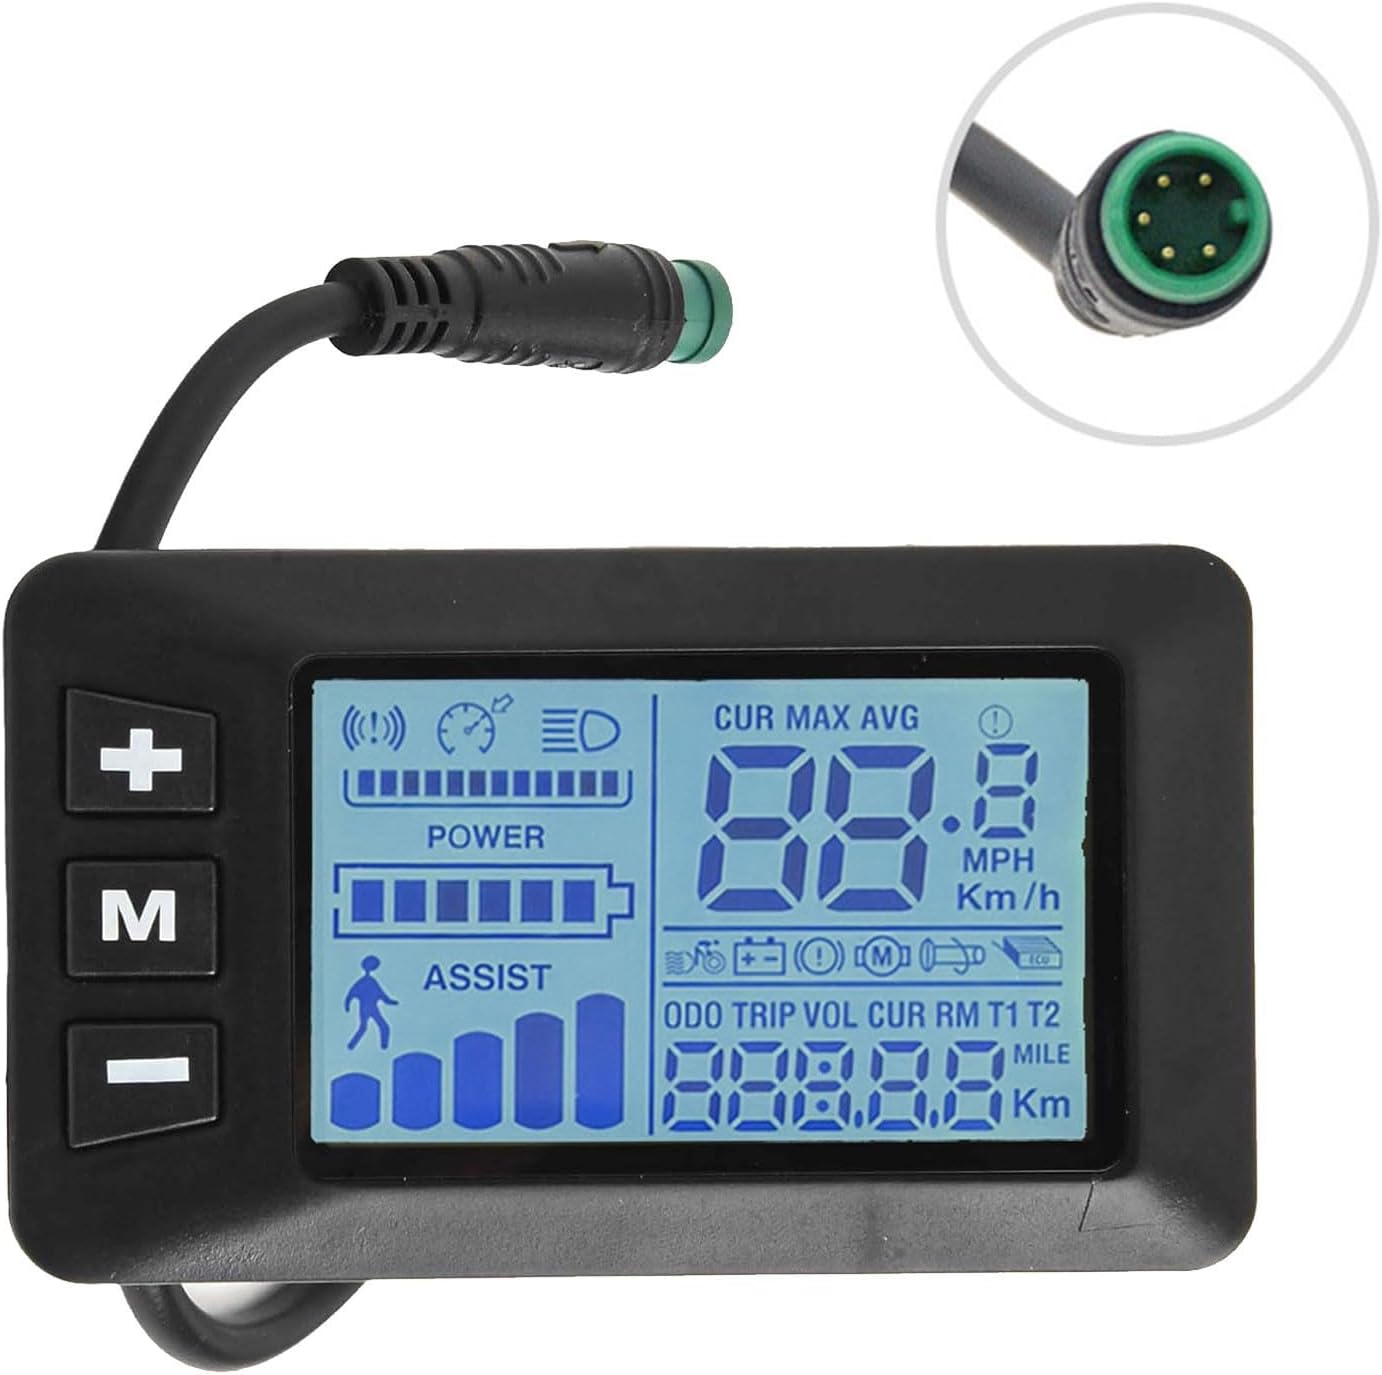
Image 4.2: Detailed view of the GD01 display screen, illustrating the information presented during operation, including current speed, battery status, pedal assist level, and trip data.

Image 4.3: Close-up of the green 5-pin waterproof connector, highlighting its design for secure and moisture-resistant connection to the E-bike system.
5. Specifications
| Product Name | GD01 5 Pin Display |
| Material | ABS+LCD |
| Dimensions (L*W*H) | 8.2 x 4.8 x 4.3 cm (3.23 x 1.89 x 1.69 inches) |
| Weight | 60g (2.12 oz) |
| Handlebar Diameter | Φ22.2mm |
| Voltage Compatibility | 24V / 36V / 48V |
| Connector Type | 5 Pin Waterproof Connector |
| Controller Compatibility | JN Controllers |

Image 5.1: The GD01 display showing its physical dimensions, 8.2 cm in length and 4.8 cm in height, for reference during installation.
6. Setup & Installation
Follow these steps to properly install your GD01 display on your E-bike.
6.1 Pre-Installation Check
- Ensure your E-bike system is turned off and the battery is disconnected before beginning installation.
- Confirm that your E-bike uses a JN controller for compatibility.
- Verify your handlebar diameter is Φ22.2mm for proper mounting.
6.2 Mounting the Display
- Locate a suitable position on your handlebar (Φ22.2mm) that allows for clear visibility and easy access to the control buttons.
- Loosen the clamp screw on the back of the display unit.
- Position the display on the handlebar and tighten the clamp screw until the display is securely mounted and does not rotate freely. Do not overtighten.
6.3 Connecting the Display
- Identify the corresponding 5-pin connector on your E-bike's JN controller wiring harness.
- Align the pins of the GD01 display's 5-pin waterproof connector with the receptacle on the controller harness.
- Gently push the connectors together until they click securely into place. Ensure the connection is firm and fully seated to maintain its waterproof integrity.
- Once connected, you may use cable ties to neatly secure the excess cable along your E-bike frame.
7. Operating Instructions
This section details how to operate your GD01 display and understand its various functions.
7.1 Button Functions
- M (Mode) Button:
- Press and hold to power the display ON/OFF.
- Short press to cycle through display modes (e.g., Odometer, Trip Distance, Voltage).
- + (Up) Button:
- Increases pedal assist level.
- Increases value in settings menus.
- Press and hold to activate/deactivate headlights (if connected and supported by controller).
- - (Down) Button:
- Decreases pedal assist level.
- Decreases value in settings menus.
7.2 Display Readings
The GD01 display provides various real-time data:
- Current Speed: Displays your real-time riding speed.
- Battery Level: Indicates the remaining battery charge.
- Pedal Assist Level (ASSIST): Shows the current level of motor assistance.
- Odometer (ODO): Total distance traveled by the E-bike.
- Trip Distance (TRIP): Distance traveled during the current ride.
- Voltage (VOL): Current battery voltage.
- Headlight Indicator: Icon illuminates when headlights are active.
7.3 Adjusting Backlight Brightness
The display offers three levels of backlight brightness. To adjust:
- With the display on, simultaneously press and hold the + and - buttons for a few seconds to enter backlight adjustment mode.
- Use the + or - buttons to cycle through the three brightness levels.
- Press the M button to confirm your selection and exit the adjustment mode.
8. Maintenance
Proper maintenance ensures the longevity and optimal performance of your GD01 display.
- Cleaning: Use a soft, damp cloth to wipe the display screen and body. Avoid abrasive cleaners or solvents that could damage the plastic or screen.
- Connection Check: Periodically inspect the 5-pin connector for any signs of corrosion or damage. Ensure it remains securely connected.
- Storage: If storing your E-bike for an extended period, ensure the display is clean and dry. Store in a cool, dry place away from direct sunlight.
- Water Exposure: While waterproof, avoid prolonged submersion or high-pressure water jets directly on the display.
9. Troubleshooting
This section addresses common issues you might encounter with your GD01 display.
| Problem | Possible Cause | Solution |
|---|---|---|
| Display does not turn on. |
|
|
| Incorrect speed or distance readings. |
|
|
| Display backlight is too dim/bright. |
|
|
If you encounter issues not listed here or if the suggested solutions do not resolve the problem, please contact Jumplushion customer support or your E-bike dealer for further assistance.
10. Warranty & Support
Jumplushion products are manufactured to high-quality standards. For specific warranty information, please refer to the warranty card included with your purchase or contact your retailer. For technical support or inquiries, please reach out to Jumplushion customer service through the contact information provided at the point of purchase or on the official Jumplushion website.


