FYGAIN 840
FYGAIN SENTRO 40 Needles Knitting Machine User Manual
Model: 840
1. Introduction
This manual provides comprehensive instructions for the assembly, operation, maintenance, and troubleshooting of your FYGAIN SENTRO 40 Needles Knitting Machine, Model 840. Please read this manual thoroughly before using the machine to ensure safe and efficient operation. This machine is designed to facilitate the creation of knitted items such as hats, scarves, and other accessories.

Figure 1: Overview of the FYGAIN SENTRO 40 Needles Knitting Machine and included accessories.
2. Safety Information
- Keep the machine away from small children when not in use to prevent accidental injury.
- Ensure the machine is placed on a stable, flat surface during operation.
- Do not force the crank if it becomes stiff; investigate the cause to prevent damage.
- Use appropriate yarn types and weights as recommended to avoid machine malfunction.
- Avoid placing fingers near moving parts during operation.
3. Package Contents
Verify that all items listed below are present in your package:
- 1 x FYGAIN SENTRO 40 Needles Knitting Machine
- 3 x Yarn Skeins (various colors)
- 1 x Screwdriver
- 3 x Yarn Needles (various sizes)
- 1 x Crochet Hook
- 4 x Suction Cups

Figure 2: Contents of the package and machine dimensions.
4. Setup Instructions
Follow these steps to assemble your knitting machine:
- Attach Suction Cups: Insert the four suction cups into the designated holes on the bottom of the machine's legs. Ensure they are firmly seated.
- Secure Legs: Position the legs onto the main body of the machine.
- Fasten Screws: Use the provided screwdriver to secure the legs to the machine body with the screws.
- Place on Surface: Press the machine firmly onto a smooth, clean, non-porous surface to engage the suction cups for stability.
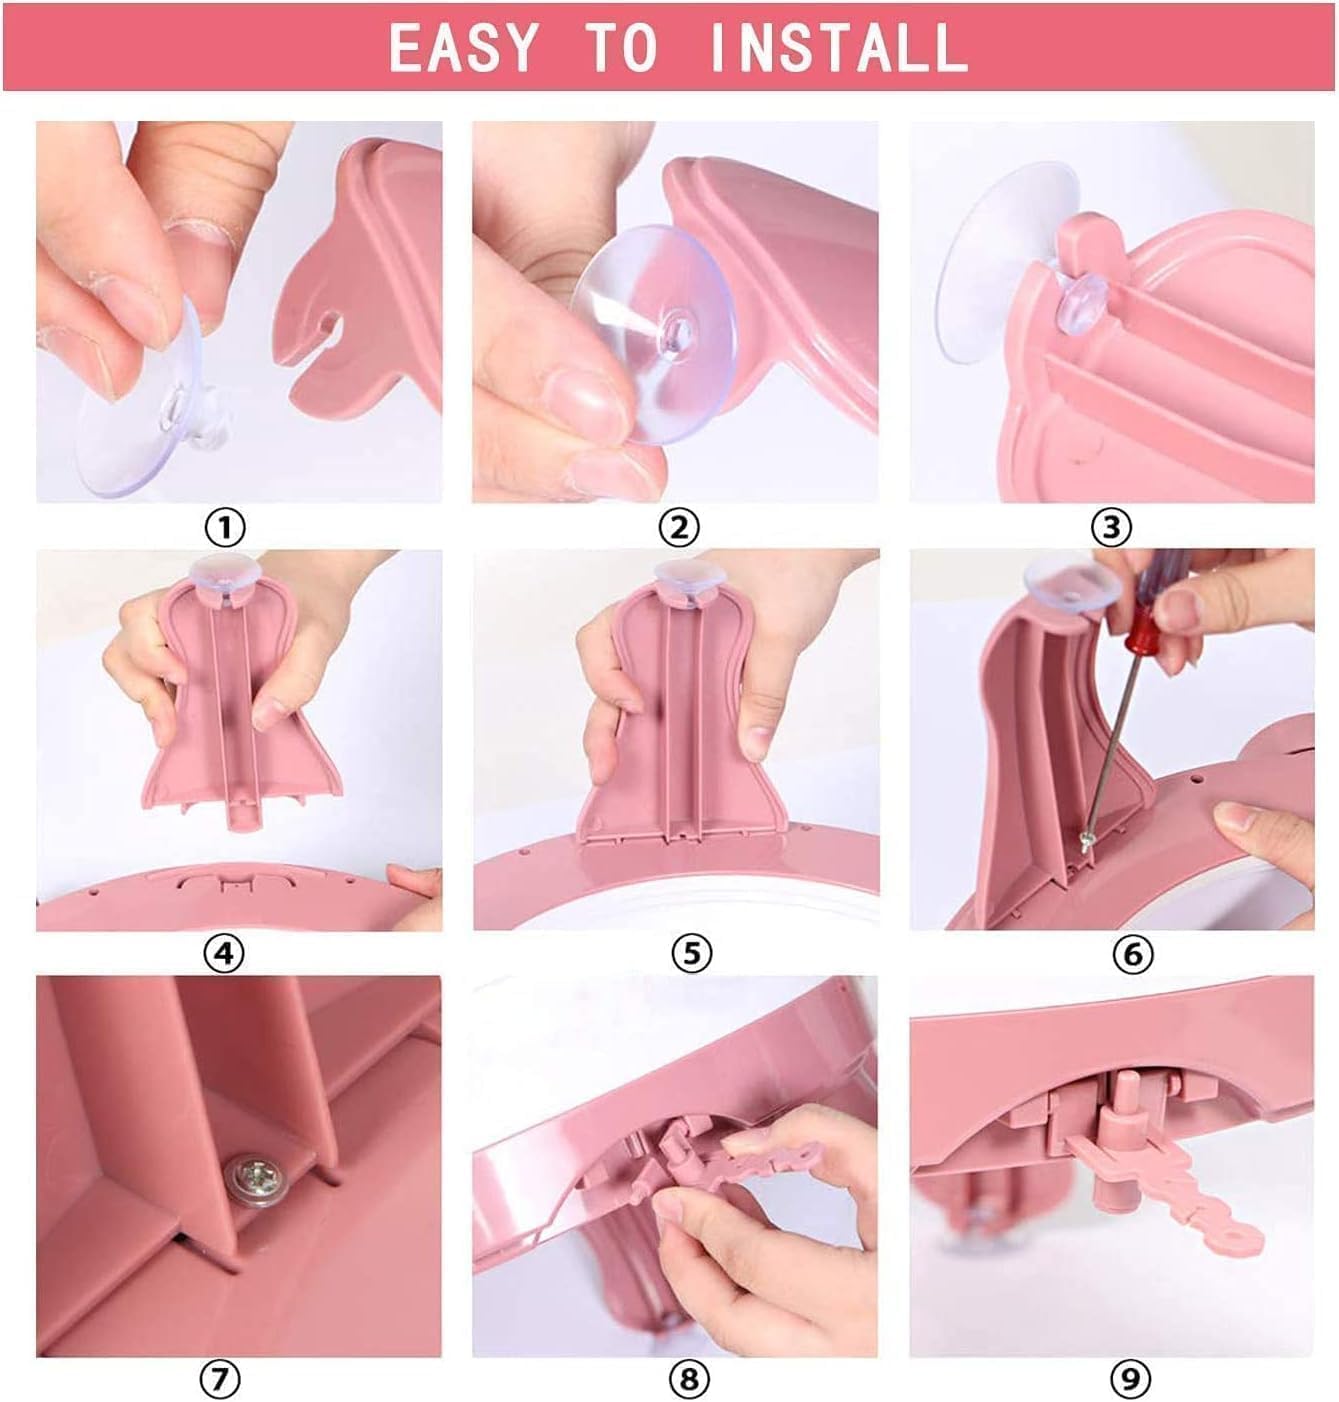
Figure 3: Visual guide for machine assembly.
5. Operating Instructions
5.1. Yarn Selection
For optimal performance, use yarn of appropriate thickness. Medium-weight yarns (DK or Worsted weight, typically size 3 or 4) are generally recommended. Thinner yarns may slip stitches, while very thick yarns can cause the machine to jam or drop stitches.

Figure 4: Example of suitable yarn thickness (approximately 3mm).
5.2. Knitting Modes
Your machine supports two primary knitting modes:
- T-Gear (Tube Knit): For circular knitting, producing seamless tubes like hats and scarves.
- P-Gear (Plain Knit): For flat knitting, producing flat panels for items like blankets or sweater pieces.
Select the desired mode using the switch located on the side of the machine.

Figure 5: T-Gear (Tube Knit) and P-Gear (Plain Knit) modes.
5.3. Threading the Machine
- Ensure the crank is turned until a white needle is at the starting position.
- Feed the yarn through the yarn guide on the side of the machine.
- For the initial cast-on, wrap the yarn around every other needle, alternating front and back, until all needles are engaged.
- Place the yarn into the tension guide.
- Slowly turn the crank to begin knitting.
5.4. Adjusting Thread Tension
Proper yarn tension is crucial for consistent stitches and to prevent dropped stitches or jamming. The machine features an adjustable tension guide.
- Loose: For very thin yarns or when less resistance is desired.
- Moderate: Standard setting for most medium-weight yarns.
- Tight: For slightly thicker yarns or when a denser fabric is desired.
- Tightest: For specific projects requiring maximum tension, use with caution to avoid yarn breakage or machine strain.
Experiment with different settings to find the ideal tension for your chosen yarn.

Figure 6: Yarn tension adjustment settings.
6. Maintenance
- Cleaning: Regularly remove lint and yarn fibers from the needles and gears using a soft brush or compressed air.
- Lubrication: Periodically apply a small amount of machine oil to the moving parts, such as the crank mechanism and needle tracks, to ensure smooth operation.
- Storage: Store the machine in a clean, dry place away from direct sunlight and extreme temperatures.
7. Troubleshooting
| Problem | Possible Cause | Solution |
|---|---|---|
| Dropped Stitches | Incorrect yarn tension, yarn too thick/thin, turning crank too fast, improper cast-on. | Adjust tension, use recommended yarn, turn crank slowly and consistently, re-cast on carefully. |
| Crank is Stiff or Jams | Yarn caught in mechanism, yarn too thick, machine needs lubrication, debris in gears. | Check for tangled yarn, ensure yarn is appropriate thickness, lubricate moving parts, clean machine. Do not force the crank. |
| Uneven Knitting | Inconsistent crank speed, incorrect tension, varying yarn thickness. | Maintain a steady crank speed, adjust tension, ensure consistent yarn quality. |
| Suction Cups Not Holding | Surface is not smooth/clean, suction cups are dirty or damaged. | Clean the surface and suction cups. Ensure surface is non-porous. Consider alternative stabilization if necessary (e.g., clamping). |
8. Specifications
- Brand: FYGAIN
- Model Name: 840
- Number of Needles: 40
- Material: Plastic
- Color: Pink
- Item Dimensions (L x W x H): 0.39 x 0.39 x 0.39 inches (Note: This dimension seems incorrect based on product images, likely a placeholder. Refer to Figure 2 for visual scale.)
- Item Weight: 3.08 pounds
- Special Feature: Smart fabric loom and double knit rotating knitting board
9. Warranty and Support
For any questions, technical support, or warranty inquiries, please contact the retailer or manufacturer directly. Please retain your proof of purchase for warranty claims.