Introduction
This manual provides detailed instructions for the safe and efficient operation of your ANPUDS 1/2" Digital Torque Adapter Set. Designed for precision and durability, this tool is ideal for a wide range of applications including bicycle, motorcycle, automotive repair, and industrial use. Please read this manual thoroughly before first use and keep it for future reference.
Key Features:
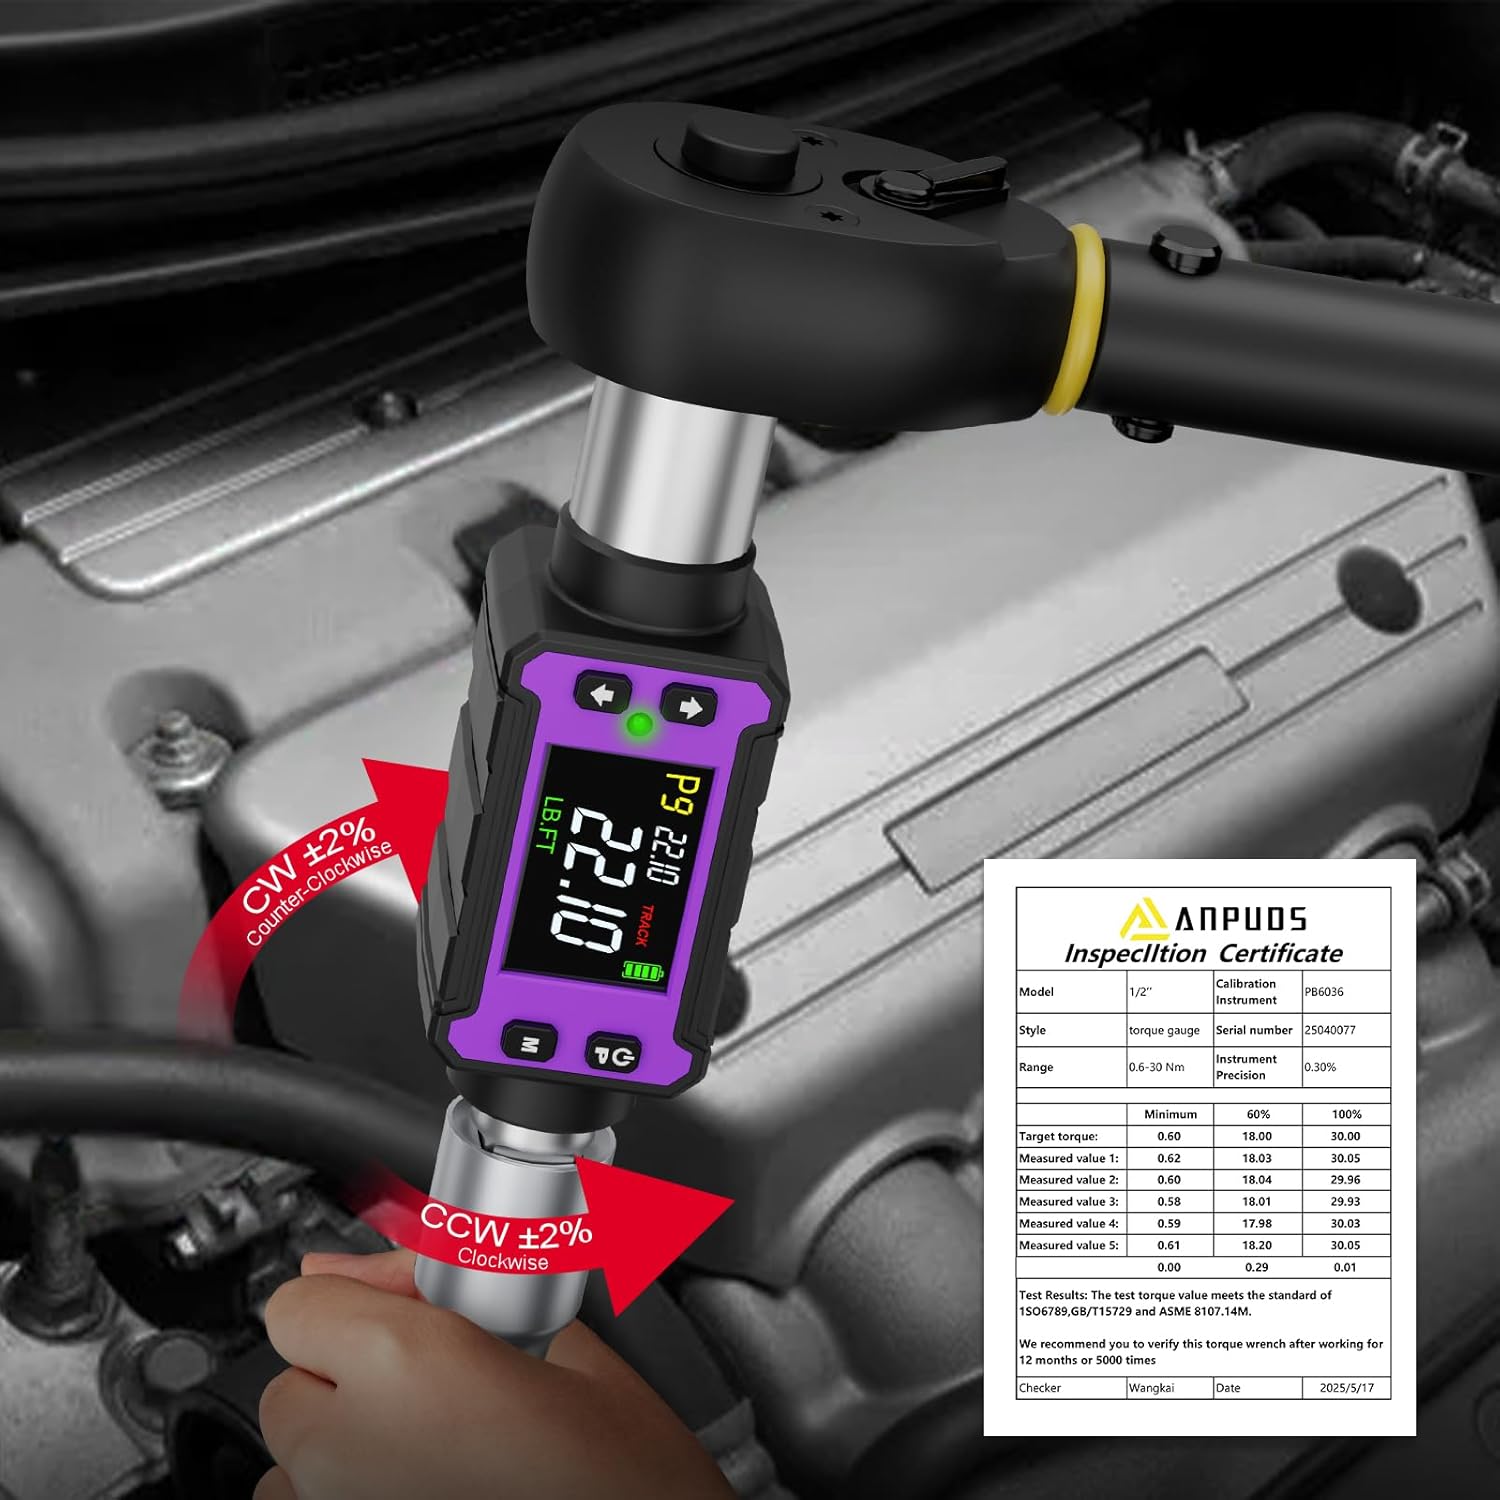
- Precision Engineering: Professional calibration with reading accuracy up to ±2% for reliable results.
- Wide Torque Range: 0.4-22.1 Ft.lbs / 0.6-30 Nm, with four selectable units (N.m, ft-lb, in-lb, kg.cm).
- Data Storage & Modes: P1-P9 preset modes, PEAK mode for maximum torque value recording, and TRACK mode for real-time display. Stores up to 500 groups of historical data.
- Audible & Visual Notifications: Buzzer and LED indicators (green for 85-90% of set torque, red for 100%) to prevent over-tightening.
- Versatile Adapters: Includes 1/4" and 3/8" adapters for extensive fastener compatibility.
- Compact Design: Narrow and elongated body suitable for confined spaces.
- Adjustable Buzzer: Option to turn buzzer sound on or off.
Setup
Battery Installation:
- Locate the battery cover on the digital torque adapter.
- Use the provided tool (or a suitable small screwdriver) to open the battery cover.
- Insert AAA batteries, ensuring correct polarity.
- Close the battery cover securely.
- Press the power button to turn on the device.

Attaching Adapters:
The ANPUDS Digital Torque Adapter comes with 1/4" and 3/8" adapters to increase versatility. Simply insert the desired adapter into the 1/2" drive of the torque adapter until it clicks securely into place. Then, attach your ratchet wrench to the other end of the adapter.

Operating Instructions
Power On/Off:
Press the power button (usually marked with a power symbol) to turn the device on. The display will illuminate. The device features an auto-shutdown function after 120 seconds of inactivity to conserve battery life. If inactive for 20 seconds, the time will be displayed.

Selecting Measurement Units:
The adapter supports four units: N.m, ft-lb, in-lb, and kg.cm. Use the "U" button to cycle through and select your desired unit of measurement.

Setting Torque Values (Preset Modes P1-P9):
The device offers P1-P9 preset modes. Use the up/down arrow buttons to adjust the target torque value within these presets. The display will show the selected preset and value.

Track Mode vs. Peak Mode:
The digital torque adapter features two operational modes:
- TRACK Mode: Displays the torque value in real-time as force is applied.
- PEAK Mode: Records and displays the maximum torque value achieved during use. This mode can store up to 500 groups of historical data.
Use the "M" button to switch between TRACK and PEAK modes.

Applying Torque:
- Attach the digital torque adapter to your ratchet wrench and the appropriate socket.
- Select your desired torque value and unit using the buttons.
- Begin applying force to the fastener.
- As you approach the set torque value (85-90%), the device will emit a beep and a green LED light will illuminate.
- Upon reaching 100% of the set torque value, the device will beep, the green light will turn off, and a red light will illuminate, indicating that you should stop applying force to prevent over-tightening.
Buzzer Sound On/Off:
To toggle the buzzer sound, ensure the device is in the shutdown state. Press the "P/T" and "M" buttons simultaneously. One sound indicates the buzzer is enabled, while two sounds indicate it is disabled.
Important Usage Tip:
When using the digital torque adapter, ensure you hold the ratchet wrench handle and not the adapter itself. Holding the adapter can interfere with accurate readings and proper operation.
Maintenance
- Keep the digital torque adapter clean and dry. Wipe it with a soft, damp cloth after each use.
- Store the device in its protective case when not in use to prevent damage.
- Replace batteries promptly when the low battery indicator appears to ensure accurate readings.
- Avoid exposing the device to extreme temperatures or harsh chemicals.
- Regular calibration is recommended to maintain accuracy, especially with frequent use. Refer to the included calibration certificate for details.
Troubleshooting
| Problem | Possible Cause | Solution |
|---|---|---|
| Device does not power on. | Dead or incorrectly installed batteries. | Check battery polarity and replace with fresh AAA batteries. |
| Inaccurate torque readings. | Device needs calibration; improper handling during use. | Ensure proper handling (hold the wrench, not the adapter). Consider professional recalibration if issues persist. |
| Buzzer not sounding. | Buzzer is turned off. | Refer to "Buzzer Sound On/Off" section to enable the buzzer. |
Specifications
| Feature | Detail |
|---|---|
| Brand | ANPUDS |
| Model Number | AP5-340 |
| Size | 0.4-22.1 Ft-lb / 0.6-30 Nm |
| Drive Size | 1/2-Inch (includes 1/4-inch and 3/8-inch adapters) |
| Accuracy | ±2% |
| Measurement Units | N.m, ft-lb, in-lb, kg.cm |
| Modes | Track, Peak (P1-P9 presets) |
| Data Storage | 500 groups (in Peak mode) |
| Notifications | Buzzer and LED (Green: 85-90%, Red: 100%) |
| Material | Alloy Steel |
| Item Weight | 580 g |
| Batteries | AAA (Included) |
| Auto Shutdown | 120 seconds of inactivity |
Warranty and Support
For warranty information and customer support, please refer to the documentation included with your product or visit the official ANPUDS store on Amazon. The product includes a calibration certificate for your reference.
Link to ANPUDS Store: ANPUDS Store