1. Product Overview
The BENFEI 8-in-1 USB C Hub with Secure Clamp is a versatile connectivity solution designed to expand the capabilities of your USB-C enabled devices. It features a unique clamp design for secure mounting, optimizing desk space and providing easy access to multiple ports. This hub integrates essential ports for video output, high-speed data transfer, network connectivity, and power delivery.

Image: The BENFEI 8-in-1 USB C Hub, highlighting its compact design and multiple connection ports.
2. Key Features
- Secure Clamp Design: Adjustable screw clamp allows mounting on monitor screens or desk edges from 5mm to 36mm (0.19 to 1.41 inches) thick, saving desk space.
- 4K@60Hz HDMI Output: Supports video output up to 4K resolution at 60Hz for external displays. The host device's USB-C port must support video output.
- 100W Power Delivery (PD): Provides up to 85W pass-through charging to your laptop via the Type-C PD port, with 15W reserved for hub operations. This port does not support data or video.
- 10Gbps High-Speed Data Transfer: Includes 1x USB-C 3.2 port and 2x USB-A 3.2 ports for data transfer speeds up to 10Gbps.
- 1Gbps Gigabit Ethernet: Ensures a stable and fast wired internet connection.
- Additional USB Ports: Two USB-A 2.0 ports for connecting peripherals like keyboards, mice, or other standard USB devices.

Image: A visual representation of the hub's 8-in-1 functionality, detailing each port type and its primary function.
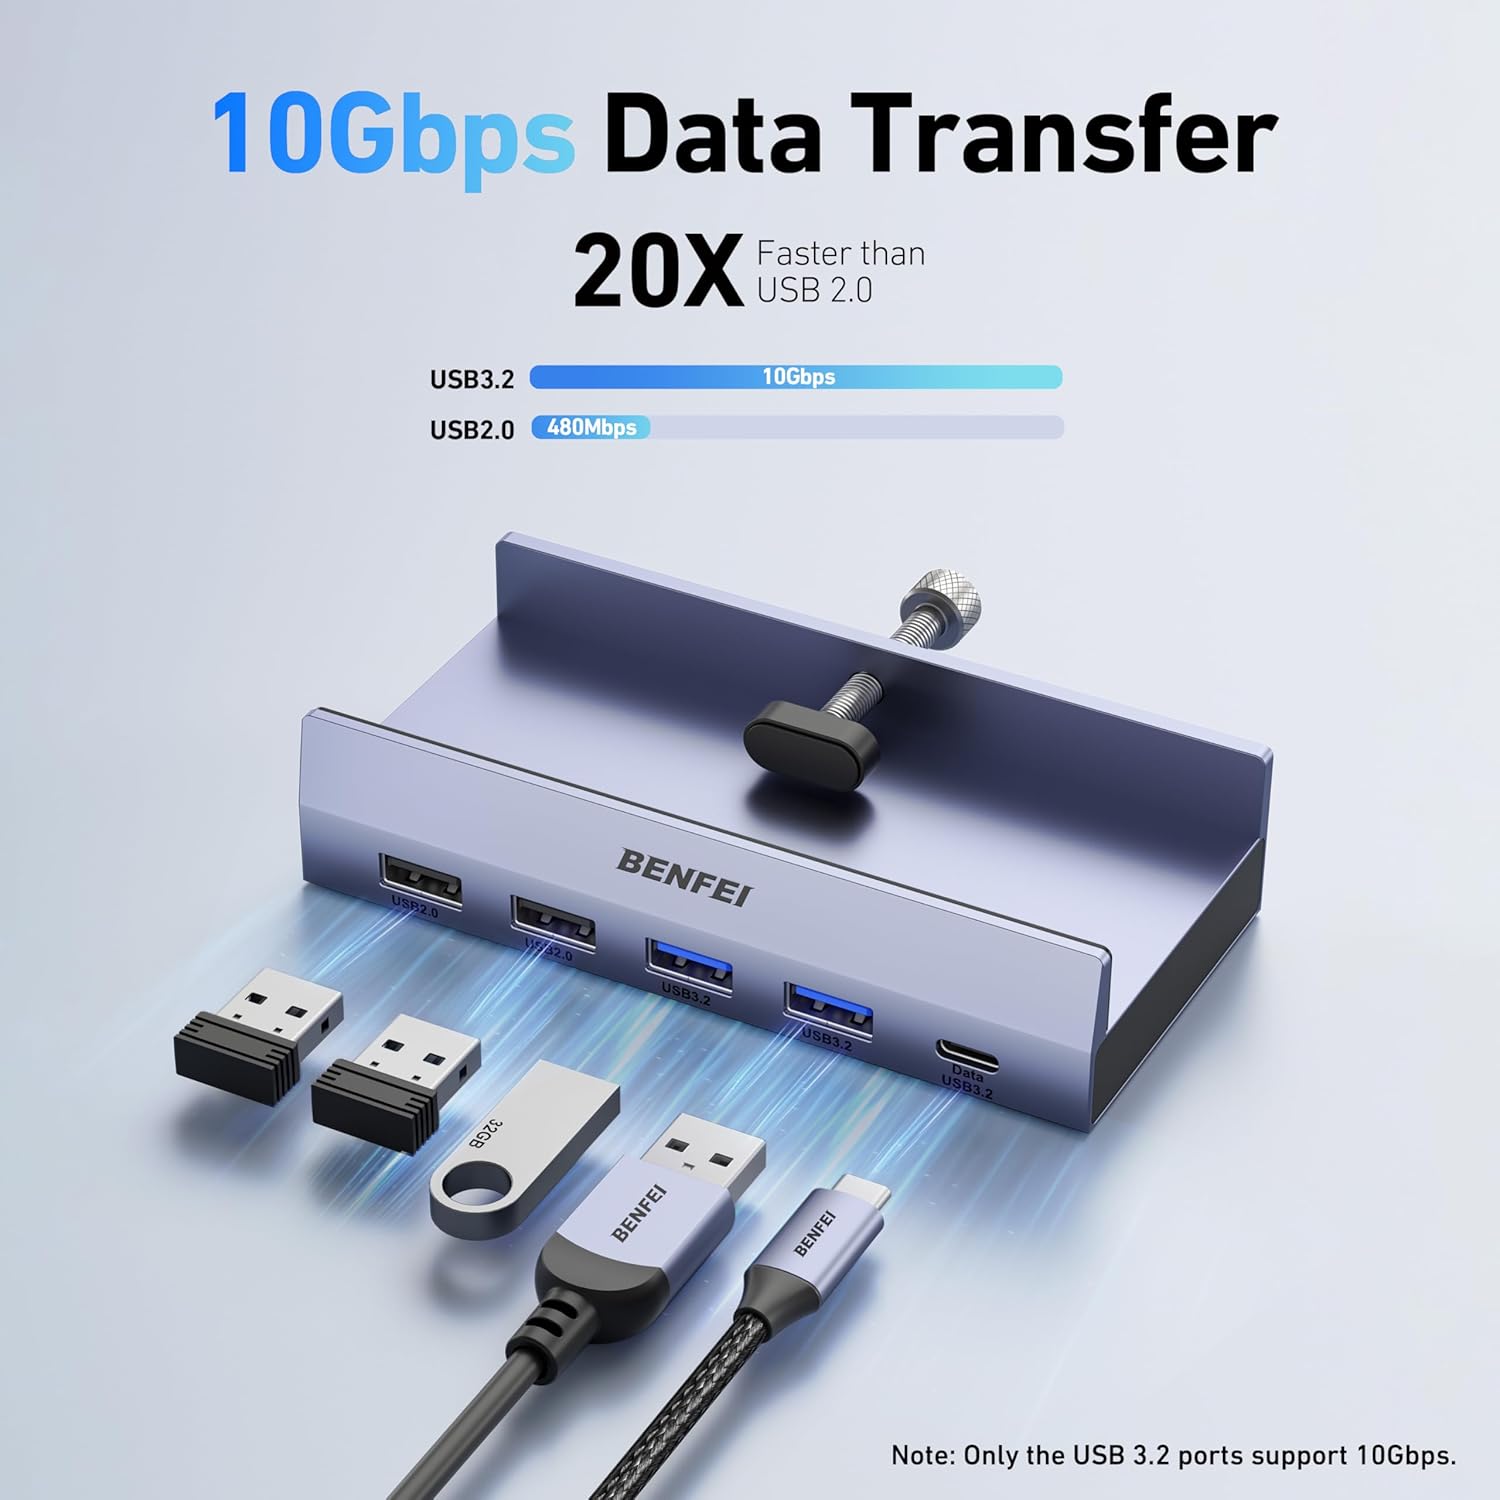
Image: A graphic demonstrating the high-speed data transfer capabilities of the USB 3.2 ports compared to USB 2.0.

Image: The hub connected to a laptop, showcasing the 1Gbps Ethernet port for stable network access.

Image: An illustration of the 100W Power Delivery function, demonstrating power flow from a charger through the hub to a laptop.
3. Setup Instructions
3.1 Mounting the Hub
The BENFEI USB C Hub features an adjustable clamp for secure attachment to various surfaces. Ensure the surface thickness is between 5mm and 36mm (0.19 to 1.41 inches).
- Identify a suitable mounting location on your monitor's edge, desk edge, or monitor stand.
- Loosen the adjustable screw on the clamp to open it sufficiently.
- Position the hub on the desired edge, ensuring the silicone pads make contact with the surface to prevent scratches and provide stability.
- Tighten the screw until the hub is firmly secured. Do not overtighten.

Image: Examples of how the hub can be installed in various positions, such as on a monitor, table edge, or monitor stand.

Image: A close-up of the hub's aluminum construction, showing its dimensions and the protective silicone pads on the clamp.

Image: A diagram illustrating the minimum and maximum thickness for surfaces compatible with the hub's clamp.
3.2 Connecting to Your Device
- Connect the provided USB-C to USB-C cable from the hub's 'INPUT' port to a compatible USB-C port on your host device (laptop, tablet, etc.).
- For power delivery, connect a USB-C power adapter (not included) to the hub's 'PD 100W' port.
- Connect your external display to the HDMI port using an HDMI cable.
- Connect any USB peripherals (flash drives, keyboard, mouse, external hard drives) to the available USB-A 3.2, USB-C 3.2, or USB-A 2.0 ports.
- For a wired network connection, connect an Ethernet cable to the Gigabit Ethernet port.

Image: The hub in a typical setup, connected to a laptop and an external monitor, with multiple devices attached.
4. Operating Instructions
4.1 HDMI Display Output
Once connected, your operating system should automatically detect the external display. You can configure display settings (mirror, extend, resolution) through your device's display settings.
- Ensure your host device's USB-C port supports video output (DisplayPort Alternate Mode).
- For optimal 4K@60Hz performance, use a high-quality HDMI 2.0 or newer cable.
4.2 USB Data Transfer
Plug your USB devices into the appropriate ports. The USB-C 3.2 and USB-A 3.2 ports offer speeds up to 10Gbps, ideal for external hard drives and flash drives. The USB-A 2.0 ports are suitable for keyboards, mice, and other standard peripherals.
4.3 Ethernet Connection
Connect an Ethernet cable from your router or modem to the hub's Gigabit Ethernet port. Your device should automatically establish a wired network connection, providing a stable internet experience.
4.4 Power Delivery (PD)
Connect a USB-C power adapter to the hub's 'PD 100W' port. This will charge your connected laptop while the hub is in use. The hub reserves 15W for its own operation, delivering up to 85W to your laptop. Ensure your power adapter is sufficient for your laptop's charging requirements plus the hub's operation.
5. Maintenance
- Cleaning: Disconnect the hub from all power sources and devices before cleaning. Use a soft, dry cloth to wipe the surface. Avoid liquid cleaners or abrasive materials.
- Storage: Store the hub in a cool, dry place away from direct sunlight and extreme temperatures when not in use.
- Handling: Avoid dropping the hub or subjecting it to strong impacts.
6. Troubleshooting
- No Display Output:
- Ensure your host device's USB-C port supports DisplayPort Alternate Mode.
- Check all cable connections (USB-C from device to hub, HDMI from hub to display).
- Try a different HDMI cable or display.
- Restart your host device.
- Slow Charging or No Charging:
- Ensure your USB-C power adapter is connected to the hub's 'PD 100W' port and is powerful enough for your laptop (e.g., 65W or 100W).
- Verify the USB-C cable connecting the hub to your laptop supports power delivery.
- Some laptops may require specific power adapters; consult your laptop's manual.
- USB Devices Not Detected:
- Ensure the hub is securely connected to your host device.
- Try connecting the USB device directly to your host device to confirm functionality.
- Disconnect and reconnect the USB device to the hub.
- Avoid connecting high-power-consumption devices simultaneously without external power to the hub.
- No Internet Connection via Ethernet:
- Check the Ethernet cable connection to both the hub and your router/modem.
- Verify your router/modem is functioning correctly.
- Ensure your device's network settings are configured for a wired connection (usually automatic).
- MacBook Pro (2019-2024 models)
- iMac, MacBook, Mac Mini
- iPad Pro
- Surface Book 2, Surface Go
- HP Envy 13
- Pixelbook, Chromebook
- Galaxy Book, Samsung Galaxy S8/S9/Note 8/Note 9 series
- Dell XPS 15 / XPS 13
- Intel NUC
- Steam Deck, Nintendo Switch
- Windows
- macOS
- Linux
- 1x BENFEI 8-in-1 USB C Hub with Secure Clamp
- 1x USB-C to USB-C Cable
- 1x User Manual
7. Technical Specifications
| Model Number | 000396grey |
| Brand | BENFEI |
| Dimensions | 5.55 x 4.41 x 1.34 inches |
| Item Weight | 1.06 ounces |
| Color | Gray |
| Hardware Interface | Ethernet, HDMI, USB, USB Type C |
| HDMI Output | 4K@60Hz |
| Ethernet | 1Gbps |
| USB-C Data Port | 1x USB-C 3.2 (10Gbps) |
| USB-A Data Ports | 2x USB-A 3.2 (10Gbps), 2x USB-A 2.0 |
| Power Delivery | Up to 100W input, 85W output to host device |
| Clamp Thickness Range | 5mm - 36mm (0.19 - 1.41 inches) |
8. Compatibility
The BENFEI 8-in-1 USB C Hub is designed for broad compatibility with various USB-C enabled devices and operating systems.
8.1 Compatible Host Devices
8.2 Compatible Operating Systems

Image: A visual guide to the hub's broad compatibility with different devices and operating systems.
9. Package Contents
The BENFEI 8-in-1 USB C Hub package includes the following items:

Image: Contents of the product package, including the hub, USB-C cable, and user manual.
10. Warranty and Support
BENFEI products are designed for reliability and performance. This product is covered by a standard manufacturer's warranty. For detailed warranty information, technical support, or assistance with your product, please refer to the contact information provided on the BENFEI official website or your purchase documentation.
Please retain your proof of purchase for warranty claims.