1. Introduction
This manual provides essential information for the safe and effective operation, setup, and maintenance of your AZZUNO CUT-65L-P 65 Amp Plasma Cutter. Please read this manual thoroughly before using the equipment to ensure proper function and to prevent injury or damage.
2. Safety Precautions
WARNING: Plasma cutting can be dangerous. Always follow safety guidelines to prevent serious injury or death.
- Electric Shock: Can kill. Ensure proper grounding. Do not touch live electrical parts. Wear dry gloves.
- Fumes and Gases: Can be hazardous to your health. Work in a well-ventilated area. Use a fume extractor if necessary.
- Arc Rays: Can burn eyes and skin. Wear a welding helmet with appropriate shade, safety glasses, and protective clothing.
- Fire and Explosion: Hot metal and sparks can cause fires. Keep flammable materials away from the work area. Have a fire extinguisher readily available.
- Noise: Excessive noise can damage hearing. Wear ear protection.
- Compressed Air: Use clean, dry compressed air at the recommended pressure. Do not exceed maximum pressure.
- Maintenance: Disconnect power before performing any maintenance or changing consumables.
3. Package Contents
Verify that all items are present upon unpacking:
- AZZUNO CUT-65L-P Plasma Cutter Unit
- Plasma Cutting Torch (AW-65)
- Ground Clamp with Cable
- Air Hose and Hose Clamps
- 110V/220V Dual Voltage Power Adapter Cable
- Consumables (Tips, Electrodes) - Note: Two sets are included. Specific sourcing for additional consumables may vary.
- User Manual (this document)
4. Product Features
- 65A High Frequency Non-Touch Pilot Arc: The AZZUNO CUT-65L-P plasma cutter features a 65A high-frequency non-contact pilot arc, allowing ignition without direct contact with the metal. This minimizes consumable wear and enables clean, precise cuts on painted, rusted, or uneven surfaces.
- Enhanced Cutting Capability: Achieves precise and powerful plasma cutting. Clean cut: 10mm (3/8") @110V, 20mm (3/4") @220V. Maximum cut: 12mm (1/2") @110V, 25mm (1") @220V. This dual voltage 110/220V plasma cutter provides strong cutting power for both home DIY projects and demanding workshop tasks. Capable of cutting mild steel, stainless steel, aluminum, copper, and more. Easily handles solid plates, expanded metal, and mesh.
- Multiple Cutting Modes: Includes Test Air, Pre-Flow, Post-Flow, and 2T/4T settings, allowing full control over air flow and torch operation for smoother starts and professional results.
- Large LED Display: The extra-large LED screen clearly displays amperage, air pressure, and mode settings, enabling quick adjustments and precise control even in dimly lit environments.
- Air Sensor Technology: A built-in pressure monitoring system with a warning light alerts if air pressure is too low or too high, ensuring consistent cutting performance and preventing potential damage to the machine.
5. Setup
5.1 Connecting the Air Supply
The unit features a built-in air regulator and a pre-assembled air connector. No complex installation is needed for the air connector; simply insert the air hose and secure it with a hose clamp.

Image: Rear view of the plasma cutter, highlighting the air connector and 220V power plug. The air connector is designed for easy hose attachment.
- Connect your compressed air supply to the 'GAS IN' port on the rear of the machine.
- Use the provided air hose and secure it with a hose clamp.
- Ensure your air compressor can provide clean, dry air at the recommended pressure (refer to specifications). While the unit has a small built-in dryer, an external air dryer is recommended for optimal performance and longevity.
5.2 Connecting Power
The AZZUNO CUT-65L-P supports dual voltage (110V/220V) and comes with an adapter cable.
- For 220V operation, connect the main power plug directly to a compatible 220V outlet.
- For 110V operation, use the provided 110V/220V adapter cable to connect to a standard 110V outlet.
- Ensure the power source is capable of handling the machine's current draw.
5.3 Connecting Torch and Ground Clamp
- Connect the plasma torch cable to the designated port on the front panel.
- Connect the ground clamp cable to the ground terminal on the front panel.
- Securely attach the ground clamp to the workpiece or work table, ensuring good electrical contact.
6. Operating Instructions
6.1 Powering On and Initial Settings

Image: The plasma cutter's large LED display, indicating current PSI, amperage, and selectable modes (Test Air, Pre-Flow, Post-Flow, 2T, 4T).
- Turn on the main power switch located on the rear of the unit. The large LED display will illuminate.
- The display will show current amperage, air pressure (PSI), and selected mode.
- Adjust the amperage knob to the desired setting based on the material thickness and type.
6.2 Air Pressure Management
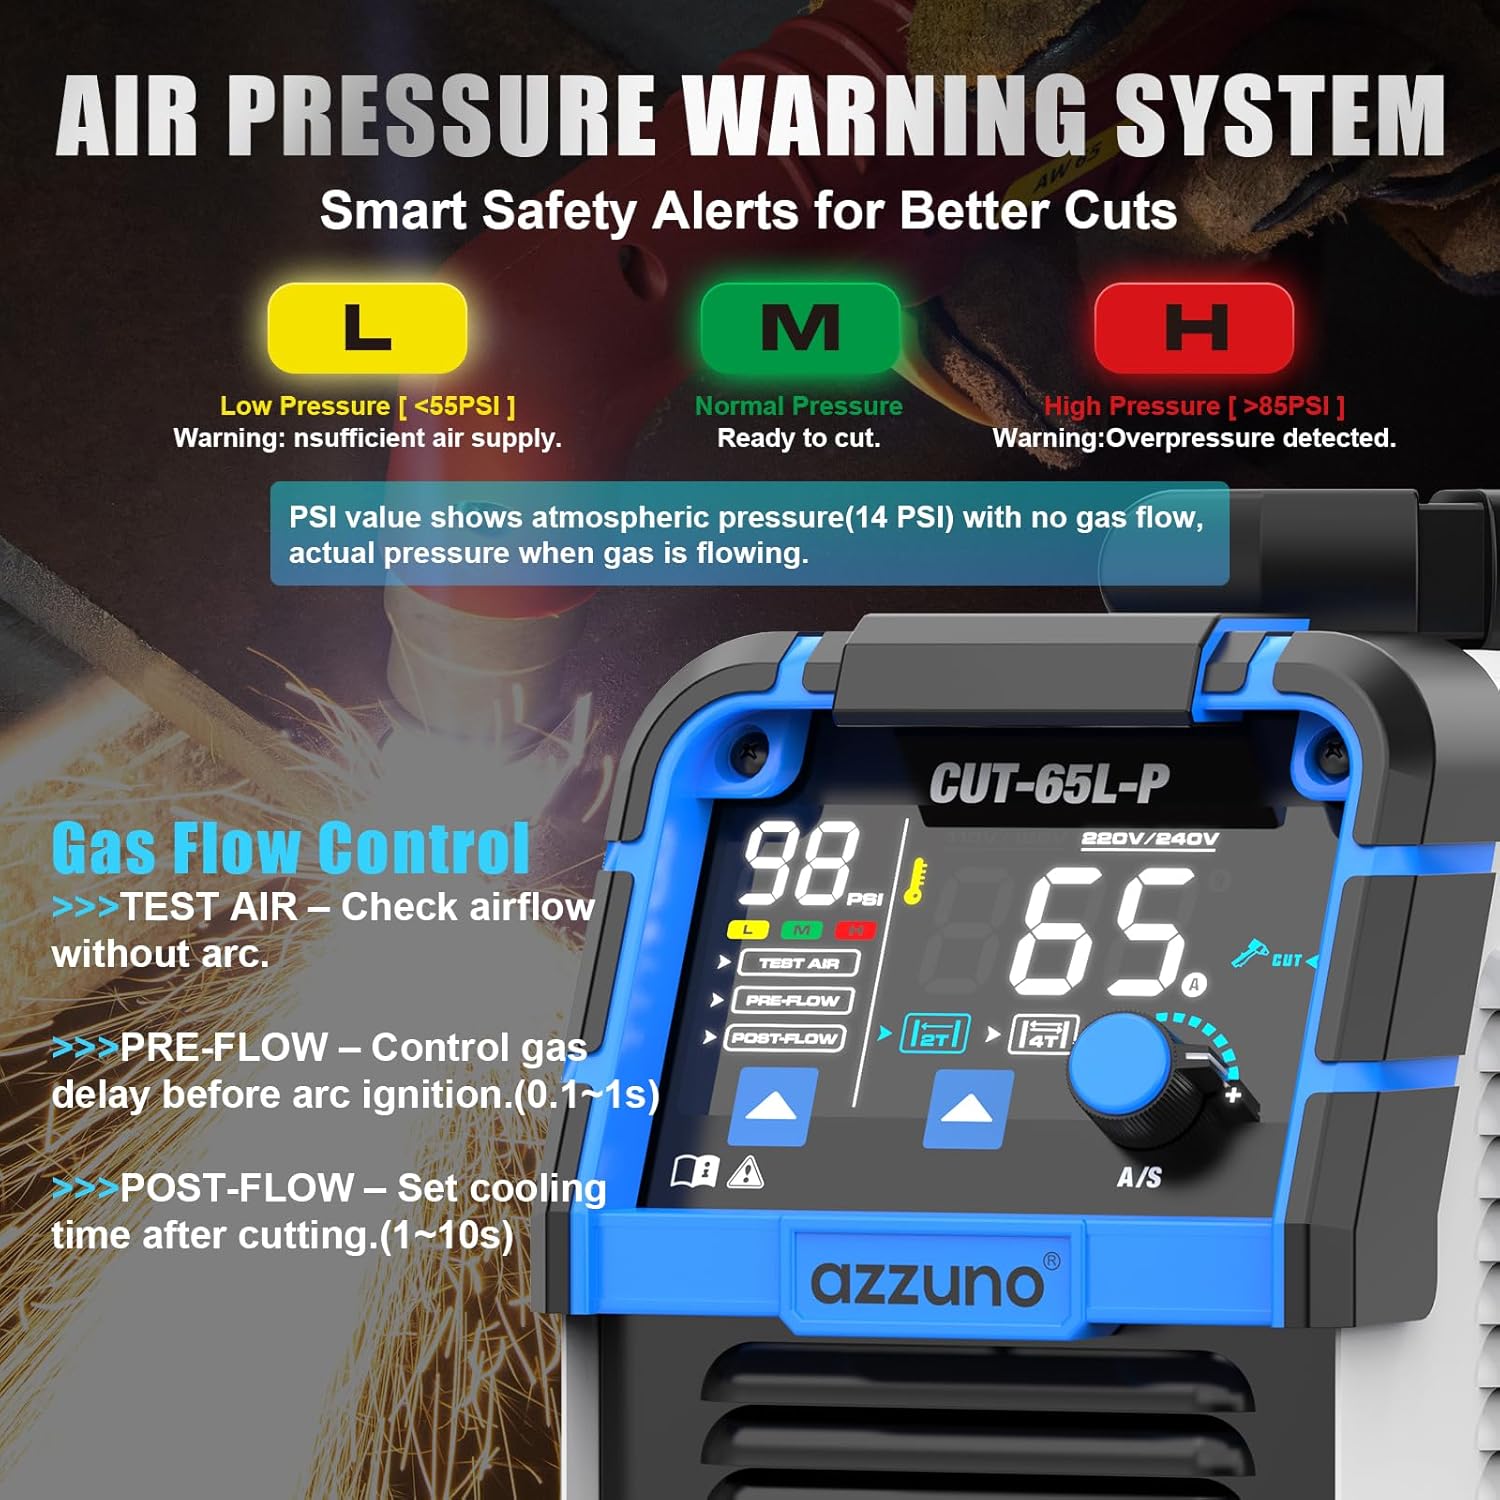
Image: Close-up of the LED display showing the Air Pressure Warning System. Indicators for Low (<55PSI), Normal (Ready to cut), and High (>85PSI) pressure are visible, along with Gas Flow Control options.
- The LED display shows the current air pressure.
- The Air Sensor Technology provides warnings for low (L) or high (H) pressure. Aim for the 'M' (Medium/Normal) range for optimal cutting.
- Use the 'TEST AIR' function to check airflow without initiating an arc. This helps in setting the correct air pressure before cutting.
6.3 Cutting Modes (2T/4T, Pre-Flow, Post-Flow)

Image: The LED display illustrating the 2T/4T function. 2T is for short cuts requiring continuous trigger hold, while 4T is for longer cuts, allowing release of the trigger after initiation.
- 2T (Two-Touch) Function: Press and hold the torch trigger to cut. Release to stop. Ideal for short, quick cuts.
- 4T (Four-Touch) Function: Press the trigger once to start cutting, then release. The arc will continue until you press the trigger again to stop. Ideal for longer cuts to reduce finger fatigue.
- PRE-FLOW: Controls the gas delay before the arc starts (0.1-1s). This purges the torch and prepares the gas flow.
- POST-FLOW: Sets the cooling time after cutting (1-10s). This cools the torch and extends consumable life.
6.4 Cutting Technique

Image: Demonstrates the cutting capability, showing a clean cut at 10mm (3/8") with 110V and a maximum cut at 25mm (1") with 220V.

Image: A plasma torch cutting through expanded metal mesh, demonstrating a stable arc and no sticking, allowing for clean and consistent cuts.
- Non-Touch Pilot Arc: Position the torch nozzle slightly above the workpiece (do not drag). The pilot arc will initiate without contact.
- Maintain a consistent travel speed. Too slow will result in a wide kerf and excessive dross; too fast will result in an incomplete cut.
- For optimal results, ensure the workpiece is clean and free of heavy rust or paint, although the non-touch pilot arc can handle some surface imperfections.
- When cutting mesh or expanded metal, the stable arc and non-sticking feature provide effortless and clean cuts.
7. Maintenance
Regular maintenance ensures the longevity and optimal performance of your plasma cutter.
- Consumables: Regularly inspect the torch tip, electrode, swirl ring, and shield cup. Replace them when worn to maintain cut quality and prevent damage to the torch.
- Air Filter: Check and clean or replace the air filter element in the built-in regulator periodically to ensure a supply of clean, dry air.
- Cleaning: Keep the machine clean and free of dust and metal particles. Use compressed air to blow out internal components if necessary (ensure power is disconnected).
- Cables: Inspect power and torch cables for damage. Replace any frayed or damaged cables immediately.
8. Troubleshooting
| Problem | Possible Cause | Solution |
|---|---|---|
| No arc initiation | No power, poor ground connection, low air pressure, worn consumables. | Check power supply, ensure ground clamp is secure, verify air pressure on LED display, replace torch consumables. |
| Poor cut quality (excessive dross, incomplete cut) | Incorrect amperage, incorrect air pressure, travel speed too fast/slow, worn consumables. | Adjust amperage, check air pressure, optimize travel speed, replace consumables. |
| Air pressure warning (L or H) | Insufficient or excessive air supply, clogged air filter. | Adjust air compressor output, check for leaks, clean/replace air filter. |
| Machine overheats | Exceeding duty cycle, poor ventilation. | Allow machine to cool down, ensure adequate ventilation around the unit. |
9. Specifications
| Feature | Detail |
|---|---|
| Brand | AZZUNO |
| Model Name | CUT-65L-P |
| Product Dimensions | 41.91 x 14.48 x 22.86 cm (16.5 x 5.7 x 9 inches) |
| Item Weight | 6.62 kg (14.6 lbs) |
| Input Voltage | 110V/220V Dual Voltage |
| Max Output Current | 65 Amps |
| Cutting Technology | IGBT Inverter, High Frequency Non-Touch Pilot Arc |
| Clean Cut (110V) | 10mm (3/8") |
| Max Cut (110V) | 12mm (1/2") |
| Clean Cut (220V) | 20mm (3/4") |
| Max Cut (220V) | 25mm (1") |
| Display | Large LED Display (Amps, PSI, Mode) |
| Safety Features | Air Pressure Warning System |
| ASIN | B0F9WW8X5W |
| First Available Date | September 16, 2025 |
10. Warranty and Support
Specific warranty information for the AZZUNO CUT-65L-P Plasma Cutter is not provided in the available product details. For warranty claims, technical support, or to inquire about replacement consumables, please contact AZZUNO customer service directly or refer to the documentation included with your purchase. Keep your purchase receipt as proof of purchase.