1. Important Safety Instructions
Please read all instructions carefully before installation and use. Keep this manual for future reference.
- Ensure the power supply is disconnected before installation, cleaning, or maintenance.
- Installation should be performed by a qualified electrician or in accordance with local electrical codes.
- Do not operate the fan with damaged wiring or if it has been dropped or damaged.
- Keep fingers and other objects away from the fan blades during operation.
- This product is designed for indoor use only.
- Do not expose the product to water or excessive humidity.
2. Product Overview
The SWBSLL Ceiling Fan with Light is a compact and versatile lighting and cooling solution, featuring hidden fan blades and remote control operation.
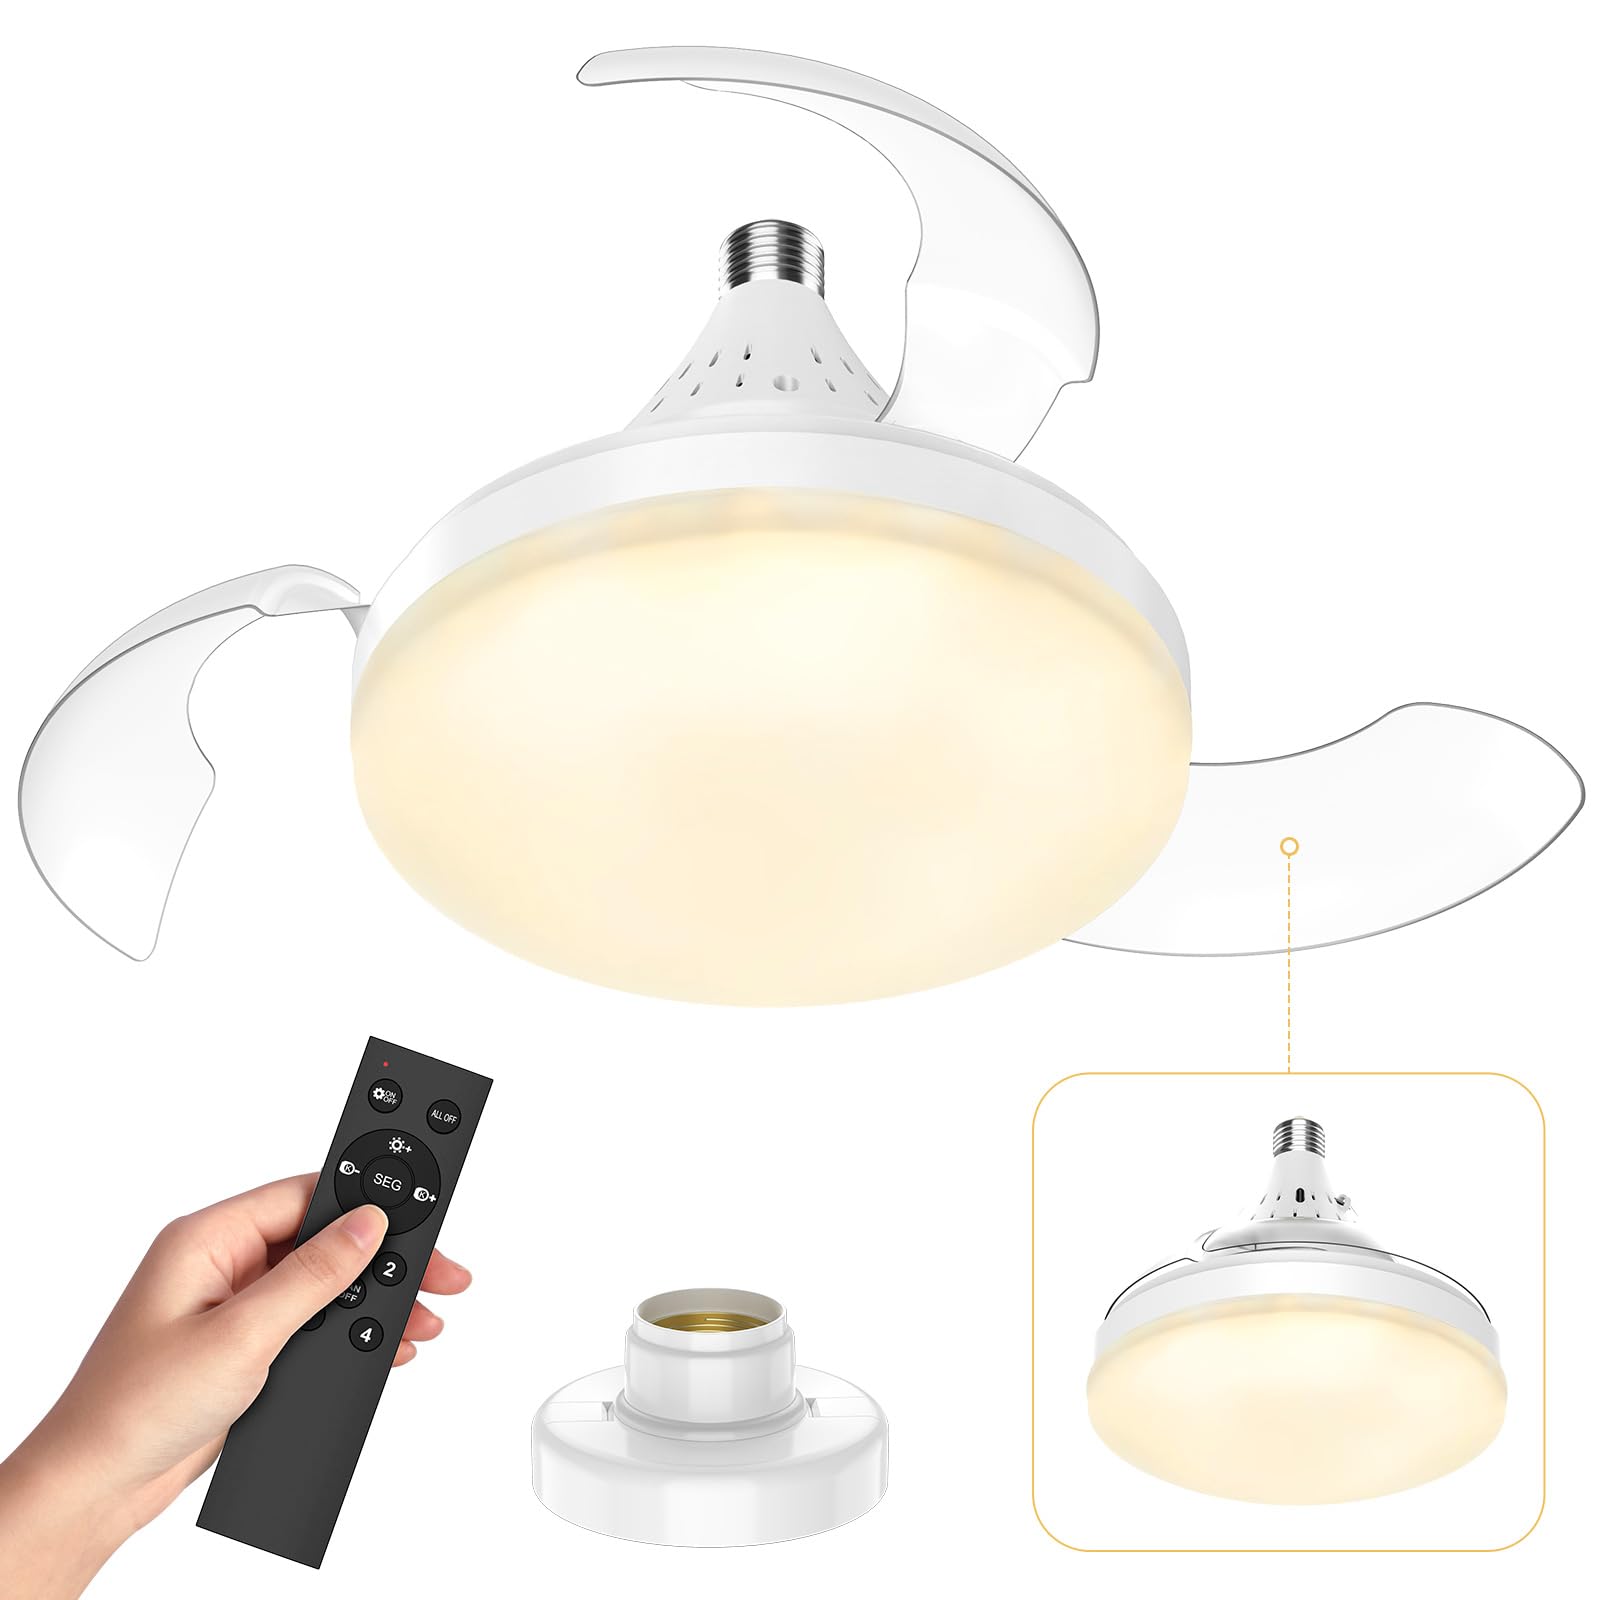
Figure 2.1: Overview of the SWBSLL Ceiling Fan with Light, showing the main unit, remote control, and E27 screw-in base.
Components:
- Ceiling Fan Unit with Integrated LED Light
- Remote Control (batteries not included)
- User Manual
3. Setup and Installation
This ceiling fan is designed for easy installation into a standard E27 light bulb socket.
- Power Off: Ensure the power supply to the light fixture is completely turned off at the circuit breaker before beginning installation.
- Screw In: Carefully screw the fan unit into your existing E27 light bulb socket until it is securely tightened. Do not overtighten.
- Restore Power: Once the fan is securely installed, restore power at the circuit breaker.
- Insert Batteries: Open the battery compartment on the remote control and insert 2 x AAA batteries (not included), ensuring correct polarity.
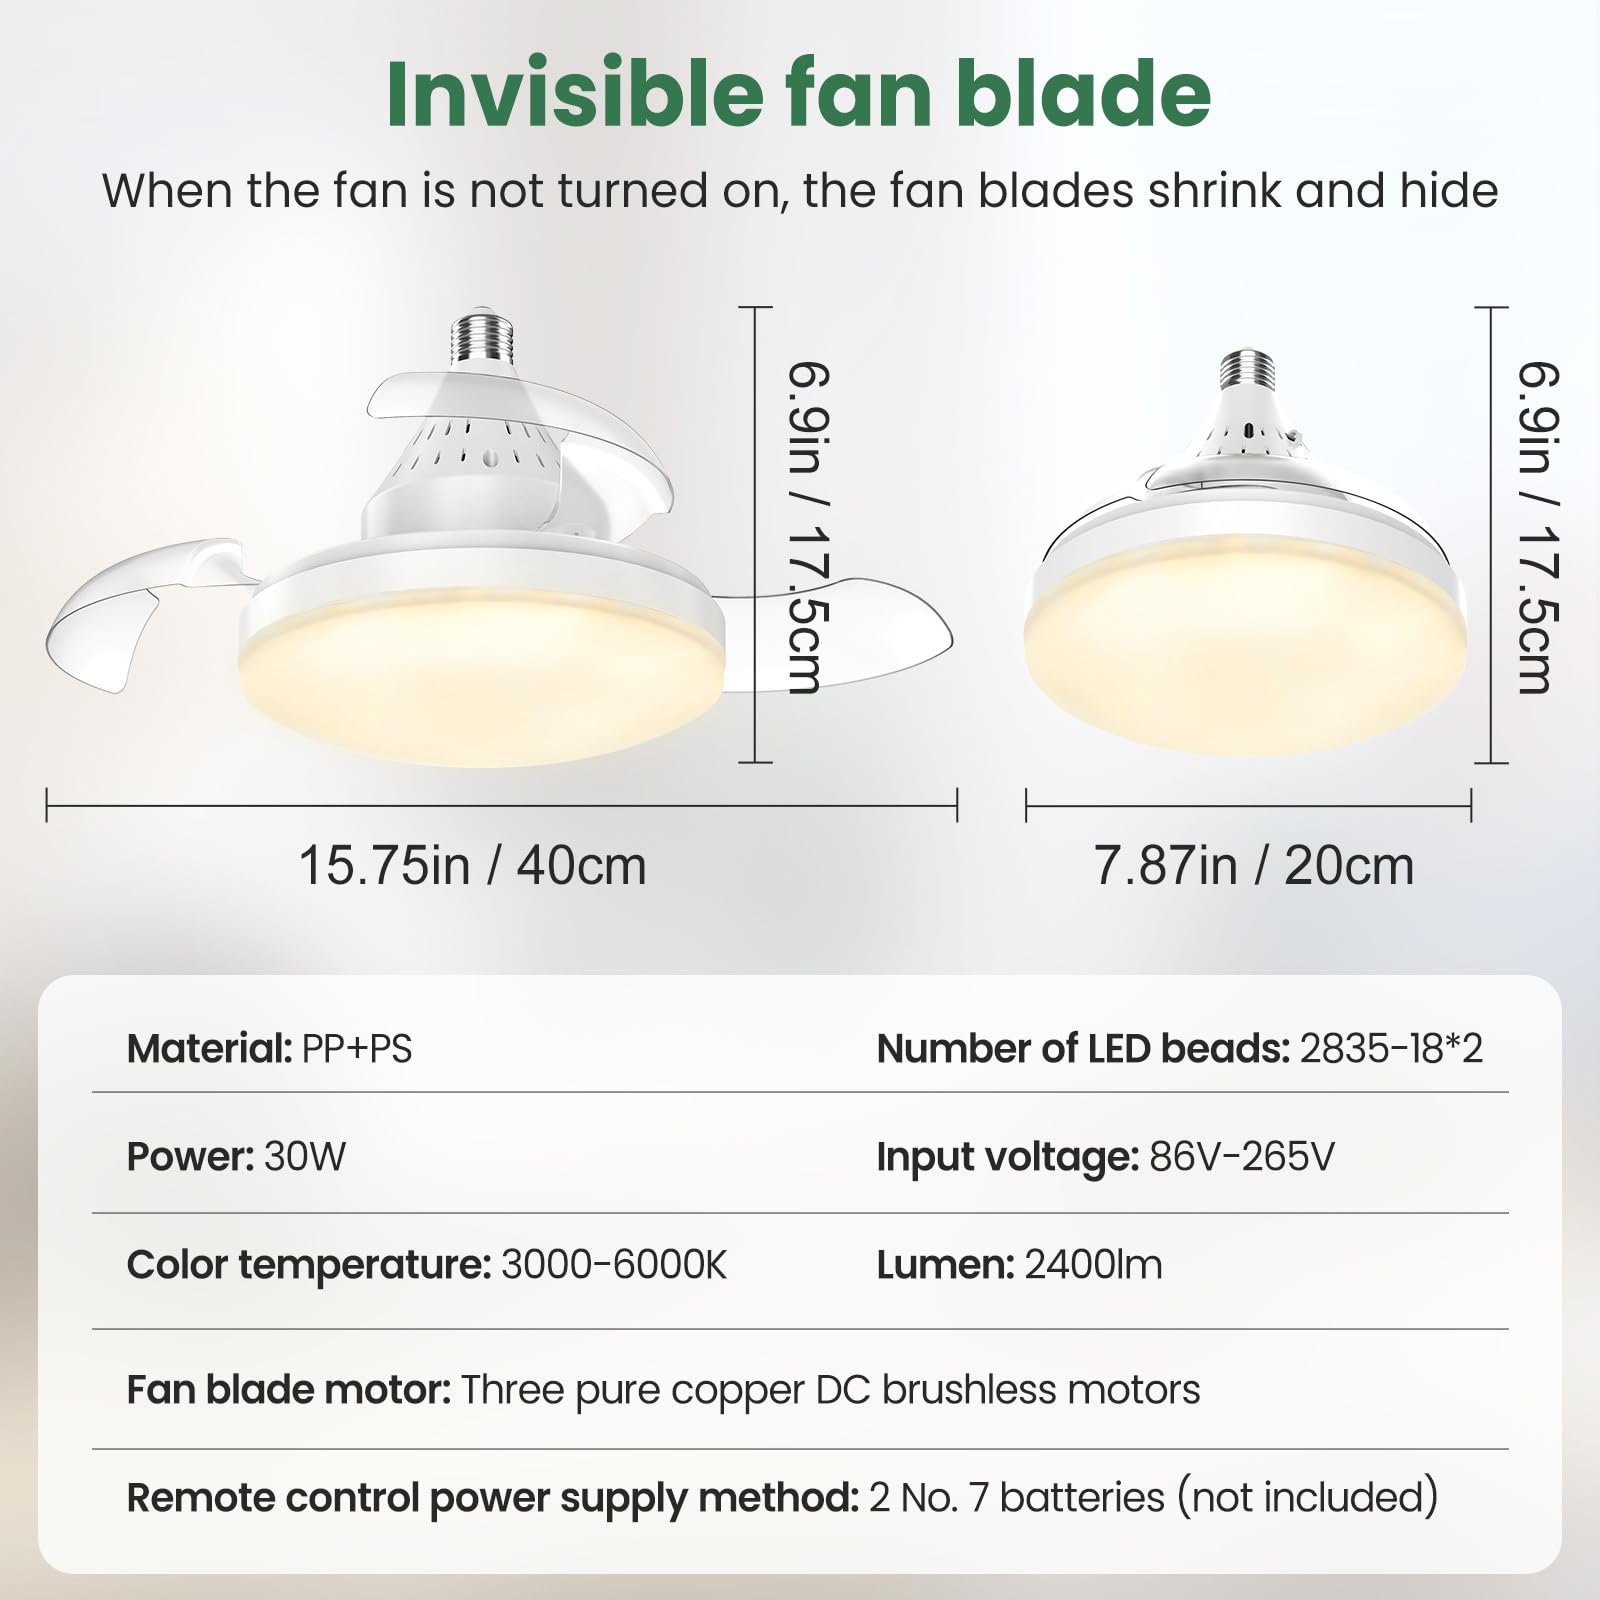
Figure 3.1: The fan unit easily screws into a standard E27 light bulb socket, making installation simple and quick.
4. Operating Instructions
4.1 Remote Control Functions
The included remote control allows for convenient operation of all fan and light functions.
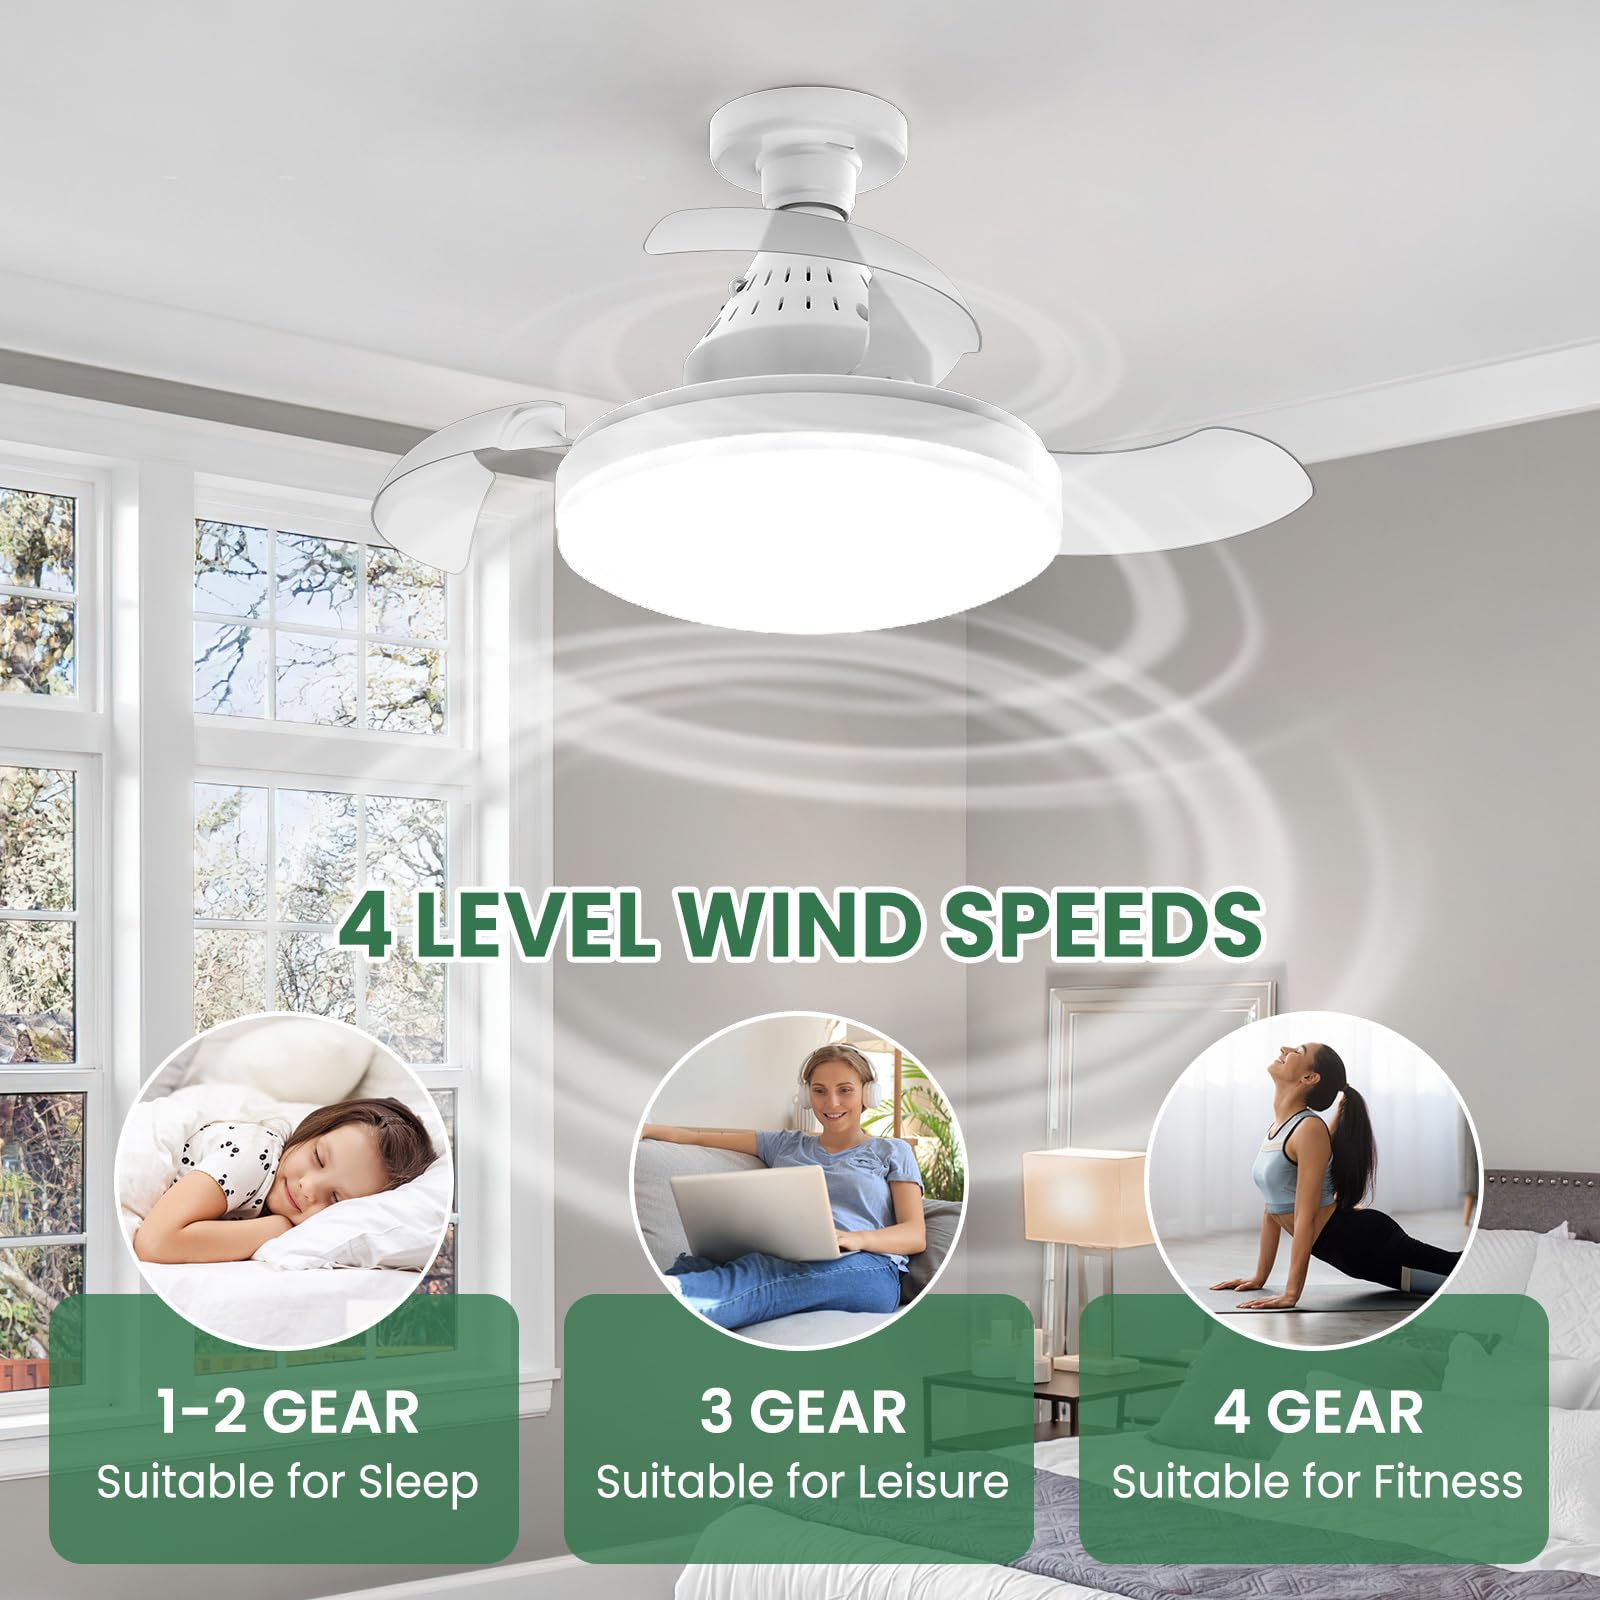
Figure 4.1: Remote control showing buttons for light switch, fan+light switch, brightness adjustment, color temperature adjustment, and fan speed selection.
- Light Switch: Turns the light on or off independently.
- Fan + Light Switch: Turns both the fan and light on or off simultaneously.
- Brightness (+/-): Adjusts the light brightness from 10% to 100%.
- Color Temperature Switch (SEG): Cycles through 3 color temperatures: Cool White (6000K), Natural Light (4500K), Warm Light (3000K).
- Fan Speed (1, 2, 3, 4): Selects one of the four fan speeds.
- Fan OFF: Turns the fan off.
4.2 Fan Speed Settings
The fan offers four adjustable speeds to suit various needs and environments.
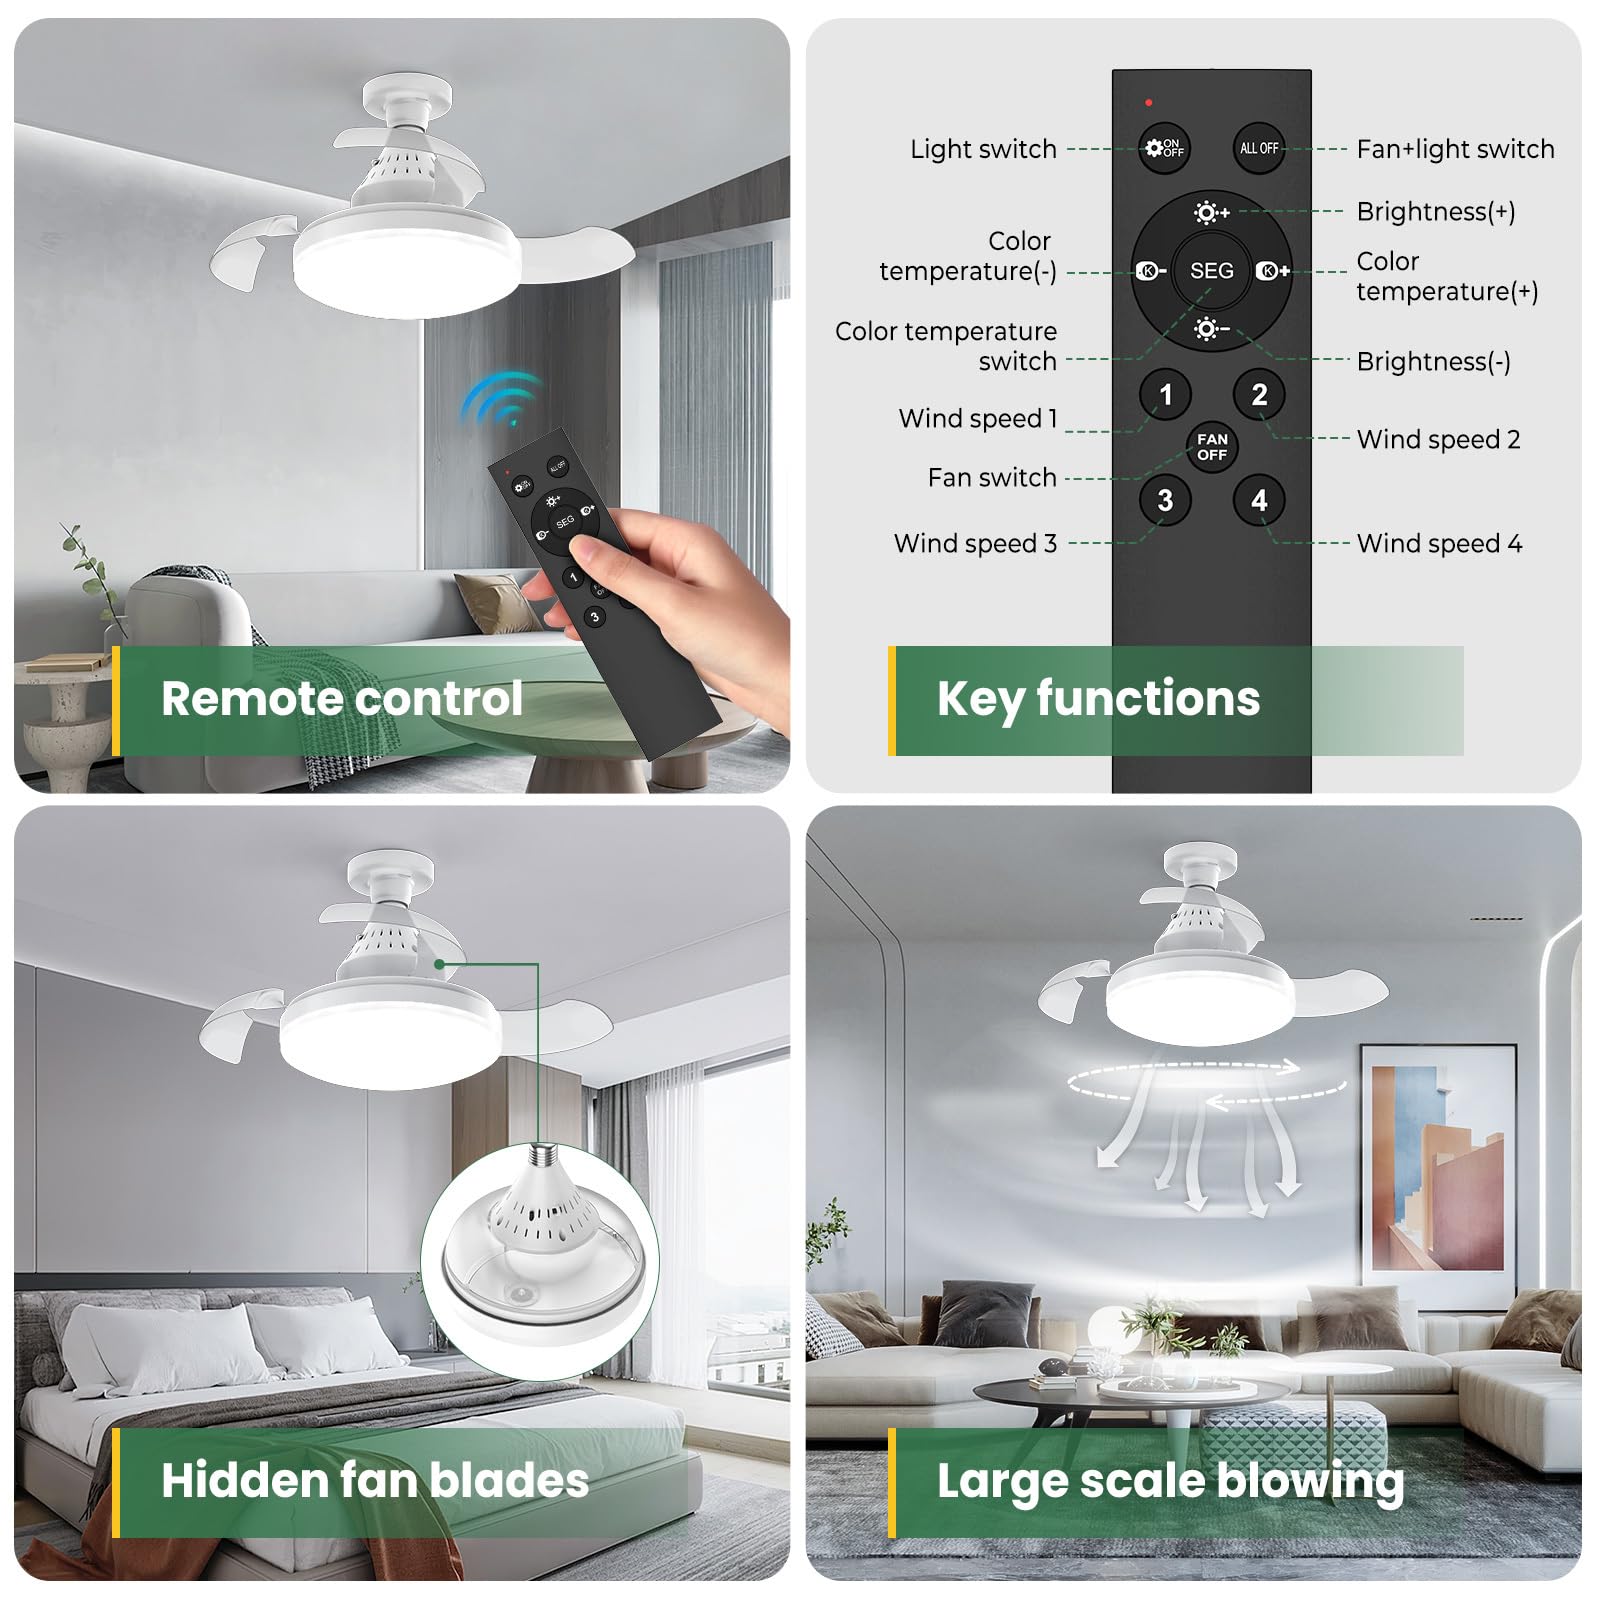
Figure 4.2: Illustration of the four fan speed levels: 1-2 for sleep, 3 for leisure, and 4 for fitness.
- Speed 1-2: Ideal for quiet environments and sleeping.
- Speed 3: Suitable for general leisure and comfortable airflow.
- Speed 4: Provides maximum airflow for cooling during physical activity or warmer conditions.
4.3 Light Customization
The integrated LED light offers adjustable brightness and three color temperature options to create the desired ambiance.
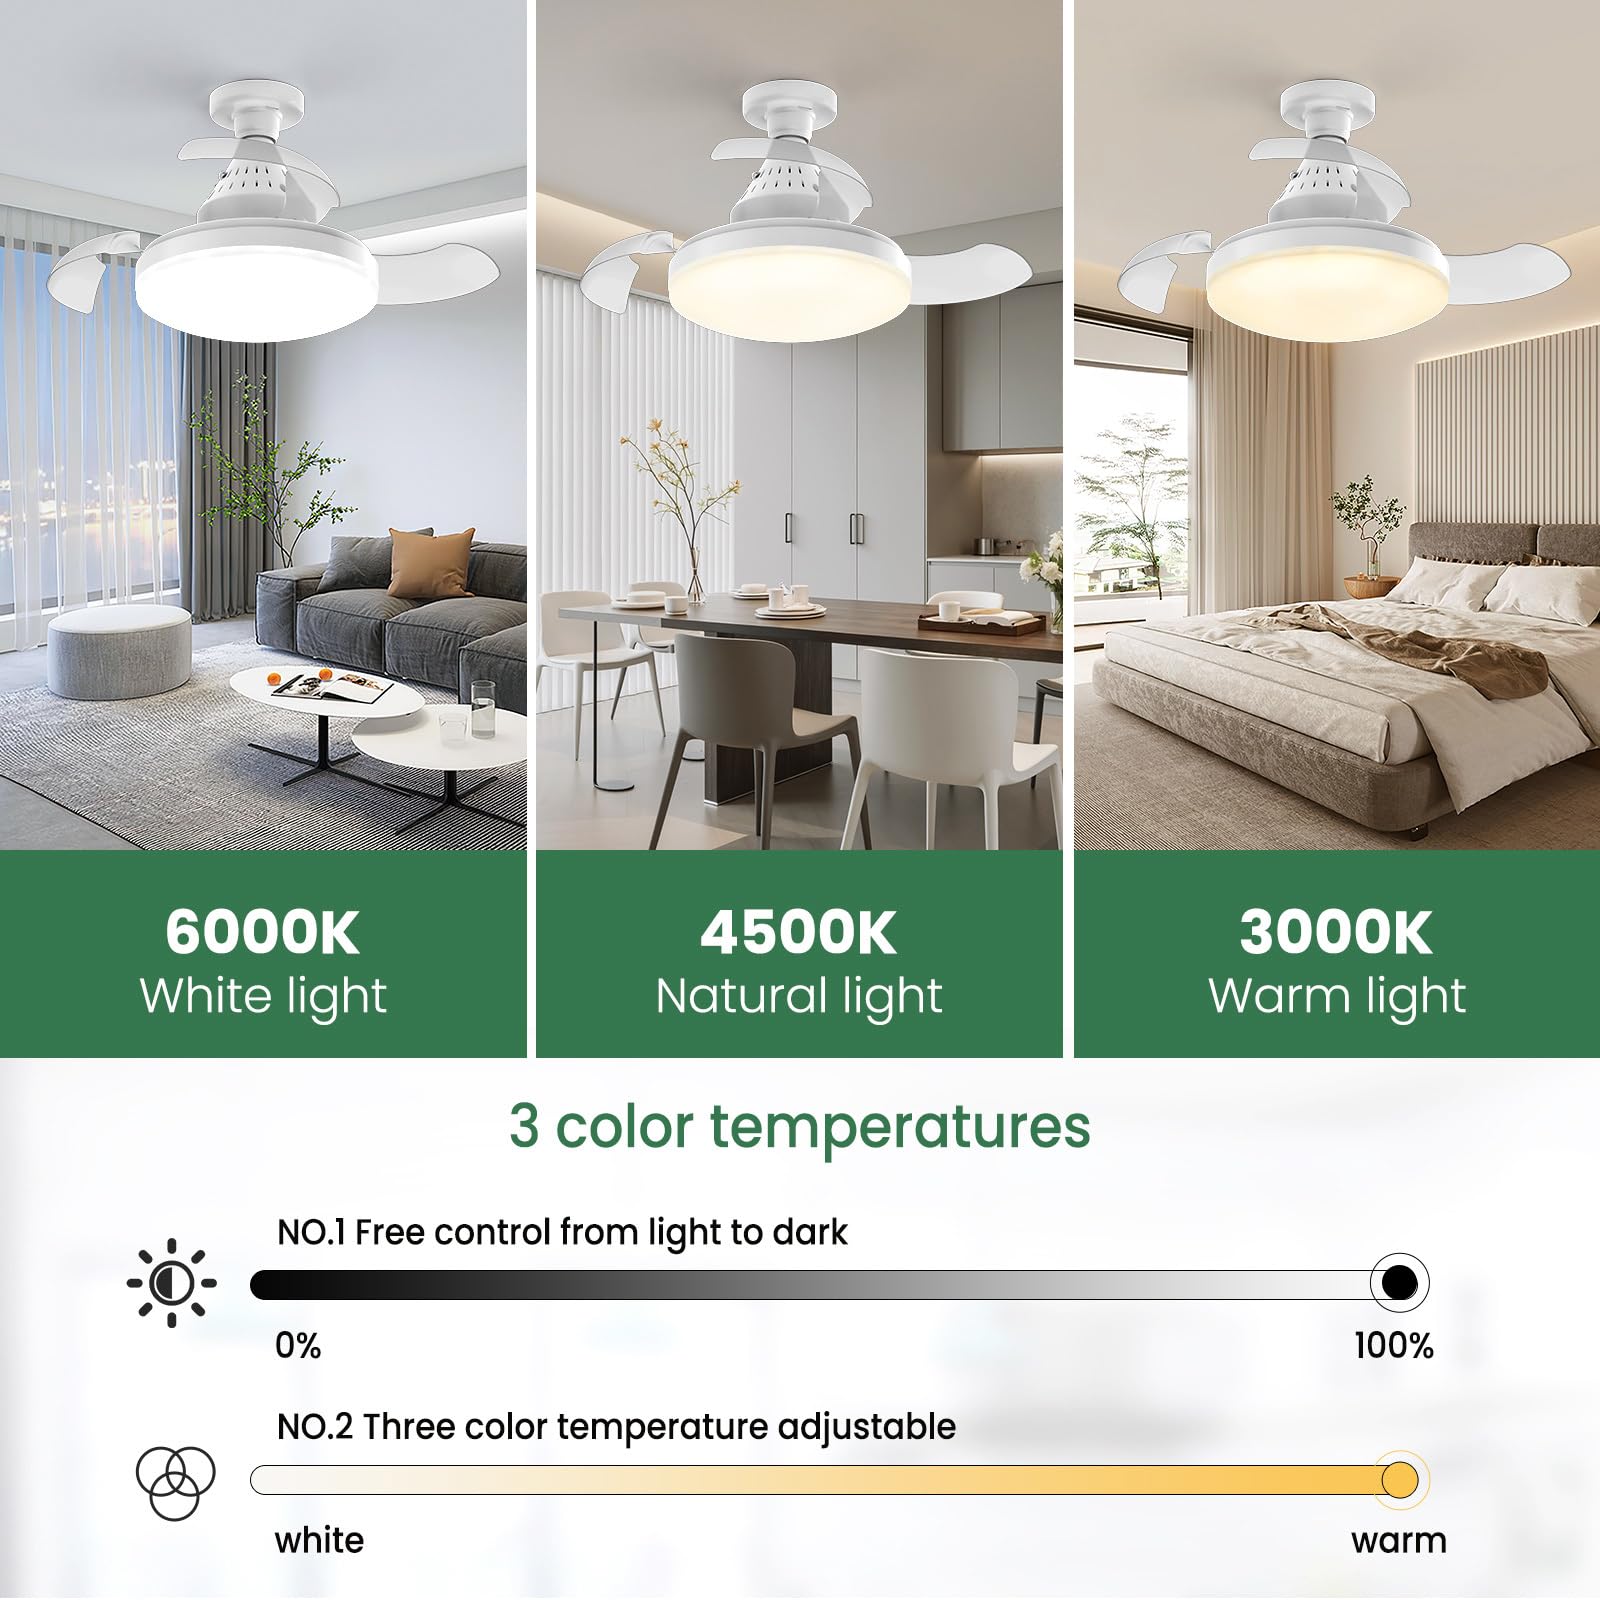
Figure 4.3: The light can be adjusted to three color temperatures: 6000K (Cool White), 4500K (Natural Light), and 3000K (Warm Light).
- Brightness: Smoothly adjustable from 10% to 100% via the remote control.
- Color Temperature: Choose between 6000K (Cool White), 4500K (Natural Light), and 3000K (Warm Light) to match your preference or activity.
4.4 Low Noise Operation
Equipped with a high-quality brushless copper motor, the fan operates with minimal noise, ensuring a peaceful environment.
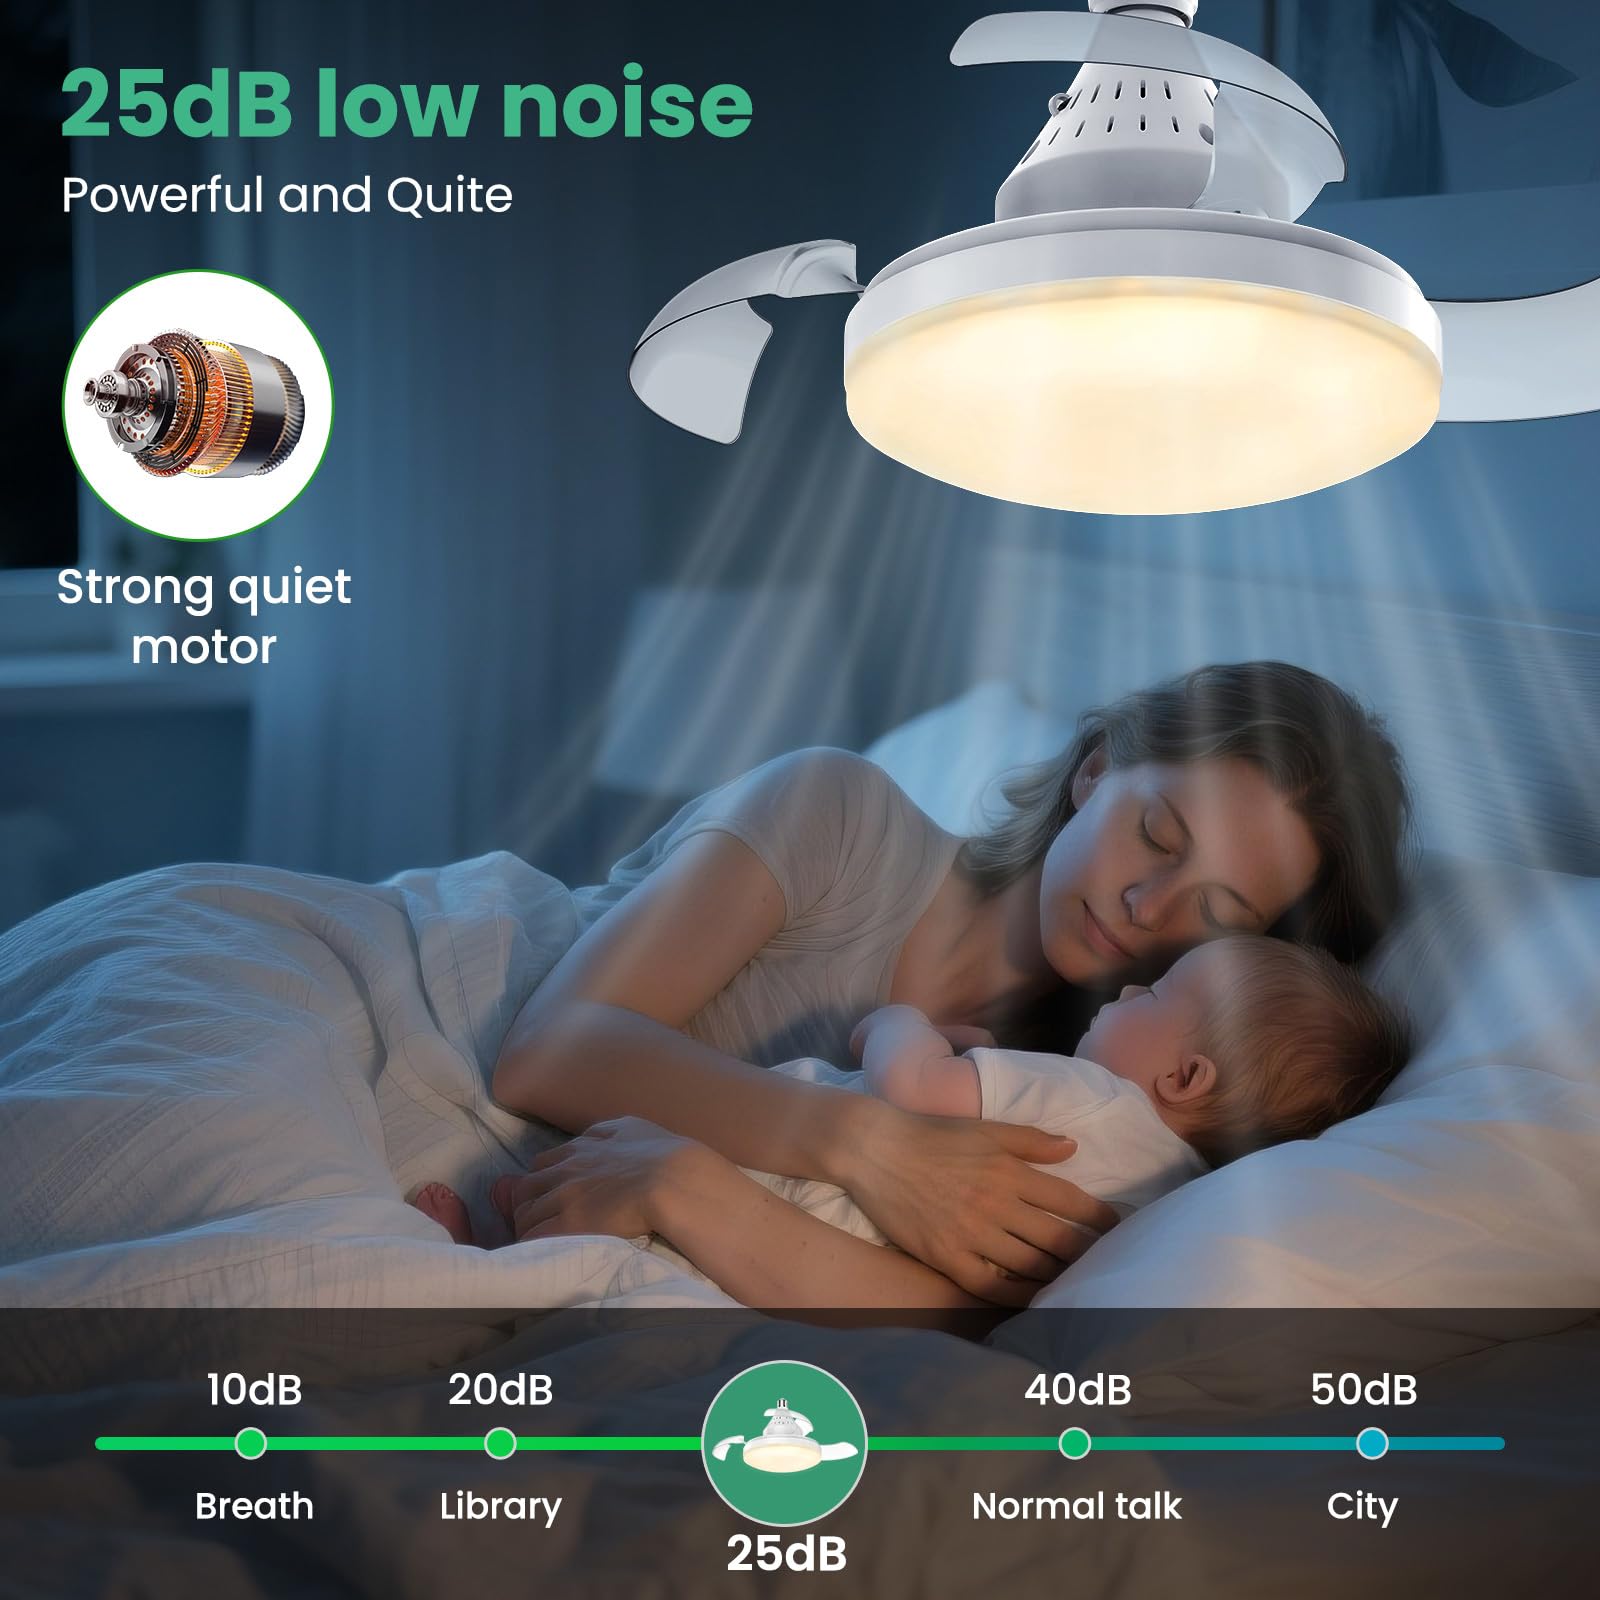
Figure 4.4: The fan operates at a low noise level of 25dB, comparable to a quiet whisper, making it ideal for bedrooms and nurseries.
5. Maintenance and Care
Regular cleaning will help maintain the performance and appearance of your ceiling fan.
- Cleaning: Before cleaning, ensure the power is turned off at the circuit breaker. Use a soft, damp cloth to wipe down the fan and light housing. Do not use abrasive cleaners or solvents.
- Hidden Blades: The fan features hidden blades that retract when the fan is off, simplifying cleaning and maintaining a sleek appearance.
- Bulb Replacement: The LED light is integrated and not user-replaceable. If the light fails, contact customer support.
6. Troubleshooting
If you encounter any issues with your ceiling fan, please refer to the following table for common problems and solutions.
| Problem | Possible Cause | Solution |
|---|---|---|
| Fan or Light does not turn on. | No power supply; Remote control batteries are dead or incorrectly inserted; Fan not screwed in properly. | Check circuit breaker; Replace remote control batteries; Ensure fan is securely screwed into the E27 socket. |
| Fan operates but light does not. | Light function not activated on remote; Integrated LED failure. | Press the 'Light Switch' button on the remote; Contact customer support if LED is faulty. |
| Fan makes unusual noise or wobbles. | Loose installation; Obstruction near blades. | Ensure fan is tightly screwed into the socket; Check for any objects interfering with the blades (with power off). |
| Remote control not responding. | Batteries are dead or incorrectly inserted; Remote is too far or obstructed. | Replace batteries; Ensure clear line of sight to the fan; Move closer to the fan. |
7. Specifications
Key technical details for your SWBSLL Ceiling Fan with Light.
| Feature | Specification |
|---|---|
| Model | S52 |
| Dimensions (L x W x H) | 40 x 40 x 17.5 cm (15.75 x 15.75 x 6.9 inches) |
| Material | Polypropylene (PP) + Polystyrene (PS) |
| Input Voltage | 86-265 Volts (AC) |
| Light Power | 30 Watts |
| Luminous Flux | 2400 Lumens |
| Color Temperature | 3000K-6000K (Adjustable) |
| Fan Speeds | 4 Levels |
| Noise Level | Minimum 25 dB |
| Control Method | Remote Control |
| Socket Type | E27 |
8. Warranty and Support
Your SWBSLL Ceiling Fan with Light is covered by a manufacturer's warranty against defects in materials and workmanship. Please retain your proof of purchase for warranty claims.
For technical support, troubleshooting assistance, or warranty inquiries, please contact our customer service team through the retailer's platform or visit our official website.
Note: Information regarding spare parts availability is not provided. Software updates are not applicable to this product.