1. Introduction
The Wanneton RT22pro is a compact and lightweight two-way radio designed for reliable communication. It features wireless frequency replication, hands-free operation (VOX), privacy codes, scrambling, decoding, scanning, analog mode, low battery alerts, and power-saving functions. This manual provides detailed instructions for the proper setup, operation, and maintenance of your RT22pro walkie talkies.

Image 1.1: Overview of Wanneton RT22pro Walkie Talkies highlighting key features such as VOX, wireless frequency copy, privacy codes, scrambling, decoding, power display, low battery alarm, power saving, scan function, and wide/narrowband.
2. Package Contents
Please check the package for the following items:
- 2 x RT22pro Walkie Talkies
- 2 x Lithium-Ion Batteries
- 2 x Belt Clips
- 1 x Charging Head (Power Adapter)
- 1 x USB Charging Cable
- 1 x Instruction Manual (This document)
3. Product Overview
Familiarize yourself with the components and controls of your RT22pro walkie talkie.

Image 3.1: Front view of the RT22pro walkie talkie with labels for Antenna, Battery bar display, Headphone jack, PTT/Talk Button, Volume + keys, Volume - keys, Channel+/channel lock button, USB Type-C Charging Socket, Channel-/power switch button, MIC, and Speaker.
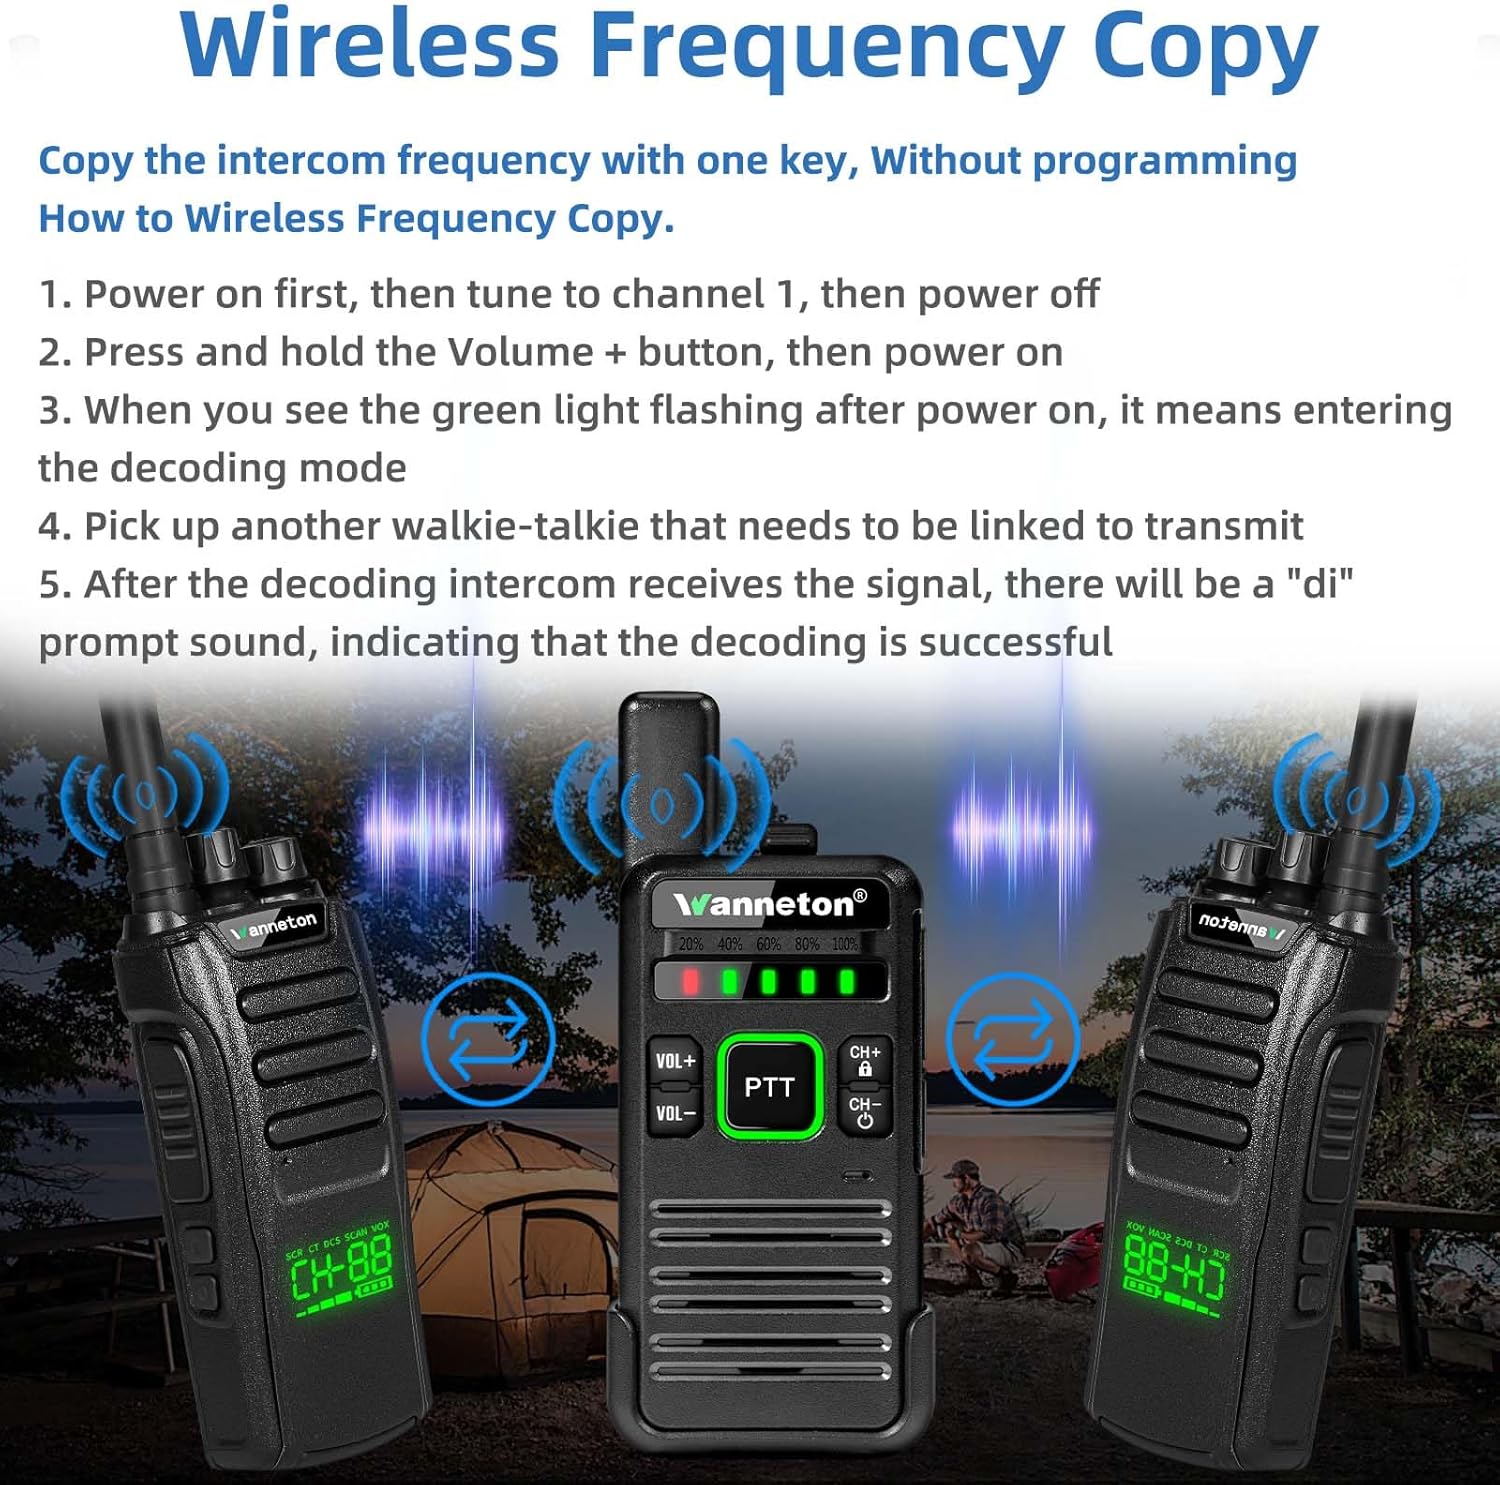
Image 3.2: Back view of the RT22pro walkie talkie showing the battery compartment, the included Li-ion battery with FCC ID, a Kenwood standard 2-pin earpiece jack, and a USB Type-C Charging Socket.
4. Setup
4.1 Battery Installation
- Ensure the walkie talkie is powered off.
- Open the battery compartment cover on the back of the radio.
- Insert the Li-ion battery, ensuring the contacts align correctly.
- Close the battery compartment cover securely.
4.2 Charging the Battery
The RT22pro uses fast USB charging. You can charge the device using a computer, power bank, or car charger.
- Connect the USB charging cable to the USB Type-C Charging Socket on the side of the walkie talkie.
- Connect the other end of the USB cable to the charging head (power adapter) and plug it into a power outlet, or connect it to a compatible USB power source.
- The battery indicator lights will show charging status. A full charge is indicated when all lights are green.

Image 4.1: Two RT22pro walkie talkies being charged simultaneously using a dual USB power adapter.
4.3 Attaching the Belt Clip
The unique clip design allows for quick and easy attachment and detachment without tools.
- Align the belt clip with the designated slots on the back of the walkie talkie.
- Slide the clip into place until it locks securely.
- To remove, press the release tab (if present) and slide the clip off.

Image 4.2: The RT22pro walkie talkie shown with its detachable belt clip, illustrating its compact profile and ease of attachment.
5. Operating Instructions
5.1 Power On/Off and Volume Control
- Power On/Off: Press and hold the Channel-/power switch button (CH-) to turn the radio on or off.
- Volume Adjustment: Use the VOL+ and VOL- buttons to increase or decrease the listening volume.
5.2 Channel Selection
Use the CH+ and CH- buttons to cycle through the available 16 channels. The current channel number may be indicated by voice prompt or display (if available).
5.3 Push-to-Talk (PTT)
To transmit, press and hold the PTT button on the side of the radio. Speak clearly into the microphone. Release the PTT button to receive.
5.4 Wireless Frequency Copy
This feature allows you to quickly copy frequencies from other walkie-talkie models of different brands without manual programming.
- Power on the RT22pro, then tune it to channel 1. After tuning, power off the device.
- Press and hold the Volume + button, then power on the RT22pro.
- When the green light flashes after power on, the device has entered decoding mode.
- Pick up another walkie-talkie that needs to be linked and transmit a signal.
- After the decoding RT22pro receives the signal, a "di" prompt sound will indicate successful decoding.

Image 5.1: Visual guide for the wireless frequency copy function, showing two RT22pro units and a third radio transmitting a signal for frequency replication.
5.5 VOX (Voice Operated Exchange)
VOX allows for hands-free operation, transmitting your voice automatically when you speak, without needing to press the PTT button. This feature can be enabled or disabled via the device's menu.
5.6 Scrambling and Decoding
These functions enhance communication privacy by encrypting and decrypting transmissions. They can be activated through the radio's menu settings.
5.7 Scanning
The scanning feature allows the radio to automatically scan through channels to detect active conversations. Activate scanning via the menu.
5.8 Privacy Codes (CTCSS/DCS)
Privacy codes help filter out unwanted conversations on a channel. By setting a specific privacy code, you will only hear transmissions from radios using the same channel and code. These are configurable through the menu.
5.9 Low Battery Alert and Power Saving
The radio will provide an alert when the battery level is low. The power-saving function automatically reduces power consumption when no activity is detected, extending battery life.
6. Maintenance
- Cleaning: Use a soft, damp cloth to clean the radio's exterior. Do not use harsh chemicals or solvents.
- Storage: Store the walkie talkie in a cool, dry place when not in use. Remove the battery if storing for extended periods.
- Battery Care: Avoid overcharging or completely draining the battery. Charge the battery regularly to maintain its lifespan.
- Water Resistance: The RT22pro is water resistant. However, avoid submerging it in water or exposing it to heavy rain for prolonged periods.
7. Troubleshooting
If you encounter issues with your RT22pro walkie talkie, refer to the following common problems and solutions:
- No Power: Ensure the battery is correctly installed and fully charged. Check if the power button is pressed and held sufficiently.
- Cannot Transmit or Receive: Verify that both radios are on the same channel and have the same privacy codes (if enabled). Check battery level. Ensure PTT button is fully pressed when transmitting.
- Poor Audio Quality: Check volume levels. Ensure radios are within range and not obstructed by large obstacles.
- Short Battery Life: Ensure the battery is fully charged. Reduce usage of high-power transmission. Enable power-saving mode.
For persistent issues, please contact customer support.
8. Specifications
| Feature | Specification |
|---|---|
| Brand | Wanneton |
| Model Number | Wanneton-RT22PRO |
| Color | Black |
| Number of Channels | 16 |
| Frequency Range | UHF |
| Talking Range Maximum | 3 Miles |
| Voltage | 3.7 Volts |
| Water Resistance Level | Water Resistant |
| Product Dimensions (D x W x H) | 3.5" x 6.53" x 7.8" |
| Item Weight | 0.7 Pounds |
| Battery Type | 1 Lithium Ion battery (included) |
| Battery Average Life | 7 days (standby) |
| Impedance | 50 Ohms |
| Operating Temperature Range | 5-40°C Degrees Celsius |
| Special Features | Battery Saver Mode, Emergency Alarm, Keypad Lock, Lightweight, One-key decoding copy frequency |
| Compatible Devices | Most walkie talkies |
| FCC ID | 2AUMTRT22PRO |
9. Warranty and Support
9.1 Warranty Information
Wanneton provides an unconditional return service within 60 days of purchase. Additionally, Wanneton offers lifetime after-sales service for the RT22pro walkie talkies, demonstrating confidence in product quality.
9.2 Customer Support
If you have any questions, require assistance, or encounter issues not covered in this manual, please feel free to contact Wanneton customer support. Our team is available to assist you.