1. Introduction
Thank you for purchasing the Retrolife HQ-KZ009 Record Player. This all-in-one vintage turntable is designed to provide a high-fidelity audio experience with its built-in stereo speakers, Bluetooth connectivity, and support for various vinyl record speeds. This manual will guide you through the setup, operation, and maintenance of your new record player to ensure optimal performance and longevity.

2. Safety Instructions
Please read and understand all safety instructions before using this product. Keep this manual for future reference.
- Power Source: Use only the provided power adapter (DC 5.8V 1.5A). Ensure the voltage matches your local power supply.
- Water and Moisture: Do not expose the unit to rain, moisture, or dripping/splashing liquids. Do not place objects filled with liquids, such as vases, on the apparatus.
- Ventilation: Ensure proper ventilation. Do not block any ventilation openings. Maintain a minimum distance around the apparatus for sufficient ventilation.
- Heat: Do not place the unit near heat sources such as radiators, heat registers, stoves, or other apparatus (including amplifiers) that produce heat.
- Cleaning: Unplug the unit from the power outlet before cleaning. Use a soft, dry cloth for cleaning. Do not use liquid cleaners or aerosol cleaners.
- Servicing: Do not attempt to service this product yourself. Refer all servicing to qualified service personnel.
- Placement: Place the unit on a stable, flat surface to prevent it from falling. Avoid placing it in direct sunlight or extreme temperatures.
3. Package Contents
Carefully unpack the box and ensure all the following items are included:
- 1. Retrolife HQ-KZ009 Turntable Unit
- 2. Power Adapter (DC 5.8V 1.5A)
- 3. Instruction Manual (this document)
- 4. A 45 RPM Fixtor (Mounted)
- 5. An AT-3600L Stylus Needle (Mounted)
- 6. Detachable Dust Cover (Mounted)
4. Product Overview
Familiarize yourself with the main components of your Retrolife HQ-KZ009 Record Player.

- Platter: The rotating disc where records are placed.
- Tonearm: Holds the cartridge and stylus, which reads the grooves of the record.
- AT-3600L Cartridge: A high-quality moving magnet (MM) cartridge ensuring precise stylus movement and rich audio reproduction.
- Tonearm Lifter: Lever to gently raise and lower the tonearm, protecting your records and stylus.
- Speed Selector: Allows selection of 33 1/3, 45, or 78 RPM playback speeds.
- 45 RPM Adapter: An embedded adapter for playing 7-inch records with a large center hole. Turn clockwise to raise, counter-clockwise to sink.
- Built-in Stereo Speakers: Features two bass speakers and one tweeter speaker for spacious and detailed sound.
- Control Knobs: Integrated controls for power, volume, and mode selection (Bluetooth, Phono, AUX).
- Dust Cover: A clear, detachable cover to protect the turntable from dust.

5. Setup
Follow these steps to set up your record player for the first time.
- Unpacking: Carefully remove the record player and all accessories from the packaging. Retain the packaging for future transport or storage.
- Placement: Place the record player on a stable, level surface away from direct sunlight, heat sources, and excessive dust or vibrations. Ensure there is enough space around the unit for proper ventilation.
- Dust Cover: The detachable dust cover is pre-mounted. You can remove it if preferred, but it is recommended to keep it on when not in use to protect the unit.
- Stylus Protection: Remove the clear plastic stylus protector from the AT-3600L cartridge before use. Be careful not to touch the stylus tip.
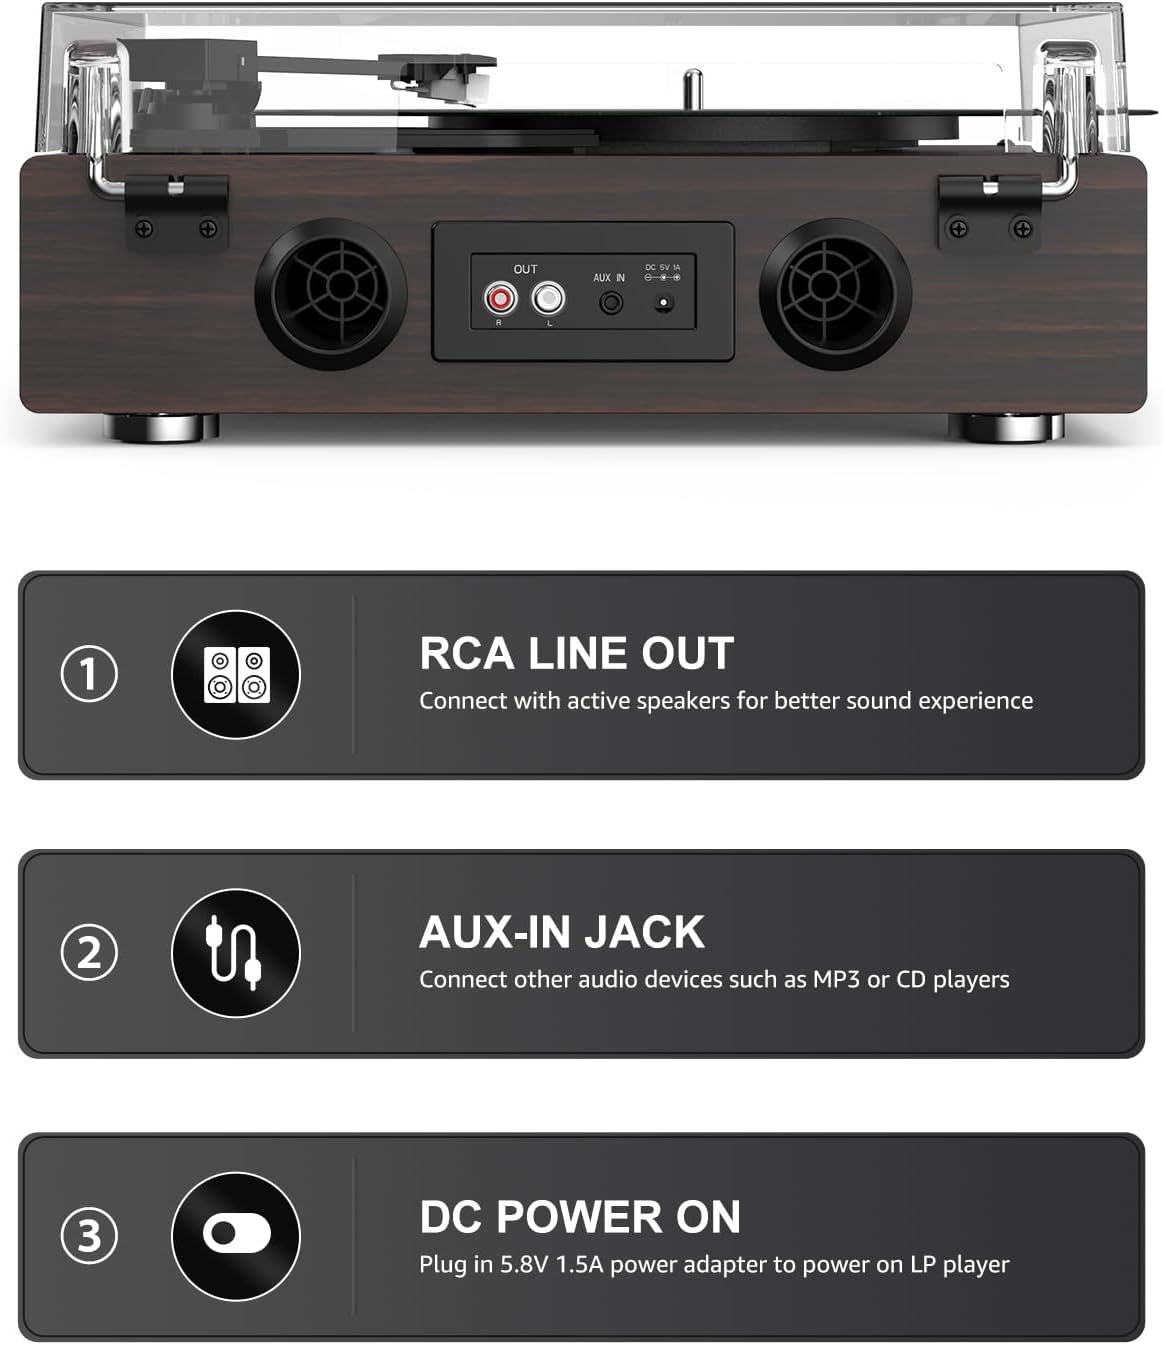
- Power Connection: Connect the provided DC 5.8V 1.5A power adapter to the 'DC Power On' port on the rear of the unit. Plug the other end into a wall outlet.
- External Connections (Optional):
- RCA Line Out: To connect to external active speakers or an amplifier, use an RCA cable (not included) to connect the 'OUT' ports on the rear of the record player to the input of your external audio system.
- AUX In: To connect external audio devices like an MP3 player or CD player, use a 3.5mm audio cable (not included) to connect the device to the 'AUX IN' port on the rear.
6. Operating Instructions
6.1. Powering On/Off and Volume Control
- To power on the unit, turn the 'MIN/OFF' knob clockwise. You will hear a click, and the unit will power on.
- Continue turning the knob clockwise to increase the volume. Turn counter-clockwise to decrease the volume.
- To power off, turn the knob counter-clockwise until it clicks into the 'OFF' position.
6.2. Playing Vinyl Records (Phono Mode)

- Ensure the unit is powered on.
- Select 'PHONO' mode using the mode selector knob.
- Place a vinyl record on the platter. If playing a 7-inch record with a large center hole, use the embedded 45 RPM adapter by turning it clockwise to raise it.
- Select the correct speed (33 1/3, 45, or 78 RPM) using the speed selector switch located on the top panel.
- Gently lift the tonearm using the tonearm lifter lever.
- Move the tonearm over the desired starting groove of the record.
- Slowly lower the tonearm using the tonearm lifter lever. The stylus will gently descend onto the record, and playback will begin.
- To stop playback, lift the tonearm using the lifter lever, return it to the tonearm rest, and gently lower the lifter.
6.3. Bluetooth Connectivity

The record player features Bluetooth 5.3 input, allowing you to stream audio wirelessly from your smart devices.
- Ensure the unit is powered on.
- Select 'BT' mode using the mode selector knob. The Bluetooth indicator light will blink, indicating it is in pairing mode.
- On your smartphone, tablet, or other Bluetooth-enabled device, turn on Bluetooth and search for available devices.
- Select 'Retrolife HQ-KZ009' (or similar name) from the list of devices.
- Once paired, the Bluetooth indicator light will stop blinking and remain solid. You can now play audio from your device through the record player's speakers.
6.4. AUX Input
Use the AUX input to connect non-Bluetooth audio devices.
- Ensure the unit is powered on.
- Select 'AUX' mode using the mode selector knob.
- Connect your external audio device (e.g., MP3 player, CD player) to the 'AUX IN' port on the rear of the record player using a 3.5mm audio cable.
- Play audio from your connected device. The sound will be output through the record player's speakers.
6.5. RCA Line Out

The RCA Line Out allows you to connect your record player to external active speakers or an amplifier for a more powerful and customized audio experience.
- Ensure the record player and your external audio system are powered off.
- Connect an RCA cable (not included) from the 'OUT' ports on the rear of the record player to the corresponding input ports on your external amplifier or active speakers.
- Power on the record player and your external audio system.
- Play a record or stream via Bluetooth/AUX. The audio will be routed through your external system. Adjust volume on both the record player and the external system as needed.
7. Maintenance
Proper care and maintenance will ensure the longevity and optimal performance of your record player.
- Cleaning the Unit: Use a soft, dry, lint-free cloth to wipe the surface of the record player. Do not use abrasive cleaners, waxes, or solvents as they may damage the finish.
- Stylus Care: The stylus (needle) is delicate. Avoid touching it with your fingers. Use a soft brush (not included) to gently clean the stylus tip from back to front to remove dust and debris. Replace the stylus if you notice a significant drop in sound quality or distortion.
- Dust Cover: Clean the dust cover with a soft, damp cloth. Avoid using harsh chemicals that could scratch or cloud the plastic.
- Record Care: Keep your vinyl records clean and free of dust. Store them vertically in their sleeves to prevent warping.
8. Troubleshooting
If you encounter any issues, refer to the following common problems and solutions.
| Problem | Possible Cause | Solution |
|---|---|---|
| No power | Power adapter not connected; Power outlet not working; Unit not turned on. | Ensure power adapter is securely connected to the unit and a working outlet. Turn the volume/power knob clockwise past the 'OFF' position. |
| No sound from speakers | Volume too low; Incorrect mode selected; Stylus protector still on; Stylus damaged. | Increase volume. Ensure correct mode (PHONO, BT, AUX) is selected. Remove stylus protector. Check stylus for damage and replace if necessary. |
| Sound distorted or skipping | Record is dirty or scratched; Stylus is dirty or worn; Unit is on an unstable surface; Incorrect speed selected. | Clean the record. Clean or replace the stylus. Place the unit on a stable, level surface. Ensure correct playback speed (33 1/3, 45, or 78 RPM) is selected. |
| Bluetooth not connecting | Unit not in BT mode; Device not in pairing mode; Device too far. | Select 'BT' mode on the record player. Ensure Bluetooth is enabled on your device and it's searching for devices. Move your device closer to the record player. |
| Record plays too fast/slow | Incorrect speed selected. | Adjust the speed selector switch to match the record's required RPM (33 1/3, 45, or 78). |
If the problem persists after trying these solutions, please contact customer support.
9. Specifications
| Feature | Description |
|---|---|
| Brand | Retrolife |
| Model Name | HQ-KZ009 |
| Item Model Number | HQ-KZ009 |
| Package Dimensions | 15.83 x 15.43 x 7.91 inches |
| Item Weight | 7.26 pounds |
| Maximum Rotational Speed | 78 RPM (Supports 33 1/3, 45, 78 RPM) |
| Included Components | Turntable HQ-KZ009 Unit, Power Adapter(DC 5.8V 1.5A), Instruction Manual, A 45 RPM Fixtor(Mounted), An AT-3600L Stylus Needle(Mounted), Detachable Dust Cover(Mounted) |
| Special Features |
|
| Material | Engineered Wood |
| Style | Vintage |
| Color | Walnut Dark Red |
| Compatible Devices | Smartphone (via Bluetooth) |
| Motor Type | DC Motor |
| Manufacturer | Retrolife |
10. Warranty and Support
Retrolife products are designed for reliability and performance. This product comes with a standard manufacturer's warranty. For specific warranty details, please refer to the warranty card included in your package or contact Retrolife customer support.
If you require technical assistance, have questions about your product, or need to claim warranty service, please contact Retrolife customer support through the official website or the contact information provided with your purchase.