Introduction
This manual provides essential instructions for the setup, operation, and maintenance of your Generic STARLINK Mini Kit. Designed for high-speed internet access in various environments, including RVs, camping, travel, remote work, and off-grid locations, this kit ensures reliable connectivity where traditional services may be unavailable.
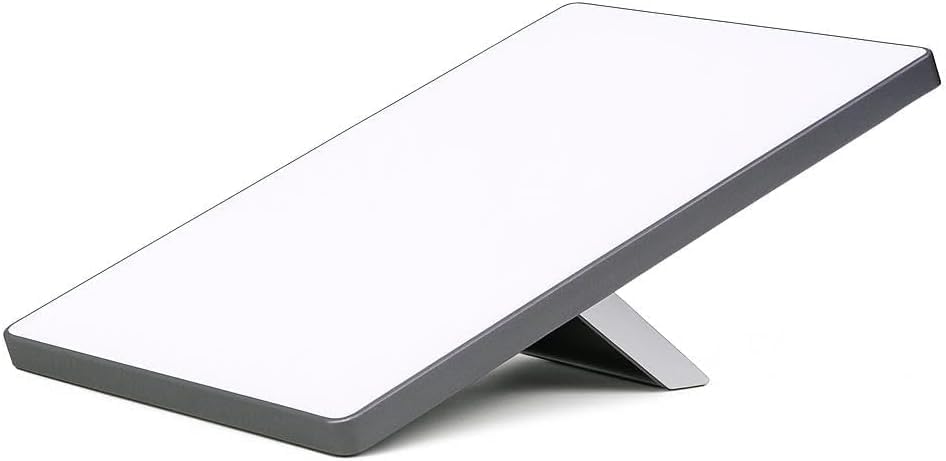
What's in the Box
Verify that all components listed below are present in your STARLINK Mini Kit package:
- STARLINK Mini Antenna with Integrated Wi-Fi Router
- Kickstand
- DC Power Cable (15m / 49.2 ft)
- Power Supply
- Mini Pipe Adapter (for flat mount)
- Plug

The kit includes the compact STARLINK Mini antenna, a kickstand for easy positioning, a DC power cable, a power supply, a mini pipe adapter for flat mounting, and a plug. These components are designed for quick and efficient setup.
Setup
Follow these steps for the initial setup of your STARLINK Mini Kit:
Step 1: Choose a Location
Select an outdoor location for your STARLINK Mini antenna that provides a clear, unobstructed view of the sky. Avoid areas with trees, buildings, or other structures that could block the satellite signal. The Starlink app can assist in finding the optimal placement by scanning for obstructions.
Step 2: Assemble the Antenna
- Unfold the integrated kickstand on the back of the STARLINK Mini antenna.
- Connect the DC Power Cable to the designated port on the antenna. Ensure a secure connection.


Step 3: Power Connection
Connect the other end of the DC Power Cable to the provided Power Supply. Then, plug the Power Supply into a suitable power source (e.g., a 120V AC outlet or a 12V DC car adapter/power station). The system will power on automatically.
Step 4: App Configuration and Alignment
Download the official Starlink app from your device's app store. Follow the in-app instructions to connect to your STARLINK Mini's Wi-Fi network and complete the initial setup. The app will guide you through aligning the antenna to the nearest satellite and optimizing its connection. The antenna will automatically align itself once powered on and connected to the app.
Video 1: Installation Guide for Mini - Easy Setup Tutorial. This video demonstrates the step-by-step process of setting up the Starlink Mini antenna and connecting it to the network.
Video 2: Installation Guide for Mini - Easy Setup Tutorial. This video provides an alternative or supplementary guide to the setup process, focusing on key installation steps.
Operating
Once set up, your STARLINK Mini provides high-speed internet access. The integrated Wi-Fi router broadcasts a signal for your devices.
Connectivity Options
The STARLINK Mini is versatile, offering internet connectivity for various scenarios:
- Residential Use: Connect at home for reliable internet.
- Roam: Ideal for travel, camping, and remote work, providing internet on the go.
- Boats: Stay connected while on the water.

For optimal performance, ensure your antenna has an unobstructed view of the sky. The Starlink app can help you monitor your connection status and identify any potential obstructions.

Power Management
The STARLINK Mini is designed for efficient power consumption. It can be powered via a standard AC outlet using the provided power supply, or through a 12V DC source, making it suitable for mobile and off-grid applications. When using a 12V DC source, ensure it can provide sufficient power for stable operation.
Maintenance
To ensure the longevity and optimal performance of your STARLINK Mini Kit, follow these maintenance guidelines:
- Cleaning: Periodically wipe the antenna surface with a soft, damp cloth to remove dust, dirt, or debris. Avoid using harsh chemicals or abrasive materials.
- Cable Inspection: Regularly check the DC Power Cable for any signs of wear, damage, or fraying. Replace damaged cables immediately to prevent power interruptions or safety hazards.
- Environmental Protection: While designed for outdoor use, protect the antenna from extreme weather conditions when possible. Ensure it is securely placed to prevent displacement by wind.
- Software Updates: Keep the Starlink app updated to the latest version to benefit from performance improvements and new features. The antenna's firmware updates are typically managed automatically through the app.
Troubleshooting
If you encounter issues with your STARLINK Mini Kit, refer to the following common troubleshooting steps:
- No Internet Connection:
- Verify all cables are securely connected to the antenna and power supply.
- Ensure the antenna has a clear view of the sky. Use the "Check for Obstructions" feature in the Starlink app.
- Restart the STARLINK Mini by unplugging it from the power source for 30 seconds and then plugging it back in.
- Slow Speeds:
- Check the Starlink app for any reported obstructions or network issues in your area.
- Ensure your devices are connected to the STARLINK Mini's Wi-Fi network and are within optimal range.
- Minimize the number of active devices or high-bandwidth activities on your network.
- Antenna Not Aligning:
- Confirm the antenna is placed on a stable, level surface.
- Use the Starlink app's alignment tool to manually adjust the antenna if prompted.
For further assistance, consult the Starlink app's support section or visit the official Starlink support website.
Product Specifications
| Feature | Specification |
|---|---|
| Product Dimensions | 7 x 4 x 9 inches (7"L x 4"W x 9"H) |
| Item Weight | 5 pounds |
| Manufacturer | SpaceX |
| Item Model Number | UTA-231 |
| Antenna Type | Satellite |
| Brand | Generic |
| Color | White and Gray |
| Number of Channels | 2 |
| Impedance | 40 Ohm |
| Maximum Range | 400 Feet |
| Number of Items | 1 |
Warranty and Support
For detailed warranty information, please refer to the documentation included with your purchase or visit the official manufacturer's website. For technical support, troubleshooting assistance, or service inquiries, please contact the manufacturer's customer support channels as outlined in your product packaging or on their official website.


