1. Product Overview
The JOYING JY-HT145N4 is an Android 13 car stereo head unit designed specifically for Honda Civic models from 2016 to 2021. This 9-inch unit integrates advanced features such as wireless Apple CarPlay and Android Auto, GPS navigation, Bluetooth 5.0, and a physical volume knob for enhanced user experience. It supports various factory features of your Honda Civic, including the reverse camera, steering wheel controls, USB ports, and amplifier, ensuring a seamless upgrade.
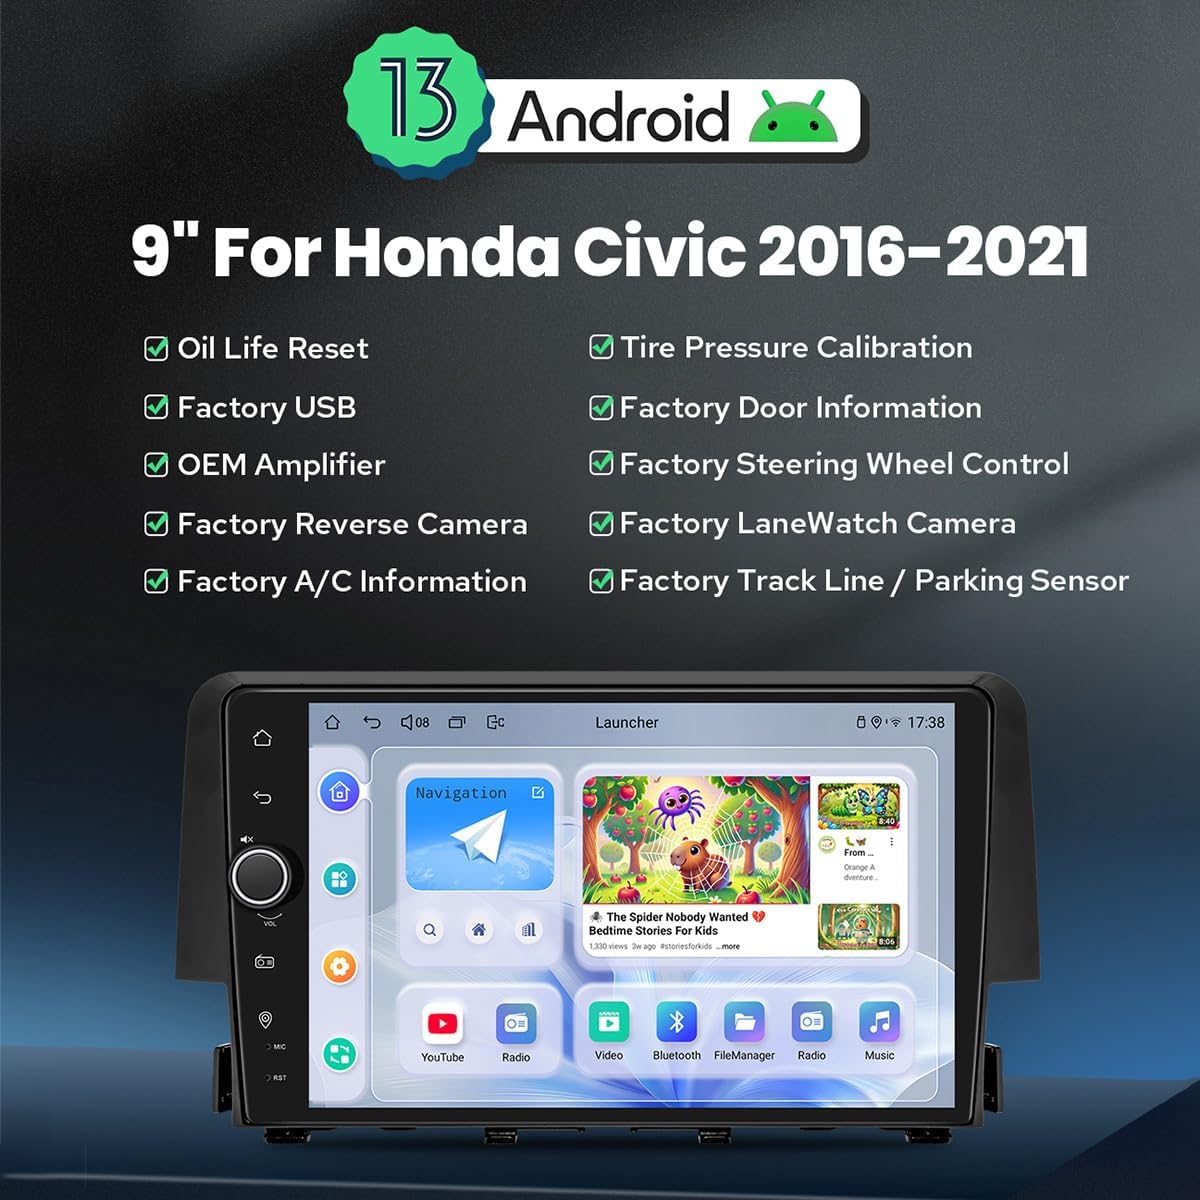
Image 1.1: Front view of the JOYING Android 13 Car Stereo, highlighting key features like Android 13 OS, 9-inch display, and compatibility with various factory vehicle functions.
Key Features:
- Android 13 Operating System: Provides a modern and responsive user interface.
- 9-Inch High-Definition Display: Offers clear visuals for navigation and media.
- Wireless Apple CarPlay & Android Auto: Seamless smartphone integration for navigation, calls, and music.
- GPS Navigation: Precise positioning with support for offline maps and real-time navigation.
- Bluetooth 5.0: For stable hands-free calling and audio streaming.
- Built-in 4G Module: Allows direct internet access via a SIM card (data only).
- Optical Fiber and Coaxial Digital Output: For high-fidelity audio output to external amplifiers.
- Plug & Play Installation: Designed for easy installation with included wiring harnesses, supporting factory features like reverse camera, steering wheel controls, and amplifier.
2. Setup and Installation
This section provides guidance for installing your JOYING car stereo. It is designed for a plug-and-play experience, but professional installation is recommended if you are unfamiliar with car audio systems.
2.1 Wiring Harness Selection
The correct wiring harness is crucial for proper functionality. Please identify your vehicle's original radio type to select the appropriate harness (A, B, or C).

Image 2.1: Guide for selecting the correct wiring harness based on your Honda Civic's original radio configuration.
- Wire Harness A: For OEM radios with a small screen.
- Wire Harness B: For OEM radios with a large screen.
- Wire Harness C: For OEM radios with a factory amplifier (includes power amplifier interface).
Ensure you select the harness that matches your vehicle's specifications to avoid installation issues.
2.2 CAN Bus Setting
Since your Honda Civic is equipped with a CAN bus system, you must set the communication protocol switch on the back of the head unit to the 'CAN' position. This ensures proper communication with your vehicle's systems, including steering wheel controls and factory cameras.

Image 2.2: Location of the CAN bus switch on the rear of the head unit. Ensure it is set to 'CAN' for correct vehicle integration.
2.3 Package Contents
Verify that all components are present in your package before beginning installation:
- 9" Radio Head Unit (1)
- Single Din Cage (1)
- Left & Right Brackets (1 pair)
- WiFi Antenna (1)
- GPS Antenna (1)
- 4G Antennas (2)
- External Microphone (1)
- USB Cables (2)
- AR Cable (1)
- Screen Ribbon Cable (1)
- Power Cable (1)
- User Manual (1)

Image 2.3: Visual representation of the included components in the JOYING car stereo package.
2.4 Optional Accessories (Not Included)
Enhance your experience with these optional accessories:
- OBD2 Scanner: Connects via Bluetooth to retrieve real-time vehicle data and diagnostic trouble codes.
- AR Front Camera: Records the road ahead automatically while driving.
- AR Rear Camera: Provides a clear view behind the vehicle, automatically switching when reversing.

Image 2.4: Examples of optional accessories like OBD2, AR Front Camera, and AR Rear Camera.
3. Operating Instructions
This section covers the primary functions and features of your JOYING car stereo.
3.1 Fast Boot
After the initial boot-up (which may take 30-40 seconds), the system will start almost instantly (within 2 seconds) when you turn on your vehicle, allowing quick access to the user interface.
3.2 GPS Navigation
The unit features precise GPS navigation with an included GPS antenna for improved satellite signal reception. It supports offline maps, allowing you to download map data for specific regions and use navigation without an internet connection. You can also synchronize mobile phone map data via Apple CarPlay or Android Auto.
3.3 Built-in 4G Module
Insert a SIM card into the designated slot to enable internet access directly from the head unit. This module supports data services but cannot be used for phone calls or SMS messages. Supported bands include FDD-LTE: B2/B4/B5/B7/B12/B13/B14/B17/B25/B26/B38/B66/B71 and TDD-LTE: B41.
3.4 Audio Output
The unit features Optical Fiber and Coaxial Digital Outputs. If your external amplifier supports these inputs, you can achieve superior sound quality directly from the head unit.

Image 3.1: Illustrates the audio capabilities, including the TDA7851 DSP chip, 48-band graphic equalizer, 4x50W output, and support for aftermarket amplifiers via various outputs.
3.5 Apple CarPlay & Android Auto
Connect your smartphone via USB cable or Bluetooth to utilize Apple CarPlay or Android Auto. This allows you to access navigation, make phone calls, send messages, and listen to music through the head unit's display.

Image 3.2: Depicts the user interfaces for Apple CarPlay and Android Auto on the head unit's screen.
3.6 Split-screen Multitasking
The split-screen feature allows you to run two applications simultaneously on the display. For example, you can view navigation on one side and a media player on the other. To activate, tap the recent apps icon, then select the split-screen function for a compatible app.

Image 3.3: Visual guide on how to activate and use the split-screen multitasking feature.
3.7 HDMI Output
The HDMI output provides a full digital image and sound interface, allowing synchronous output of audio and video signals to external displays, such as headrest monitors. This enables passengers to watch movies while the driver uses the main screen for navigation. Note: An HDMI cable is not included.
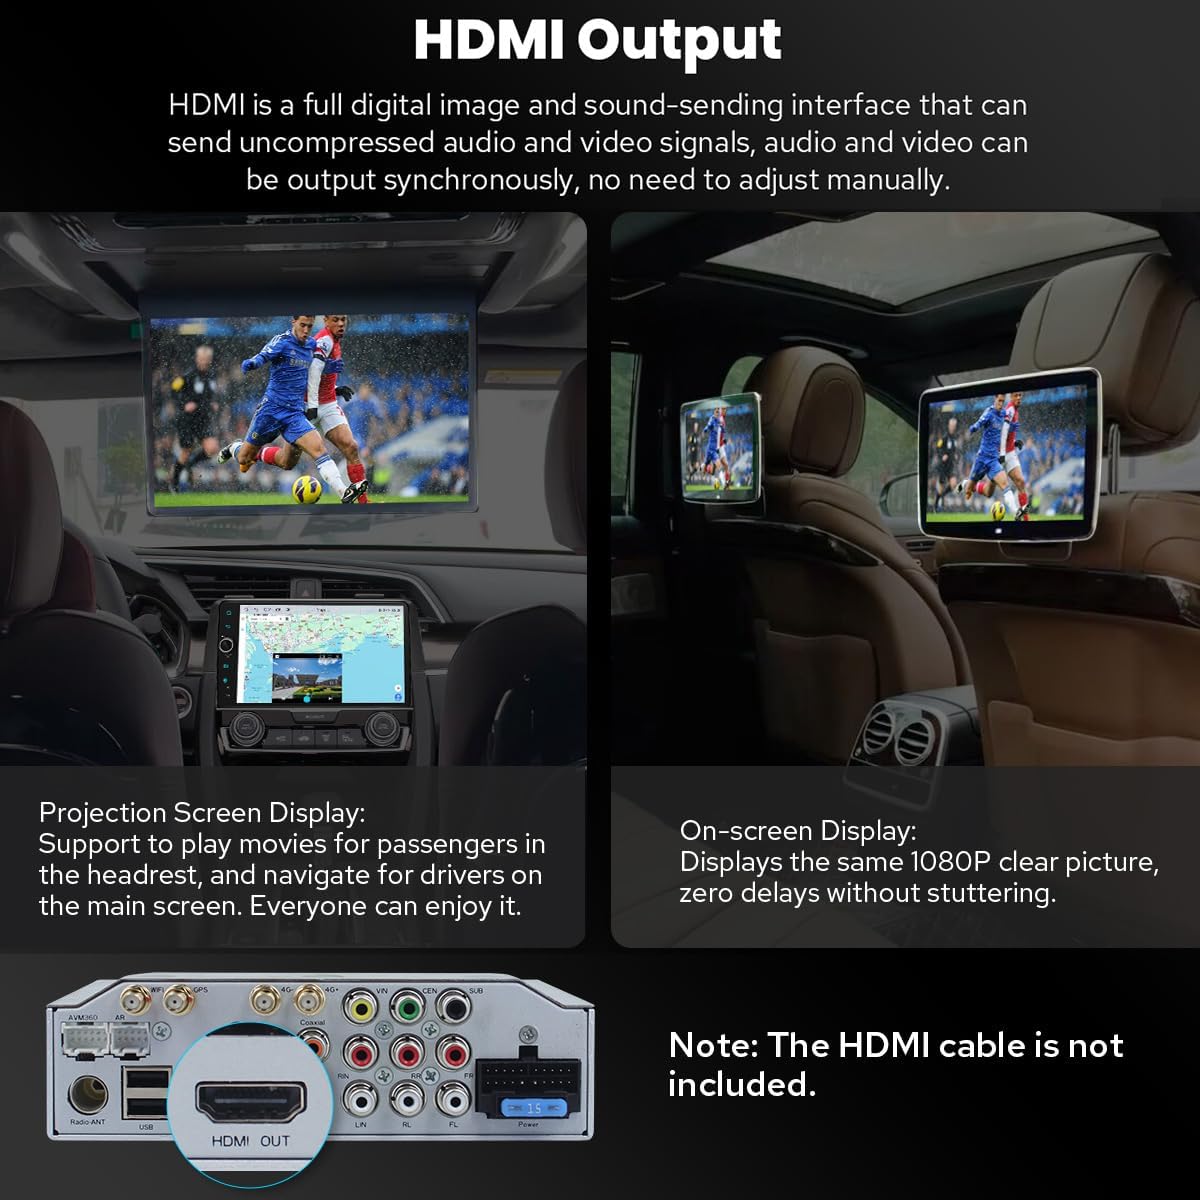
Image 3.4: Demonstrates the HDMI output functionality for connecting to rear seat entertainment systems.
3.8 Personalized Settings
Customize your head unit experience with various settings:
- Car Boot Logo: Select a custom logo to display when the unit starts.
- Customizable Wallpapers: Personalize the background of your home screen.
- Changeable Button Color: Adjust the color of the physical buttons to match your vehicle's interior lighting.
- Adjustable Screen Brightness: Optimize display visibility for different lighting conditions.

Image 3.5: Overview of personalized settings including boot logo, wallpapers, button color, and screen brightness adjustment.
3.9 Other Features
- AM/FM Radio: Access local radio stations.
- Hands-free Call: Make and receive calls safely via Bluetooth.
- Picture-in-Picture: Display a small video window over other applications.
- 3 USB Ports: For connecting external devices, charging, or media playback.
- Micro SD Card Slot: For additional storage or media.
- 4G SIM Card Slot: For mobile data connectivity.

Image 3.6: Icons representing additional features such as Fast Boot, GPS Navigation, AM/FM Radio, Hands-free Call, Picture-in-Picture, 3 USB Ports, Micro SD Card Slot, and 4G SIM Card Slot.
4. Maintenance
Proper maintenance ensures the longevity and optimal performance of your JOYING car stereo.
4.1 Cooling System
The unit features an upgraded dual heat sink design for superior heat dissipation and improved temperature control, enhancing performance stability. A built-in fan automatically activates when the CPU temperature or radio volume exceeds a set warning value, preventing overheating.
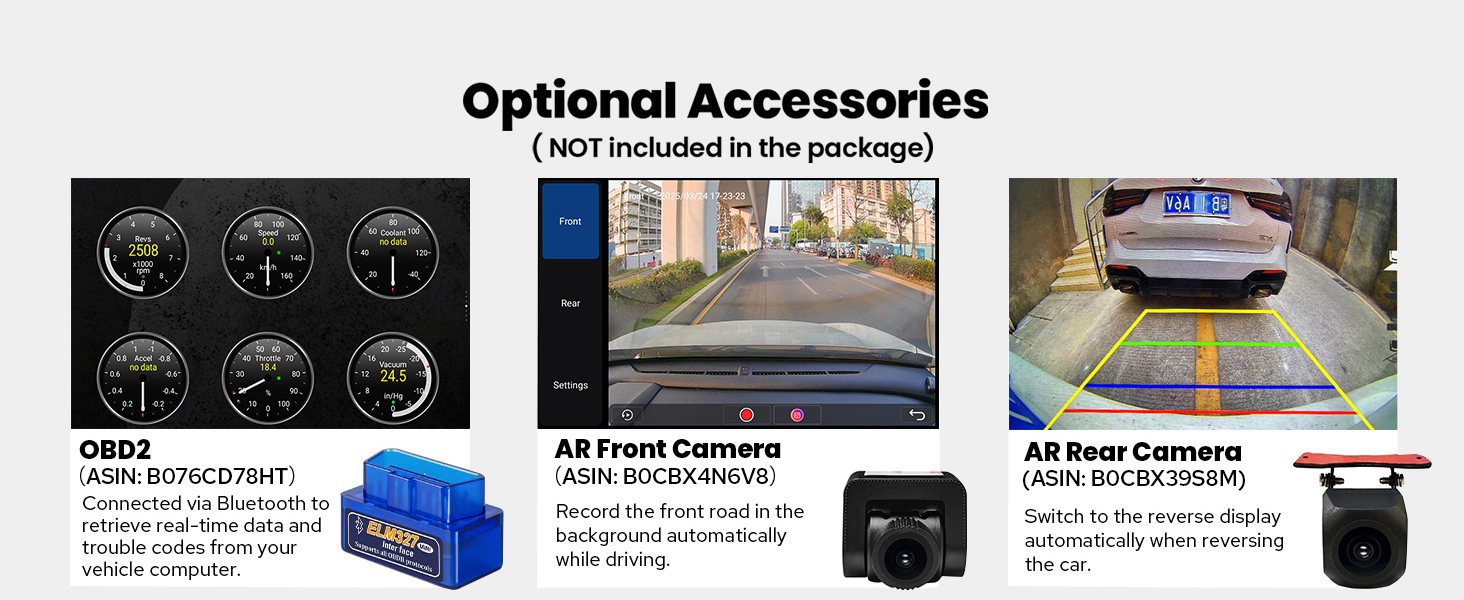
Image 4.1: Diagram illustrating the dual heat sink design and fan control for optimized cooling.
4.2 WiFi Signal
An independent WiFi antenna ensures stable signal quality and provides fast, smooth internet access. The unit supports 802.11a/b/g/n/AC standards across 2.4GHz and 5GHz spectral bands.

Image 4.2: Shows the independent WiFi antenna and its connection point on the rear of the unit, highlighting improved signal.
4.3 General Care
- Cleaning: Use a soft, dry cloth to clean the screen and exterior. Avoid abrasive cleaners or solvents.
- Temperature: Avoid exposing the unit to extreme temperatures, both hot and cold, for extended periods.
- Connections: Periodically check all cable connections to ensure they are secure.
5. Troubleshooting
This section addresses common issues you might encounter and provides potential solutions.
5.1 Common Issues and Solutions
- No Power/Unit Not Turning On:
Solution: Check all power connections. Ensure the vehicle's ignition is on. Verify the fuse in the power cable is intact. - No Sound:
Solution: Check speaker connections. Ensure the volume is not muted or set too low. If using an external amplifier, verify its power and connections. - Backup Camera Not Displaying:
Solution: Confirm the camera is correctly wired to the head unit's reverse input. Check the camera settings in the unit's menu to ensure the correct camera type is selected. Verify the CAN bus switch is set to 'CAN'. - Steering Wheel Controls Not Working:
Solution: Ensure the CAN bus switch on the back of the unit is set to 'CAN'. Check the steering wheel control settings in the unit's menu for proper configuration. - Microphone Issues (Low Volume/Unclear Audio):
Solution: Ensure the external microphone is securely connected and positioned correctly. Adjust microphone sensitivity settings in the unit's audio menu. - Android Auto/CarPlay Connection Issues:
Solution: Ensure your phone's software is up to date. Try a different USB cable. Restart both the phone and the head unit. For wireless connections, ensure Bluetooth and Wi-Fi are enabled on your phone. - AC Controls Not Functioning Correctly:
Solution: This issue can sometimes occur with aftermarket units. Double-check all wiring related to the AC system. Consult the vehicle's specific wiring diagram or contact support if the issue persists. - Unit Freezes or Becomes Unresponsive:
Solution: Perform a soft reset by pressing the reset button (usually a small pinhole) or by turning off the vehicle and restarting it. If the issue persists, a factory reset may be necessary (note: this will erase all user data).
5.2 General Troubleshooting Tips
- Check Connections: Always ensure all cables are securely connected.
- Restart the Unit: A simple restart can often resolve minor software glitches.
- Consult Online Resources: JOYING's official website or user forums may offer additional troubleshooting guides.
- Contact Support: If you cannot resolve an issue, refer to the Warranty & Support section for assistance.
6. Specifications
Detailed technical specifications for the JOYING JY-HT145N4 car stereo.
| Feature | Specification |
|---|---|
| Brand | JOYING |
| Model Name | HT145N4 |
| Operating System | Android 13 |
| Screen Size | 9 Inches |
| Display Type | LED |
| Touch Screen Type | Capacitive |
| Memory Storage Capacity | 64 GB |
| Connectivity Technology | Bluetooth, Ethernet, USB, Wi-Fi |
| Connectivity Protocol | Bluetooth, Wi-Fi |
| Bluetooth Version | 5.0 |
| Supported Satellite Navigation System | BeiDou, GLONASS, GPS |
| Map Type | North America (Offline maps supported) |
| Audio Output Mode | Stereo |
| Special Features | Bluetooth, Touchscreen, Carplay, Android Auto, Mirror Link, GPS Navigation, Volume Knob, Built-in 4G Module, Optical Fiber/Coaxial Digital Output |
| Mounting Type | Dashboard Mount |
| Compatible Devices | Camera, Smartphone |
| Item Weight | 6 Pounds |
7. Warranty and Support
7.1 Product Warranty
The JOYING JY-HT145N4 car stereo comes with a 2-year warranty from the date of purchase. This warranty covers manufacturing defects and malfunctions under normal use. Please retain your proof of purchase for warranty claims.
7.2 Customer Support
For technical assistance, troubleshooting, or warranty inquiries, please contact JOYING customer support. It is recommended to reach out to the Amazon seller support for this product directly for the most responsive and helpful assistance. When contacting support, please provide your product model number (JY-HT145N4), purchase date, and a detailed description of the issue.
You can often find contact information for the seller through your Amazon order history.


