CAMECHO 6292W
CAMECHO 1 DIN Car Radio User Manual
Model: 6292W (6.8-inch IPS Touchscreen)
Brand: CAMECHO
1. Introduction
This user manual provides detailed instructions for the installation, operation, and maintenance of your CAMECHO 1 DIN Car Radio. This device features a 6.8-inch HD IPS touchscreen, wireless CarPlay and Android Auto, Bluetooth 5.2, Mirror Link, FM radio, and steering wheel control support. Please read this manual thoroughly before using the product to ensure proper functionality and safety.
2. Package Contents
Please verify that all items listed below are included in your package. If any items are missing or damaged, please contact customer support.
- 1 x Car MP5 Player (Main Unit)
- 1 x Power Cable
- 1 x Horn Cable
- 1 x D-bus Cable
- 1 x Microphone
- 1 x Remote Control
- 1 x SWC (Steering Wheel Control) Cable
- 1 x User Manual

Figure 2.1: Packing List and Dimensions. This image illustrates the physical dimensions of the head unit and visually lists the components included in the product package, such as cables, microphone, remote control, and user manual.
3. Product Overview
The CAMECHO 1 DIN Car Radio is designed to enhance your in-car entertainment and connectivity. Below are the key features and components of the device.
3.1 Key Features
- Wireless CarPlay & Android Auto: Seamless integration with your smartphone for navigation, music, calls, and more.
- 6.8-inch HD IPS Touchscreen: High-resolution (1280*600) display for clear visuals and responsive touch control.
- Mirror Link Function: Display your smartphone screen directly on the car radio.
- Bluetooth 5.2: Stable and efficient wireless connection for hands-free calling and audio streaming.
- FM Radio: Built-in tuner for accessing local radio stations.
- Steering Wheel Control Support: Compatible with existing steering wheel controls for convenient operation.
- USB Type-C Port: For media playback and charging.
- Rear View Camera Input: Supports external rear view cameras for safer parking (camera not included).
3.2 Front Panel and Connections

Figure 3.1: Front Panel Overview. This image highlights the main display, control knob, and various ports on the front of the car radio unit.
Figure 3.2: Rear Connections. This diagram details the various input and output ports located on the back of the car radio, including power, speaker, video, and antenna connections.
4. Setup and Installation
Proper installation is crucial for the optimal performance of your car radio. It is recommended to have the installation performed by a qualified professional.
4.1 Pre-Installation Checklist
- Ensure your vehicle has a standard 1 DIN opening (approximately 188mm x 58mm).
- Disconnect the vehicle's negative battery terminal before starting installation to prevent electrical shorts.
- Gather necessary tools (screwdrivers, wire strippers, electrical tape, etc.).
4.2 Wiring Diagram
Refer to the provided wiring diagram in the physical user manual and Figure 3.2 for correct connections. Common connections include:
- Power Cable: Connect to vehicle's constant 12V, accessory 12V, and ground.
- Speaker Cable: Connect to vehicle's speaker wires (front left, front right, rear left, rear right).
- Antenna: Connect the vehicle's radio antenna.
- Reverse Input (CVBSIN): Connect to the reverse light signal for automatic rear camera display (if applicable).
- SWC (Steering Wheel Control): Connect to vehicle's steering wheel control wires.
- Microphone (MIC): Plug in the external microphone for hands-free calls.
4.3 Installation Steps
- Remove the existing car radio from the dashboard.
- Connect the wiring harness from the new CAMECHO radio to the vehicle's wiring. Ensure all connections are secure and insulated.
- If installing a rear view camera (optional, not included), route the camera cable and connect it to the CVBSIN port on the radio.
- Carefully slide the new radio into the 1 DIN opening until it clicks into place or is secured with mounting brackets.
- Reconnect the vehicle's negative battery terminal.
- Power on the radio and perform initial function tests.
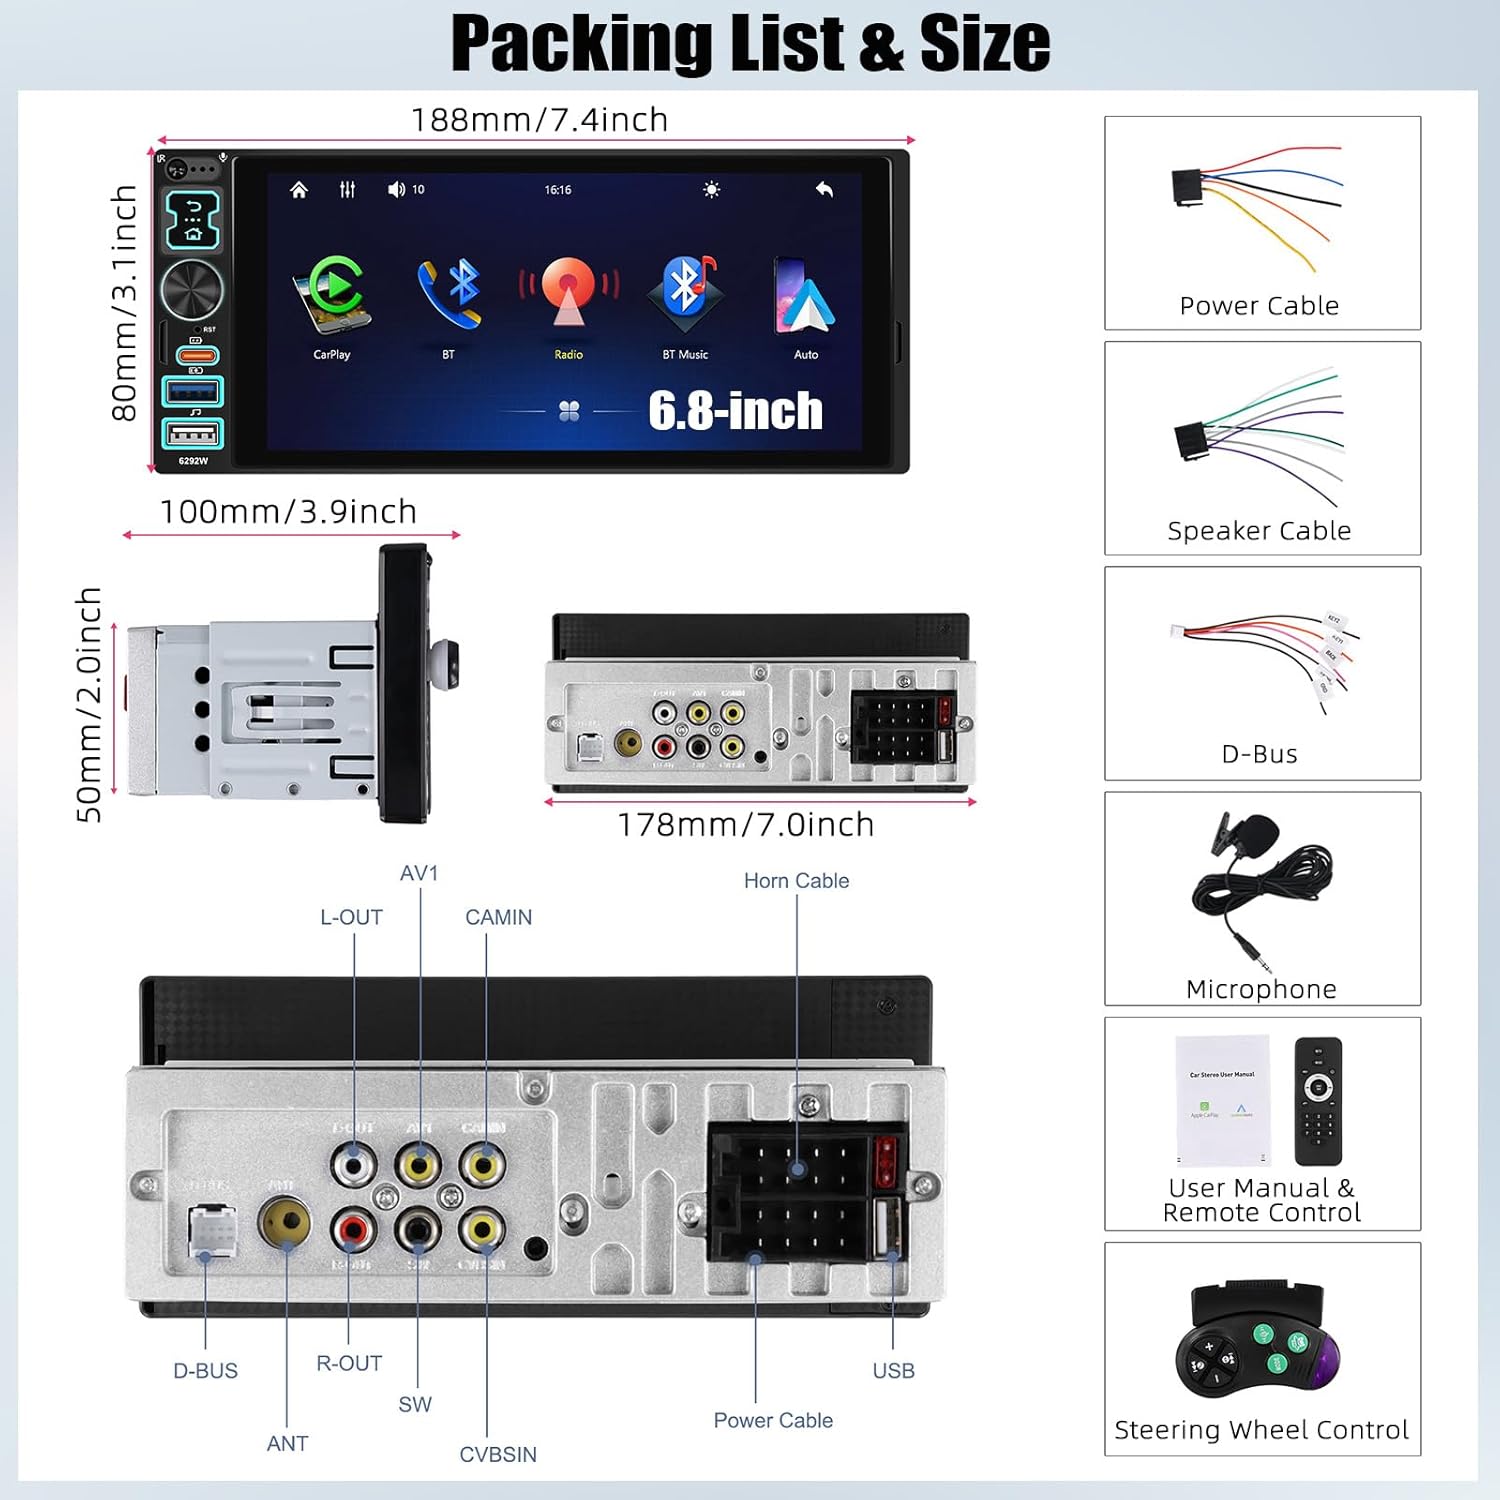
Figure 4.1: Installation Display. This image provides a visual comparison of car dashboards before and after the installation of the CAMECHO car radio, illustrating how it fits into a standard 1 DIN slot.
5. Operating Instructions
5.1 Wireless CarPlay and Android Auto
This unit supports wireless CarPlay for iOS devices and wireless Android Auto for Android devices, allowing you to access smartphone features safely while driving.
- Ensure Bluetooth is enabled on your smartphone.
- On the car radio, navigate to the "CarPlay" or "Android Auto" icon.
- Search for the car radio's Bluetooth name on your phone and pair.
- Confirm the pairing code on both devices.
- Once paired, CarPlay or Android Auto will launch automatically.

Figure 5.1: Wireless CarPlay/Android Auto/Mirror Link Connectivity. This image demonstrates the various connection methods for smartphone integration, including wireless and wired options for CarPlay, Android Auto, and Mirror Link.
5.2 Bluetooth Functionality (5.2)
Connect your smartphone via Bluetooth for hands-free calling and audio streaming.
- On the car radio, select the "Bluetooth" icon.
- Enable Bluetooth on your phone and search for available devices.
- Select the car radio's Bluetooth name (e.g., "CAMECHO") from your phone's list.
- Confirm the pairing. You can now make/receive calls and play music wirelessly.

Figure 5.2: Wireless Bluetooth Operation. This image depicts the Bluetooth interface on the car radio, showing music playback and hands-free calling capabilities.
5.3 FM Radio
Access your favorite radio stations with the built-in FM tuner.
- From the main menu, select the "FM" or "Radio" icon.
- Use the scan function to automatically search and save available stations.
- Manually tune to a frequency using the touchscreen or physical controls.

Figure 5.3: FM Radio and EQ Settings. This image displays the radio tuning interface and the graphic equalizer settings, allowing users to customize audio output.
5.4 Mirror Link
Mirror Link allows you to display your smartphone's screen directly on the car radio's display.
- Connect your smartphone to the radio via USB cable.
- On the radio, select the "Mirror Link" icon.
- Follow the on-screen prompts on both your phone and the radio to establish the connection.
- Once connected, your phone's screen will be mirrored.
Figure 5.4: Mirror Link Connectivity. This image shows the Mirror Link option alongside CarPlay and Android Auto, indicating its capability to project a smartphone screen onto the car radio display.
5.5 Steering Wheel Control (SWC)
If your vehicle supports steering wheel controls, you can configure them to operate the car radio.
- Go to "Settings" on the car radio.
- Find the "Steering Wheel Control" or "SWC Learning" option.
- Follow the on-screen instructions to assign functions (e.g., volume up/down, track skip, call answer/end) to your vehicle's steering wheel buttons.

Figure 5.5: Steering Wheel Control Setup. This image illustrates the interface for configuring steering wheel controls, allowing users to map vehicle buttons to radio functions.
5.6 Rear View Camera Input
The unit supports an external rear view camera (sold separately) for enhanced safety when reversing.
- Ensure the camera is properly connected to the CVBSIN port and the reverse light signal.
- When the vehicle is shifted into reverse gear, the radio will automatically display the camera feed.
Figure 5.6: Back-up Camera Input. This image shows a visual representation of how a back-up camera system integrates with the car radio, providing a clear view when reversing.
6. Specifications
| Feature | Specification |
|---|---|
| Model | 6292W |
| Screen Material | IPS |
| Screen Size | 6.8 inches |
| Screen Resolution | 1280*600 |
| Voltage | DC12V |
| CPU Chip | F133 |
| Bluetooth Version | 5.2 |
| Radio Band | FM (87.5-108MHz) |
| Radio Chip | QN8035 |
| Power Output | 45W * 4 |
| Amplifier Chip | TDA7388 |
| Working Temperature | -10 ~ 60 ℃ |
| Audio Format Support | MP3/WMA/WAV/APE/FLAC |
| Video Format Support | RM/RMVB/AVI/MP4/MKV/3GP |
| Image Format Support | JPG BMP PNG |
| Supported Languages | English, Chinese, Spanish, Portuguese, Russian, Italian, German, French, Turkish, Czech, Arabic, Polish, Hebrew |
7. Troubleshooting
If you encounter issues with your CAMECHO car radio, please refer to the following common problems and solutions before contacting support.
| Problem | Possible Cause | Solution |
|---|---|---|
| No Power | Incorrect wiring; Blown fuse; Loose connection. | Check power and ground connections. Inspect vehicle's fuse box and radio's fuse. Ensure all cables are securely connected. |
| No Sound | Incorrect speaker wiring; Volume too low; Mute function active. | Verify speaker connections. Increase volume. Check if the mute function is enabled. |
| Bluetooth Pairing Fails | Bluetooth not enabled on phone/radio; Incorrect pairing procedure; Interference. | Ensure Bluetooth is on for both devices. Delete previous pairings and try again. Move closer to the unit. |
| CarPlay/Android Auto Not Connecting | Incorrect phone settings; App issues; USB cable fault (for wired connection). | Ensure phone is compatible. Check phone's CarPlay/Android Auto settings. Try a different USB cable if connecting wired. Restart both devices. |
| Poor Radio Reception | Antenna not connected; Weak signal area; Damaged antenna. | Check antenna connection. Try scanning for stations again. Consider an antenna booster if in a weak signal area. |
8. Maintenance
To ensure the longevity and optimal performance of your CAMECHO car radio, follow these simple maintenance guidelines:
- Cleaning the Screen: Use a soft, lint-free cloth to gently wipe the touchscreen. For stubborn smudges, slightly dampen the cloth with water or a screen-safe cleaner. Avoid abrasive materials or harsh chemicals.
- General Cleaning: Keep the unit free from dust and debris. Use a soft brush or compressed air to clean around buttons and ports.
- Temperature: Avoid exposing the unit to extreme temperatures, both hot and cold, for extended periods.
- Liquid Contact: Prevent any liquids from entering the unit. In case of accidental spills, immediately power off the unit and allow it to dry completely before powering on again.
9. Warranty and Support
CAMECHO is committed to providing high-quality products and excellent customer service. For any questions, technical assistance, or warranty inquiries, please contact our support team.
Customer Support Email: CAMECHOVIP@126.com
Please include your product model (6292W) and a detailed description of your issue when contacting support to ensure a prompt and efficient resolution.

Figure 9.1: Customer Support Information. This image provides visual confirmation of the customer support email address for assistance and user manual inquiries.
Ask a question about this manual
Ask about setup, troubleshooting, compatibility, parts, safety, or missing instructions. Manuals+ will review the question and use this page’s manual context to help answer it.