OKANEN OKANEN
User Manual: Hyper Tough Pneumatic 21 Degree Framing Nailer
Model: OKANEN
Introduction
This manual provides essential information for the safe and effective operation, maintenance, and troubleshooting of your Hyper Tough Pneumatic 21 Degree Framing Nailer. This air-powered nail gun is designed for tasks such as framing, sheathing, subfloors, wood fencing, and assembling furniture, shipping crates, and pallets. It is compatible with 21-degree plastic collated framing nails ranging from 2 inches to 3-1/2 inches.
Key Features:
- Rugged and Lightweight Design: Constructed with a magnesium body for extended use and reduced fatigue.
- Enhanced Durability: Features a one-piece drive blade for increased longevity and reduced maintenance.
- Versatile Trigger Options: Dual mode trigger allows for both single and sequential firing.
- Protection Against Damage: Anti-dry-firing design minimizes internal component damage.
- Adjustable Depth: Tool-free depth adjustment for precise control over nail depth.
- Comfort Grip Handle: Textured comfort grip reduces fatigue and enhances control.
- No-Mar Safety Tip: Prevents damage to the working surface.
- Adjustable Exhaust: 360-degree adjustable exhaust directs air away from the user.
Important Safety Information
WARNING: Risk of Injury to Persons. Please read the instruction manual and understand it completely before operating this tool. Failure to do so could result in SERIOUS INJURY OR EVEN DEATH. Risk of Eye Injury. Operators and others in work area MUST wear safety glasses with side shields. Risk of Hearing Loss. Wear hearing protection. Risk of Injury to Persons. DO NOT make contact with the safety tip when not driving fasteners into the work surface. Risk of Injury to Persons. Keep all parts of the body, especially hands and fingers, away from the work surface. Risk of Injury to Persons. Disconnect the tool from the air supply before making adjustments, unloading, clearing jams or leaving the work area. Keep fingers away from the trigger when not driving fasteners to avoid accidental discharge. Risk of Injury to Persons. Always use clean, dry, regulated compressed air. Risk of Injury to Persons. Always keep the tool pointed in a safe direction when connected to an air supply to avoid accidental discharge. Risk of Injury to Persons. DO NOT alter or remove the trigger or the safety devices. Check all triggering methods important. Check the manual for triggering options.
Always ensure the tool is disconnected from the air supply before performing any maintenance, adjustments, or when not in use. Keep the work area clean and well-lit. Do not operate the tool in explosive atmospheres, such as in the presence of flammable liquids, gases, or dust.
Components Overview
Familiarize yourself with the main parts of your pneumatic framing nailer:
- Magazine: Holds the collated nails.
- Trigger: Activates the firing mechanism.
- Depth Adjustment Dial: Allows for tool-free adjustment of nail depth.
- Exhaust Port: Directs expelled air away from the user.
- Air Inlet: Connection point for the air hose.
- Safety Tip/Contact Trip: Must be depressed against the work surface for the tool to fire.

Image: The Hyper Tough Pneumatic 21 Degree Framing Nailer, showing its main body, magazine, and handle.

Image: The nailer displayed with its included accessories: 50 count 21-degree framing nails, air tool oil, and adjustment tools (hex keys).
Setup and Preparation
1. Connecting to Air Supply:
- Ensure your air compressor is off and the air tank is drained.
- Apply a few drops of air tool oil (included) into the air inlet of the nailer.
- Connect a suitable air hose (not included) to the air inlet fitting on the nailer. Ensure a secure connection.
- Set your air compressor to the recommended operating pressure (refer to specifications for details). Do not exceed the maximum operating pressure.

Image: Close-up view of the air inlet on the nailer, indicating where to apply air tool oil for lubrication.
2. Loading Nails:
- Ensure the tool is disconnected from the air supply.
- Pull back the pusher assembly at the rear of the magazine until it locks into place.
- Insert a strip of 21-degree plastic collated framing nails into the magazine. Ensure the nails are oriented correctly with the points facing forward.
- Release the pusher assembly, allowing it to push the nails forward until they are seated against the nose piece.
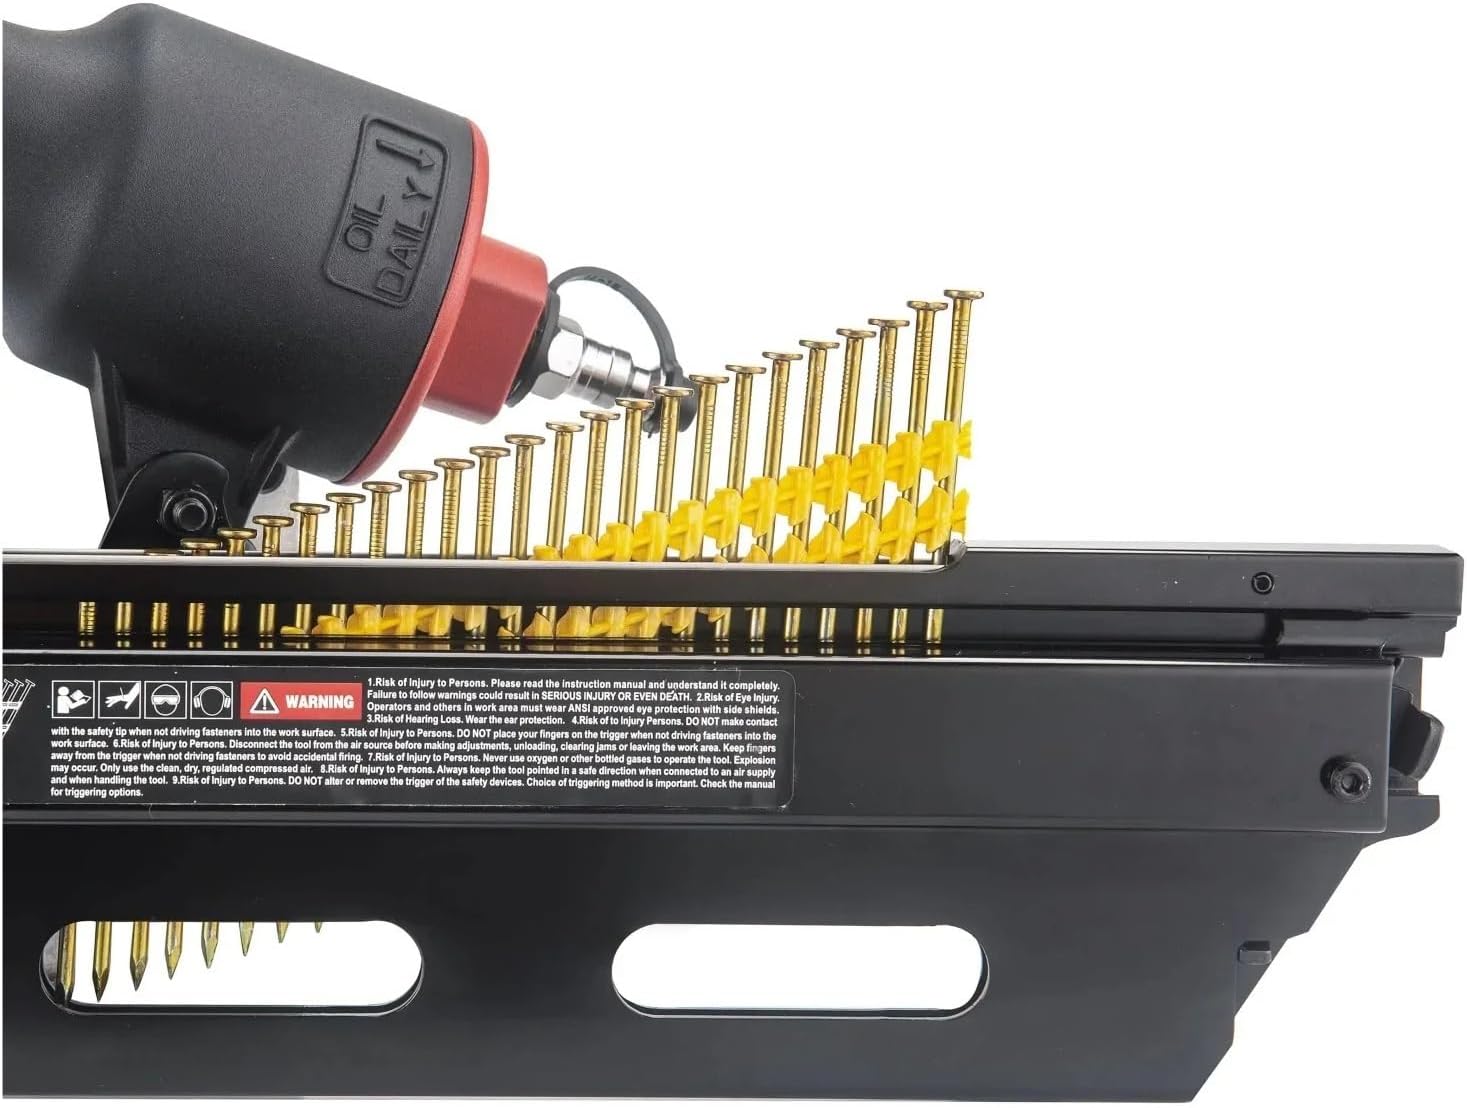
Image: A close-up of the nailer's magazine, showing a strip of 21-degree collated framing nails loaded and ready for use.
3. Adjusting Depth:
- The tool features a tool-free depth adjustment. Locate the depth adjustment dial near the nose of the tool.
- Rotate the dial to increase or decrease the driving depth of the nails. Test on a scrap piece of material to achieve the desired depth.

Image: Close-up view of the depth adjustment mechanism on the nailer's nose, allowing for precise control over nail penetration.
Operating Instructions
Trigger Modes:
This nailer features a dual mode trigger, allowing for two firing methods:
- Sequential Firing: For precise nail placement. Depress the safety tip against the work surface, then pull the trigger to fire a nail. Release the trigger and lift the tool to prepare for the next nail.
- Contact Firing (Bump Fire): For rapid nailing. Hold the trigger, then repeatedly depress the safety tip against the work surface to fire nails in quick succession.
General Operation:
- Ensure all safety precautions are followed.
- Connect the tool to the air supply.
- Select the desired trigger mode.
- Place the nose of the tool firmly against the work surface where the nail is to be driven.
- Activate the trigger according to the chosen firing mode.
- The anti-dry-firing design prevents the tool from firing when the magazine is empty, protecting internal components. Reload nails when this occurs.
Maintenance
Regular maintenance ensures the longevity and optimal performance of your nailer.
Daily Maintenance:
- Lubrication: Before each use, apply 2-3 drops of air tool oil into the air inlet. This lubricates internal components and prevents wear.
- Cleaning: Keep the tool clean and free of debris. Wipe down the exterior with a clean cloth.
- Air Filter: Check your air compressor's inline air filter regularly and clean or replace as needed to ensure clean, dry air supply to the tool.
Image: Close-up of the air inlet, marked "OIL DAILY!", indicating the point for regular lubrication.
Periodic Maintenance:
- Inspect Fasteners: Periodically check all screws and fasteners for tightness. Tighten as necessary.
- Nose Piece Inspection: Inspect the nose piece and driver blade for wear or damage. Replace if necessary.

Image: Detailed view of the nailer's nose piece and driver blade components, showing parts that may require inspection or replacement.
Troubleshooting
This section addresses common issues you might encounter with your nailer.
| Problem | Possible Cause | Solution |
|---|---|---|
| Nailer does not fire | No air supply; Low air pressure; Magazine empty; Safety tip not depressed; Trigger not pulled correctly; Jammed nail. | Check air hose connection and compressor; Increase air pressure; Reload nails; Ensure safety tip is fully depressed; Check trigger mode; Clear any jammed nails (disconnect air first). |
| Nails not driving fully | Low air pressure; Depth adjustment too shallow; Incorrect nail length. | Increase air pressure; Adjust depth setting deeper; Ensure correct nail length for material. |
| Nails jamming frequently | Damaged nails; Incorrect nail type; Worn driver blade; Low lubrication. | Use only recommended nails; Inspect and replace driver blade if worn; Apply air tool oil. |
| Air leaks | Loose fittings; Damaged O-rings/seals. | Tighten all air fittings; Inspect and replace worn O-rings or seals. |
Product Specifications
| Attribute | Detail |
|---|---|
| Brand | OKANEN |
| Model Number | OKANEN |
| Nail Compatibility | 21 Degree Plastic Collated Framing Nails (2" to 3-1/2") |
| Body Material | Magnesium |
| Trigger Type | Dual Mode (Single/Sequential) |
| Features | Anti-dry-firing design, Tool-free depth adjustment, Comfort grip handle, No mar safety tip, 360 degree adjustable exhaust |
| Item Weight | 10 g (Note: This seems unusually low for a nail gun, likely a data entry error in source. User should refer to product packaging for accurate weight.) |
| Country of Origin | China |
| ASIN | B0F9P36KHY |
Warranty and Support
Specific warranty details for this product are not provided in the available information. Please refer to the product packaging or contact the manufacturer, OKANEN, directly for warranty information and customer support.
For further assistance or inquiries, please visit the official OKANEN website or contact their customer service department.