
Lavinda Professional Rechargeable Nail Drill Machine
Model: LA-901-RG
User Manual
1. Introduction
Thank you for choosing the Lavinda Professional Rechargeable Nail Drill Machine. This device is designed for efficient and precise nail care, suitable for both natural and artificial nails, including acrylic and gel. Featuring a powerful brushless motor, adjustable speed, and a portable design, it offers a professional-grade experience. Please read this manual thoroughly before use to ensure safe and optimal operation.
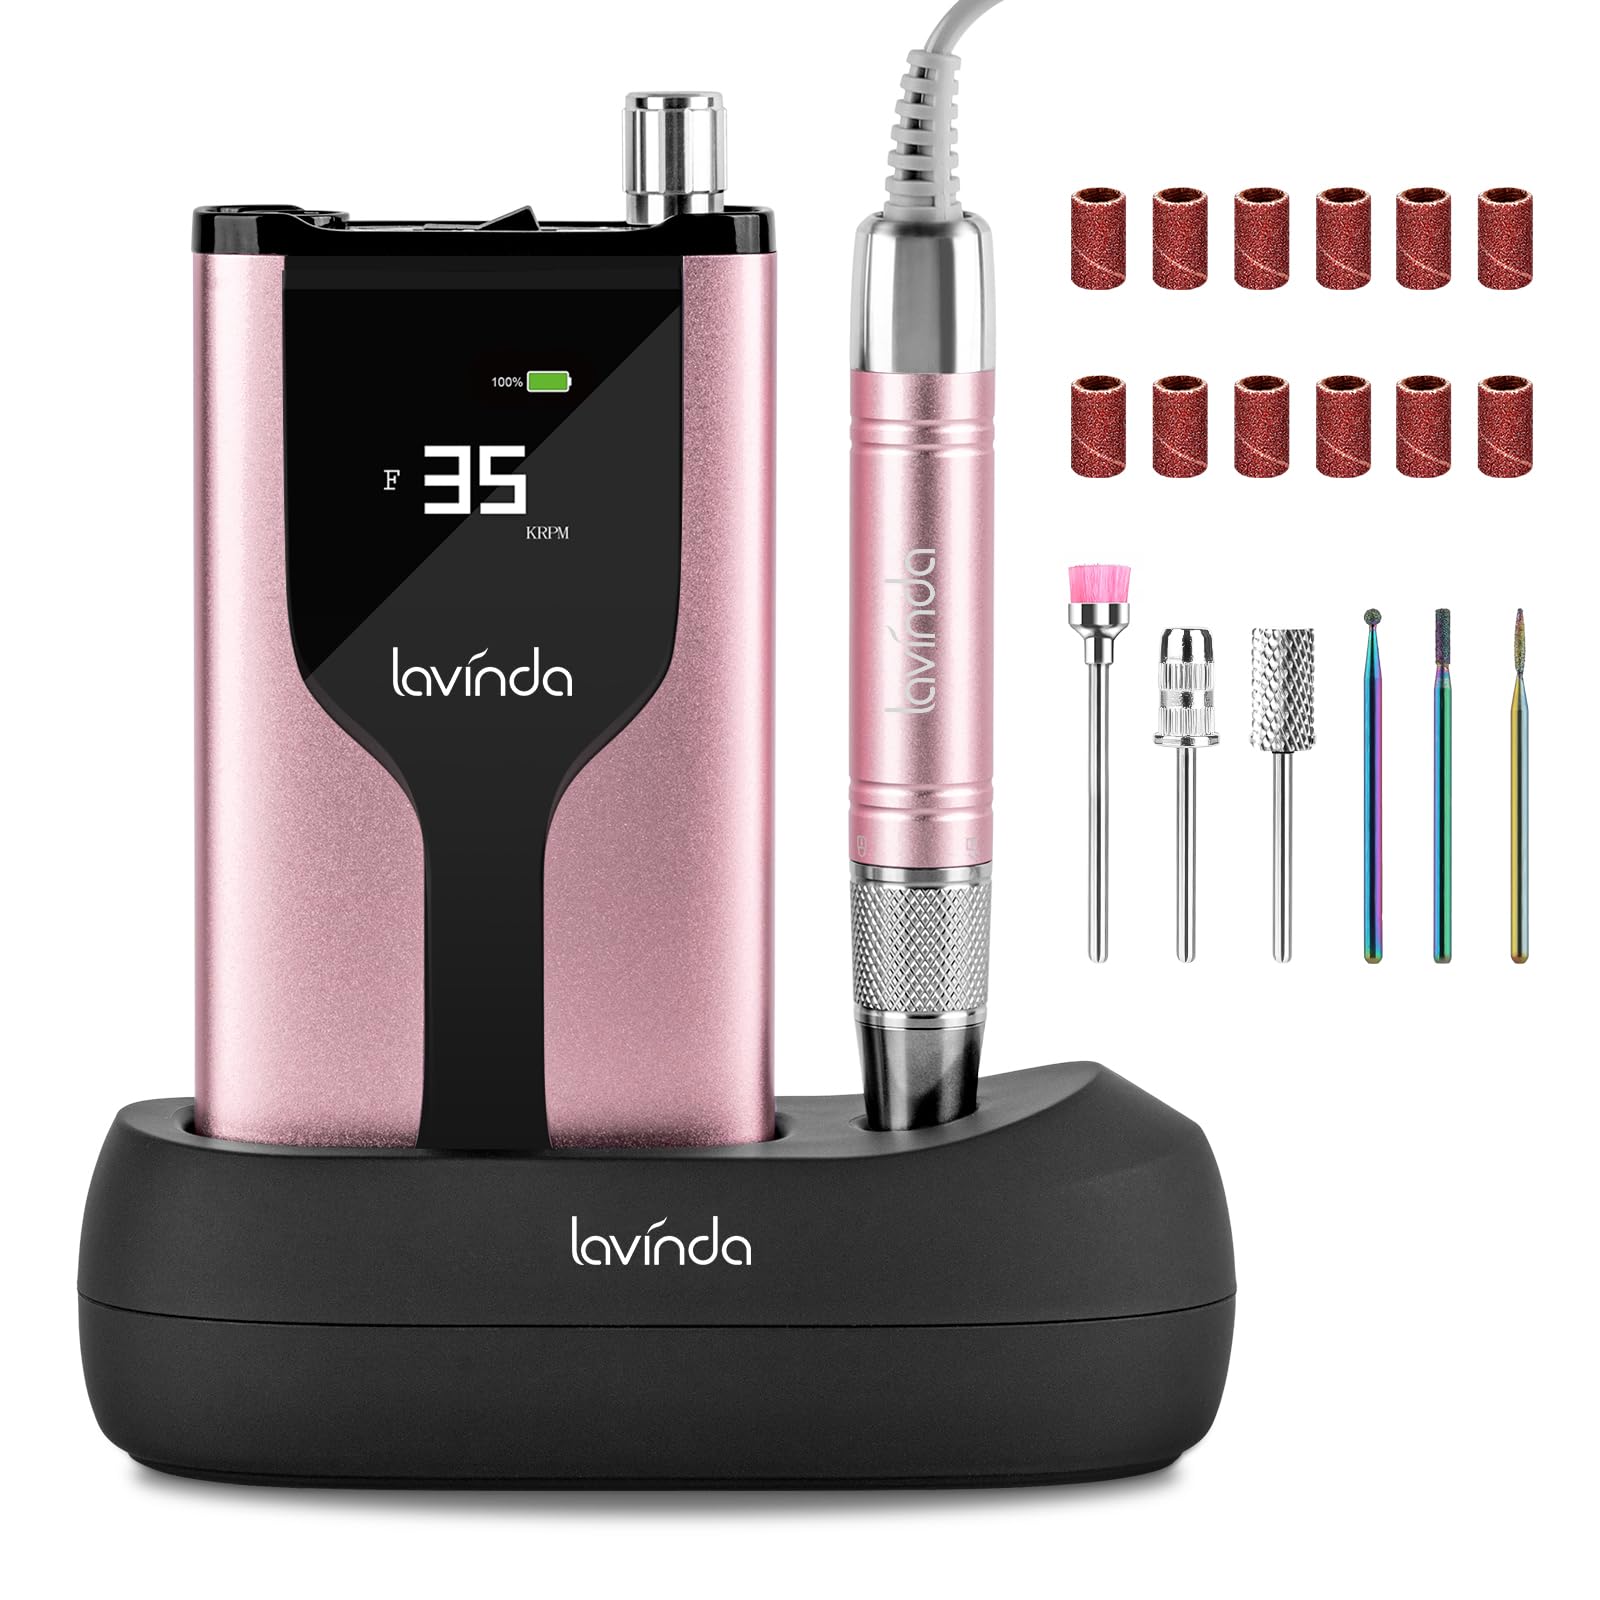
Image 1.1: Lavinda Professional Rechargeable Nail Drill Machine (Rose Gold)
2. Product Overview
2.1 Key Features
- Brushless Motor: Equipped with an updated high-quality bearing brushless motor for smooth operation, lower heat, quiet performance, and minimal vibration. Offers a lifespan of over 15,000 hours.
- High Speed & Precision: Adjustable speed from 0-35,000 RPM with 0.015mm coaxiality max for precise control.
- Portable & Versatile Design: 2-in-1 desktop and portable wireless design for flexibility in use.
- Dual Charging Options: Supports Type-C connection and wireless charging base.
- Long-lasting Battery: Built-in rechargeable battery provides up to 10 hours of continuous use after a 2-hour recharge. Features an LCD battery status display.
- Comprehensive Accessories: Includes a portable carrying bag and 6 high-quality 3/32" ceramic and carbide bits for various nail tasks.
- Safety & Quality: Certified with CE/UL/FCC/MSDS.
2.2 Components

Image 2.1: Main components of the Lavinda Nail Drill Machine.
- Main Control Unit: Houses the battery, display, and control knobs.
- Handpiece: The drilling tool where bits are inserted.
- Dust Shield: Attaches to the handpiece to minimize dust.
- TFT Display: Shows current RPM, battery status, and rotation direction.
- Speed Adjustable Wheel: Controls the rotational speed of the handpiece.
- Forward/Reverse (F/R) Switch: Changes the rotation direction of the drill bit.
- Power Input (Type-C): For direct charging of the main unit.
- Wireless Charging Base: For convenient charging of the main unit.
- Power Output (Motor): Connects the handpiece to the main unit.
2.3 Brushless Motor Technology
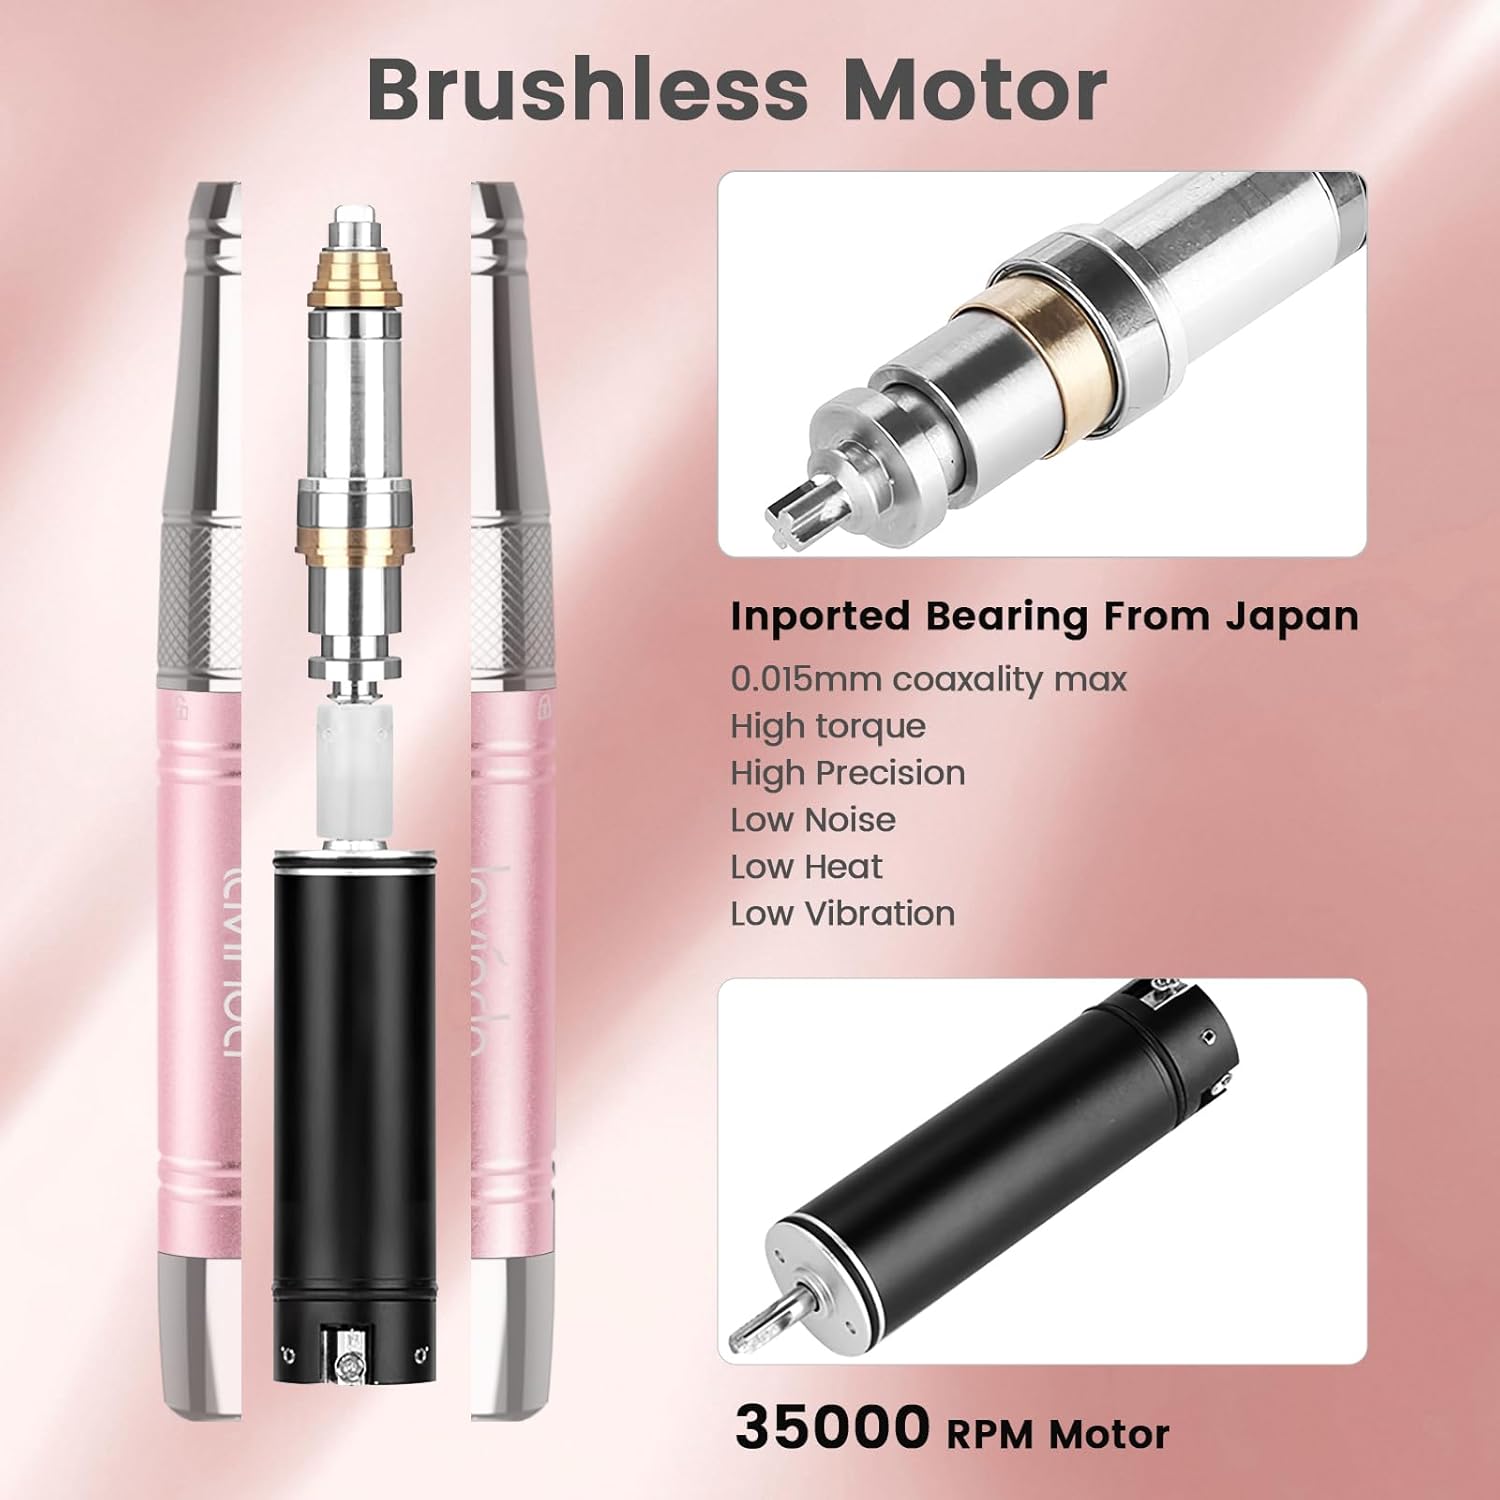
Image 2.2: Internal view of the brushless motor and handpiece.
The Lavinda Nail Drill utilizes an advanced brushless motor, offering significant advantages over traditional brush motors. This technology ensures:
- Extended Lifespan: Over 15,000 hours of operation.
- Reduced Heat: Operates with significantly less heat buildup.
- Quiet Operation: Minimizes noise during use.
- Low Vibration: Provides a stable and comfortable user experience.
- High Precision: Achieves 0.015mm coaxiality max for accurate work.
3. Setup
3.1 Charging the Device
The device can be charged using two methods: direct Type-C connection or via the wireless charging base.

Image 3.1: Dual charging options: Type-C and wireless charging base.
- Type-C Charging: Connect the provided Type-C cable to the power input port on the main control unit and plug the other end into a suitable power adapter (not included).
- Wireless Charging Base: Place the main control unit onto the wireless charging base. Ensure the base is connected to a power source.
A full charge takes approximately 2 hours and provides up to 10 hours of continuous operation. The LCD display will show the battery status.
3.2 Installing and Changing Drill Bits
Always ensure the machine is OFF before installing or changing drill bits to prevent injury and damage to the device.

Image 3.2: Step-by-step guide for installing drill bits.
- Unlock: Twist the handpiece clockwise to unlock the chuck.
- Remove: Carefully pull out the existing drill bit.
- Insert: Insert your desired 3/32" drill bit fully into the chuck.
- Lock: Twist the handpiece anticlockwise to securely lock the bit in place. Ensure it clicks twice for a secure fit.
ATTENTION: Please TURN OFF the machine when you replace the drill bit. Forcing the grinding head change while the drill is working will damage the rubber shaft inside the handpiece, which can cause permanent damage. The nail drill will NOT WORK if it is not LOCKED.
4. Operating Instructions
4.1 Power On/Off and Speed Adjustment

Image 4.1: TFT Display showing operational information.
- Power On: Turn the Speed Adjustable Wheel clockwise to power on the device. The TFT display will illuminate.
- Adjust Speed: Continue turning the Speed Adjustable Wheel clockwise to increase the RPM (rotations per minute) up to 35,000 RPM. Turn counter-clockwise to decrease speed.
- Power Off: Turn the Speed Adjustable Wheel counter-clockwise until the display turns off.
4.2 Changing Rotation Direction (F/R)

Image 4.2: Forward/Reverse switch and speed control.
The F/R switch allows you to change the rotation direction of the drill bit, which is useful for different techniques and for left-handed or right-handed users.
- Forward (F): Slide the switch to 'F' for clockwise rotation.
- Reverse (R): Slide the switch to 'R' for counter-clockwise rotation.
Note: It is recommended to pause the drill or reduce the speed before changing the rotation direction to prevent damage to the motor.
4.3 Using Different Drill Bits

Image 4.3: Overview of included drill bits and their applications.
The included 6 types of 3/32" ceramic and carbide bits are designed for various nail art tasks:
- Cone Head: Ideal for cuticle work, polishing, and shaping the nail side edge.
- Fire Arrow: Used for removing nail polish.
- Ball Bit: Excellent for removing cuticles.
- Large Barrel Top: Suitable for easy surface machining and bulk reduction.
- Brush Bit: For cleaning nail dust and debris.
- Mandrel Bit + Sanding Bands: Used for polishing thick nails and removing calluses.
4.4 Applications

Image 4.4: Versatile applications of the nail drill.
The Lavinda Nail Drill is suitable for a wide range of applications, including:
- Shaping and filing natural nails.
- Removing gel polish and acrylic nails.
- Cleaning cuticles and dead skin.
- Reducing calluses and thick nails.
- Performing manicures and pedicures.
4.5 Official Product Video
Video 4.1: Lavinda Professional Rechargeable Nail Drill Machine. This video demonstrates the key features and operation of the Lavinda Professional Rechargeable Nail Drill Machine, including bit installation, speed adjustment, and charging methods.
5. Maintenance
- Cleaning: After each use, disconnect the handpiece and gently clean it with a soft, dry cloth. Remove any dust or debris from the drill bits using a brush. Do not use harsh chemicals or abrasive materials.
- Storage: Store the nail drill machine and its accessories in the provided portable carrying bag in a cool, dry place, away from direct sunlight and moisture.
- Bit Care: Ensure drill bits are clean and dry before storage. Replace worn or damaged bits promptly to maintain performance and safety.
- Battery Care: To prolong battery life, avoid fully discharging the device frequently. Charge it regularly, even if not in use for extended periods.
6. Troubleshooting
If you encounter any issues with your Lavinda Nail Drill Machine, please refer to the following common troubleshooting steps:
- Device Not Turning On: Ensure the device is fully charged. Check the power connection if charging via Type-C.
- Handpiece Not Rotating: Verify that the drill bit is correctly installed and securely locked in the handpiece (refer to Section 3.2). Check that the handpiece cable is firmly connected to the main control unit.
- Unusual Noise or Vibration: This may indicate a loose or improperly installed drill bit. Turn off the device, re-install the bit, and ensure it is locked. If the issue persists, the bit might be damaged and needs replacement.
- Reduced Performance: Ensure the battery is adequately charged. Clean the drill bit and handpiece to remove any accumulated debris.
- Overheating: The device has a safety protection system to prevent excessive temperature rise. If it overheats, it may temporarily shut down. Allow it to cool down before resuming use. Ensure proper ventilation during operation.
If these steps do not resolve the issue, please contact Lavinda customer support for assistance.
7. Specifications
| Feature | Detail |
|---|---|
| Model Number | LA-901-RG |
| Brand | Lavinda |
| Maximum Rotational Speed | 35,000 RPM |
| Motor Type | Brushless |
| Power Source | Battery Powered |
| Battery Runtime | Up to 10 hours (continuous use) |
| Charging Time | Approx. 2 hours |
| Motor Lifespan | Over 15,000 hours |
| Material Type | Aluminum |
| Package Dimensions | 9.76 x 8.5 x 3.98 inches |
| Weight | 3.04 Pounds |
| Certifications | CE/UL/FCC/MSDS |
8. Warranty and Support
The Lavinda Professional Rechargeable Nail Drill Machine is manufactured to high standards and comes with certifications for safety and durability (CE/UL/FCC/MSDS).
For any after-sales issues, technical assistance, or warranty inquiries, our dedicated support team is ready to assist you. Please contact Lavinda customer support, and we aim to respond within 24 hours on working days.
Please retain your proof of purchase for warranty claims.