WNJACO A19
WNJACO A19 Motorcycle Helmet Bluetooth Headset User Manual
Model: A19 | Brand: WNJACO
Introduction
This manual provides detailed instructions for the installation, operation, and maintenance of your WNJACO A19 Motorcycle Helmet Bluetooth Headset. Please read this manual thoroughly before using the product to ensure proper function and safety.
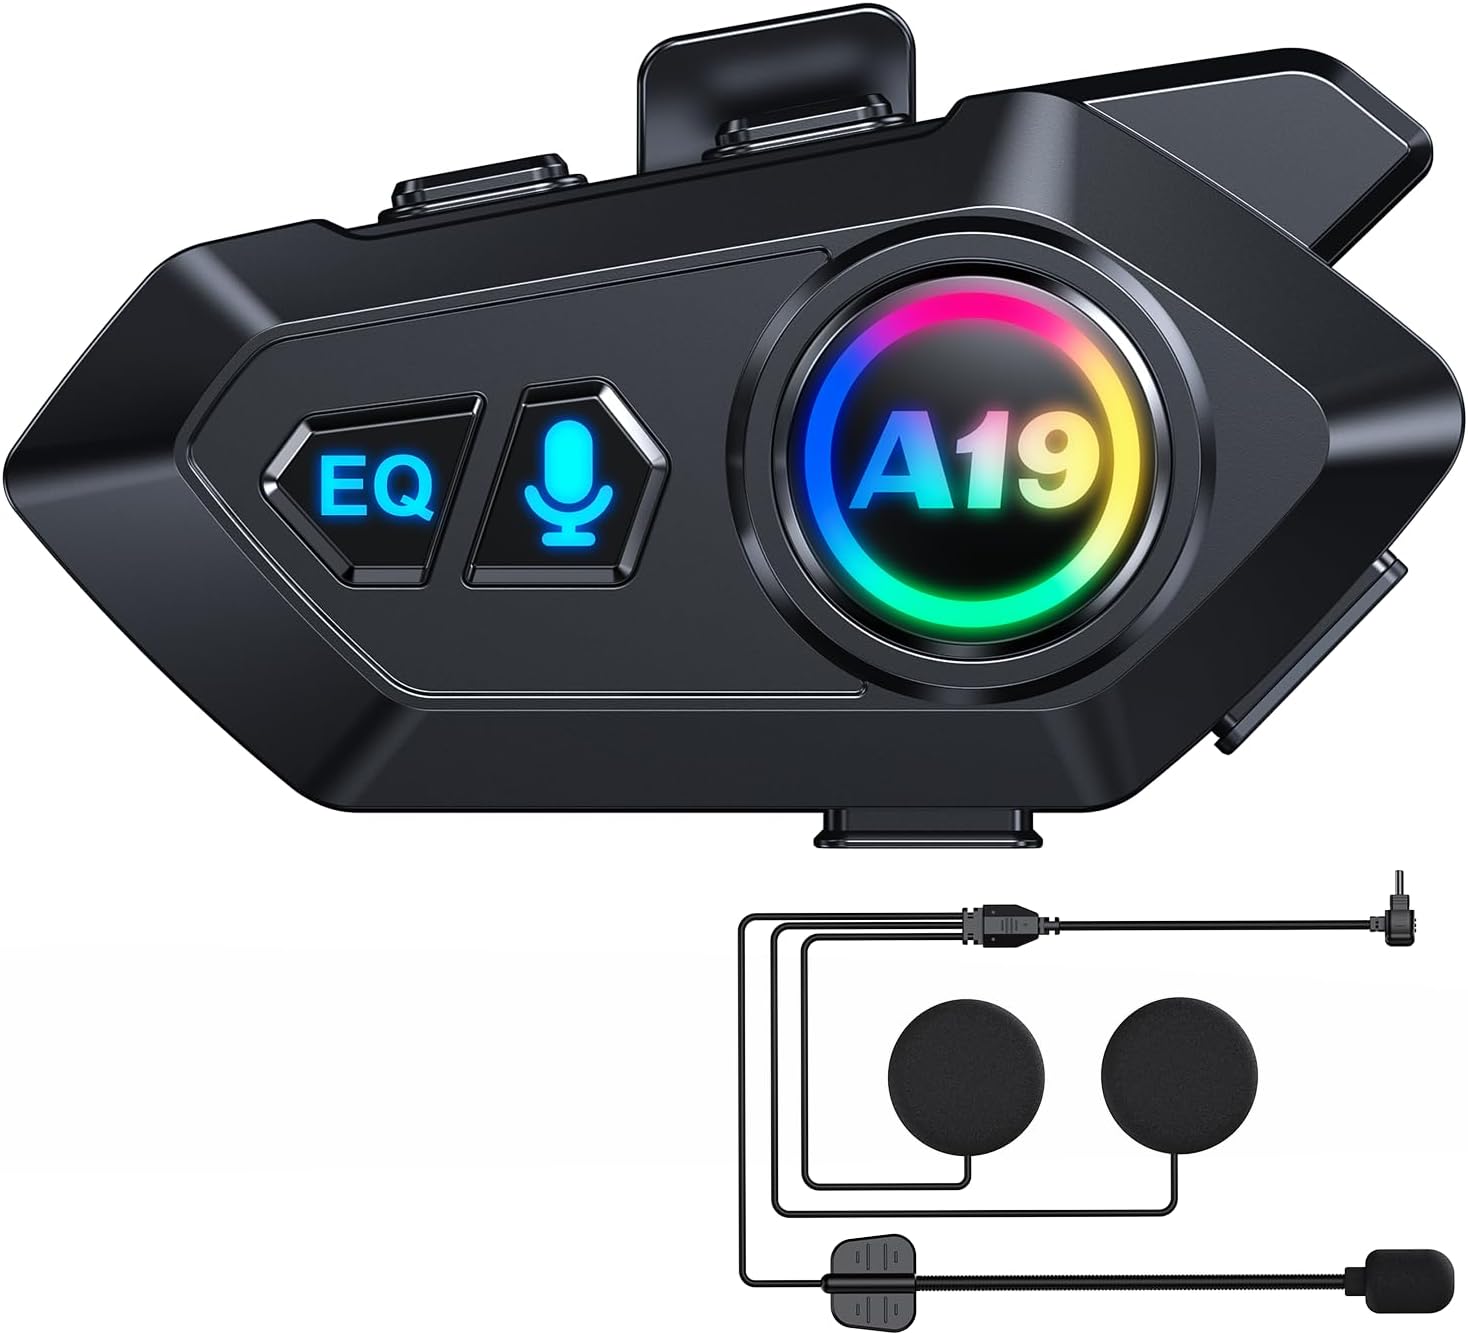
Image: The WNJACO A19 main unit with its attached speakers and microphone, ready for helmet installation.
Package Contents
Verify that all items listed below are included in your package:
- A19 Host Unit
- 2-in-1 Soft Label and Hard Label (Speaker/Microphone Set)
- Clamp Base
- Paste Base
- Horn Velcro
- Hard Soft Mac Velcro
- Type-C Charging Cable
- Instruction Manual (this document)
- Adapter (Power Adapter)

Image: Visual representation of the A19 host, speaker/microphone set, mounting accessories, charging cable, and manual.
Product Features
- Bluetooth 5.4 Technology: Ensures stable and high-quality audio transmission with reduced interference.
- Hi-Fi Stereo Sound: Features 40mm graphene diaphragm speakers for clear music and call audio.
- Dual Noise Cancellation: Microphone with dual noise cancellation and windproof sponge for clearer communication.
- IPX6 Waterproof: Designed to withstand dust, rain, snow, and other weather conditions.
- Long Battery Life: Built-in 1000mAh battery provides up to 32 hours of music playback, 30 hours of talk time, and 18 months standby. Supports Type-C fast charging.
- Voice Assistant Support: Intelligent voice assistant system (Siri/Google Assistant) for hands-free control.
- Auto Answer: Automatically answers incoming calls.
- Multi-device Connectivity: Can connect to two smartphones simultaneously.
- Ultra-thin Speakers: 10mm thick speakers designed to fit various helmet types comfortably.
Installation Guide
Proper installation ensures optimal performance and comfort. The A19 offers flexible mounting options.
1. Choosing a Mounting Method
The A19 unit can be attached to your helmet using either the Clamp Base or the Paste Base. Select the method that best suits your helmet type and preference.
- Clamp Base: Ideal for helmets with an edge where the clamp can securely grip.
- Paste Base: Suitable for helmets without a suitable edge for clamping, using adhesive for attachment.
2. Installing the Main Unit
- Clean the Surface: Ensure the helmet surface where the unit will be mounted is clean and dry.
- Attach Base:
- For Clamp Base: Loosen the screws, position the clamp on the helmet's lower edge, and tighten the screws securely.
- For Paste Base: Remove the protective film from the adhesive, carefully align the base, and press firmly onto the helmet surface for at least 30 seconds. Allow adhesive to cure for several hours before use.
- Mount A19 Unit: Slide the A19 host unit onto the installed base until it clicks into place.
3. Installing Speakers and Microphone
- Remove Helmet Liner: Carefully remove the helmet's inner liner and cheek pads to access the interior shell.
- Position Speakers: Identify suitable flat areas inside the helmet, near your ears, for speaker placement. Use the provided Horn Velcro (soft side) on the speakers and the Hard Soft Mac Velcro (hard side) on the helmet interior. Ensure speakers are centered over your ears for optimal sound.
- Position Microphone: Attach the microphone to the inside of the helmet, near your mouth. Ensure it is positioned to pick up your voice clearly without being obstructed or causing discomfort. The microphone comes with a windproof sponge for improved call clarity.
- Route Cables: Carefully route all speaker and microphone cables under the helmet liner and padding to conceal them and prevent interference with comfort or safety. Connect the speaker/microphone cable to the earphone jack on the A19 main unit.
- Reinstall Liner: Reinstall the helmet liner and cheek pads, ensuring no cables are pinched or exposed.

Image: The A19 headset is versatile for various activities, including motorcycling, cycling, and other outdoor pursuits.
Operating Instructions
Familiarize yourself with the controls for seamless operation.
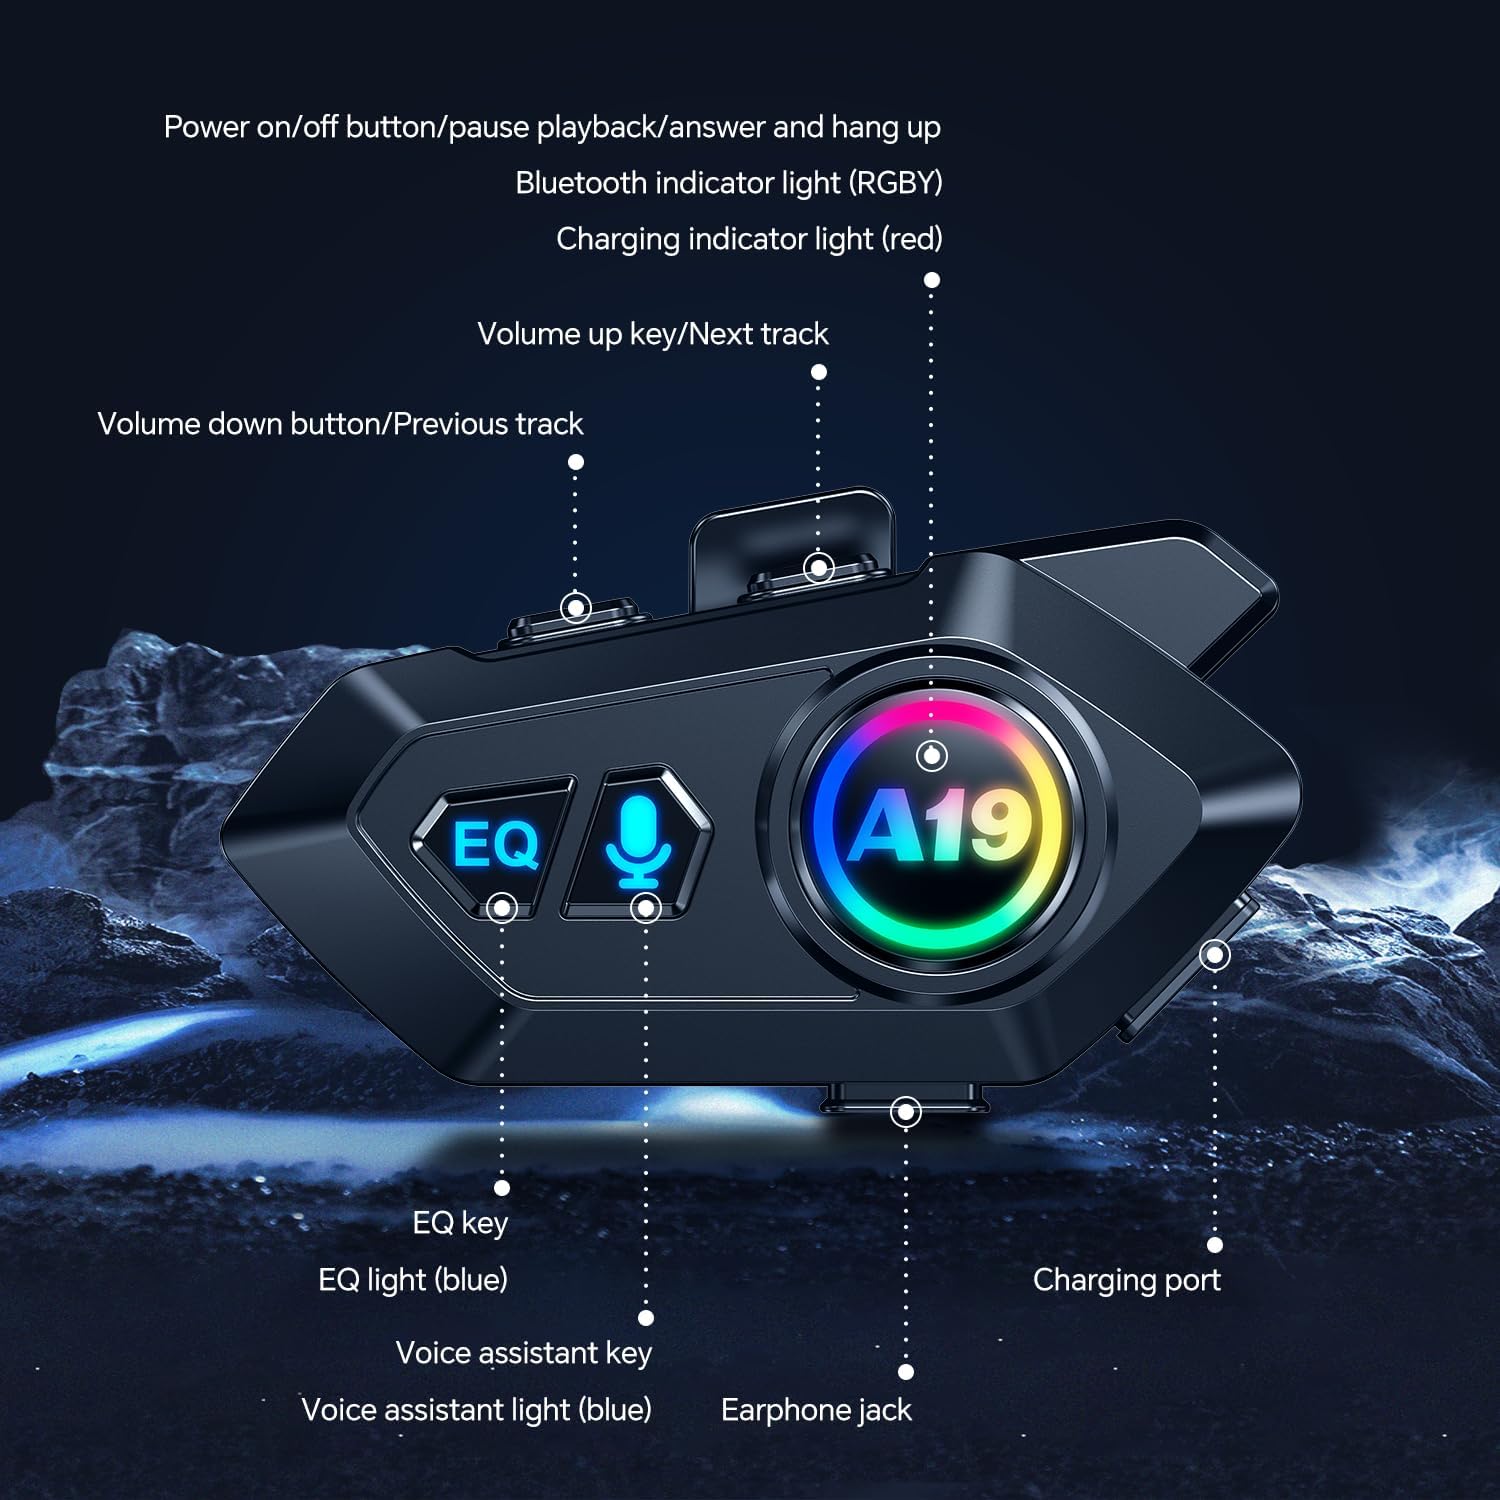
Image: Detailed view of the A19 unit highlighting the power, volume, EQ, voice assistant buttons, and charging port.
1. Power On/Off
- Power On: Press and hold the Power On/Off button until the Bluetooth indicator light illuminates.
- Power Off: Press and hold the Power On/Off button until the Bluetooth indicator light turns off.
2. Bluetooth Pairing
- Ensure the A19 headset is powered off.
- Press and hold the Power On/Off button for approximately 5-7 seconds until the Bluetooth indicator light flashes rapidly, indicating pairing mode.
- On your smartphone or Bluetooth device, enable Bluetooth and search for "A19" in the list of available devices.
- Select "A19" to connect. The Bluetooth indicator light will change to a slow flash or solid blue once successfully paired.
- The headset can connect to two smartphones simultaneously. Repeat the pairing process for the second device if needed.
3. Music Playback
- Play/Pause: Press the Power On/Off button once.
- Next Track: Press the Volume Up key once.
- Previous Track: Press the Volume Down button once.
- Volume Up: Press and hold the Volume Up key.
- Volume Down: Press and hold the Volume Down button.
4. Call Management
- Answer Call: When an incoming call rings, the headset will automatically answer after a few seconds (Auto Answer feature). Alternatively, press the Power On/Off button once to answer.
- End Call: Press the Power On/Off button once during a call.
- Reject Call: Press and hold the Power On/Off button for 2 seconds during an incoming call.
- Redial Last Number: Double-press the Power On/Off button.
5. Voice Assistant
- Activate Voice Assistant: Press the Voice Assistant key (microphone icon) once to activate your smartphone's voice assistant (Siri or Google Assistant). The voice assistant light (blue) will illuminate.
6. EQ Settings
- Change EQ Mode: Press the EQ key once to cycle through available equalizer sound modes. The EQ light (blue) will illuminate.
Charging and Battery
The A19 headset is equipped with a 1000mAh rechargeable battery.
- Charging Port: Connect the provided Type-C charging cable to the charging port on the A19 unit and to a suitable USB power adapter.
- Charging Indicator: The charging indicator light (red) will illuminate during charging and turn off when fully charged.
- Charging Time: A full charge takes approximately 20 minutes.
- Battery Life:
- Music Playback: Up to 32 hours
- Talk Time: Up to 30 hours
- Standby Time: Up to 18 months (360 hours)
- Battery Level Display: The battery level can be displayed on your connected smartphone.

Image: Visual details on the A19's 1000mAh battery, charging time, and usage duration.
Maintenance and Care
- Cleaning: Wipe the unit with a soft, damp cloth. Do not use harsh chemicals or abrasive cleaners.
- Water Resistance: The A19 is IPX6 waterproof, meaning it is protected against high-pressure water jets from any direction. While it can withstand rain and splashes, it is not designed for submersion. Ensure the charging port cover is securely closed when not charging.
- Storage: Store the headset in a cool, dry place away from direct sunlight and extreme temperatures.
- Battery Longevity: For optimal battery life, avoid fully discharging the battery frequently. Charge the unit regularly, even if not in use for extended periods.

Image: Illustration of the A19's noise reduction capabilities and its IPX6 waterproof design, suitable for various weather conditions.
Troubleshooting
| Problem | Possible Cause | Solution |
|---|---|---|
| Device does not power on. | Low battery. | Charge the device for at least 20 minutes. |
| Cannot pair with smartphone. | Headset not in pairing mode; Bluetooth disabled on phone; device too far. | Ensure headset is in pairing mode (rapidly flashing light). Enable Bluetooth on phone. Keep devices within 1 meter during pairing. |
| No sound or low volume. | Volume too low; speakers misaligned; loose connection. | Increase volume on both headset and phone. Check speaker placement. Ensure speaker/microphone cable is securely connected. |
| Poor call quality. | Microphone misaligned; wind noise; environmental interference. | Adjust microphone position closer to mouth. Ensure windproof sponge is correctly placed. Move away from sources of strong electromagnetic interference. |
| Connection drops frequently. | Out of range; interference; low battery. | Keep devices within Bluetooth range. Avoid areas with strong wireless interference. Ensure battery is sufficiently charged. |
Specifications
| Feature | Detail |
|---|---|
| Model Name | Bluetooth Headsets (A19) |
| Connectivity Technology | Wireless (Bluetooth) |
| Bluetooth Version | 5.4 |
| Noise Control Features | Noise Cancellation |
| Water Resistance Level | IPX6 Waterproof |
| Battery Capacity | 1000mAh |
| Charging Time | Approximately 20 minutes |
| Music Playback Time | Up to 32 hours |
| Talk Time | Up to 30 hours |
| Standby Time | Up to 18 months (360 hours) |
| Speaker Diameter | 40mm (Graphene diaphragm) |
| Speaker Thickness | 10mm |
| Control Method | Voice, Button |
| Compatible Devices | Smartphones, Car Audio Systems (Bluetooth enabled) |
| Item Weight | 0.011 ounces (main unit) |
| Manufacturer | WNJACO |
Safety Information
- Always prioritize road safety. Do not operate the device in a manner that distracts you from driving.
- Ensure the headset is securely installed in your helmet to prevent detachment during riding.
- Do not attempt to disassemble or modify the device, as this may void the warranty and cause damage.
- Keep the device away from extreme heat sources and open flames.
- Dispose of the battery and device according to local regulations.
Related Documents - A19
 |
A19 Motorbike Helmet Headphones User Manual User manual for the A19 Motorbike Helmet Headphones, detailing features, functions, and safety precautions. |
 |
BRIKSMAX Architecture Shanghai 21039 Building Set Instructions with Lighting Comprehensive assembly instructions for the BRIKSMAX Architecture Shanghai 21039 building set, detailing the construction of the model and the integration of its lighting system. |
 |
GE Connected Full Color LED Lamp (CLEDA199CD1/CLEDA199CDRV) - Specifications and Regulatory Information Comprehensive technical specifications and regulatory compliance details for the GE Connected Full Color LED Lamp, models CLEDA199CD1 and CLEDA199CDRV, from GE Lighting (a Savant Company). Features include Bluetooth 5.0, Wi-Fi 2.4GHz connectivity, adjustable CCT and color, and FCC/Industry Canada statements. |
 |
GE Connected A19 CLEDA199CD1 Smart LED Lamp Technical Specifications Explore the technical specifications of the GE Connected A19 CLEDA199CD1 smart LED lamp, featuring Bluetooth 4.2 and 2.4G Wi-Fi connectivity for remote control via app, adjustable color temperature, and compliance with FCC and Industry Canada regulations. |
 |
Bright Smart Lighting User Guide - U-tec Comprehensive user guide for the U-tec Bright smart lighting device, covering setup options via U-tec App and Amazon Alexa, mesh network functionality, and FCC compliance. |
Ask a question about this manual
Ask about setup, troubleshooting, compatibility, parts, safety, or missing instructions. Manuals+ will review the question and use this page’s manual context to help answer it.