1. Introduction
This manual provides instructions for the safe and effective operation of the TEKCOPLUS Digital K/J Type Thermometer. This device is designed for accurate temperature measurement across a wide range, suitable for various industrial and scientific applications. Please read this manual thoroughly before use and retain it for future reference.
2. Product Overview and Components
The TEKCOPLUS Digital K/J Type Thermometer is a single-channel device compatible with K-type thermocouples. It features a backlit LCD display and various functions for versatile temperature monitoring.

Image: Front view of the TEKCOPLUS Digital K/J Type Thermometer, showing the display and control buttons.
2.1 Main Unit Features
- Wide Measurement Range: -328°F to 2501°F (-200°C to 1372°C) with ±0.2% +0.7 accuracy.
- Compatibility: Designed for K-type thermocouple probes.
- Display: Backlit large LCD for clear readings.
- Unit Switching: Easily switch between °C and °F.
- Data Functions: Data Hold, Max/Min value display.
- Power Management: Auto Power Off feature (can be disabled), Low battery indicator.
2.2 Package Contents
The standard package includes the following items:
- TEKCOPLUS Digital K/J Type Thermometer Main Unit
- Stainless Steel K-type Probe (Measuring range: -58°F~1292°F / -50°C~700°C)
- K-type Bead-type Probe (Measuring range: -4°F~392°F / -20°C~200°C)
- User Manual

Image: Package contents showing the thermometer, two K-type probes, and the user manual.
3. Setup
3.1 Battery Installation
- Locate the battery compartment cover on the back of the thermometer.
- Open the cover.
- Insert the required batteries (typically AAA, refer to specifications for exact type) ensuring correct polarity (+/-).
- Close the battery compartment cover securely.
3.2 Connecting Thermocouple Probes
The thermometer supports K-type thermocouple probes. Ensure the probe is correctly inserted into the T1 channel input.
- Identify the T1 channel input port at the top of the thermometer.
- Align the K-type thermocouple probe connector with the input port, observing the polarity markings (+ and -).
- Gently push the probe connector into the port until it is firmly seated.

Image: Labeled diagram of the thermometer indicating the T1 channel input, screen, and control buttons.
4. Operating Instructions
4.1 Power On/Off
- To power on the device, press the Power Button (red button with circle and line symbol) located at the bottom center.
- To power off the device, press and hold the Power Button for a few seconds.
4.2 Temperature Unit Switching (°C/°F)
To switch between Celsius (°C) and Fahrenheit (°F) temperature units:
- Press the UNIT Button located on the left side of the control panel.
- The display will toggle between °C and °F.

Image: The thermometer display showing temperature readings in Celsius and Fahrenheit after pressing the UNIT button.
4.3 Data Hold Function
To freeze the current temperature reading on the display:
- Press the HOLD Button located above the MAX button.
- The "HOLD" indicator will appear on the screen, and the displayed value will remain constant.
- Press the HOLD Button again to release the data hold and resume live measurement.
4.4 Max/Min Temperature Display
The thermometer can display the maximum and minimum temperatures recorded during a measurement session.
- Press the MAX Button to display the maximum temperature recorded since the device was powered on or the function was reset.
- Press the MIN Button to display the minimum temperature recorded.
- Press the MAX or MIN button again to cycle through MAX, MIN, and current readings, or to exit the Max/Min display mode.
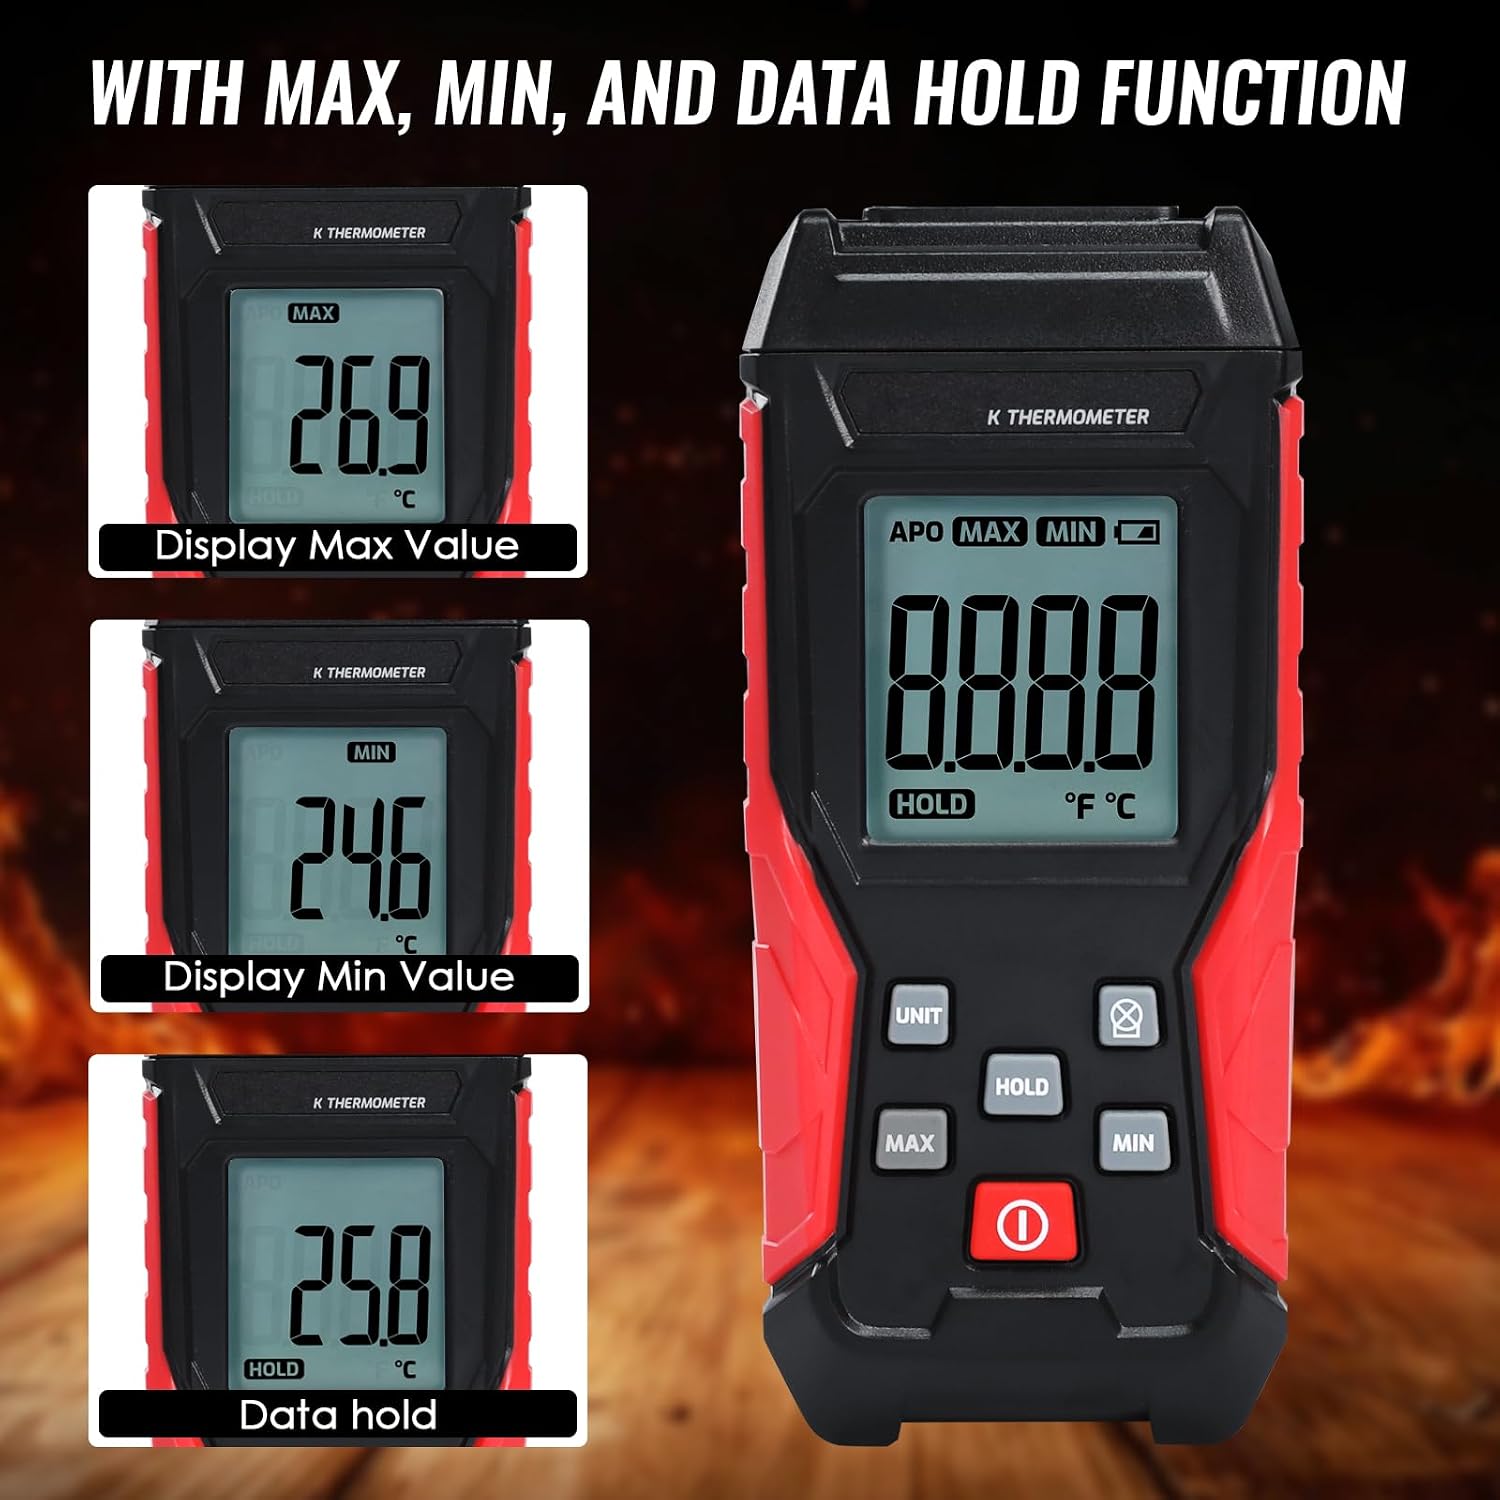
Image: The thermometer display illustrating the Max, Min, and Data Hold functions with corresponding readings.
4.5 Backlight Control
To activate or deactivate the display backlight for improved visibility in low-light conditions:
- Press the Backlight Button (light bulb icon) located on the right side of the control panel.
- Press it again to turn off the backlight.
4.6 Auto Power Off (APO)
The thermometer features an automatic power-off function to conserve battery life after a period of inactivity. The "APO" indicator will be visible on the display when this feature is active.
- To disable the Auto Power Off function, refer to the specific instructions in the full product manual, usually involving holding a button during power-on.
- When APO is disabled, the device will remain on until manually powered off.
5. Measurement Range and Probes
The TEKCOPLUS thermometer supports a broad temperature range, with specific ranges depending on the connected K-type probe.
- Main Unit Measuring Range: -328°F to 2501°F (-200°C to 1372°C)
- Stainless Steel K-type Probe: -58°F to 1292°F (-50°C to 700°C)
- K-type Bead-type Probe: -4°F to 392°F (-20°C to 200°C)
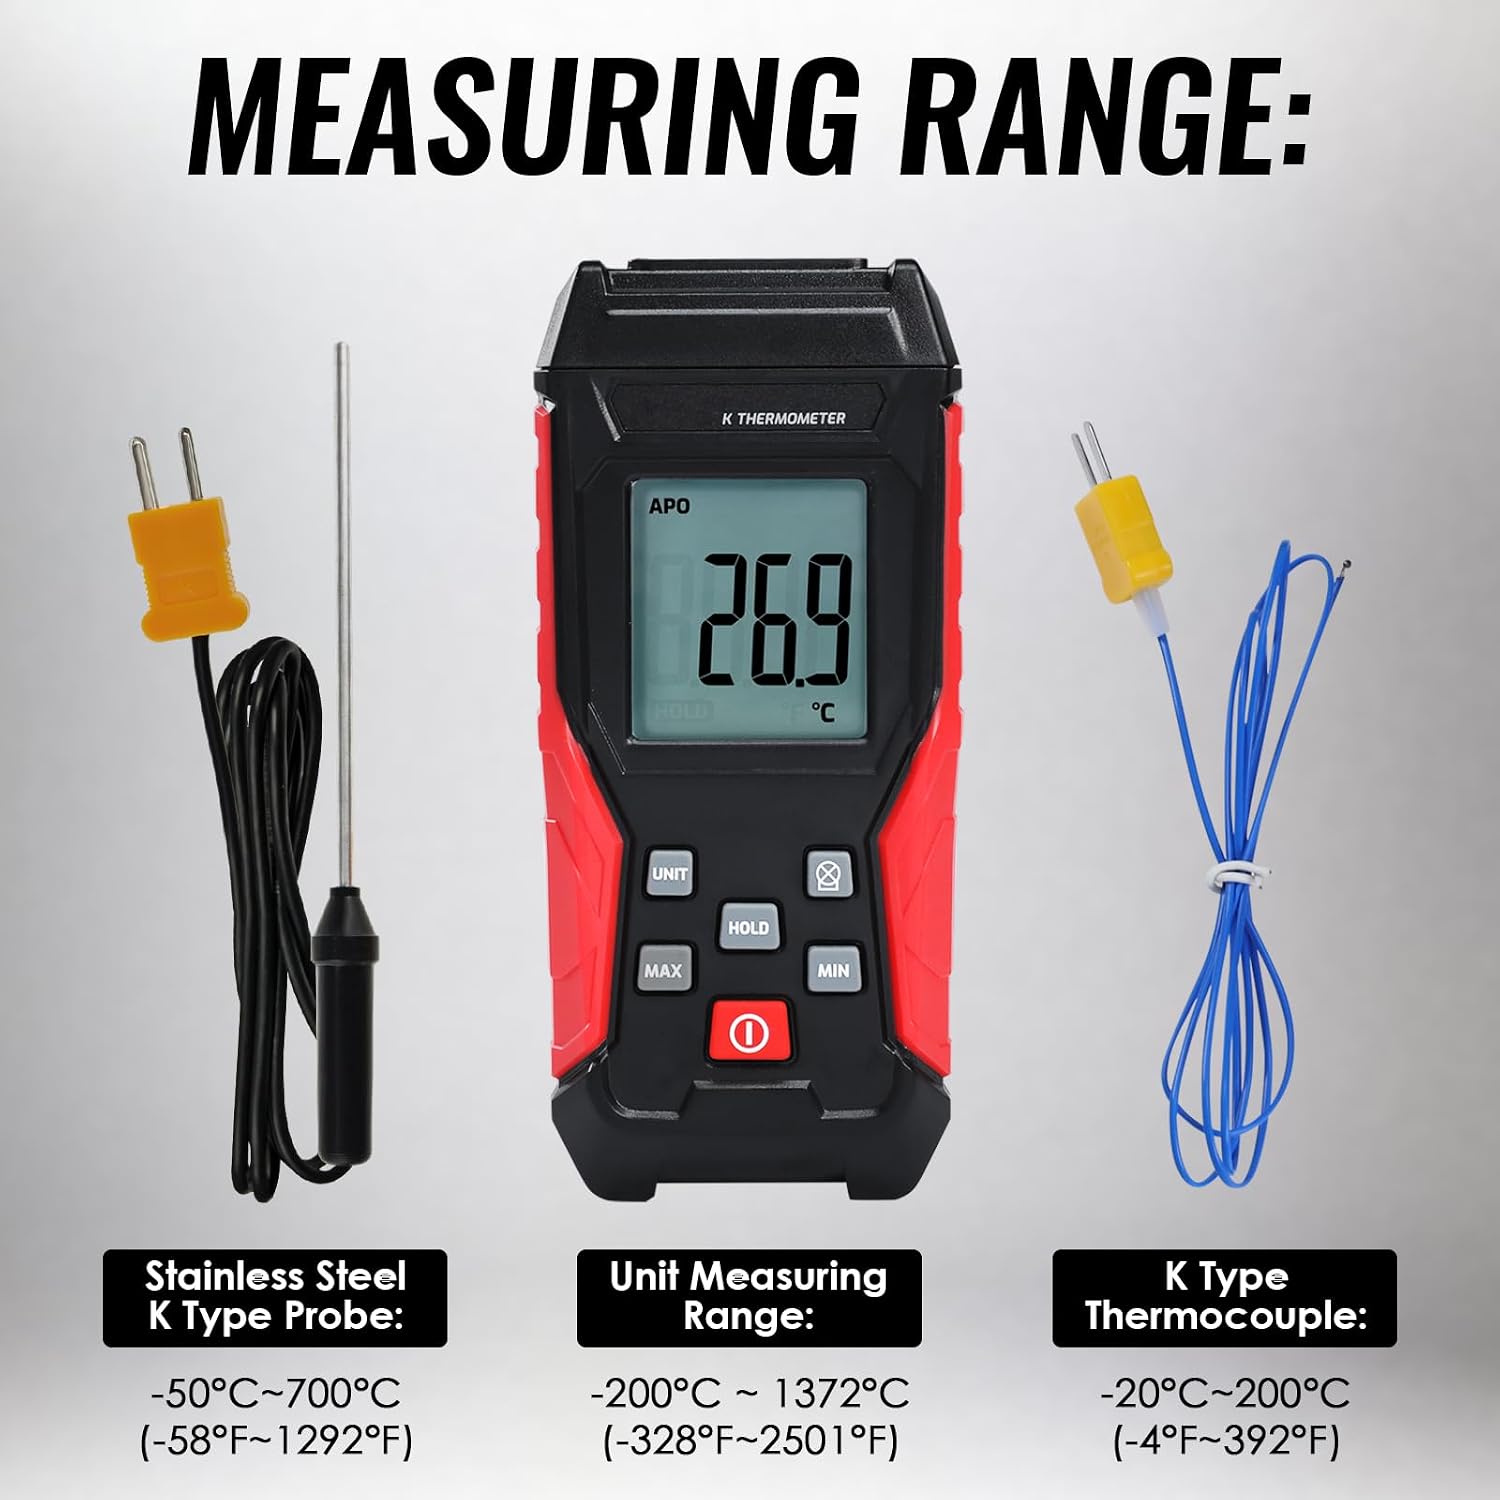
Image: Visual representation of the temperature measurement ranges for the main unit, stainless steel K-type probe, and bead-type K-type thermocouple.
Always select the appropriate probe for the temperature range and application to ensure accurate and safe measurements.
6. Applications
This thermometer is suitable for measuring surface temperatures of liquids, vapors, gaseous media, and solids across various environments. Common applications include:
- HVAC systems
- Ovens and Furnaces
- Ceramics and Pottery production
- Molten Metal temperature monitoring
- Scientific research and industrial processes involving high and low temperatures (e.g., Liquid Hydrogen, Liquid Nitrogen).

Image: Examples of wide applications for the thermometer, including steel making furnaces, coke ovens, and measuring temperatures of liquid hydrogen and liquid nitrogen.
7. Maintenance
7.1 Cleaning
- Wipe the thermometer's casing with a soft, damp cloth. Do not use abrasive cleaners or solvents.
- Ensure the device is powered off and probes are disconnected before cleaning.
- Clean probes according to their material and application requirements.
7.2 Storage
- When not in use for extended periods, remove the batteries to prevent leakage.
- Store the thermometer and probes in a dry, cool place, away from direct sunlight and extreme temperatures.
8. Troubleshooting
| Problem | Possible Cause | Solution |
|---|---|---|
| Device does not power on | Dead or incorrectly installed batteries | Check battery polarity; replace batteries. |
| Inaccurate readings | Incorrect probe type; damaged probe; probe not fully inserted | Ensure K-type probe is used; inspect probe for damage; re-insert probe firmly. |
| Display is dim or blank | Low battery; backlight off | Replace batteries; press backlight button. |
| "APO" indicator on, device powers off unexpectedly | Auto Power Off feature is active | Disable APO if continuous monitoring is required (refer to full manual for specific steps). |
9. Specifications
| Feature | Detail |
|---|---|
| Model Number | ZRA-9041800-1P |
| Brand | TEKCOPLUS |
| Main Unit Measuring Range | -328°F to 2501°F (-200°C to 1372°C) |
| Accuracy | ±0.2% +0.7 (main unit) |
| Stainless Steel K-type Probe Range | -58°F to 1292°F (-50°C to 700°C) |
| K-type Bead-type Probe Range | -4°F to 392°F (-20°C to 200°C) |
| Outer Material | Acrylonitrile Butadiene Styrene |
| Item Weight | 6.7 ounces |
| Package Dimensions | 7.95 x 3.27 x 1.77 inches |
| Special Feature | Alarm |
10. Warranty and Support
For warranty information and technical support, please refer to the documentation included with your product or contact TEKCOPLUS customer service. Keep your purchase receipt as proof of purchase for warranty claims.