1. Introduction
Thank you for choosing the Asyko 52-inch Crystal Ceiling Fan Fandelier with Lights. This manual provides essential information for the safe installation, operation, and maintenance of your new ceiling fan. Please read these instructions thoroughly before beginning installation or use, and retain this manual for future reference.

Image 1.1: The Asyko 52-inch Crystal Ceiling Fan Fandelier with black blades and a crystal light fixture.
2. Important Safety Information
To reduce the risk of electric shock, fire, or personal injury, always follow these basic safety precautions:
- Power Disconnection: Always turn off power at the main circuit breaker or fuse box before attempting any installation, maintenance, or cleaning.
- Qualified Electrician: All electrical wiring must be performed by a qualified electrician and comply with all local and national electrical codes.
- Mounting Structure: Ensure the mounting structure is securely fastened to the building structure and can support a minimum of 35 lbs (15.9 kg).
- Blade Clearance: Do not bend the fan blade holders during installation, balancing, or cleaning. Ensure there is adequate clearance between the fan blades and any obstacles.
- Moving Parts: Avoid placing objects in the path of the fan blades while the fan is operating.
- Light Bulbs: Use only the specified type and wattage of light bulbs. Allow bulbs to cool before replacing.
- Children and Pets: Keep children and pets away from the fan during operation and installation.
3. Product Overview
3.1 Key Features
- Crystal Lampshade: Features an exquisite crystal lampshade for enhanced aesthetics and light transmission.
- Silent DC Motor: Equipped with a 100% copper DC motor and balanced blade assembly for smooth, noiseless operation (below 35 dB).
- Energy Efficient: 65W copper core brushless motor reduces electricity costs compared to conventional AC motors.
- Remote Control: Full-function remote control for adjusting fan speed, light settings, and timer.
- 6 Speed Settings: Offers six fan speed options to suit various comfort levels.
- 3 Color Temperature Adjustable: Light color temperature can be adjusted to 3000K (warm white), 4500K (neutral white), and 6000K (cool white).
- Reversible DC Motor: Allows for seasonal use, providing a cooling effect in summer and enhancing air circulation in winter.
- Timer Function: Includes a 2-hour timer setting.
- Dual-Sided Blades: Fan blades feature a reversible design with black on one side and wood grain on the other for versatile styling.
3.2 Components and Dimensions
Familiarize yourself with the fan's components and dimensions before installation.
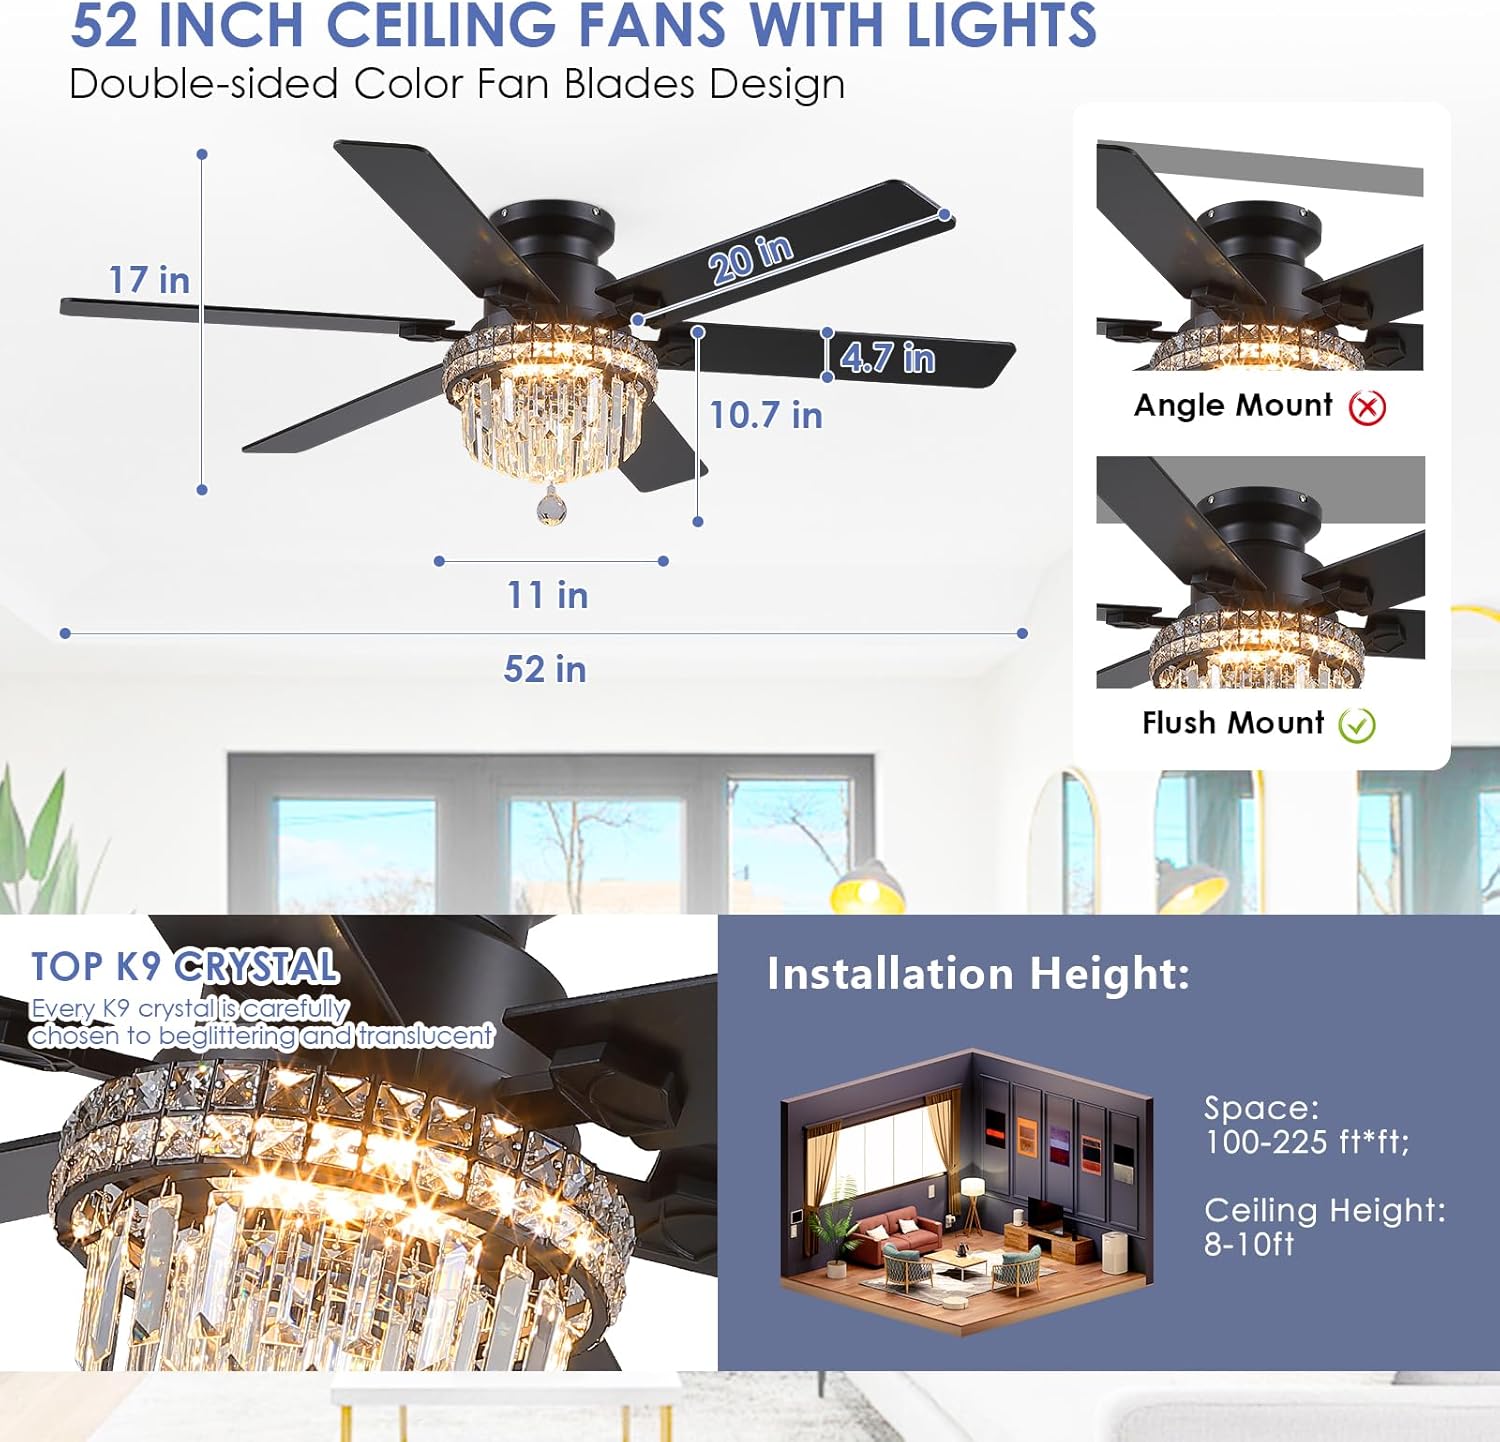
Image 3.1: Dimensions of the 52-inch ceiling fan and illustration of flush mount installation.

Image 3.2: Illustration of the dual-sided fan blades, offering both black and wood grain finishes.
4. Installation Instructions
Installation typically takes approximately 45 minutes. It is recommended to have two people for installation. Always ensure power is disconnected at the circuit breaker before starting.
4.1 Pre-Installation Steps
- Unpack Components: Carefully unpack all components and ensure all parts are present according to the packing list.
- Power Off: Turn off the electrical power at the main fuse box or circuit breaker.
- Mounting Location: Select a suitable mounting location that can support the fan's weight and allows for proper blade clearance. This fan is designed for indoor use and flush mount installation.
4.2 Mounting the Fan
- Secure Mounting Bracket: Attach the mounting bracket to the ceiling junction box using the provided screws. Ensure the bracket is firmly secured to the building structure.
- Wiring Connections: Connect the fan's electrical wires to the household wiring according to the wiring diagram in your detailed instruction manual. Ensure all connections are secure and properly insulated.
- Attach Fan Body: Carefully lift the fan body and attach it to the mounting bracket.
4.3 Blade and Light Kit Assembly
- Attach Fan Blades: Securely attach the fan blades to the motor housing. Choose either the black or wood grain side of the blades to face downwards.
- Install Light Kit: Connect the light kit wiring to the fan body. It is often easier to install the light section and crystals before hanging the entire fan assembly if possible, or at least before attaching the light fixture to the fan body once it's mounted.
- Crystal Installation: The crystal assembly can be time-consuming. Carefully attach each crystal piece to the light fixture. Extra crystals are typically provided.
- Install Light Bulbs: Insert the appropriate light bulbs into the sockets.

Image 4.1: Detailed view of the fan's craftsmanship, including the sturdy metal light fixture, dazzling crystal lampshade, dual finished blades, and durable metal canopy.

Image 4.2: Overview of key installation and product details, including recommended room sizes and mounting type.
5. Operating Instructions
Your Asyko ceiling fan can be operated using the included remote control or a compatible smartphone application.
5.1 Remote Control Functions
The remote control allows you to manage all fan and light functions:
- Power ON/OFF: Turns the fan and light on or off.
- Fan Speed: Adjusts between 6 fan speeds.
- Light ON/OFF: Controls the light independently.
- Color Temperature: Cycles through 3000K, 4500K, and 6000K light settings.
- Dimming: Adjusts the brightness of the light.
- Reverse Function: Changes the direction of blade rotation for summer (downward airflow) or winter (upward airflow).
- Timer: Sets the fan to turn off after 2 hours.

Image 5.1: The ceiling fan with its remote control and a smartphone displaying the control app.

Image 5.2: Demonstrates the adjustable light color temperatures (3000K, 4500K, 6000K) and dimming capability.

Image 5.3: Explains the reversible DC motor function for optimal airflow in summer and winter.
5.2 Smartphone App Control
For additional convenience, you can control your fan via a smartphone application:
- Download App: Scan the QR code provided in the image below or visit https://www.jasonghost.com/fanlamppro/ to download the app.
- Add Device: Open the app and follow the instructions to add a new device.
- Select Fan Light: Choose 'Light Fan' from the device list.
- Pairing: Click the '+' button to set the name of your fan light. Then, click the pair button 1-2 times within 5 seconds after the fan is powered on to complete pairing.

Image 5.4: Remote control and smartphone app interface with QR code for app download and pairing instructions.
6. Maintenance
Regular maintenance ensures the longevity and optimal performance of your ceiling fan.
- Cleaning: Clean the fan and light fixture periodically with a soft, damp cloth. Do not use abrasive cleaners or solvents, as these can damage the finish or crystals.
- Crystal Care: Gently wipe crystals with a soft, lint-free cloth to maintain their sparkle.
- Blade Screws: Periodically check all blade screws for tightness. Over time, they may loosen, causing the fan to wobble.
- Light Bulb Replacement: Ensure power is off before replacing light bulbs. Allow bulbs to cool completely before handling.
7. Troubleshooting
If you encounter issues with your fan, refer to the following common problems and solutions:
| Problem | Possible Cause | Solution |
|---|---|---|
| Fan does not start | No power to the fan; Remote control battery low; Incorrect wiring. | Check circuit breaker/fuse; Replace remote battery; Verify wiring connections. |
| Light does not work | Bulb faulty or loose; Incorrect wiring; Light switch off. | Replace bulb or tighten; Check wiring; Ensure light switch is on. If lights are dim, consider using brighter bulbs. |
| Fan wobbles excessively | Loose blade screws; Unbalanced blades; Loose mounting bracket. | Tighten all blade screws; Use a balancing kit (not included) to balance blades; Ensure mounting bracket is securely fastened. |
| Blades scraping | Improper blade installation; Obstruction. | Ensure blades are correctly installed and have adequate clearance from the fan body and surrounding objects. |
| Remote control not working | Battery low or dead; Remote not paired. | Replace battery; Re-pair the remote control with the fan (refer to Section 5.2 for pairing instructions). |
| App control issues | App not paired; Incorrect app version. | Follow app pairing instructions (Section 5.2); Ensure you have the correct and latest version of the app. |
If you are unable to resolve the issue using these steps, please contact Asyko customer service for assistance.
8. Product Specifications
| Feature | Detail |
|---|---|
| Brand | Asyko |
| Model Name | Crystal Ceiling Fan Fandelier with Lights |
| Item Model Number | A8341-52inch Ceiling Fan |
| ASIN | B0F9KWZ4KF |
| Size | 52 inch |
| Color | Black-8341 |
| Material | Iron (Body), MDF (Blade) |
| Finish Type | Crystal |
| Power Source | DC |
| Voltage | 12 Volts (DC) |
| Control Method | Remote Control |
| Special Feature | Remote Controlled, Reversible DC Motor, 6 Fan Speeds, 3 Color Temperature Adjustable, Timer Function |
| Indoor/Outdoor Usage | Indoor |
| Room Type | Bedroom, Living Room |
| Mounting Type | Ceiling Mount (Flush Mount recommended) |
| Item Weight | 17.35 pounds |
| Product Dimensions | 6 x 6 x 6 inches (packaging/general dimensions, refer to diagram for fan specific dimensions) |
| Assembly Required | Yes |
9. Warranty and Customer Support
Asyko is committed to providing high-quality products and excellent customer service.
- Free Replacement Service: We offer a free replacement service for damaged parts.
- Professional Customer Service: Our professional team is available to assist you with product installation or any product quality issues.
If you have any questions or require support, please do not hesitate to contact us. We aim to provide a satisfactory answer within 24 hours. Please refer to your purchase documentation or the Asyko brand store on Amazon for specific contact details.


