HOME VISION HV8901
HOME VISION Heavy Duty Fixed TV Wall Mount (Model HV8901) Instruction Manual
For 48-150 inch TVs up to 330 lbs
1. Introduction
Thank you for choosing the HOME VISION Heavy Duty Fixed TV Wall Mount. This manual provides essential instructions for safe installation, operation, and maintenance of your new TV mount. Please read this manual thoroughly before installation and retain it for future reference.
1.1 Safety Information
WARNING: Failure to read and follow these instructions may result in personal injury, property damage, or voiding your warranty. If you have any questions, please contact customer support.
- This product is designed for installation on wood studs, solid concrete, or brick walls. DO NOT install on drywall alone.
- Ensure the wall structure can safely support the combined weight of the mount and your TV. The mount supports up to 330 lbs (150 kg).
- Verify your TV's VESA pattern and weight are within the mount's specifications before installation.
- Always use a stud finder to locate wood studs accurately.
- Professional installation is recommended for concrete or brick walls to ensure proper anchoring.
- Keep all small parts away from children.
2. Package Contents
Before installation, please verify that all components are present and undamaged. Refer to the image below for a visual guide to the included parts.
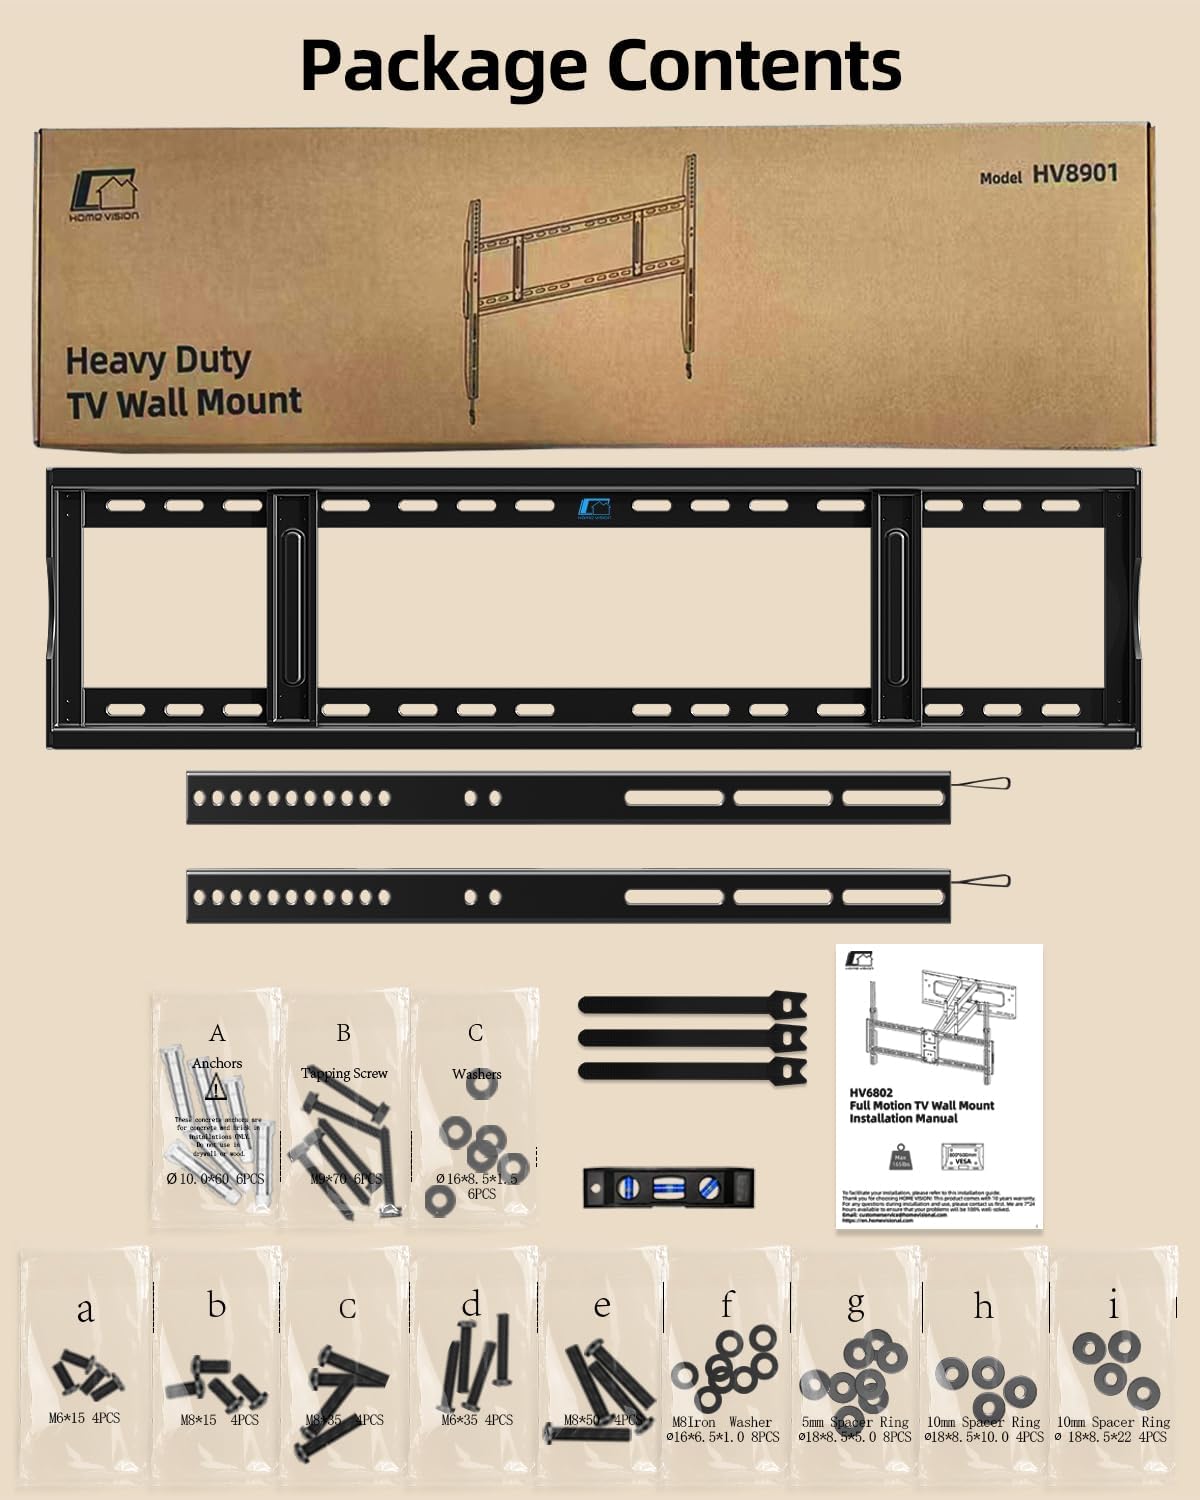
Image: All components included in the HOME VISION HV8901 TV Wall Mount package, showing the wall plate, TV brackets, level, cable ties, and various hardware bags (A-I) with screws, anchors, washers, and spacers.
2.1 Main Components
- Wall Plate Assembly
- TV Brackets (2 pieces)
- Bubble Level
- Cable Ties (3 pieces)
- Instruction Manual
2.2 Hardware Bags
- Bag A: Anchors (for concrete/brick walls)
- Bag B: Lag Screws (for wood studs)
- Bag C: Washers (for lag screws)
- Bags a-i: Various TV screws (M6, M8), washers, and spacers to fit different TV models.
3. Product Specifications

Image: Detailed dimensions of the HOME VISION HV8901 TV Wall Mount, showing a width of 37.0 inches (940mm) and height of 24.41 inches (620mm), with a low profile of 1.26 inches (32mm) from the wall.
| Feature | Specification |
|---|---|
| Model Number | HV8901 |
| Brand | HOME VISION |
| Mounting Type | Wall Mount |
| Movement Type | Fixed |
| Material | Alloy Steel |
| Color | Black |
| Compatible TV Sizes | 48 - 150 inches |
| Maximum Load Capacity | 330 lbs (150 kg) |
| VESA Compatibility | 200x200mm to 900x600mm |
| Wall Profile | 1.45 inches (3.7 cm) |
| Item Weight | 7 pounds (3.17 kg) |
| Package Dimensions | 37.5 x 9.75 x 1.75 inches |
4. Compatibility Check
Before proceeding with installation, it is crucial to confirm that this TV wall mount is compatible with your television and wall type.

Image: A visual guide to checking compatibility, including screen size range (48-150 inches), maximum load (330 lbs), VESA range (200x200mm to 900x600mm), and supported wall types (wood studs, brick, concrete).
4.1 TV Size and Weight
- This mount is designed for flat or curved TVs ranging from 48 to 150 inches.
- Your TV's weight must not exceed 330 lbs (150 kg).
4.2 VESA Pattern
The VESA (Video Electronics Standards Association) pattern refers to the spacing of the mounting holes on the back of your TV. This mount supports VESA patterns from 200x200mm to 900x600mm.

Image: A chart illustrating various VESA patterns supported by the mount, ranging from 200x200mm to 900x600mm, suitable for 48-150 inch TVs up to 330 lbs.
Common VESA patterns supported:
- 200x200mm, 200x300mm, 200x400mm
- 300x200mm, 300x300mm, 300x400mm
- 400x200mm, 400x300mm, 400x400mm
- 500x300mm, 500x400mm
- 600x300mm, 600x400mm, 600x500mm, 600x600mm
- 800x400mm, 800x600mm
- 900x500mm, 900x600mm
4.3 Wall Types
This mount is compatible with:
- Wood Studs: Fits 16", 24", and 32" spaced wood studs.
- Solid Concrete Walls: Requires anchors (included).
- Brick Walls: Requires anchors (included).
IMPORTANT: Do not install this mount on drywall alone. Drywall cannot support the weight of the mount and TV.
5. Setup and Installation
Follow these steps carefully to ensure a secure and correct installation of your TV wall mount.
5.1 Tools Required (Not Included)
- Pencil
- Phillips Head Screwdriver
- Electric Drill
- Stud Finder (for wood stud installation)
- Socket Wrench (13mm)
- Hammer (for concrete/brick anchors)
5.2 Step-by-Step Installation

Image: A three-step visual guide showing how to attach brackets to the TV, install the wall plate, and hang the TV onto the wall plate.
Step 1: Attach Brackets to TV Back
- Carefully place your TV face down on a soft, clean surface to prevent screen damage.
- Identify the VESA mounting holes on the back of your TV.
- Select the correct diameter and length screws (from hardware bags a-i) that fit your TV's mounting holes. Use washers and spacers if necessary to ensure a snug fit without overtightening.
- Attach the two TV brackets to the back of your TV using the selected screws, washers, and spacers. Ensure the brackets are securely fastened and evenly aligned.
Step 2: Install the Wall Plate

Image: Demonstrates how to mount the wall plate on wood studs (16-32 inch spacing), solid concrete walls, and brick walls, emphasizing that anchors are included for concrete/brick and not to mount on drywall alone.
- Determine the desired height for your TV. Mark the center point on the wall.
- For Wood Stud Installation: Use a stud finder to locate the edges of the wood studs. Mark the center of the studs. Position the wall plate against the wall, aligning its mounting holes with the marked stud centers. Use the included bubble level to ensure the wall plate is perfectly horizontal. Mark the drill points. Drill pilot holes (approx. 7/32" or 5.5mm diameter) into the center of the studs. Secure the wall plate using the lag screws (Bag B) and washers (Bag C).
- For Solid Concrete or Brick Wall Installation: Position the wall plate against the wall at the desired height. Use the bubble level to ensure it is horizontal. Mark the drill points. Drill holes (approx. 3/8" or 10mm diameter) at the marked points to a depth of at least 2.36" (60mm). Insert the concrete anchors (Bag A) into the drilled holes, tapping gently with a hammer until flush with the wall surface. Secure the wall plate using the lag screws (Bag B) and washers (Bag C).
- Ensure the wall plate is firmly and securely attached to the wall.
Step 3: Hang TV onto Wall Plate
- With assistance, carefully lift the TV (with brackets attached) and hook the TV brackets onto the top edge of the wall plate.
- Gently lower the TV until the brackets fully engage with the wall plate. The TV should sit securely.
- Locate the pull straps at the bottom of the TV brackets. Pull these straps down to release the locking mechanism, allowing you to adjust the TV horizontally for centering. Once centered, push the straps back up to lock the TV in place.
- Use the included cable ties to manage and organize your TV cables, routing them neatly behind the TV and mount.
6. Operating the Mount
This is a fixed TV wall mount, meaning it does not offer tilt, swivel, or extension. Its primary function is to hold your TV securely in a low-profile position.

Image: A side view of the TV mounted, highlighting its slim 1.45-inch profile and the adjustable pull tabs at the bottom of the TV brackets for locking and releasing the TV.
6.1 Locking and Releasing the TV
- The mount features a pull strap design for locking and releasing the TV from the wall plate.
- To lock the TV in place after hanging, ensure the pull straps are pushed upwards and fully retracted. This engages the safety mechanism.
- To release the TV (e.g., for cable access or removal), gently pull the straps downwards. This disengages the locking mechanism, allowing the TV to be lifted off the wall plate. Always have assistance when lifting or removing the TV.
7. Maintenance
Regular maintenance helps ensure the longevity and safety of your TV wall mount.
- Cleaning: Wipe the mount with a soft, dry cloth. Avoid abrasive cleaners or solvents that could damage the finish.
- Periodic Inspection: Every few months, check all screws and bolts to ensure they are tight and secure. Over time, vibrations or temperature changes can cause fasteners to loosen.
- Damage Check: Inspect the mount for any signs of wear, corrosion, or damage. If any damage is found, do not use the mount and contact customer support.
8. Troubleshooting
If you encounter any issues during or after installation, refer to the following common problems and solutions.
| Problem | Possible Cause | Solution |
|---|---|---|
| TV not level | Wall plate not level during installation. | Remove TV, loosen wall plate screws, adjust with bubble level, re-tighten screws. |
| TV does not fit mount | Incorrect TV size, weight, or VESA pattern. | Verify TV specifications against mount compatibility. Ensure correct screws/spacers are used. |
| Mount feels unstable | Screws not fully tightened, incorrect wall type, or improper anchoring. | Ensure all screws are securely tightened. Confirm installation on appropriate wall type (wood stud, concrete, brick) with correct anchors. Do not install on drywall alone. |
| TV cannot be locked/released | Pull straps are stuck or mechanism is obstructed. | Ensure no cables or debris are obstructing the pull strap mechanism. Gently pull/push the straps to engage/disengage. |
9. Warranty and Customer Support
HOME VISION products are manufactured with quality and durability in mind. For specific warranty details regarding your HV8901 TV Wall Mount, please refer to the warranty card included in your package or visit the official HOME VISION website.
If you have any questions, require technical assistance, or need to report a missing/damaged part, please contact HOME VISION customer support:
- Website: Visit the HOME VISION Store on Amazon
- Email: Refer to product packaging or website for contact email.
- Phone: Refer to product packaging or website for contact phone number.
Please have your model number (HV8901) and purchase information ready when contacting support.
Ask a question about this manual
Ask about setup, troubleshooting, compatibility, parts, safety, or missing instructions. Manuals+ will review the question and use this page’s manual context to help answer it.