HengTianMei SUGON A9 245&210
SUGON A9 Precision Soldering Station User Manual
Model: SUGON A9 245&210
1. Introduction
The SUGON A9 Precision Soldering Station is a high-performance digital soldering iron kit designed for various soldering applications, from intricate SMD work to high-power requirements. Featuring rapid heating, precise temperature control, and multiple handle and tip options, this station provides efficiency and versatility for professional and hobbyist use.

Figure 1.1: SUGON A9 Precision Soldering Station overview.
2. Key Features
- Fast Heating: Equipped with a 120W power supply, the station heats from standby to 716°F (380°C) in approximately 2 seconds, ensuring minimal waiting time.
- PID Temperature Control: Advanced PID control maintains stable and accurate temperatures for consistent soldering results.
- Versatile Handles & Tips: Includes 210, 245, and 115 series handles, along with 9 assorted soldering iron tips, catering to a wide range of soldering tasks.
- Quick Change Tip Holder: Designed for easy and rapid tip replacement without the need for additional tools or waiting for the tip to cool.
- Automatic Hibernation (Sleep Mode): The soldering iron automatically enters sleep mode when placed in its bracket, extending the lifespan of the heating core and conserving energy.
- Temperature Storage: Three programmable memory channels (CH1, CH2, CH3) allow users to store and quickly recall frequently used temperature settings.
- Temperature Unit Conversion: Easily switch between Celsius (°C) and Fahrenheit (°F) display units.

Figure 2.1: Rapid heating capability of the SUGON A9.

Figure 2.2: Three temperature memory storage channels.

Figure 2.3: Quick change soldering iron tips holder.
3. Safety Information
WARNING: Failure to follow these safety instructions may result in electric shock, fire, or serious injury.
- Always operate the soldering station in a well-ventilated area to avoid inhaling fumes.
- Wear appropriate personal protective equipment, including safety glasses, to protect against solder splashes.
- Do not touch the soldering iron tip or heated components directly. They can reach temperatures over 800°F (427°C) and cause severe burns.
- Ensure the power cord is securely connected and not damaged. Do not operate the station with a damaged cord.
- Keep the work area clean and free of flammable materials.
- Unplug the soldering station from the power outlet when not in use or before performing any maintenance.
- Do not expose the unit to water or excessive moisture.
- Keep out of reach of children.
4. Setup Instructions
- Unpack Components: Carefully remove all items from the packaging. Verify that all components are present: the soldering station unit, soldering handles (210, 245, 115 series), and the assortment of 9 soldering tips.
- Position the Station: Place the soldering station on a stable, heat-resistant, and non-flammable surface. Ensure there is adequate space around the unit for ventilation.
- Connect Soldering Handles: Connect the desired soldering handle(s) to the corresponding ports on the soldering station. Ensure the connectors are fully inserted and secure.
- Insert Soldering Tip: Select the appropriate soldering tip for your task. Insert the tip firmly into the soldering iron handle. The quick-change mechanism allows for easy insertion and removal.
- Power Connection: Connect the power cord to the soldering station and then plug it into a standard 110V AC power outlet.
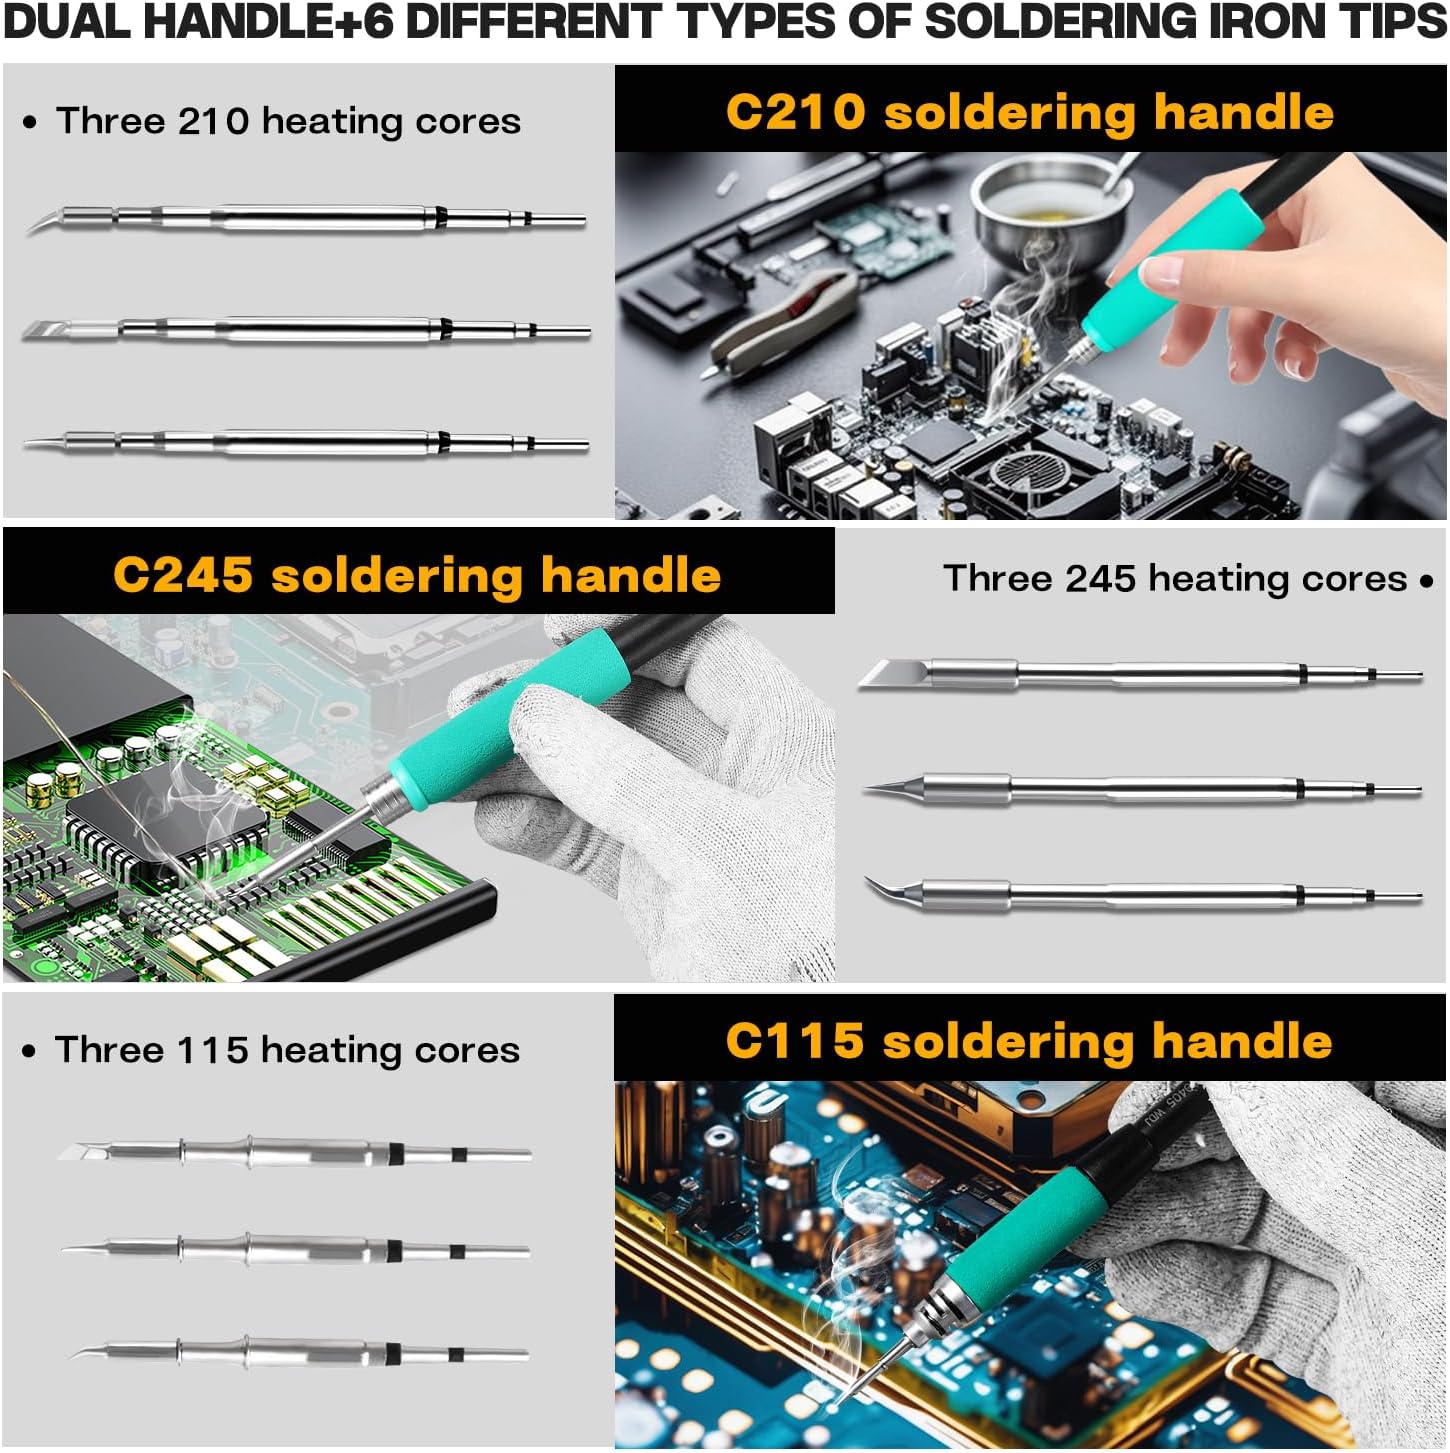
Figure 4.1: Different soldering handles and heating cores.

Figure 4.2: Inserting a soldering tip.
5. Operating Instructions
- Power On: Press the power button to turn on the soldering station. The digital display will illuminate.
- Temperature Adjustment:
- Use the TEMP buttons (up/down arrows) to adjust the desired temperature.
- To use preset temperatures, press CH1, CH2, or CH3. To save a new temperature to a channel, adjust to the desired temperature, then press and hold the respective channel button until the display confirms.
- Temperature Unit Conversion: The station supports both Celsius (°C) and Fahrenheit (°F). Refer to the manual's specific section or on-screen prompts for switching units.
- Automatic Hibernation (Sleep Mode): When the soldering iron handle is placed back into its designated holder on the station, the unit will automatically detect this and enter sleep mode. This reduces tip oxidation and extends the life of the heating element. Picking up the handle will instantly bring it back to the set working temperature.
- Quick Tip Change: To change a tip, simply pull the current tip out of the handle using the quick-change holder on the station. Insert the new tip firmly until it clicks into place. No need to wait for the tip to cool down.

Figure 5.1: Sleep mode and other settings.
6. Maintenance
Proper maintenance ensures the longevity and optimal performance of your soldering station.
- Tip Cleaning: Regularly clean the soldering iron tip using a damp sponge or brass wool. This removes excess solder and oxidation, ensuring efficient heat transfer.

Figure 6.1: Cleaning tip with brass wool.

Figure 6.2: Cleaning tip with damp sponge.
- Tip Tinning: After cleaning and before storing, always tin the tip with a small amount of solder. This prevents oxidation and prolongs tip life.
- Station Cleaning: Wipe down the station's exterior with a soft, dry cloth. Do not use abrasive cleaners or solvents.
- Storage: Store the soldering station in a dry, dust-free environment when not in use.
7. Troubleshooting
If you encounter issues with your SUGON A9 soldering station, refer to the table below for common problems and solutions.
| Problem | Possible Cause | Solution |
|---|---|---|
| Station does not power on. | No power supply; loose power cord. | Check power outlet and ensure power cord is securely connected to both the station and the outlet. |
| Soldering iron not heating up. | Loose handle connection; faulty tip; station in sleep mode. | Ensure handle is fully inserted. Check if the tip is properly seated. Pick up the handle to exit sleep mode. Try a different tip. |
| Temperature display shows "S-E" error. | Sensor error; poor tip contact; internal issue. | Ensure the soldering tip is firmly inserted into the handle. Try re-inserting the handle into the station. If the error persists, try a different tip. If the issue continues, contact customer support. |
| Temperature is unstable or inaccurate. | Oxidized tip; poor tip contact; environmental factors. | Clean and tin the soldering tip. Ensure the tip is fully seated. Avoid drafts or extreme temperatures in the work area. |
If the problem persists after attempting these solutions, please contact customer support for further assistance.
8. Specifications
| Feature | Detail |
|---|---|
| Manufacturer | HengTianMei |
| Model Number | SUGON A9 245&210 |
| Power Source | AC |
| Voltage | 110 Volts |
| Wattage | 120 watts |
| Display Style | Digital |
| Item Weight | 3.16 pounds |
| Package Dimensions | 9.41 x 8.27 x 6.97 inches |
| Included Components | Soldering station, multiple handles, 9 soldering tips |
9. Warranty and Support
For warranty information and technical support, please refer to the documentation provided with your purchase or contact the seller/manufacturer directly. Keep your proof of purchase for any warranty claims.
For general inquiries or troubleshooting assistance not covered in this manual, please visit the HengTianMei Store on Amazon.
Ask a question about this manual
Ask about setup, troubleshooting, compatibility, parts, safety, or missing instructions. Manuals+ will review the question and use this page’s manual context to help answer it.