
Introduction
The Slrvio LC300A Salt Chlorine Generator is designed to provide efficient and consistent chlorination for inground pools up to 40,000 gallons. This system utilizes electrolysis to convert salt into chlorine, offering a softer, more balanced pool water experience with reduced reliance on traditional chemical additives. Its compact, all-in-one design simplifies installation, and the smart digital control panel provides real-time status monitoring and convenient remote control via a mobile application. The integrated self-cleaning titanium plates minimize maintenance by reducing scale buildup.
Safety Information
Always read and understand all instructions before installing or operating this product. Ensure all electrical connections comply with local codes and regulations. Disconnect power before performing any maintenance or service. Keep children and pets away from the unit during operation. Maintain proper pool water chemistry as recommended by pool professionals. Do not operate the unit if any part is damaged or appears to be malfunctioning. For detailed safety warnings, refer to the separate safety guide included with your product.
Package Contents
Verify that all components are present and undamaged before beginning installation.
- Slrvio LC300A Salt Chlorine Generator Unit
- 2 x 2-inch PVC Connectors
- 2 x 1.5-inch PVC Connectors (adapters for smaller pipes)
- 2 x Nuts (for securing connectors)
- 2 x Waterproof Silicone Rings (O-rings)
- User Manual
Setup & Installation
Proper installation is crucial for the optimal performance and longevity of your salt chlorine generator. Follow these steps carefully.
Required Tools & Materials:
- Tape Measure / Ruler
- Hacksaw or PVC Pipe Cutter
- Sandpaper
- PVC Cement / Silicone Gel (for sealing connections)
- Marker
Installation Steps:
- Prepare the Installation Area: Ensure the pool pump and filter system are turned off and depressurized. Identify a suitable section of your pool's return line after the filter and heater (if applicable) for installation.
- Measure and Mark the Pipe: Using the provided size drawing (refer to the user manual for exact dimensions, typically 273mm for the unit), measure and mark the section of the PVC pipe where the chlorinator will be installed. This measurement ensures the correct fit for the unit and its connectors.
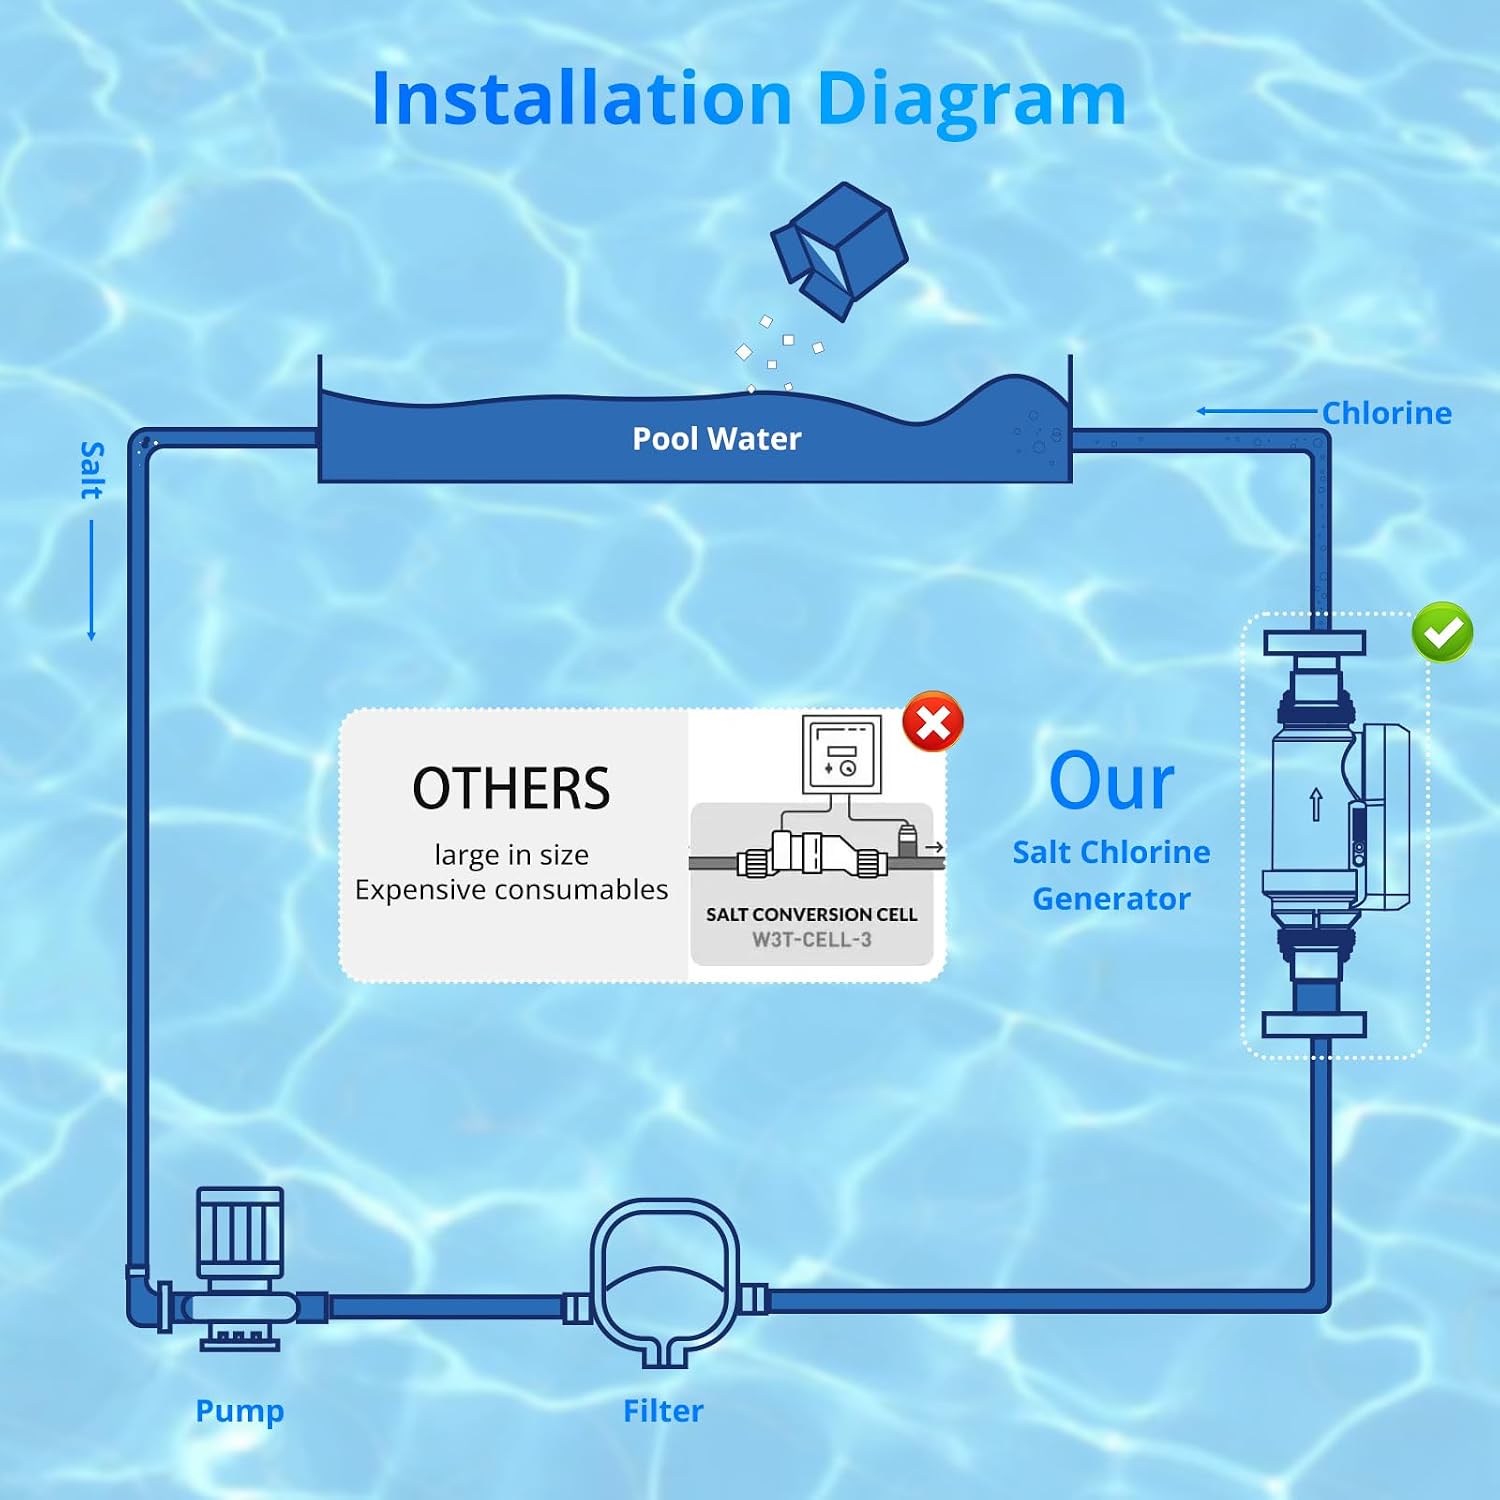
Image: Installation diagram illustrating the placement of the salt chlorine generator within the pool's plumbing system, typically after the pump and filter.
- Cut the Pipe: Carefully cut the marked section of the PVC pipe using a hacksaw or PVC pipe cutter. Ensure the cuts are straight and clean to facilitate a proper seal.
- Attach Nuts and Silicone Rings: Slide the large nuts onto the cut ends of the existing PVC pipe. Then, insert the waterproof silicone rings into the PVC connectors (1.5-inch or 2-inch, depending on your pipe size).
- Sand Pipe and Connectors: Lightly sand the outside of the cut PVC pipe ends and the inside of the PVC connectors. This roughens the surfaces, allowing the silicone gel/PVC cement to adhere better and create a stronger, watertight seal.
- Apply Silicone Gel/PVC Cement: Apply a generous amount of silicone gel (or PVC cement if using) to the sanded surfaces of both the pipe ends and the inside of the PVC connectors.
- Attach PVC Connectors: Firmly push the PVC connectors onto the pipe ends, twisting slightly to ensure even distribution of the sealant and a tight fit. Allow the sealant to dry completely for at least 2 hours (or as per sealant instructions) before proceeding.
- Install the Chlorinator Unit: Ensure the chlorinator unit's flow direction matches the water flow in your pipe. The unit has arrows indicating water inlet and outlet. Connect the chlorinator unit to the installed PVC connectors. Tighten the nuts securely to create a watertight seal.

Image: The Slrvio LC300A Salt Chlorine Generator unit, showing its compact design and connection points.

Image: Illustration of the chlorinator's compatibility with standard 1.5-inch and 2-inch PVC pipes.
- Allow Drying Time: After installation, wait for a minimum of 24 hours before connecting the power supply and turning on the water supply to allow all seals to fully cure.
- Watch Installation Video: For a visual guide on the installation process, please refer to the official installation video below.
Video: A detailed step-by-step guide demonstrating the physical installation of the Slrvio Salt Chlorine Generator onto existing pool plumbing.
Operating Instructions
The Slrvio LC300A features a smart digital control panel and APP remote control for easy operation.
- Power On/Off: Use the dedicated power button on the control panel or via the APP to turn the unit on or off.
- Chlorine Output Control: Adjust the chlorine production level using the '+' and '-' buttons on the control panel or through the APP. The LED display will show the current output setting.
- Real-time Status Monitoring: The smart LED display provides real-time information including low salt alerts, voltage/current monitoring, and water temperature (10°C–45°C). Temperature alerts help protect the unit.
- Memory Function: The unit retains your last settings, ensuring consistent operation after power cycles.
- APP Remote Control: Download the dedicated mobile application to control the unit remotely, monitor status, and adjust settings from your smartphone.
The system works by transforming salt into chlorine through electrolysis, producing fresh, skin-friendly water and reducing the need for additional pool chemicals. This results in a more comfortable and low-maintenance swimming experience.

Image: Visual representation of improved water quality after using the electrolytic plates to convert chloride water into chlorine gas.
Maintenance
Regular maintenance ensures the longevity and efficiency of your Slrvio Salt Chlorine Generator.
- Self-Cleaning Function: The integrated salt cell features an automatic polarity reversal function and self-cleaning titanium plates. This significantly reduces calcium scale buildup, minimizing manual cleaning and maintenance costs.
- Check Water Temperature: The unit provides water temperature alerts (10°C–45°C). Ensure the pool water temperature remains within this optimal range to protect the generator and extend its lifespan.
- Monitor Salt Levels: The smart digital control panel will display low salt alerts. Maintain the recommended salinity level (3000-4000 ppm) for effective chlorine production.
- General Inspection: Periodically inspect the unit and connections for any signs of leaks, damage, or wear. Address any issues promptly.

Image: Explanation of the self-cleaning function, detailing how electrochemical dissolution prevents calcium buildup on the titanium plates.
Troubleshooting
If you encounter issues with your Slrvio Salt Chlorine Generator, refer to the following common troubleshooting steps:
- No Chlorine Production: Check salt levels. Ensure the unit is receiving power and the pump is running. Inspect the cell for excessive scale buildup (though self-cleaning, extreme conditions may require manual inspection). Verify flow direction.
- Low Salt Alert: Test your pool's salt level using a reliable salt test kit. Add salt as needed to reach the recommended range (3000-4000 ppm).
- Error Codes/Display Issues: Refer to the specific error codes in the detailed user manual for their meanings and recommended actions. Try power cycling the unit.
- Leaks at Connections: Ensure all nuts are tightened securely. If leaks persist, check the silicone rings for proper seating or damage. Reapply sealant if necessary after drying.
- Unit Not Responding: Check power supply and cable connections. Ensure the control panel is clean and dry. If using APP control, verify Bluetooth/Wi-Fi connection.
If problems persist after following these steps, contact customer support.
Specifications
| Feature | Description |
|---|---|
| Model | LC300A |
| Chlorine Production | 30g (grams) |
| Pool Volume Capacity | 25,000 - 40,000 Gallons (Inground) |
| Voltage Input/Output | Input: AC100-240V | Output: DC24V |
| Recommended Salinity | 3000-4000 ppm |
| Pipe Connection Size | 1.5" / 2.0" PVC Pipe (48.3mm & 60.3mm outer diameter) |
| Product Dimensions | 7.87 x 5.91 x 3.54 inches |
| Item Weight | 5 Pounds |
| Control Panel | Smart LED Display with Low Salt Alerts, Voltage/Current Monitoring, Temperature Alerts (10°C–45°C), Memory Function |
| Chlorinator Cell | Self-Cleaning Titanium Plates with Automatic Polarity Reversal |
Warranty & Support
For warranty information and customer support, please refer to the warranty card included with your product or visit the official Slrvio website. You may also contact our support team directly via the contact information provided in the packaging or on our website for assistance with installation, operation, or troubleshooting.