1. Introduction
This manual provides essential instructions for the proper installation, operation, and maintenance of your ZHRCLY Johnson Fan Coil Unit Temperature Controller, model T6634-TF20-9JS0. Please read this manual thoroughly before using the device to ensure safe and efficient operation. Retain this manual for future reference.
2. Safety Information
Observe the following safety precautions to prevent damage to the product or injury to personnel:
- Installation and servicing should only be performed by qualified personnel.
- Disconnect power before installing or servicing the controller to prevent electrical shock.
- Ensure all wiring connections comply with local and national electrical codes.
- Do not expose the controller to water or excessive moisture.
- Do not attempt to modify or repair the controller yourself. Contact qualified service personnel.
3. Product Overview
The T6634-TF20-9JS0 is a manual temperature controller designed for fan coil units. It features a rotary dial for temperature setting and two slider switches for mode and fan speed control.
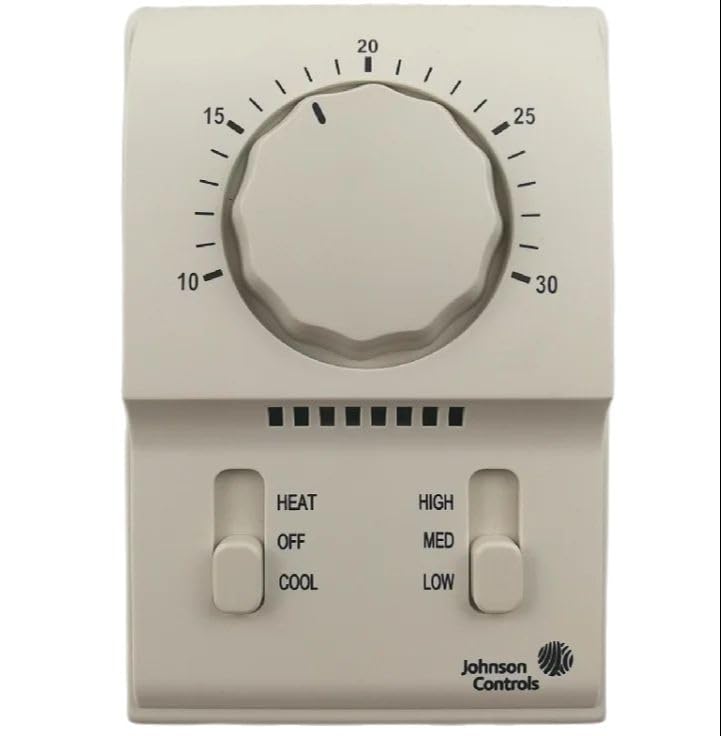
Figure 1: Front view of the ZHRCLY Johnson Fan Coil Unit Temperature Controller T6634-TF20-9JS0. This image displays the device with a central temperature control dial, a left slider for operating modes (HEAT, OFF, COOL), and a right slider for fan speeds (HIGH, MED, LOW). The Johnson Controls logo is visible at the bottom right.
3.1. Components
- Temperature Control Dial: A central rotary dial used to set the desired temperature, ranging from 10 to 30 degrees Celsius.
- Mode Selector Switch: A left vertical slider switch with three positions:
- HEAT: Activates heating function.
- OFF: Turns off the unit.
- COOL: Activates cooling function.
- Fan Speed Selector Switch: A right vertical slider switch with three positions:
- HIGH: Sets fan to high speed.
- MED: Sets fan to medium speed.
- LOW: Sets fan to low speed.
- Indicator Lights: A series of small black squares above the slider switches, which may indicate operational status (specific functionality not detailed in this manual).
4. Setup and Installation
This section provides general guidance. For detailed wiring diagrams and specific installation procedures, refer to the product's technical specifications sheet or consult a qualified HVAC technician.
- Mounting Location: Choose a central location on an interior wall, away from direct sunlight, drafts, and heat sources, to ensure accurate temperature sensing.
- Power Disconnection: Before beginning installation, ensure that the main power supply to the fan coil unit is completely disconnected at the circuit breaker.
- Wiring: Connect the controller's terminals to the fan coil unit's wiring according to the provided wiring diagram. Ensure all connections are secure and correctly matched (e.g., power, fan speeds, heating/cooling outputs).
- Mounting the Controller: Secure the controller to the wall using appropriate screws and anchors.
- Power Restoration: Once installation is complete and all connections are verified, restore power to the fan coil unit.
5. Operating Instructions
Follow these steps to operate your temperature controller:
- Set Operating Mode: Use the left slider switch to select the desired mode:
- Slide to HEAT for heating operation.
- Slide to COOL for cooling operation.
- Slide to OFF to turn off the fan coil unit.
- Set Desired Temperature: Rotate the central dial to the desired temperature setting. The dial is marked from 10 to 30 degrees Celsius.
- Set Fan Speed: Use the right slider switch to select the desired fan speed:
- Slide to HIGH for maximum airflow.
- Slide to MED for moderate airflow.
- Slide to LOW for minimal airflow.
The unit will now operate according to your selected mode, temperature, and fan speed settings.
6. Maintenance
The T6634-TF20-9JS0 temperature controller requires minimal maintenance. Regular cleaning and periodic checks are recommended.
- Cleaning: Gently wipe the exterior of the controller with a soft, damp cloth. Do not use abrasive cleaners or solvents. Ensure no liquid enters the device.
- Dust Removal: Periodically remove any dust accumulation from the vents or openings to ensure proper airflow and temperature sensing.
- Operational Check: Periodically verify that the controller responds correctly to changes in temperature settings, mode selections, and fan speed adjustments.
7. Troubleshooting
If you encounter issues with your temperature controller, refer to the following common problems and solutions:
| Problem | Possible Cause | Solution |
|---|---|---|
| Controller is unresponsive / No power | No power supply; Loose wiring; Blown fuse/tripped breaker. | Check power supply to the fan coil unit. Verify wiring connections. Check circuit breaker/fuse. |
| Fan coil unit not heating/cooling | Incorrect mode selected; Temperature setting too high/low; Fan coil unit malfunction. | Ensure correct mode (HEAT/COOL) is selected. Adjust temperature setting to be above/below ambient. Consult fan coil unit manual or technician. |
| Fan not operating at selected speed | Incorrect fan speed selected; Fan motor issue. | Verify fan speed switch position. If issue persists, consult a qualified technician. |
| Inaccurate temperature reading | Controller exposed to drafts/heat sources; Sensor obstruction. | Relocate controller if possible. Ensure no obstructions around the controller. |
If the problem persists after attempting these solutions, contact a qualified service technician.
8. Specifications
| Feature | Detail |
|---|---|
| Model Number | T6634-TF20-9JS0 |
| Brand | ZHRCLY |
| Package Dimensions | 1 x 1 x 1 inches |
| Item Weight | 6.6 pounds |
| Manufacturer | Original factory |
| Batteries Required | No |
| Included Components | NEW (Controller unit) |
9. Warranty and Support
For warranty information or technical support, please refer to the documentation provided with your purchase or contact the seller directly. Keep your purchase receipt as proof of purchase.