Reatan A6
Reatan A6 Mini Gaming PC User Manual
Model: A6 (Alloy-X Series)
Brand: Reatan
1. Introduction
This manual provides essential information for setting up, operating, maintaining, and troubleshooting your Reatan A6 Mini Gaming PC. Please read it thoroughly to ensure optimal performance and longevity of your device.
2. What's in the Box
Verify that all items are present in the package:
- Ryzen 7 7840HS 32GB 1TB Mini PC × 1
- HDMI Cable × 1
- Adapter (DC 19V/6.32A , AC 100~240V, 50/60Hz) × 1
- VESA Mount & Screws × 1
- User Manual × 1
3. Product Overview
The Reatan A6 is a compact and powerful mini PC designed for gaming, business, and office use. Its small form factor integrates high-performance components for a versatile computing experience.
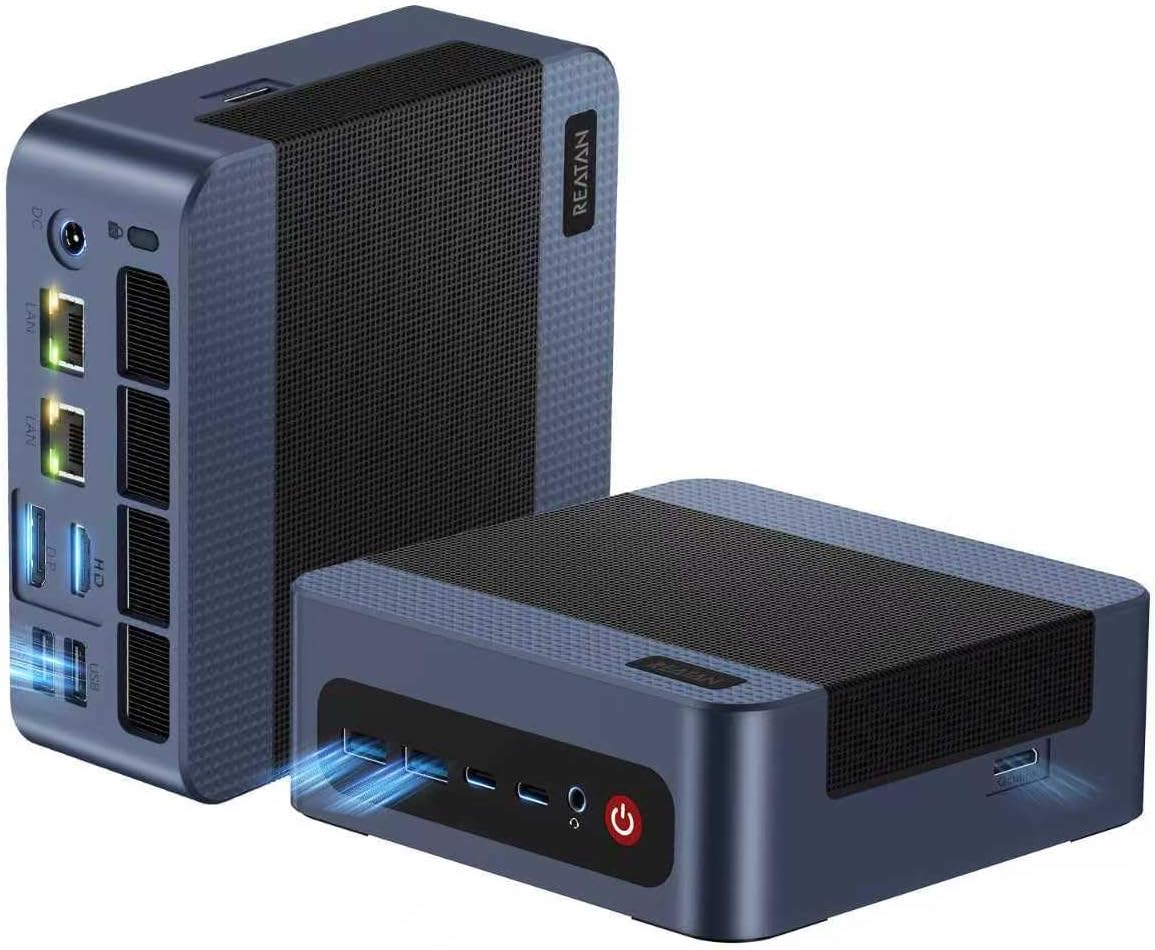
Figure 1: Reatan A6 Mini PC, showcasing its compact design and front-facing ports.
Ports and Connectors
The Reatan A6 offers a comprehensive set of ports for various connectivity needs:

Figure 2: Detailed view of the Reatan A6 Mini PC's front and rear interfaces.
- Front Ports: 2x USB 3.2 (Gen2), 2x USB4 (8K@60Hz), 1x 3.5mm CTIA Audio Jack, Power Button.
- Rear Ports: 2x 2.5G RJ45 LAN, 1x HDMI 2.0 (4K@60Hz), 1x DisplayPort (4K@144Hz), 2x USB 2.0, DC Power Input.
- Side Port: 1x Oculink (PCIe 4.0 x4) for external GPU expansion.
4. Setup
Follow these steps to set up your Reatan A6 Mini Gaming PC:
- Connect Peripherals: Connect your keyboard, mouse, and monitor(s) to the appropriate USB, HDMI, or DisplayPort connections.
- Power Connection: Connect the provided power adapter to the DC power input on the rear of the mini PC, then plug the adapter into a power outlet.
- Initial Boot: Press the power button on the front of the device. The system will boot into the pre-installed Windows 11 Pro operating system.

Figure 3: Reatan A6 Mini PC with essential cables connected for operation.
Video 1: This video demonstrates the unboxing, physical setup, and initial boot process of the Reatan A6 Mini PC, including a brief overview of its BIOS settings.
5. Operating System & BIOS
The Reatan A6 comes with Windows 11 Pro pre-installed, offering a familiar and robust operating environment. For advanced configurations, you can access the BIOS/UEFI settings.
Accessing BIOS/UEFI
To enter the BIOS setup, press the Delete key repeatedly during startup. To access the boot options menu, press the F7 key repeatedly during startup.
Key BIOS Settings
- Power Limit Select: Adjust between Quiet, Balance, and Performance modes to optimize power consumption and thermal output.
- Wake On LAN: Enable or disable the ability to wake the system remotely via a network signal.
- iGPU Configuration: Adjust settings related to the integrated graphics, such as UMA Frame Buffer Size, to allocate system memory to the GPU.
6. Key Features & Performance
The Reatan A6 is engineered with high-performance components to deliver exceptional computing power in a compact design.

Figure 4: Overview of the Reatan A6 Mini PC's core features.
- Processor: AMD Ryzen 7 7840HS (8 Cores, 16 Threads, up to 5.1GHz) with a 4nm process, integrating a dedicated AI engine for improved energy efficiency and performance comparable to an NVIDIA GTX 1650 Ti.
- Graphics: AMD Radeon 780M Integrated Graphics with advanced DNA3 architecture, supporting hardware-accelerated ray tracing and advanced frame generation for smooth gaming and graphics tasks.
- Memory: 32GB DDR5 5600MHz dual-channel memory (2x16GB), expandable up to 64GB.
- Storage: 1TB M.2 2280 PCIe 4.0 SSD, with dual-slot expansion supporting up to two PCIe 4.0 2TB SSDs for a total capacity of 4TB.
- Networking: Dual 2.5G Ethernet ports for high-speed wired connections, WiFi 6E, and Bluetooth 5.2 for wireless connectivity.
- Display Output: Supports Quad Display setups via HDMI 2.0, DisplayPort, and USB-C ports (up to 4K@60Hz), and 8K@60Hz via the USB4 port.
- Expandability: Features an Oculink (PCIe 4.0 x4) interface for expanding graphics card performance via an eGPU, transforming the device into a mobile workstation.

Figure 5: The Reatan A6 Mini PC supporting a quad-screen display setup for enhanced productivity and entertainment.
7. Maintenance & Upgrades
The Reatan A6 is designed for user-friendly maintenance and upgrades, allowing you to enhance its capabilities over time.
Accessing Internal Components
To access the internal components for upgrades or maintenance, carefully remove the four screws located under the rubber feet on the bottom panel. Gently pry open the bottom cover.
Video 2: This video provides a detailed look at the internal components of the Reatan A6 Mini PC, demonstrating how to access and potentially upgrade RAM and SSDs.
RAM Upgrade
The mini PC comes with 32GB DDR5 5600MHz RAM (2x16GB SODIMM modules). You can upgrade the memory up to a maximum of 64GB by replacing the existing modules with higher capacity DDR5 SODIMM modules.
SSD Expansion
The device includes a 1TB M.2 2280 PCIe 4.0 SSD. It supports dual-slot expansion, allowing you to add a second PCIe 4.0 2TB SSD for a total storage capacity of up to 4TB. Ensure any new SSDs do not have integrated heat sinks that might interfere with the chassis.
Cooling System
The Reatan A6 features an efficient and stable heat dissipation system with quiet operation, utilizing both top and bottom fans to maintain optimal temperatures during use.

Figure 6: The internal cooling design ensures efficient heat dissipation for stable performance.
8. Troubleshooting
If you encounter any issues with your Reatan A6 Mini Gaming PC, refer to the following common troubleshooting tips:
- No Power: Ensure the power adapter is securely connected to both the mini PC and a working power outlet. Try a different outlet if necessary.
- No Display: Verify that the HDMI or DisplayPort cable is firmly connected to both the mini PC and the monitor. Ensure the monitor is powered on and set to the correct input source.
- Peripheral Issues: If a keyboard, mouse, or other USB device is not responding, try connecting it to a different USB port. Ensure drivers are up to date if applicable.
- Slow Performance: Check for background applications consuming resources. Ensure sufficient free storage space. Consider upgrading RAM or SSD if performance remains consistently low.
- Network Connectivity Problems: For wired connections, ensure the Ethernet cable is properly connected. For Wi-Fi, verify the network password and signal strength.
For more complex issues or persistent problems, please contact Reatan After-sales Service.
9. Specifications
| Feature | Specification |
|---|---|
| Processor | AMD Ryzen 7 7840HS (8C/16T, up to 5.1GHz) |
| Graphics Coprocessor | AMD Radeon 780M Integrated Graphics |
| RAM | 32 GB DDR5 5600MHz (Expandable to 64GB) |
| Hard Drive | 1 TB SSD (PCIe 4.0 x4, Dual-slot expansion up to 4TB) |
| Operating System | OS 11 Pro |
| Connectivity | WiFi 6E, Bluetooth 5.2, Dual 2.5G RJ45 LAN |
| Video Output | HDMI 2.0, DisplayPort, USB-C, USB4 (Quad Display, up to 8K@60Hz) |
| USB Ports | 2x USB 3.0, 2x USB 2.0, 2x USB4 |
| Audio Port | 3.5mm CTIA Audio Jack |
| Special Ports | Oculink (PCIe 4.0 x4) |
| Item Weight | 2.75 pounds |
| Product Dimensions | 5 x 4.84 x 1.73 inches |
10. Warranty and Support
Reatan is committed to providing excellent customer service and support for your A6 Mini Gaming PC.
- Warranty: Enjoy one year of full-cycle after-sales service from the date of purchase.
- Online Support: Our professional team provides 7-day/24-hour online support for equipment inquiries and troubleshooting.
- Contact: For support, you can email us at support@reatan.com or use the "Ask Product Questions" feature on your Amazon order page.
Ask a question about this manual
Ask about setup, troubleshooting, compatibility, parts, safety, or missing instructions. Manuals+ will review the question and use this page’s manual context to help answer it.