1. Introduction
This manual provides detailed instructions for the assembly, operation, and maintenance of your Jocisland YPG109 6.15x8 Ft Wooden Greenhouse. Please read this manual thoroughly before beginning assembly or use to ensure proper installation and safe operation. Retain this manual for future reference.

Image 1.1: Exterior view of the Jocisland 6.15x8 Ft Wooden Greenhouse, showcasing its cedar frame and polycarbonate panels.
Key Features:
- Sturdy Cedar Wood Frame: Constructed from premium cedar wood with reinforced metal hardware, designed for durability and stability. The structure can withstand wind speeds of 24-38 mph and has a maximum roof load capacity of 440 lbs.
- Pre-Assembled Components: Walls, doors, and windows are largely pre-assembled, simplifying the setup process.
- Spacious Interior: Features a 4.86 ft wall height and a 6.46 ft peak height, providing ample internal space for gardening activities and plant growth. The total internal volume is approximately 230 cubic feet.
- Adjustable Ventilation: Equipped with adjustable roof windows and a door to regulate internal temperature and humidity, ensuring optimal airflow.
- Polycarbonate Panels: High-quality sunboard panels offer effective heat insulation and UV protection, safeguarding plants from harmful rays while maintaining a stable internal climate.
- Secure Entry: Includes a lockable door for security.
2. Safety Information
Please read and understand all safety warnings before assembly and use.
- Always wear appropriate personal protective equipment (PPE) during assembly, including gloves and eye protection.
- Ensure the assembly area is clear of obstructions and hazards.
- Two or more people are recommended for assembly due to the size and weight of components.
- Do not assemble in strong winds or adverse weather conditions.
- Ensure the greenhouse is anchored securely to the ground to prevent wind damage.
- Keep children and pets away from the assembly area.
- No specific safety warnings beyond general assembly precautions are provided by the manufacturer.
3. Package Contents
Before beginning assembly, verify that all parts are present and undamaged. Refer to the packing list included with your greenhouse for a complete inventory. If any parts are missing or damaged, contact customer support immediately.
The greenhouse is shipped in multiple packages (typically 3 packages for this model).
4. Setup and Assembly
The Jocisland YPG109 greenhouse features a sub-module design with pre-mounted panels and hardware to facilitate quicker assembly.
4.1 Site Preparation
- Choose a level, well-drained site for your greenhouse.
- Ensure adequate sunlight exposure for your plants.
- The suggested foundation size for this model is approximately 8.5-9 ft in length and 6.65-7 ft in width.

Image 4.1: Diagram illustrating the product dimensions and recommended foundation size.
4.2 Assembly Steps
Follow the detailed instructions provided in the separate assembly manual for step-by-step guidance. Key aspects of the assembly process include:
- Unpacking and Organization: Open all boxes and lay out components. Sort screws and hardware into labeled containers for easy access.
- Pre-Assembly Features: Note that panels and wood frames are pre-mounted together, and hardware is pre-installed on the wood, significantly reducing assembly time.

Image 4.2: Illustration of the sub-module design, highlighting pre-mounted panels and pre-installed hardware for simplified assembly.
- Component Alignment: Align the boards to be joined with the pre-drilled holes. Wooden pins are provided to prevent misalignment and offset during assembly of crossbeams and support beams.

Image 4.3: Detail of wooden pins used to ensure precise alignment of components during assembly.
- Securing Components: Use a screwdriver to fasten the screw hardware, completing each connection. When using a battery-operated screwdriver, place a piece of cardboard between the screws and polycarbonate panels to prevent damage.
- Sealing Gaps: After assembly, fill any gaps between the wooden boards and polycarbonate panels with glass glue or a clear sealant to prevent water leakage. Allow adequate drying time for the sealant.
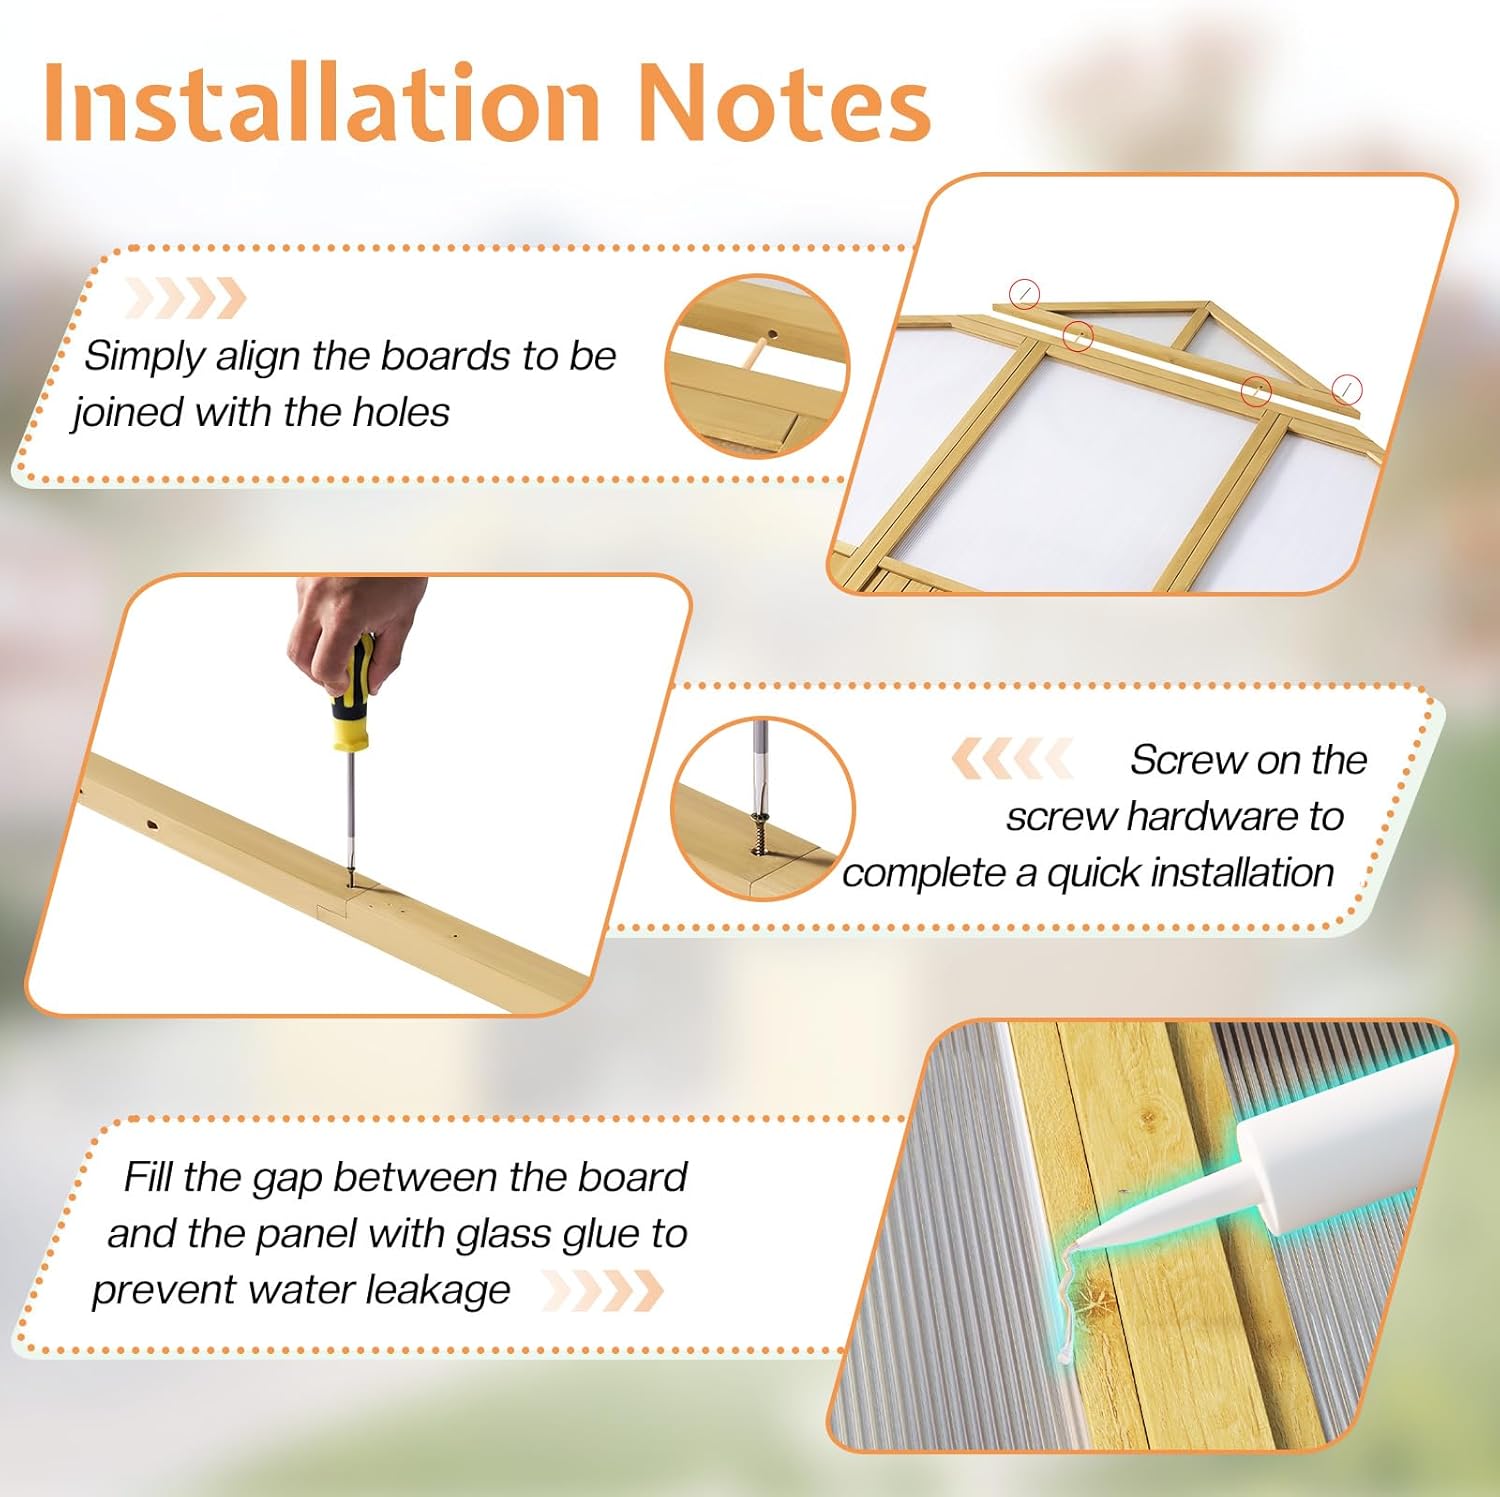
Image 4.4: Visual guide for key installation steps: aligning components, securing with screws, and applying sealant.
4.3 Stability Features
The greenhouse incorporates several design elements for enhanced stability:
- Half Mortise and Tenon Joint Structure: Provides strong, interlocking connections between wooden components.
- Reinforced Crossbeams: Adds structural integrity to the frame.
- Bottom Stabilizing Fittings: Securely anchors the greenhouse to its foundation.

Image 4.5: Close-up of structural details contributing to greenhouse stability.
5. Operating Instructions
5.1 Ventilation Control
The greenhouse is equipped with an adjustable roof window and a door to manage internal climate conditions.
- Adjustable Roof Window: Open or close the roof window to control temperature and humidity levels. This allows for proper air circulation, which is crucial for plant health.
- Door: The main door can be opened to increase airflow, especially on warmer days.

Image 5.1: Features for climate control, including the adjustable ventilation window and double-layer panels.
5.2 Door Operation
The greenhouse features a single walk-in door with both an outside and inside lock mechanism for security and convenience.
- Locking Mechanism: Utilize the provided locks to secure the door when the greenhouse is unattended.
- Door Hook: A door hook may be present to keep the door open for extended ventilation.
5.3 Internal Space Utilization
The spacious interior allows for various configurations, including shelving for plants, a working table, or a leisure area.

Image 5.2: Interior perspective demonstrating the generous space available for various gardening setups.
6. Maintenance
Regular maintenance will extend the lifespan and performance of your greenhouse.
6.1 Cleaning
- Polycarbonate Panels: Clean panels periodically with mild soap and water using a soft cloth or sponge. Avoid abrasive cleaners or tools that could scratch the surface. Rinse thoroughly with clean water.
- Wood Frame: The cedar wood frame has a lacquered, corrosion-resistant surface. Clean with a damp cloth. Avoid harsh chemicals.

Image 6.1: Detail of the pure cedarwood construction and its lacquered, corrosion-resistant surface.
6.2 Inspection
- Structural Integrity: Periodically check all bolts, screws, and joints to ensure they are tight and secure. Tighten any loose fasteners.
- Seals: Inspect the sealant around panels for any cracks or deterioration. Reapply sealant as needed to prevent water leakage.
- Ventilation Mechanism: Ensure the adjustable roof window mechanism operates smoothly. Lubricate moving parts if necessary.
6.3 Winter Preparation
- While the greenhouse is designed for all-weather use with a snow load capacity of 440 lbs, it is advisable to clear heavy snow accumulation from the roof to prevent excessive stress on the structure.
7. Troubleshooting
This section addresses common issues you might encounter with your greenhouse.
7.1 Water Leakage
- Issue: Water dripping inside the greenhouse.
- Solution: Inspect all panel seams and joints. Reapply glass glue or a suitable clear sealant to any areas where the original seal may have deteriorated or was not adequately applied during assembly.
7.2 Poor Ventilation/Temperature Control
- Issue: Greenhouse is too hot or too humid.
- Solution: Ensure the adjustable roof window is fully operational and open as needed. Keep the door open for extended periods to increase airflow. Consider adding an exhaust fan for improved air circulation in very warm climates.
7.3 Loose Components
- Issue: Parts of the frame or panels feel wobbly.
- Solution: Systematically check all screws and bolts throughout the structure. Tighten any fasteners that have become loose over time. Ensure the bottom stabilizing fittings are securely attached to the foundation.
8. Specifications
| Feature | Specification |
|---|---|
| Model Number | YPG109 |
| Product Dimensions (L x W x H) | 95.64 x 73.8 x 77.64 inches (6.15 x 8 x 6.46 ft) |
| Item Weight | 206 pounds |
| Frame Material | Cedar Wood |
| Cover Material | Polycarbonate (PC) Sunboard Panels |
| Number of Doors | 1 |
| Number of Vents | 1 (Adjustable Roof Window) |
| Wall Height | 4.86 ft |
| Peak Height | 6.46 ft |
| Internal Volume | Approx. 230 Cubic Feet |
| Wind Rating | 24-38 mph |
| Max Roof Load Capacity | 440 lbs |
9. Warranty and Support
Specific warranty details are not provided within this manual. For information regarding product warranty, returns, or technical support, please refer to the documentation included with your purchase or contact Jocisland customer service directly through their official website or the retailer where the product was purchased.
For further assistance, please visit the Jocisland Store on Amazon.