1. Introduction
This manual provides comprehensive instructions for the assembly, operation, and maintenance of your OLAKIDS Mud Kitchen. Designed for outdoor play, this wooden toddler kitchen set encourages imaginative play and skill development. Please read all instructions carefully before assembly and use to ensure safe and proper operation.

Image 1: OLAKIDS Mud Kitchen in use.
2. Safety Information
- Age Recommendation: Suitable for children aged 3 years and above.
- Adult Supervision: Always ensure adult supervision during play.
- Material Safety: Constructed from solid fir wood with child-friendly, non-peel paint. Materials are free from BPA, PVC, Phthalates, Lead, Latex, and Formaldehyde.
- Structural Integrity: Regularly check all screws and connections to ensure they are tight and secure. Loose parts can pose a hazard.
- Placement: Place the mud kitchen on a stable, level surface away from open flames or extreme heat sources.
- Sharp Edges: The product is designed with no sharp points or edges. However, inspect for any damage before each use.
- Water Play: The detachable water box and faucet are designed for real water play. Ensure water is clean and supervise children to prevent ingestion.

Image 2: Kids-friendly Safe Material features.
3. Parts List
Before beginning assembly, verify that all components listed below are present and undamaged. Refer to the assembly video for visual identification of each part.
- 1 x Kids Mud Kitchen Frame (various wooden pieces)
- 1 x Water Box with Faucet
- 1 x Sink
- 1 x Pot
- 1 x Pan
- 1 x Colander
- 1 x Spatula
- 1 x Spoon
- 12 x Cups
- Assorted Screws and Wooden Dowels (as per hardware pack)

Image 3: Included Accessories.
4. Assembly Instructions
Follow the step-by-step video guide below for clear and easy assembly. Ensure all screws are tightened securely but do not overtighten to avoid damaging the wood.
Video 1: Official installation guide for the OLAKIDS Mud Kitchen.
Key Assembly Steps:
- Step 1: Assemble the Base Frame. Connect the initial wooden pieces using the provided dowels and screws to form the foundational frame.
- Step 2: Extend the Frame. Attach additional frame pieces to expand the structure, ensuring all connections are firm.
- Step 3: Install Side Panels. Secure the slatted side panels to the frame using screws.
- Step 4: Prepare the Countertop Sections. Attach the support pieces to the main countertop sections.
- Step 5: Integrate Countertop and Shelves. Place the prepared countertop sections onto the main frame and secure them. Install the lower shelves.
- Step 6: Add Vertical Supports. Attach the remaining vertical support beams to complete the main structure.
- Step 7: Install Back Panels. Secure the back slatted panels to the rear of the mud kitchen.
- Step 8: Attach Door and Shelves. Install the transparent door with hinges and handle. Insert the plant pot shelves into their designated slots.
- Step 9: Finalize Top Sections. Attach the chalkboard and the remaining top wooden panel.
- Step 10: Place Accessories. Position the water box with faucet, sink, and other accessories as desired.
5. Operating Instructions
- Water Play: Fill the detachable water box with clean water. The working faucet allows children to pour water into the sink or other containers for realistic play.
- Stove Play: The stove features knobs that make realistic click sounds, enhancing the pretend cooking experience.
- Sink Functionality: The removable sink can be used for washing play food or collecting water. It can also be used as a planting pot for small plants.
- Storage: Utilize the spacious storage shelves and the cabinet with a transparent door to organize play accessories, teaching children tidiness.
- Planting Pots: The included plant pots can be placed on the shelves for cultivating small plants, integrating gardening into play.

Image 4: Detachable Sink functionality.
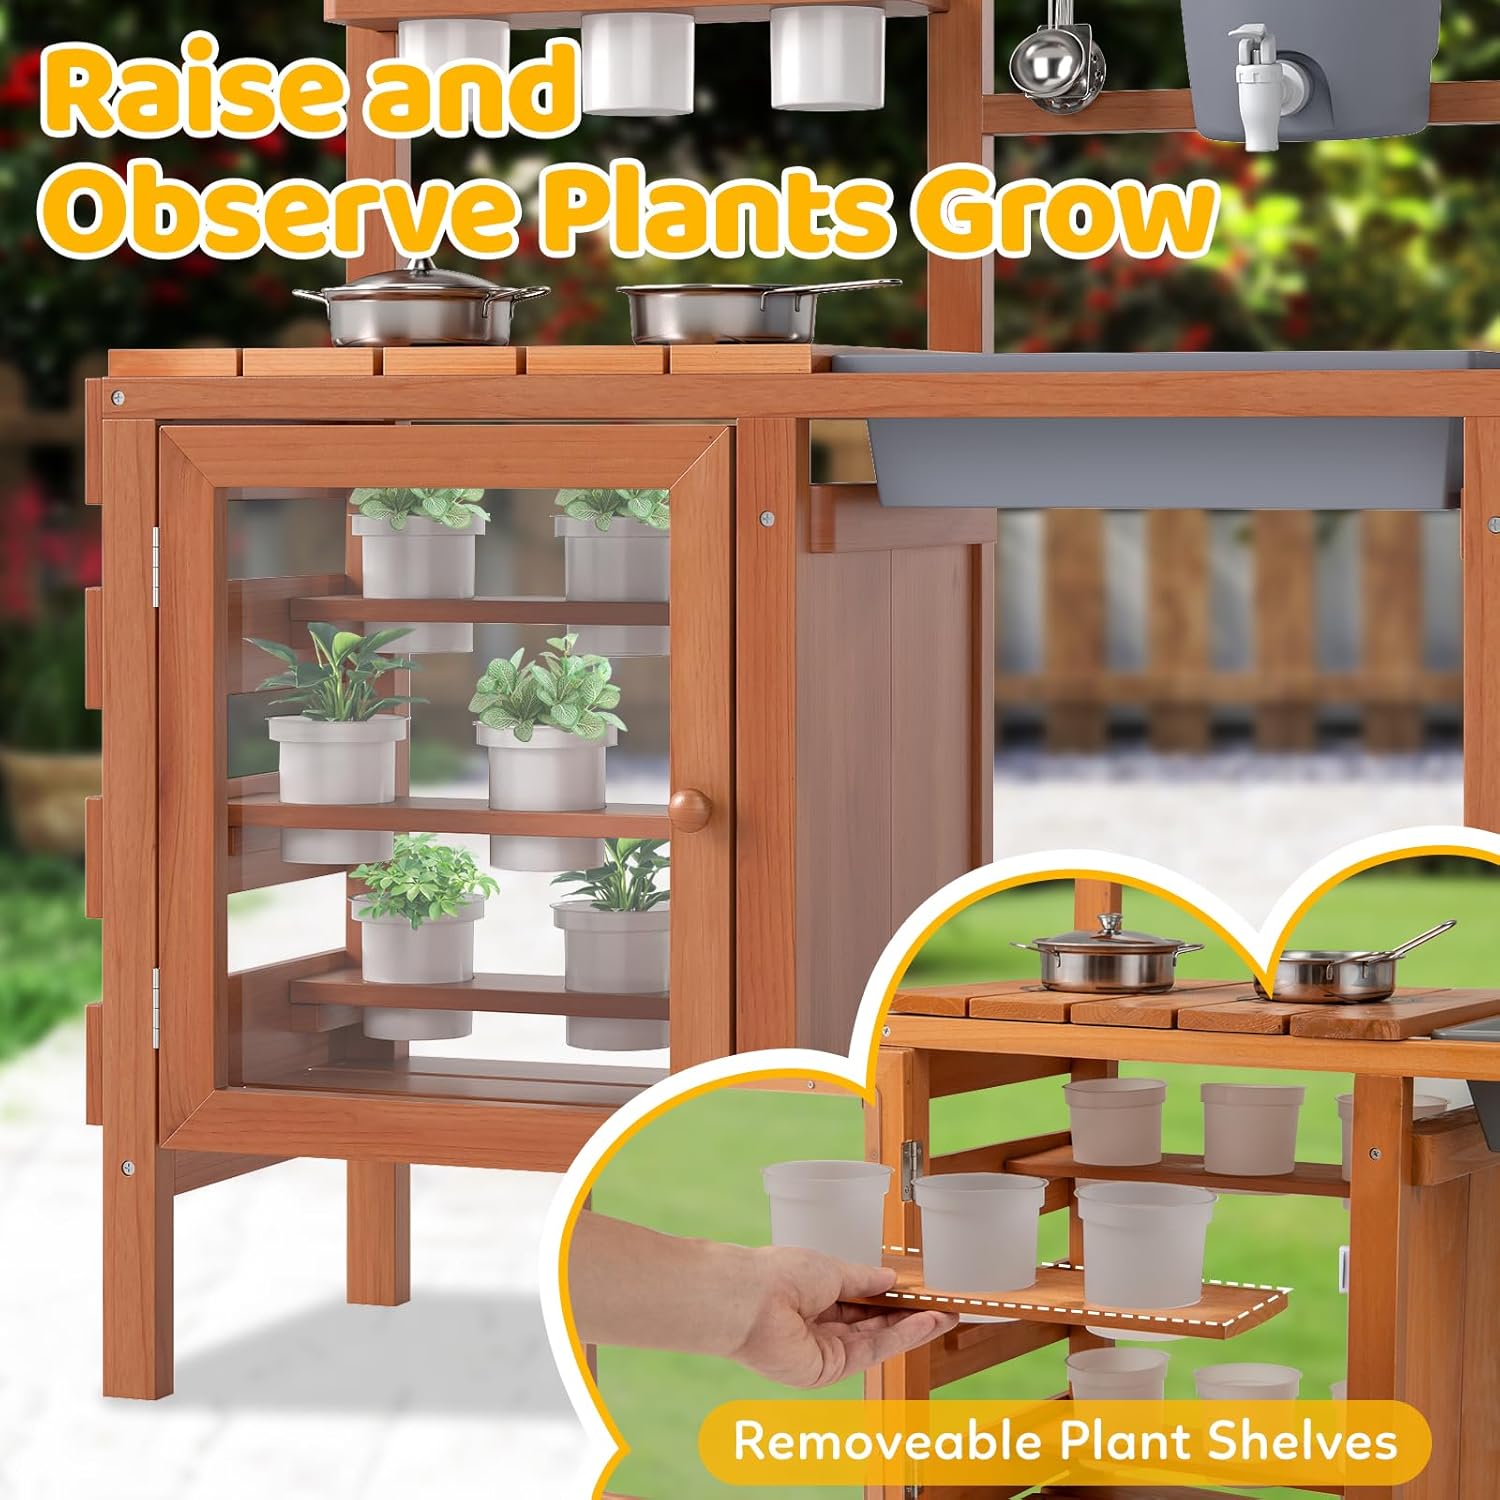
Image 5: Removable Plant Shelves for cultivation.
6. Maintenance
- Cleaning: Wipe down wooden surfaces with a damp cloth and mild soap if necessary. Avoid harsh chemicals.
- Drying: After water play or cleaning, ensure all wooden parts are thoroughly dried to prevent mold or warping.
- Storage: While designed for outdoor use, storing the mud kitchen in a sheltered area during prolonged periods of rain or extreme weather will extend its lifespan.
- Hardware Check: Periodically inspect all screws and connections for tightness. Re-tighten as needed.
7. Troubleshooting
- Loose Parts: If any wooden pieces feel loose, check the corresponding screws and tighten them with a screwdriver.
- Flickering Faucet: Ensure the water box is properly seated and filled with sufficient water for the faucet to function.
- Door Not Closing: Check the hinges and magnetic latch for proper alignment. Adjust screws if necessary.
- Stability Issues: Verify that the mud kitchen is placed on a flat, even surface. Re-check all assembly connections.
8. Specifications
- Model Number: BL-HY004
- Brand: Olakids
- Material: Fir Wood + PP
- Overall Dimensions: 34'' L x 13.5'' W x 35.5'' H (86.4 cm L x 34.3 cm W x 90.2 cm H)
- Sink Dimensions: 11'' L x 9'' W x 3'' H (27.9 cm L x 22.9 cm W x 7.6 cm H)
- Net Weight: 12 lbs (5.44 kg)
- Recommended Age: 3+ years
- Safety Certifications: Compliant with US. CPSIA and ASTM Requirements

Image 6: Product Dimensions.
9. Warranty and Support
For warranty information, product support, or to order replacement parts, please contact Olakids customer service. Refer to your purchase documentation for specific warranty terms and contact details.