1. Introduction
This manual provides comprehensive instructions for the installation and operation of the FeirTon 16-Pin Car Stereo Wiring Harness Connector. This product is designed to facilitate the integration of aftermarket stereos while retaining essential original vehicle features.
1.1 Compatibility
- Compatible with Toyota Sienna 2015-2018, Toyota RAV4 2013-2018, Toyota Camry 2012-2017, and Toyota Highlander 2015-2017 models.
- Requires vehicles to have factory-installed cameras and JBL amplifiers.
- May fit other Toyota models with the same connector; verification is recommended before purchase.
1.2 Important Notes
- This 16-PIN car radio adapter is not suitable for 2012-2017 Toyota models that lack factory rearview cameras and JBL amplifiers.
- Not compatible with major brand stereos such as Kenwood, Pioneer, Alpine, Sony, JVC, or BOSS Audio Systems, as these use proprietary power connectors.
- Only compatible with generic 9-inch and 10.1-inch aftermarket stereos equipped with a 16-pin power socket.

Figure 1: Visual guide for compatible and incompatible Toyota models.
2. Package Contents
Verify that all components are present before beginning installation:
- 16-Pin Car Stereo Wiring Harness Connector
- CANBUS Module
- GPS Antenna
- Camera Input Cable
- 6-Pin USB Cable
- RCA Cable Harness
- Radio Adapter Cable
- Rear View Adapters (various sizes)
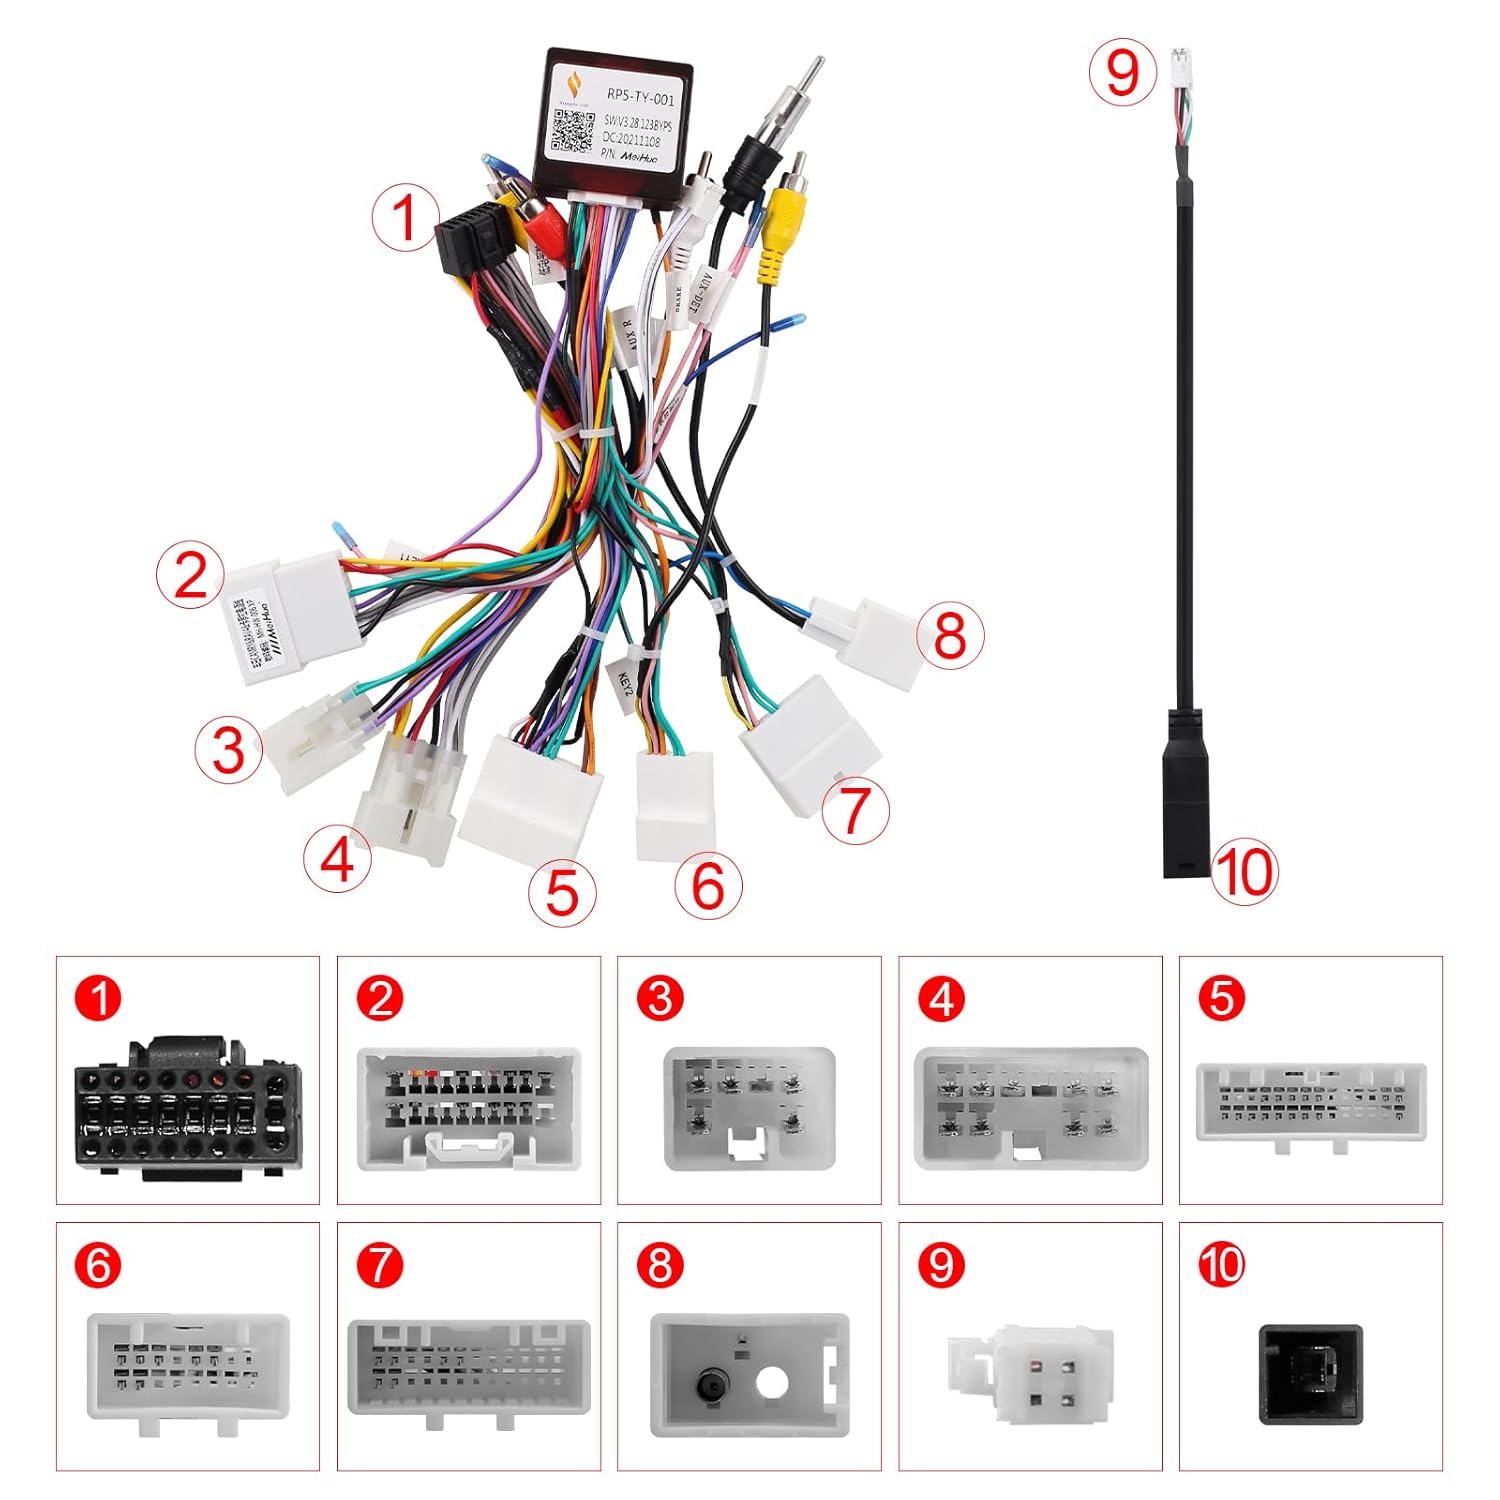
Figure 2: Overview of the wiring harness components.
3. Setup and Installation
Follow these steps carefully to ensure proper installation of the wiring harness. It is recommended to disconnect the vehicle's battery before starting any electrical work.
3.1 Installation Video Guide
Video 1: Detailed installation guide for the FeirTon Toyota Car Stereo Wiring Harness.
3.2 Step-by-Step Installation
- GPS Antenna Connection: Insert the GPS antenna into its designated port on the aftermarket stereo and tighten the screws. Remove the adhesive backing and secure the GPS antenna under the front windshield for optimal signal reception.
- Camera Input Cable: Connect the camera input cable to the corresponding port on the stereo.
- 6-Pin USB Cable: Insert the 6-pin USB cable into the appropriate USB port on the stereo.
- RCA Cable Harness: Connect the multi-colored RCA cable harness to the stereo's RCA ports.
- CANBUS Module: Connect one end of the CANBUS module to the main wiring harness cables. Ensure it is securely plugged into the corresponding socket on the stereo.
- Power Plug: Plug the black power plug from the harness into the stereo's power input.
- Radio Adapter Cable: Connect the radio adapter cable to the stereo.
- AUX Jack Connection (if applicable): If your original car has an AUX jack, plug the AUX L/R cables from the vehicle into the AUX IN L/R ports on the RCA harness.
- Rear View Adapters: The kit includes two different model sizes of rearview adapters. Choose the adapter that matches the rearview connector of your original car.
- Reversing Video Input: Connect the yellow video signal cable from the chosen rearview adapter to the "Reversing video input" line on the stereo.
- Amplifier Control (if applicable): If your original car has an amplifier, connect the blue amplifier control cable labeled "AMP" to the "AMP CONT" wire of the RCA harness. If no amplifier is present, this connection is not required.
- CANBUS Setup: After physical installation, you will need to set up the CANBUS configuration within your aftermarket stereo's settings according to your specific car model.

Figure 3: Example of CANBUS settings interface.
4. Operating Instructions
Once installed and configured, the FeirTon wiring harness allows your aftermarket stereo to seamlessly integrate with and retain several original vehicle functions:
- Backup Camera: The original backup camera functionality will be retained and displayed on your new stereo.
- JBL Amplifier: The factory JBL amplifier will continue to function, providing audio output to your vehicle's speakers.
- Steering Wheel Controls: Steering wheel audio and call controls will remain operational with your aftermarket stereo.
- USB and AUX Ports: Original USB and AUX input ports will be supported.
- Tire Pressure Monitoring System (TPMS): TPMS data will be accessible through your new system.
- Backup Radar: The vehicle's backup radar system will continue to provide alerts.
- Front Camera: If equipped, the factory front camera will also be supported.

Figure 4: Aftermarket stereo displaying backup camera and indicating JBL amplifier support.
5. Specifications
| Feature | Detail |
|---|---|
| Brand | FeirTon |
| Model Number | AFS-HPFTO1005AA |
| Material | Copper, Polyvinyl Chloride (PVC) |
| Connector Type | 16-pin |
| Cable Type | Flat Ribbon |
| Included Components | CANBUS module, wiring harness cables |
6. Maintenance
To ensure the longevity and optimal performance of your FeirTon wiring harness, consider the following maintenance guidelines:
- Regularly inspect all connections to ensure they remain secure and free from corrosion.
- Keep the wiring harness and connected components free from excessive moisture and extreme temperatures.
- Avoid pulling on the cables forcefully, as this can damage the connectors or internal wiring.
7. Troubleshooting
If you encounter issues after installation, refer to the following common troubleshooting tips:
- No Power to Stereo: Check all power connections, including the main power plug and vehicle's fuse box. Ensure the battery is properly reconnected.
- No Sound: Verify that the amplifier control cable (if used) is correctly connected. Check speaker wire connections and ensure the aftermarket stereo's audio settings are correct.
- Steering Wheel Controls Not Working: Confirm that the CANBUS module is correctly installed and configured in the stereo's settings for your specific car model.
- Backup Camera Not Displaying: Ensure the yellow video signal cable from the rearview adapter is connected to the correct "Reversing video input" on the stereo. Check the rearview adapter connection.
- Intermittent Functionality: Re-check all connections for looseness or poor contact.
If problems persist, consult a professional car audio installer or contact FeirTon customer support for further assistance.
8. Warranty and Support
FeirTon products are manufactured to high-quality standards. For warranty information, technical support, or customer service inquiries, please refer to the contact details provided with your purchase or visit the official FeirTon website.


