1. Introduction
This manual provides detailed instructions for the installation, operation, and maintenance of your JRRXM 2-Pack 24V RS555 12000RPM High Torque Drive Motor Gearbox. This product is designed as a replacement or upgrade for kids' ride-on toys, offering enhanced performance and durability. Please read this manual thoroughly before use to ensure proper function and safety.
2. Safety Information
Warning:
- Always confirm the model and size before purchasing to ensure proper installation and compatibility.
- Ensure the voltage of your power source does not exceed 36V to prevent damage to the motor gearbox.
- Installation should be performed by an adult or under adult supervision.
- Disconnect power before performing any installation or maintenance.
3. Package Contents
The JRRXM 24V RS555 Motor Gearbox package includes the following components:
- 2 x RS555 Motor Gearboxes
- 2 x Couplers (Free Gift)
- 2 x Motor Cables (Free Gift)
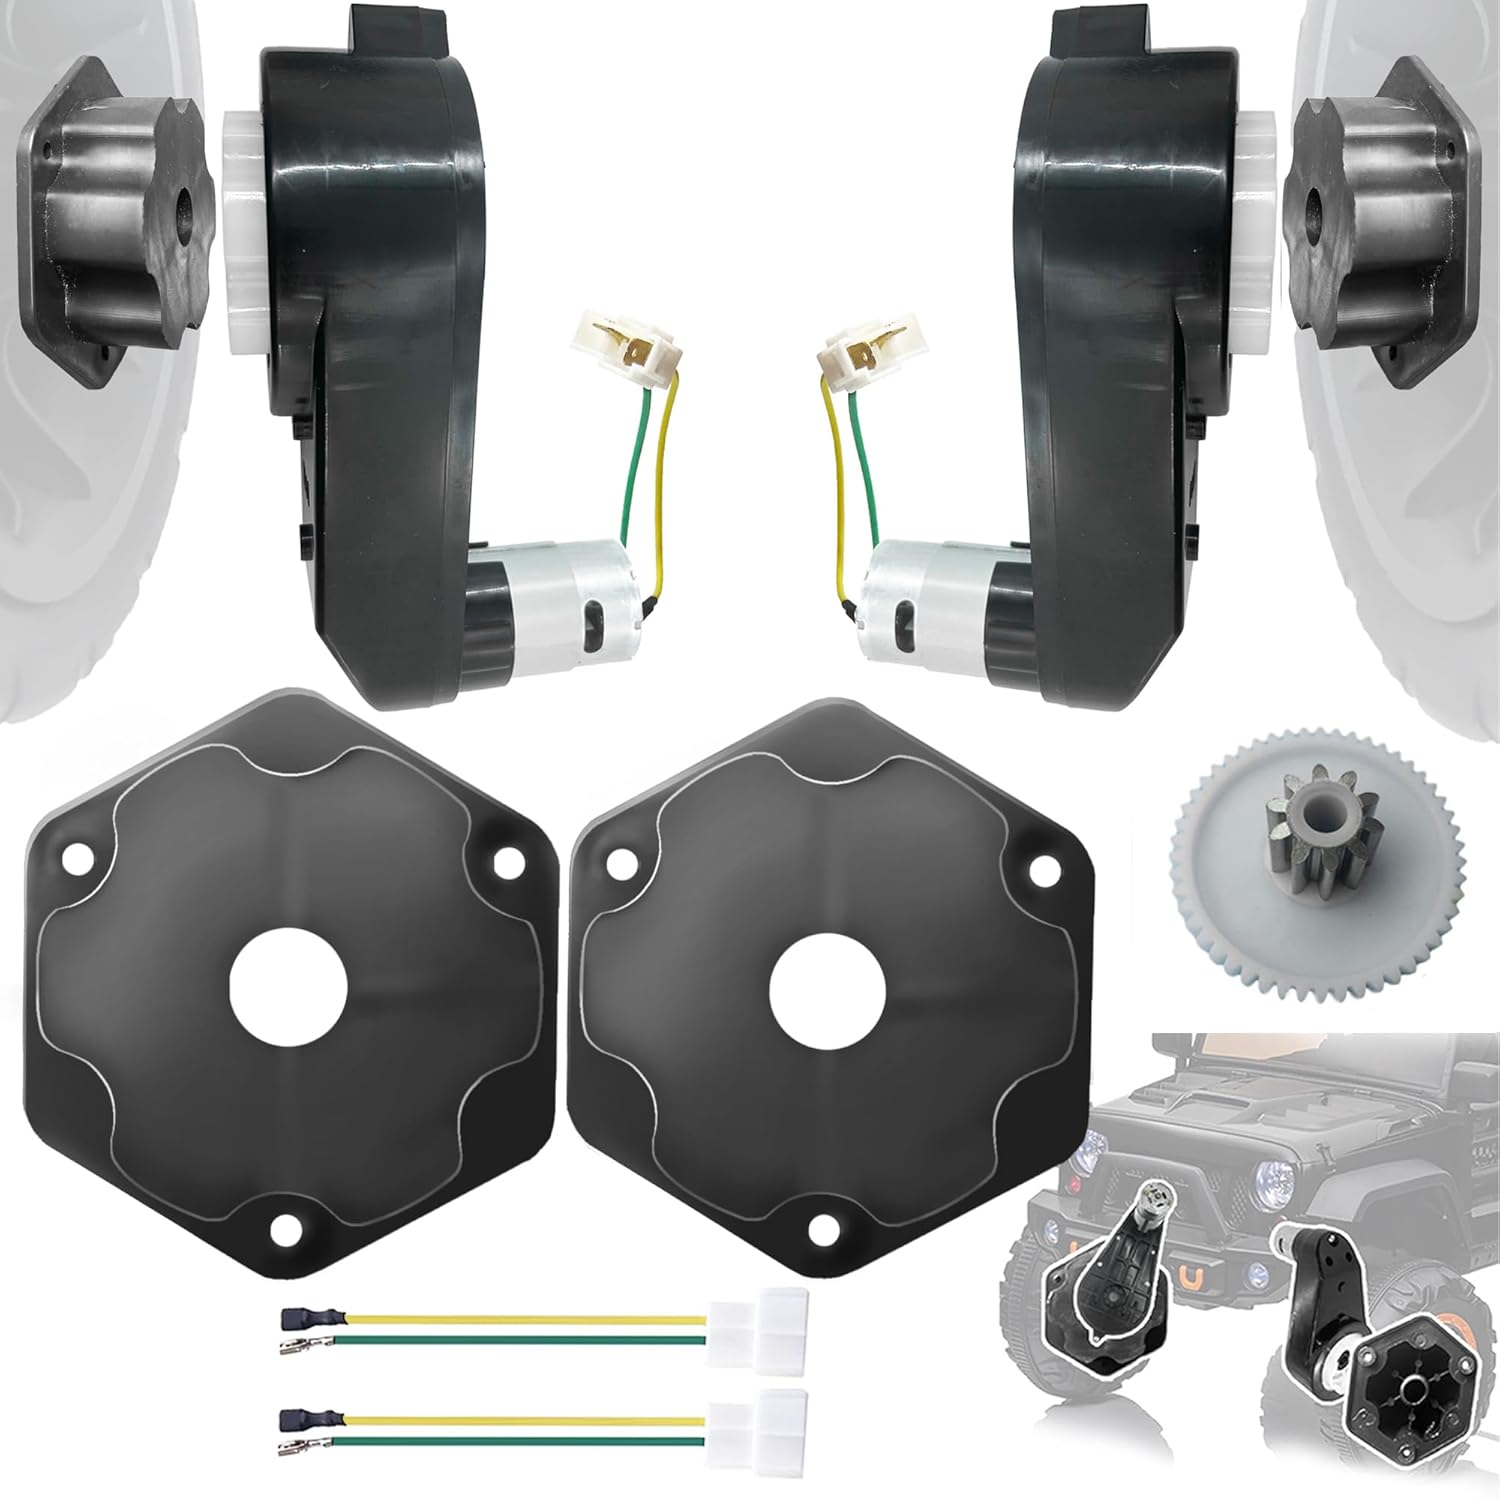
Figure 3.1: Contents of the JRRXM Motor Gearbox package.
4. Specifications
| Feature | Detail |
|---|---|
| Product Model | 2P24V12000 |
| Motor Type | RS555 |
| Rated Voltage | 24 Volts (DC) |
| Rated Speed (at 24V) | 12000 RPM |
| Maximum Power (at 24V) | 200 Watts |
| Gearbox Output Speed Ratio | 1:100 |
| Gearbox Diameter | 185mm / 7.2 inches |
| Aperture (Output Shaft) | 12mm / 0.47 inches |
| Motor Diameter | 37mm / 1.47 inches |
| Coupler Height | 28mm / 1.1 inches |
| Base Length | 78mm / 3 inches |
| Recommended Age | 36 months - 7 years |

Figure 4.1: Dimensional specifications of the motor gearbox components.
5. Setup and Installation
Follow these steps to install the JRRXM motor gearbox into your ride-on toy:
- Preparation: Ensure the ride-on toy is turned off and disconnected from any power source. Remove the existing motor gearbox assembly from the toy.
- Compare Sizes: Before installation, compare the size of the new motor gearbox with the original unit to ensure compatibility. Pay close attention to the gearbox diameter, aperture, and motor dimensions.
- Connect Coupler: The provided couplers are designed for easy connection. Simply screw the coupler onto the tire's axle. The gearbox can then be perfectly connected to the coupler.
- Motor Wiring: The motor cables are designed for one-button installation, meaning no soldering is required. Connect the motor cables to the appropriate terminals on the motor and the toy's electrical system. Ensure correct polarity.
- Secure Gearbox: Mount the new motor gearbox securely into the designated slot on the ride-on toy. Ensure all mounting points are fastened properly.
- Final Check: Once installed, double-check all connections and ensure the gearbox is firmly in place before reconnecting power and testing.

Figure 5.1: Visual guide for connecting the motor gearbox and coupler.

Figure 5.2: Key features for easy installation, including couplers and wiring.
6. Operating Instructions
The JRRXM RS555 motor gearbox is designed for universal voltage compatibility within its specified range. The performance varies with the input voltage:
- At 24V: The gearbox speed is approximately 12000 RPM.
- At 30V: The gearbox speed is approximately 15000 RPM.
- At 36V: The gearbox speed is approximately 18000 RPM.
Important: Do not use power sources exceeding 36V, as this can damage the motor and gearbox.

Figure 6.1: RS555 motor details and specifications.
7. Maintenance
The JRRXM motor gearbox is constructed with durable materials for extended service life. Regular maintenance is minimal but recommended:
- Inspection: Periodically inspect the gearbox and motor for any signs of wear, damage, or loose connections.
- Cleaning: Keep the motor and gearbox free from dirt, dust, and debris. Use a dry cloth to wipe down external surfaces. Avoid using liquids directly on electrical components.
- Lubrication: The internal gears are pre-lubricated. Additional lubrication is generally not required under normal operating conditions. If the gearbox is disassembled for advanced repair, use appropriate gear grease.
- Material Quality: The gearbox casing is made of composite material for sturdiness, and the internal middle gear is made of metal to extend its service life. The motor uses pure copper winding coils for improved torque, speed, and life, and includes a cooling fan.

Figure 7.1: Durability comparison highlighting the robust construction of JRRXM gearboxes.
8. Troubleshooting
If you encounter issues with your motor gearbox, refer to the following common problems and solutions:
| Problem | Possible Cause | Solution |
|---|---|---|
| Motor not running | No power, loose wiring, incorrect voltage, damaged motor/gearbox. | Check power source. Verify all cable connections are secure. Ensure voltage is within 24V-36V range. Inspect motor/gearbox for visible damage. |
| Reduced speed or torque | Low battery, incorrect voltage, excessive load, worn gears. | Charge or replace battery. Confirm correct operating voltage. Reduce load on the toy. Inspect internal gears for wear (advanced users). |
| Unusual noise from gearbox | Foreign object, worn gears, insufficient lubrication. | Disconnect power and inspect for obstructions. If noise persists, internal inspection may be required (advanced users). |
| Motor overheating | Excessive load, prolonged use, insufficient cooling. | Reduce load. Allow motor to cool down between uses. Ensure cooling fan is unobstructed. |
9. Warranty and Support
JRRXM is committed to providing high-quality products. While specific warranty details are not provided in this manual, we offer professional pre-sales and after-sales support.
If you have any questions, require assistance with installation, or encounter any issues with your product, please contact our support team. Refer to your purchase documentation or the retailer's website for contact information.