1. Product Overview
The Rvwsx 12-in-1 Detachable Handheld Steam Mop is a versatile cleaning device designed for various surfaces. It utilizes high-temperature steam to clean and sanitize without harsh chemicals. This manual provides essential information for safe and effective use.
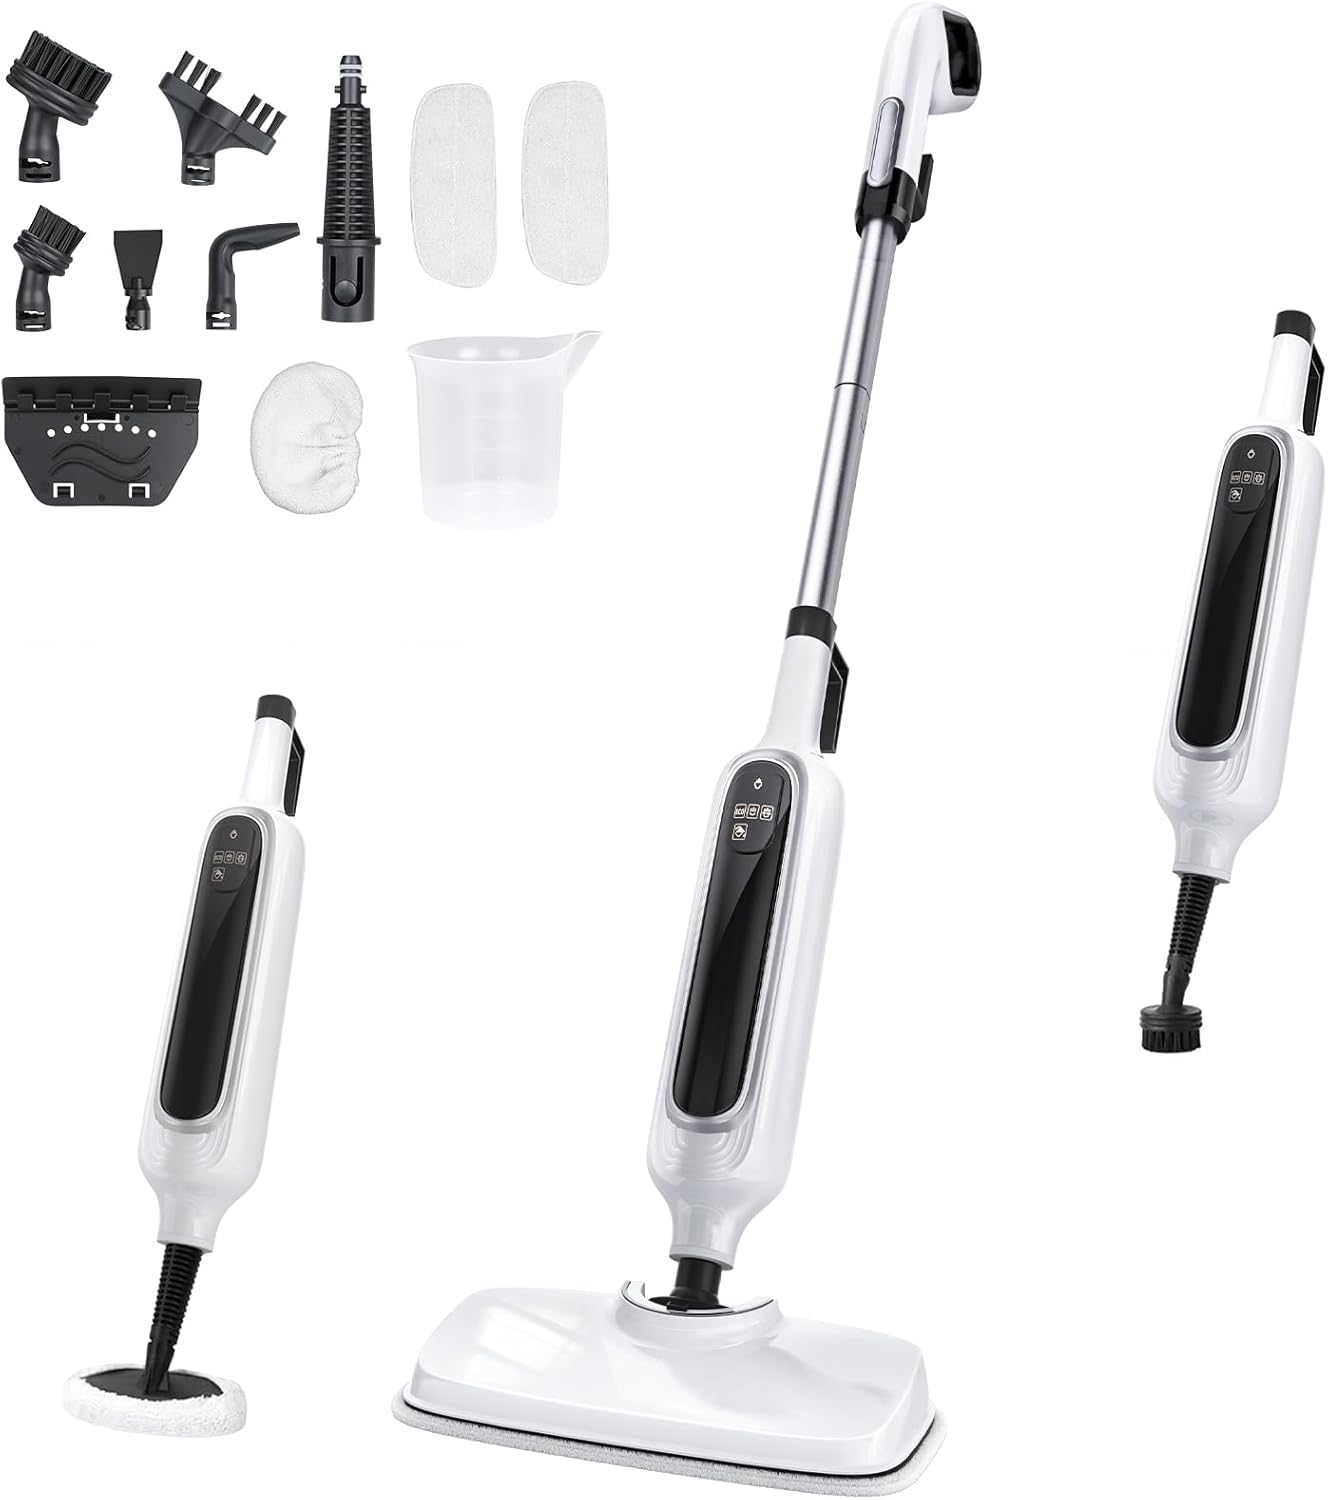
Image 1.1: The Rvwsx 12-in-1 Steam Mop in its upright configuration, alongside its detachable handheld unit and various cleaning attachments.
2. Safety Information
- WARNING: To avoid damaging floors, do not use carpet gliding mats on hard floor surfaces.
- CAUTION: If high steam output and leakage occur, adjust the ECO mode to the lowest setting.
- IMPORTANT: Do not add detergent or any other chemical substances to the water tank. Use only clean water.
- Keep the appliance out of reach of children and pets.
- Always unplug the appliance before filling or emptying the water tank, or when not in use.
3. Setup and Assembly
3.1 Unpacking and Component Identification
Carefully remove all components from the packaging. Verify that all parts listed in the 'What you will get?' section are present.

Image 3.1: A visual guide to all included accessories: 23FT Power Cord, Mop Head, Main Body, Extension Rods (x2), Handle, Ironing Brush, Round Brush, Large Round Brush, Grout Brush, Scraping Tool, Window Cleaning Tool, Accessory Adaptor, Angle Nozzle, Small Cloth, Microfiber Pads (x2), Measuring Cup.
3.2 Assembling the Upright Steam Mop
- Connect the Extension Rods to the Main Body and Handle until they click securely into place.
- Attach the Mop Head to the bottom of the assembled unit. Ensure it is firmly connected.
- Secure a Microfiber Pad to the Mop Head using the Velcro-like fasteners.
3.3 Assembling the Handheld Steam Cleaner
- Detach the Main Body from the Extension Rods by pressing the release button.
- Select the desired attachment (e.g., Grout Brush, Angle Nozzle, Window Cleaning Tool) and connect it directly to the Main Body.
4. Operating Instructions
4.1 Filling the Water Tank
- Ensure the steam mop is unplugged.
- Locate the water inlet on the Main Body.
- Use the provided Measuring Cup to fill the 350ml water tank with clean tap water. Do not overfill.
- Close the water inlet securely.

Image 4.1: The 350ml water tank and water inlet, indicating how to fill the device.
4.2 Powering On and Steam Modes
- Plug the 23-foot power cord into a suitable electrical outlet.
- The LED display will show a red light indicating preheating. The device heats up in approximately 15 seconds.
- Once preheating is complete, the light will turn green, and the device is ready for use.
- Use the digital display to select one of the 3 adjustable steam levels: Low, Medium, or High (up to 30g/min).

Image 4.2: The intelligent LED display showing heating status (red/green light) and options for Less steam Mode (ECO), Normal steam Mode, and Large steam Mode, along with a 'Need to add water' indicator.
4.3 Using the Steam Mop for Floors
- For hard floors (hardwood, tile, sealed stone, marble, vinyl), ensure the carpet glider is removed.
- For carpets, attach the carpet glider over the microfiber pad.
- Move the mop in a forward and backward motion across the floor. The flexible mop head rotates 120° side-to-side and 90° front-to-back for easy maneuverability.

Image 4.3: The steam mop effectively cleans various floor types, including sealed hardwood, tile, carpet, sealed stone, laminate, and marble.
4.4 Using the Handheld Steam Cleaner with Attachments
- Select the appropriate attachment for the cleaning task.
- Use the Angle Nozzle for tight spaces like sinks, faucets, and grout lines.
- The Ironing Brush and Small Cloth can be used for steaming clothes or upholstery.
- The Window Cleaning Tool is suitable for windows and glass surfaces.
- Round Brushes and the Grout Brush are ideal for scrubbing stubborn dirt on various surfaces.

Image 4.4: The handheld unit demonstrating its versatility in a living room, cleaning sofas, windows, and clothes.

Image 4.5: The handheld unit demonstrating its versatility in a kitchen, cleaning a microwave, sink, and stovetop.
5. Maintenance
5.1 Cleaning Microfiber Pads
The microfiber pads are washable and reusable. After each use, remove the pad from the mop head and wash it according to its care instructions. Allow to air dry completely before reattaching.
5.2 Storing the Steam Mop
The steam mop features a self-standing design and a built-in cord wrap for easy storage. Ensure the water tank is empty and the unit is cool before storing.
6. Troubleshooting
- High Steam Output/Leakage: If you experience excessive steam or leakage, adjust the steam mode to the lowest (ECO) setting.
- No Steam: Check if the unit is properly plugged in and powered on. Ensure the water tank is filled and the heating indicator light is green.
- Water Marks on Floor: Ensure the microfiber pad is clean and properly attached. For delicate surfaces, use the lowest steam setting.
7. Specifications
| Feature | Specification |
|---|---|
| Brand | Rvwsx |
| Model Name | C228 |
| Power Source | Corded Electric |
| Cord Length | 23 Feet |
| Heat Time | 15 Seconds |
| Maximum Temperature | 260 Degrees Fahrenheit |
| Steam Modes | 3 (Low, Medium, High) |
| Steam Output | Up to 30g/min |
| Tank Volume | 350 Milliliters |
| Item Weight | 6.6 Pounds |
| Form Factor | Handheld, Upright |
| Surface Recommendation | Floor (Hardwood, Tile, Sealed Stone, Marble, Vinyl, Carpet) |
8. Warranty and Support
This product comes with a standard manufacturer's warranty. Please refer to the warranty card included in your packaging for specific terms and conditions. For technical support, troubleshooting assistance, or to inquire about replacement parts, please contact Rvwsx customer service through their official channels.
For additional support and product information, visit the Rvwsx Store on Amazon.