1. Important Safety Information
This Kesy Smoke and Carbon Monoxide Detector is designed to provide early warning of smoke and carbon monoxide presence. It is certified to UL217 and UL2034 standards by an ILAC ISO 17025/NRTL-accredited laboratory, ensuring trusted protection. Please read this manual thoroughly before installation and use, and keep it for future reference.
- Never ignore any alarm. Prompt response is crucial.
- Test the detector regularly. Perform a test at least once a month.
- Do not paint the detector. Paint can interfere with the sensors.
- Do not block the ventilation openings. Ensure proper airflow for accurate detection.
2. Product Overview
The Kesy Upgraded Smoke and Carbon Monoxide Detector offers enhanced 2-in-1 protection with advanced dual sensors. It combines a photoelectric smoke sensor and an electrochemical CO sensor for faster and more accurate detection of both threats.

Image: Four Kesy Smoke and Carbon Monoxide Detectors, illustrating the product's appearance.
Key Features:
- Dual Sensors: Photoelectric smoke sensor and electrochemical CO sensor.
- 10-Year Lifespan: Long-lasting sensors and built-in lithium battery.
- Real-Time LCD Display: Shows carbon monoxide levels (PPM) and battery status.
- Smart LED Indicators: Visual alerts (red for CO, blue for smoke).
- 360° Airflow Design: Multi-directional sensing holes minimize false alarms.
- 85dB Loud Alarm: Ensures audible alert even during sleep.
- One-Touch Test/Silence Button: Easy functionality check and false alarm silencing.

Image: Close-up of the detector highlighting the LCD display and LED indicators.
3. Setup & Installation
The detector is designed for hassle-free installation with its built-in 10-year lithium battery, eliminating the need for wiring or frequent battery changes.
Installation Steps:
- Prepare the Mounting Location: Choose a suitable location on a ceiling or wall, away from corners, windows, and vents.
- Separate the Mounting Bracket: Gently twist the detector counter-clockwise to separate it from its mounting bracket.
- Mount the Bracket: Use the included screws and anchors to securely attach the mounting bracket to your chosen surface.
- Activate the Detector: Locate the ON/OFF switch on the back of the detector. Slide it to the 'ON' position. The LCD screen will display a countdown, and the LED lights will cycle through colors, indicating self-test.
- Attach the Detector: Align the detector with the mounted bracket and twist clockwise until it clicks securely into place.

Image: A person demonstrating the easy installation process of the detector on a ceiling.
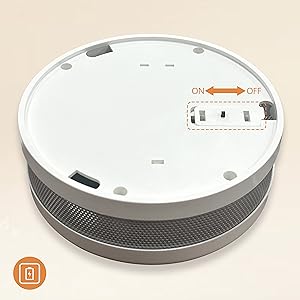
Image: The rear view of the detector, showing the ON/OFF switch for activation.
4. Operating Instructions
Self-Test and Indicators:
Upon activation, the detector performs a self-test. The LCD screen will show a countdown, and the LED indicators will flash. Once the self-test is complete, the detector enters normal operating mode.
- Normal Operation: The green LED flashes periodically (e.g., every 40 seconds) to indicate proper functioning.
- Carbon Monoxide Detection: The red LED flashes, and the alarm sounds. The LCD will display the CO concentration in PPM.
- Smoke Detection: The blue LED flashes, and the alarm sounds.
- Low Battery Warning: The yellow LED flashes, and a chirp sound indicates that the battery needs replacement.
Test Button Functionality:
Press the test button on the side of the detector to manually check its functionality. The alarm will sound, and the LED indicators will activate. This confirms the sensors and alarm are working correctly.
In case of a false alarm, press the test button again to activate silent mode. The flashing LED will indicate silent mode for approximately 10 seconds before returning to normal operation.
5. Maintenance
Regular maintenance ensures the optimal performance and longevity of your detector.
- Monthly Testing: Press the test button once a month to ensure the alarm is functioning.
- Cleaning: Gently vacuum the detector's cover and vents with a soft brush attachment at least once a year to remove dust and debris. Do not use cleaning solvents or spray directly onto the unit.
- Battery Replacement: The built-in 10-year lithium battery is designed to last the lifespan of the unit. If a low battery warning occurs prematurely, contact customer support.
6. Troubleshooting
If your detector is not functioning as expected, refer to the following common issues:
| Problem | Possible Cause | Solution |
|---|---|---|
| Alarm sounds intermittently or chirps. | Low battery warning. | Contact customer support for assistance. |
| False alarms. | Dust, steam, or cooking fumes. | Press the test button to silence. Clean the detector. Relocate if persistent. |
| No power/display. | Unit not activated or malfunction. | Ensure ON/OFF switch is in 'ON' position. If issue persists, contact support. |
For further assistance, please contact Kesymo customer support.
7. Specifications
- Model: YHW-542COM-R
- Power Source: Built-in 10-year lithium battery
- Sensor Type: Photoelectric (Smoke), Electrochemical (CO)
- Alarm Loudness: 85dB
- Product Dimensions: 1.73"D x 4.65"W x 4.69"H
- Item Weight: 1.3 Pounds
- Certifications: UL217, UL2034

Image: The detector displaying its compact size and dimensions (3.94 inches diameter, 1.58 inches height).
8. Warranty & Support
Kesy provides lifetime free replacement support for this detector. Additionally, lifetime after-sales service is available to address any questions or concerns you may have.
For warranty claims or technical support, please refer to the contact information provided in the product packaging or visit the official Kesymo website.