Introduction
The GIDIGI 8-in-1 Smart Soil pH and Moisture Meter (Model GX-S08) is a comprehensive tool designed to help you monitor various soil conditions for optimal plant health. This device provides real-time data on pH, electrical conductivity (EC), moisture, salinity, sunlight intensity, fertility, soil temperature, and air humidity, all accessible via a connected smartphone application.
Understanding these parameters allows for precise adjustments to watering, fertilization, and light exposure, ensuring your plants thrive whether they are indoor potted plants, garden vegetables, or lawn grasses.
Product Overview

Figure 1: GIDIGI 8-in-1 Soil pH Meter and companion smartphone app display.
The GX-S08 meter features a durable probe designed for direct insertion into soil. It connects wirelessly to a smartphone application, providing a user-friendly interface for data visualization and management. The device measures the following 8 parameters:
- Soil pH: Measures the acidity or alkalinity of the soil.
- Electrical Conductivity (EC): Indicates the concentration of soluble salts, reflecting nutrient availability.
- Soil Moisture: Determines the water content in the soil.
- Salinity: Measures the salt content in the soil.
- Sunlight Intensity: Assesses the light exposure received by the plants.
- Soil Fertility: Provides an indication of overall soil nutrient levels.
- Soil Temperature: Measures the temperature of the soil.
- Air Humidity: Measures the humidity of the surrounding air.
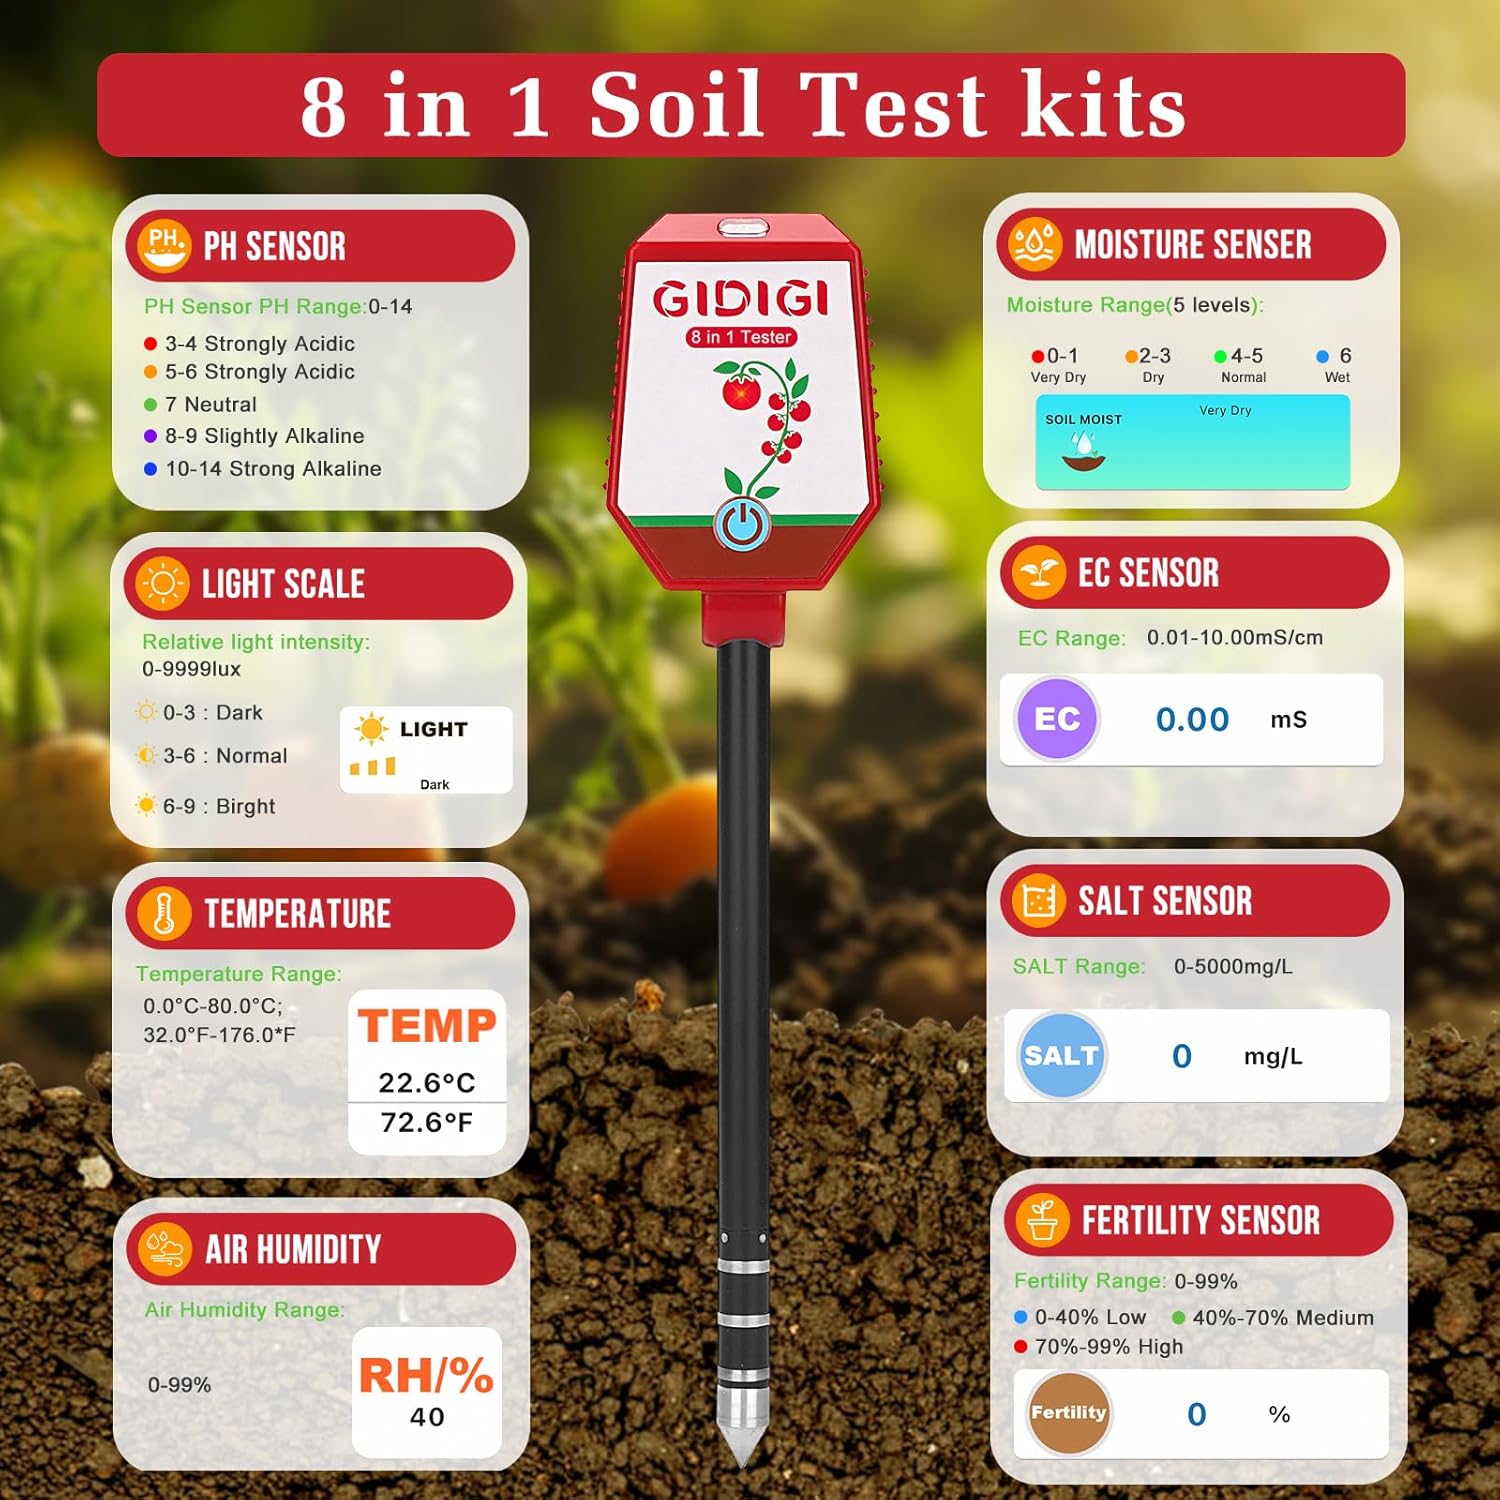
Figure 2: Detailed breakdown of the 8-in-1 soil test kit features and sensor capabilities.
Setup and Initial Use
1. Battery Installation
The device requires 4 AAA batteries (included). To install:
- Locate the battery compartment on the back of the meter.
- Use a small screwdriver to open the battery cover.
- Insert 4 AAA batteries, ensuring correct polarity.
- Replace the battery cover and secure it with the screw.

Figure 3: Battery compartment location and included pH calibration powder.
2. Probe Preparation
Before first use, carefully remove the protective cap from the probe tip. Ensure the probe is clean and free of debris.
3. App Download and Pairing
The GIDIGI GX-S08 connects to your smartphone via Bluetooth for detailed data viewing and management.
- Scan the QR code provided in the manual or on the product packaging to download the companion app (available for Android and iOS).
- Enable Bluetooth on your smartphone.
- Open the app and follow the on-screen instructions to pair your device. Ensure the meter is within 10cm of your phone during pairing.

Figure 4: Bluetooth connection to the smartphone app for Android and iOS devices.
4. pH Calibration
For accurate pH readings, calibration is recommended. The kit includes three packets of pH buffer powder (pH 4.00, pH 7.00, pH 10.01).
- Prepare three separate solutions by dissolving each powder packet in 250ml of pure or distilled water. Label each solution clearly.
- Prioritize calibration with pH 7.00 solution first. Immerse the meter's electrodes (two white dots on the probe) into the pH 7.00 solution.
- Wait for the readings to stabilize in the app. Then, navigate to the "Calibrate" section in the app and select "pH 7.0". Confirm calibration.
- Rinse the electrode with pure water and wipe it dry.
- Repeat the process for pH 4.00 and pH 10.01 solutions.
Video 1: Step-by-step guide on how to calibrate the GIDIGI Soil pH Meter using buffer solutions.

Figure 5: Visual guide for pH calibration, emphasizing immersion of electrodes.
Operating Instructions
1. Taking Measurements
- Gently insert the metal probe into the soil to a depth of 2-4 inches. Ensure the probe is fully in contact with the soil.
- Wait approximately 30 seconds for the readings to stabilize.
- View the real-time data on your smartphone app. The app will display all 8 parameters.

Figure 6: Correct insertion of the soil meter into a potted plant.

Figure 7: Recommended 30-second waiting period for stable readings.
2. Continuous Monitoring
The GX-S08 supports continuous monitoring for up to 72 hours. For prolonged use, it is recommended to remove the instrument after approximately 36 hours, clean and dry it, and then reinsert it to continue monitoring.

Figure 8: Continuous monitoring for up to 72 hours with recommended cleaning interval.
3. Data Storage and Sharing
The app automatically saves up to 1000 data points, allowing you to track historical trends and make informed decisions about your plant care. You can also share plant data with others through the app.

Figure 9: Data storage, sharing, and 24-hour monitoring capabilities.
Maintenance
1. Cleaning the Probe
After each use, especially after measuring in different soil types, clean the probe with a soft cloth or brush to remove any soil residue. This prevents cross-contamination and ensures accurate readings.

Figure 10: Cleaning the probe after use to maintain accuracy.
2. Storage
Store the meter in a cool, dry place away from direct sunlight and extreme temperatures. Always replace the protective cap on the probe when not in use.
3. Battery Replacement
Replace batteries when the low battery indicator appears on the display or in the app. For long-term storage, remove the batteries to prevent leakage.
Troubleshooting
- No Power: Ensure batteries are correctly installed and charged. Replace if necessary.
- No Bluetooth Connection: Verify Bluetooth is enabled on your phone and the meter is within range. Restart both devices and try pairing again.
- Inaccurate Readings:
- Ensure the probe is clean.
- Recalibrate the pH sensor if readings are consistently off.
- Ensure the probe is inserted deep enough (2-4 inches) and is in firm contact with the soil.
- Avoid inserting the probe into hard soil or near large rocks, which can damage the probe or affect readings.
- App Issues: Ensure the app is updated to the latest version. Clear the app cache or reinstall if problems persist.

Figure 11: Important notices for proper usage and care of the soil meter.
Specifications
| Model Number | GX-S08 |
| Product Dimensions | 1 x 1 x 1 inches; 11.22 ounces |
| pH Test Range | 0.0-14.0 pH (Accuracy ±0.1, Resolution 0.1) |
| EC Test Range | 0.01-20.00 mS/cm (Accuracy ±0.01 mS/cm, Resolution 0.01) |
| Moisture Range | 0-100% (5 levels: Very Dry, Dry, Normal, Wet, Very Wet) |
| Salinity Range | 0-5000 mg/L (Accuracy ±2% F.S., Resolution 1 mg/L) |
| Sunlight Intensity | 0-9999 Lux (3 levels: Dark, Normal, Bright) |
| Fertility Range | 0-99% (3 levels: Low, Medium, High) |
| Temperature Range | 32.0-176.0 °F (0.0-80.0 °C) (Accuracy ±2% F.S., Resolution 1 °C/°F) |
| Air Humidity Range | 0-99% RH |
| Power Source | 4 x AAA Batteries |
| Manufacturer | JiNan JiXin Electronic Co., Ltd |
Warranty and Support
For warranty information, technical support, or any inquiries regarding your GIDIGI GX-S08 Soil pH Meter, please contact the manufacturer directly. Refer to the product packaging or the official GIDIGI website for contact details.