1. Introduction
This manual provides detailed instructions for the installation, operation, and maintenance of your QueenFun 30x32 Beveled Lighted Medicine Cabinet. Please read this manual thoroughly before installation and use to ensure proper function and safety. Keep this manual for future reference.

Image 1.1: QueenFun 30x32 Beveled Lighted Medicine Cabinet in a bathroom setting.
2. Safety Information
WARNING: Electrical installation should be performed by a qualified electrician. Ensure power is disconnected at the circuit breaker before beginning any installation or maintenance.
- Always wear appropriate safety gear, including eye protection, during installation.
- Do not attempt to modify the product. Any modifications may void the warranty and create safety hazards.
- This product is designed for indoor use in bathroom environments. Ensure the installation area is structurally sound to support the cabinet's weight.
- The built-in charging socket is for low-voltage devices only (e.g., electric toothbrushes, razors). Do not use it for high-power appliances like hair dryers.
- Keep children away from the installation area.
3. Package Contents
Verify that all components are present and undamaged before proceeding with installation.
- QueenFun 30x32 Beveled Lighted Medicine Cabinet (Model BLMB)
- Adjustable Glass Shelves (3)
- Installation Kit (mounting bracket, screws, anchors)
- User Manual (this document)
4. Specifications
| Feature | Specification |
|---|---|
| Brand | QueenFun |
| Model Name | BLMB |
| Product Dimensions (Overall) | 5"D x 30"W x 32"H |
| Size | 30x32'' |
| Mounting Type | Wall Mount (Surface or Recessed) |
| Special Features | Adjustable Shelf, Built-In Charging Station, Built-in Defogger, Illuminated, Rust Resistant |
| Number of Shelves | 3 |
| Frame Material | Aluminum |
| Item Weight | 54 Pounds |
| Light Color Temperature | 3000K-6000K (Adjustable) |
| Dimming | 20%-100% Stepless |
| Power Outlet | Dual Outlet & USB (120V/2A) |
| Weatherproof Rating | IP54 |
5. Installation
The QueenFun medicine cabinet can be installed as either a surface-mount or recessed-mount unit. Choose the method that best suits your bathroom design and wall structure.
5.1. Pre-Installation Considerations
- Power Supply: Ensure a suitable electrical connection is available. The cabinet can be direct-plugged or hardwired. Consult a qualified electrician for hardwiring.
- Wall Structure: The wall must be capable of supporting the cabinet's weight (54 lbs) plus contents. Locate wall studs for secure mounting.
- Tools Required: Drill, level, measuring tape, screwdriver, stud finder, safety glasses.

Image 5.1: Outer overall dimensions and visual representation of surface and recessed mounting options.
5.2. Recessed Mount Installation
For recessed installation, a wall cutout is required. Refer to the cutout dimension reference table below for precise measurements.

Image 5.2: Cutout dimension reference for recessed installation.
- Prepare Wall Opening: Based on the dimensions for your 30x32'' model, carefully mark and cut the opening in the wall. Ensure the opening is plumb and level.
- Electrical Wiring: Route electrical wiring to the opening. If hardwiring, ensure connections are made according to local electrical codes.
- Insert Cabinet: Gently slide the cabinet into the wall opening.
- Secure Cabinet: Use the provided screws to secure the cabinet to the wall studs or framing within the opening.
5.3. Surface Mount Installation
For surface mount installation, the cabinet is mounted directly onto the wall surface.
- Mark Mounting Position: Use a level and pencil to mark the desired height and center of the cabinet on the wall.
- Install Mounting Bracket: Attach the heavy-duty mounting bracket to the wall using appropriate screws and anchors. Ensure it is level and securely fastened to wall studs if possible.
- Hang Cabinet: Carefully lift the cabinet and hook it onto the installed mounting bracket.
- Secure Bottom: Install the bottom reinforced screw to prevent the cabinet from shifting.

Image 5.3: General installation steps for mounting the medicine cabinet.
5.4. Electrical Connection
Connect the cabinet to the power supply. If using the direct-plug option, plug the cabinet into a grounded outlet. If hardwiring, ensure all connections are secure and insulated according to electrical standards.
5.5. Install Shelves
Insert the adjustable glass shelves into the desired positions within the cabinet. Ensure they are securely seated on the shelf supports.
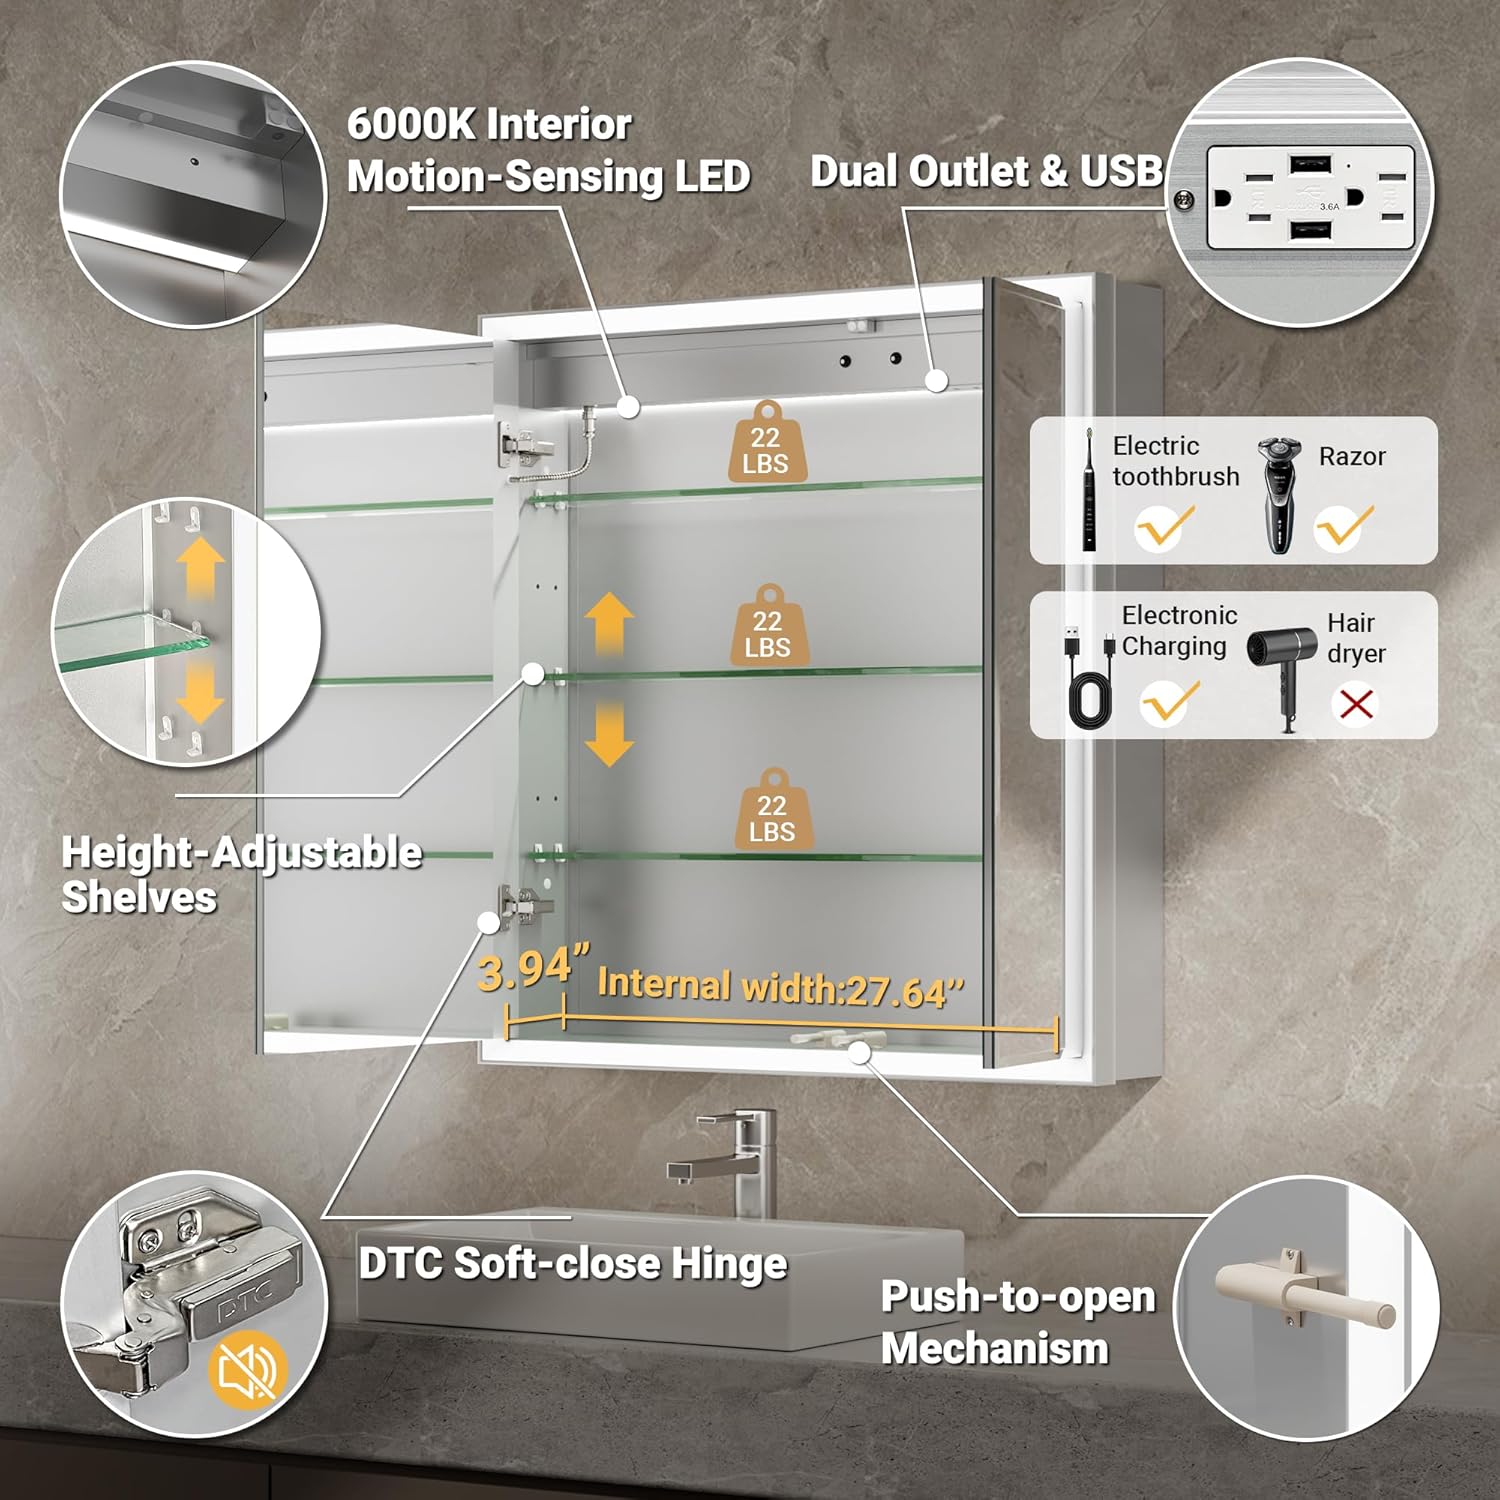
Image 5.4: Interior features including adjustable shelves and electrical outlets.
6. Operating Instructions
Your QueenFun medicine cabinet features several integrated functions for enhanced convenience.
6.1. Lighting Control
The cabinet features inwardly beveled LED light strips for focused, eye-protecting illumination. The front lighting remains functional even when the door is open.
- Power On/Off: Touch the designated sensor button on the mirror surface to turn the lights on or off.
- Color Temperature Adjustment: Touch and hold the light button to cycle through color temperatures (3000K warm white, 4500K neutral white, 6000K cool white). Release at the desired setting.
- Brightness Dimming: Touch and hold the dimming button to adjust brightness from 20% to 100%. Release at the desired brightness level.
- Memory Function: The cabinet will remember your last light color temperature and brightness settings.

Image 6.1: Light color temperature and dimming controls.
6.2. Anti-Fog Function
Activate the anti-fog function to maintain a clear mirror surface in steamy conditions.
- Activate: Touch the defogging button on the mirror surface.
- Auto-Off: The anti-fog function will automatically turn off after one hour.

Image 6.2: Anti-fog function and time display.
6.3. Time Display
The integrated clock displays the current time.
- Setting Time: Refer to the quick start guide or contact customer support for specific instructions on setting the time.
- Turning Off Display: The time display can be turned off if desired. Consult the quick start guide for instructions.
6.4. Motion-Sensing Interior Light
The cabinet features a built-in motion-sensor ceiling light that illuminates the interior when the door is opened, assisting in locating items.
6.5. Charging Station
The cabinet includes a dual outlet and USB charging ports for low-voltage electronic devices.
- Usage: Plug in devices such as electric toothbrushes or razors.
- Limitation: Do not use for high-power appliances like hair dryers.
7. Maintenance
Regular cleaning and care will help maintain the appearance and functionality of your medicine cabinet.
- Cleaning the Mirror: Use a soft, lint-free cloth and a non-abrasive glass cleaner. Spray cleaner onto the cloth, not directly onto the mirror, to prevent liquid from seeping into the edges.
- Cleaning the Cabinet: Wipe the exterior and interior surfaces with a soft, damp cloth. Avoid harsh chemicals or abrasive cleaners.
- Electrical Components: Ensure the cabinet is disconnected from power before cleaning near electrical outlets or wiring.
- Hinges: The DTC soft-close hinges are designed for durability. Avoid forcing the doors open or closed.
8. Troubleshooting
If you encounter any issues, refer to the following common problems and solutions.
| Problem | Possible Cause | Solution |
|---|---|---|
| Lights not turning on | No power supply; loose connection; faulty sensor button. | Check power connection. Ensure circuit breaker is on. Press the sensor button firmly. If hardwired, check wiring connections (consult electrician). |
| Anti-fog not working | Function not activated; power issue. | Ensure the anti-fog button has been pressed. Verify power supply to the cabinet. |
| Clock display incorrect or off | Time not set; display turned off. | Refer to the quick start guide for time setting instructions. Check if the display has been intentionally turned off. |
| Charging outlets not working | No power; device requires too much power. | Verify power supply. Ensure the device is low-voltage and compatible with the 120V/2A output. |
| Cabinet door not closing smoothly | Obstruction; hinge issue. | Check for any items obstructing the door. Inspect hinges for damage or misalignment. |
If the problem persists after attempting these solutions, please contact QueenFun customer support.
9. Warranty and Support
QueenFun products are designed for quality and durability. For warranty information, product support, or to purchase replacement parts, please contact QueenFun customer service directly. Details can typically be found on the product packaging or the official QueenFun website.
Note: Side mirrors are not included by default and must be purchased separately if required for surface-mount installations.


