
1. Product Overview
The MirrorZone 1000W Electric Paint Sprayer is designed for efficient and precise application of various paints and stains. Its high-power motor and adjustable features make it suitable for a wide range of painting projects, from furniture to walls.
Included Components:
- 1X Paint Sprayer Unit
- 1X High-Capacity Container (1400 Milliliters)
- 4X Copper Nozzles (0.8mm/1.5mm/1.8mm/2.5mm, one pre-installed)
- 3X Paper Funnels
- 1X Filter
- 1X Viscosity Cup
- 1X Nozzle Cleaning Needle
- 1X Cleaning Brush
- 1X User Manual
- Protective Gloves

Image: The complete MirrorZone 1000W Electric Paint Sprayer kit, showing the main unit, paint container, various nozzles, and cleaning tools.
2. Safety Instructions
Always read and understand all safety warnings and instructions before operating this paint sprayer. Failure to follow the warnings and instructions may result in electric shock, fire, and/or serious injury.
General Safety:
- Wear appropriate personal protective equipment (PPE), including safety glasses, gloves, and a respirator, especially when spraying in enclosed areas.
- Ensure the work area is well-ventilated to prevent the buildup of hazardous fumes.
- Keep children and bystanders away while operating the sprayer.
- Do not operate the sprayer near open flames, pilot lights, or other ignition sources.
Electrical Safety:
- Ensure the power source matches the voltage specified on the sprayer's label.
- Do not expose the sprayer to rain or wet conditions. Water entering the power tool will increase the risk of electric shock.
- Always unplug the sprayer from the power source before making any adjustments, changing accessories, or storing the tool.
Material Safety:
- Always refer to the paint or material manufacturer's instructions for proper dilution and safety precautions.
- Do not spray flammable materials near heat sources or open flames.
- Clean up spills immediately and dispose of waste materials according to local regulations.
3. Setup and Assembly
Proper setup ensures optimal performance and safety. Follow these steps to assemble your paint sprayer.
- Unpack Components: Carefully remove all components from the packaging and verify against the 'Included Components' list.
- Attach the Container: Securely screw the 1400ml paint container onto the sprayer head. Ensure it is tightly fastened to prevent leaks.
- Select and Install Nozzle: Choose the appropriate copper nozzle based on the viscosity of your paint and desired spray pattern (0.8mm/1.5mm/1.8mm/2.5mm). Screw the selected nozzle onto the sprayer head.
- Prepare Paint: Use the included viscosity cup to test and dilute your paint as needed. Pour the prepared paint into the container using a paper funnel to filter out any impurities.
- Adjust Suction Tube: For optimal paint pickup, adjust the suction tube inside the container. For downward spraying, position the tube towards the front. For upward spraying, position it towards the rear.
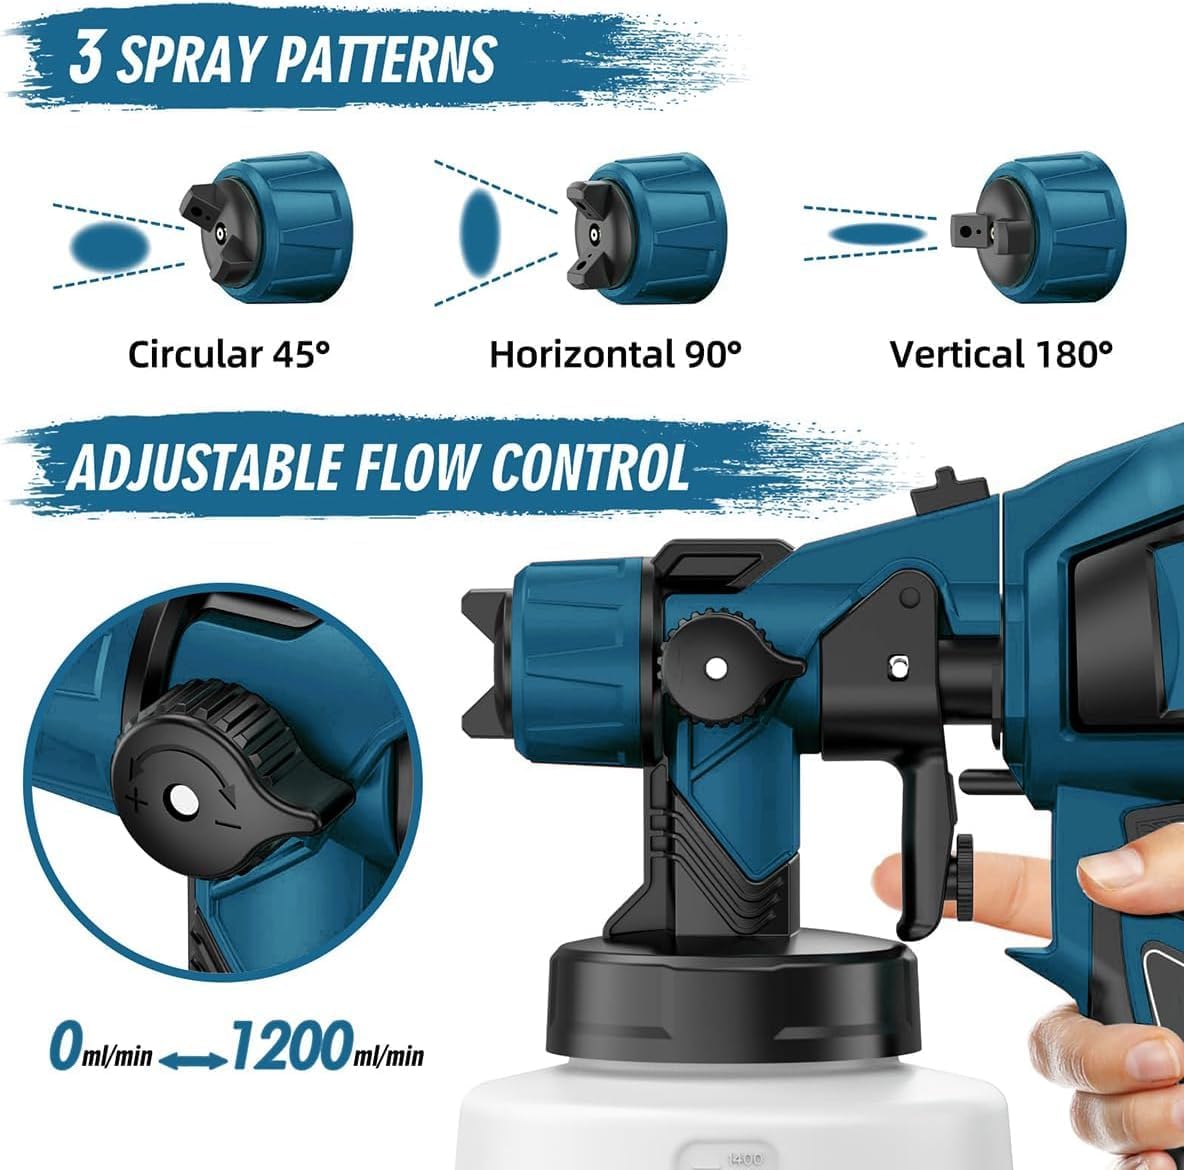
Image: The paint sprayer head detached from the motor unit, illustrating the ease of disassembly for setup and cleaning.

Image: A detailed view of the sprayer's front, highlighting the three adjustable spray patterns (circular, horizontal, vertical) and the flow control knob for precise paint output.

Image: An infographic showcasing the key features of the 1000W paint sprayer, including its powerful motor, large capacity container, easy cleaning, multiple nozzles and patterns, flexible flow control, and safety materials.
4. Operating Instructions
Follow these steps for effective and consistent paint application.
- Power On: Plug the sprayer into a suitable power outlet.
- Test Spray: Before applying to your project, test the spray pattern on a piece of scrap material. Adjust the flow control knob and spray width knob until you achieve the desired coverage and pattern.
- Spraying Technique: Hold the sprayer approximately 6-12 inches from the surface, depending on the desired coverage. Move the sprayer in smooth, even strokes, overlapping each pass slightly to ensure uniform coverage.
- Adjusting Spray Patterns: The sprayer offers vertical, horizontal, and circular spray patterns. Rotate the air cap to switch between these patterns to best suit your project's needs.
- Flow Control: Use the flow control knob to adjust the paint output from 0ml/min to 1200ml/min, allowing for fine-tuning based on paint type and desired finish.

Image: The paint sprayer in action, demonstrating its versatility on different surfaces including iron furniture, a wooden fence, kitchen cabinets, and a brick wall.
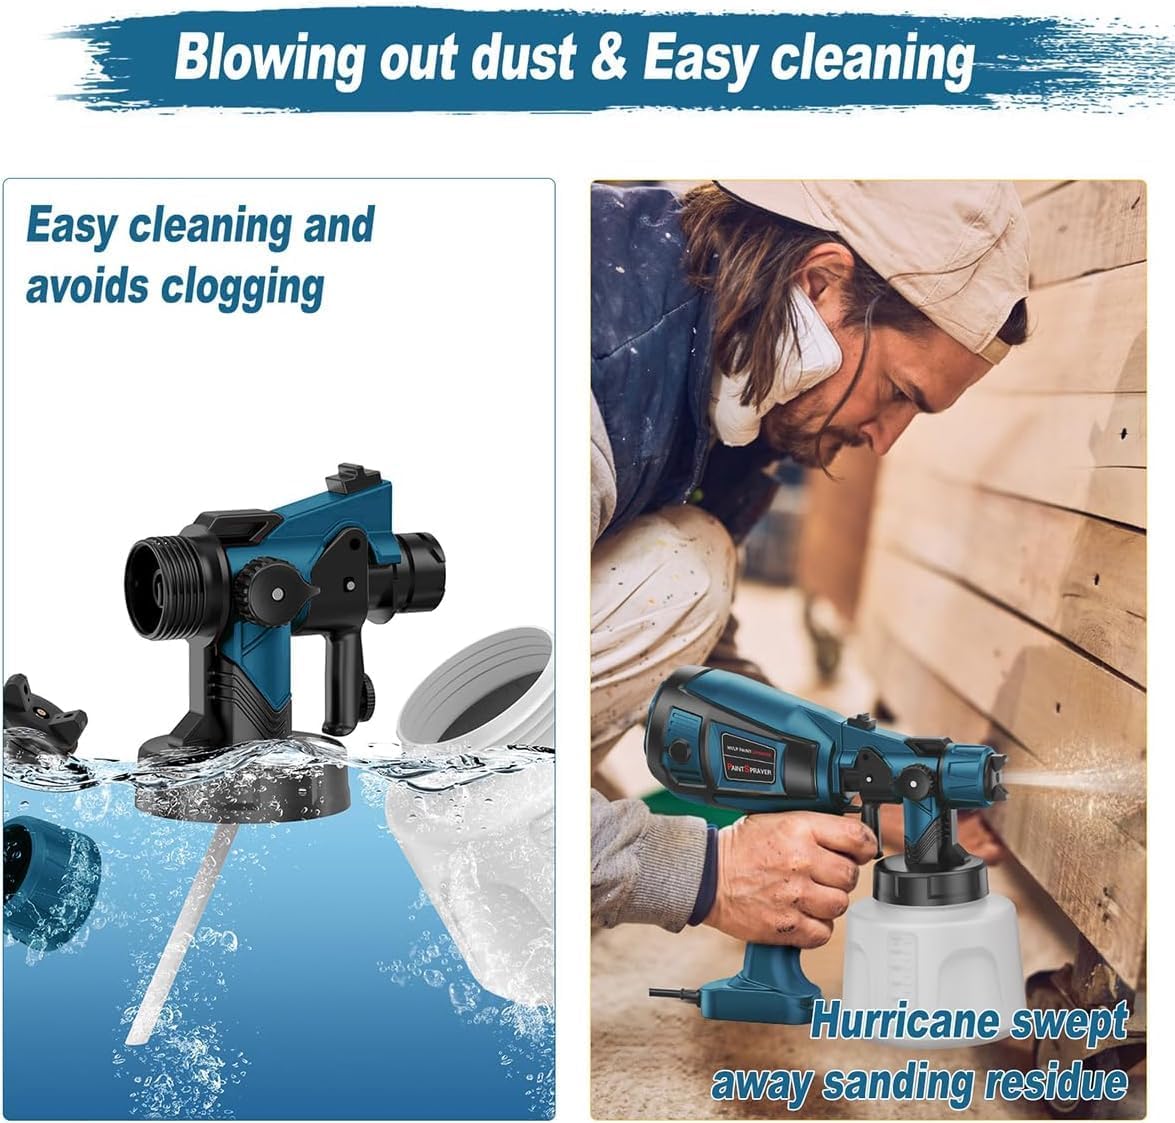
Image: Further examples of the paint sprayer's application, showing it used on a chair and table, a ceiling, a door, and a wooden deck.
Video: A demonstration of the paint sprayer in use for house painting, showcasing its ease of setup and application on wooden surfaces.
5. Maintenance and Cleaning
Regular cleaning and maintenance will extend the life of your paint sprayer and ensure consistent performance.
- Immediate Cleaning: After each use, immediately empty any remaining paint from the container.
- Disassembly: The sprayer is designed for easy disassembly without tools. Pull the switch button forward and rotate the front section to detach it from the motor housing.
- Rinse Components: Rinse the paint container, suction tube, and nozzles thoroughly with warm water if using water-based paints, or with an appropriate cleaning solution for oil-based paints.
- Clean Nozzles: Use the provided cleaning needle and brush to clear any paint residue from the nozzles and internal passages. The brass nozzles are designed to resist clogging.
- Wipe Down Unit: Wipe the exterior of the motor unit with a damp cloth. Do not immerse the motor unit in water.
- Dry and Store: Ensure all components are completely dry before reassembling and storing the sprayer in a clean, dry place.

Image: The paint sprayer's detachable front section and container submerged in water, illustrating the ease of cleaning to prevent clogging and ensure longevity.
6. Troubleshooting
Refer to this section for common issues and their solutions.
| Problem | Possible Cause | Solution |
|---|---|---|
| No spray or weak spray | Nozzle clogged; Paint too thick; Suction tube blocked; Air cap dirty. | Clean nozzle and air cap; Dilute paint; Clear suction tube. |
| Uneven spray pattern | Nozzle partially clogged; Incorrect spray pattern setting; Inconsistent spraying distance. | Clean nozzle; Adjust air cap for desired pattern; Maintain consistent distance. |
| Paint leaking from nozzle | Nozzle not tightened; Damaged O-ring; Paint too thin. | Tighten nozzle; Replace O-ring; Thicken paint or use appropriate nozzle. |
| Motor not running | Not plugged in; Power switch off; Overheating protection activated. | Check power connection; Turn on switch; Allow unit to cool down. |
7. Specifications
- Brand: MirrorZone
- Model Name: GJLSWR2
- Power Source: AC
- Motor Power: 1000W
- Tank Volume: 1400 Milliliters
- Material: Plastic
- Color: Blue
- Item Weight: 3 Pounds
- Product Dimensions: 7.6 x 10 x 6.7 inches
- Hose Length: 1.8 Meters
- Nozzle Sizes: 0.8mm, 1.5mm, 1.8mm, 2.5mm (Copper)
- Spray Patterns: Vertical, Horizontal, Circular
8. Warranty and Support
MirrorZone products are manufactured to high-quality standards and are warranted against defects in materials and workmanship. For specific warranty details and support, please refer to the warranty card included with your product or visit the official MirrorZone website.
For technical assistance or customer service inquiries, please contact MirrorZone customer support through the contact information provided in your product packaging or on the brand's official channels.