1. Introduction
This manual provides detailed instructions for the safe and efficient operation, setup, and maintenance of your LYAYYDS YS-802 Automatic SMT Component Counter. Please read this manual thoroughly before operating the device and retain it for future reference.
The YS-802 is designed for accurate counting of SMT (Surface Mount Technology) components on tape and reel, utilizing photoelectric sensing for precise measurement. It is an essential tool for efficient material management in electronic manufacturing.
2. Safety Instructions
Always observe the following safety precautions to prevent injury and damage to the device:
- Ensure the power supply matches the specifications (AC 220V/110V) before connecting the device.
- Do not operate the machine with wet hands or in damp environments.
- Keep the work area clean and free of obstructions.
- Disconnect power before performing any maintenance or cleaning.
- Do not attempt to modify or repair the device yourself. Contact qualified service personnel.
- Keep children and unauthorized personnel away from the operating machine.
3. Product Overview
The LYAYYDS YS-802 is an automatic SMT component counter featuring a robust design and precise counting capabilities. Key components include the main counting unit, reel holders, control panel, and LCD display.
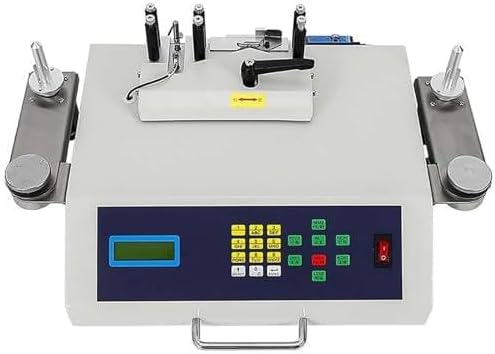
Figure 3.1: Front view of the LYAYYDS YS-802 Automatic SMT Component Counter. This image shows the main unit with the control panel, LCD display, and reel holders on both sides.
3.1 Key Features
- Automatic Counting: Photoelectric sensing for accurate SMT component counting.
- Wide Counting Range: -99999 to 99999 PCS.
- Adjustable Speed: Three-level speed regulation (High, Medium, Low).
- Leak Detection: Enhanced model with real-time leakage detection using an imported fiber optic sensing device.
- Durable Construction: Machine body made of all steel for robustness.
- User-Friendly Interface: 3-digit LCD display and intuitive control panel.

Figure 3.2: Overview of the YS-802 model, highlighting key specifications such as 50W rated power, AC220V power supply, three-level speed regulation, and a counting range of -99999 to 99999 pieces. Mechanical dimensions are L750*W340*H190mm and weight is 10kg.
4. Setup
4.1 Unpacking and Inspection
Carefully remove the component counter from its packaging. Inspect the device for any signs of damage during transit. Report any damage to your supplier immediately.
4.2 Mirror Installation
- Use a hexagonal wrench to loosen the two hexagonal screws on the back of the material point machine.
- Align the mirror with the holes on the machine and tighten the screws securely.
Figure 4.1: Visual guide for mirror installation. The image shows loosening screws with a hexagonal wrench, aligning the mirror, and tightening the screws.
4.3 Material Tray Installation
- Use a screwdriver to tighten the two screws on the shaft.
- Align the holes of the material tray with the shaft and tighten the screws.
Figure 4.2: Visual guide for material tray installation. The image shows tightening screws on the shaft and aligning the material tray.
4.4 Power Connection
Connect the power cord to the machine and then to a suitable AC 220V/110V power outlet. Ensure the power switch is in the OFF position before connecting.
5. Operating Instructions
5.1 Control Panel Overview

Figure 5.1: Detailed view of the control panel, showing number keys, function keys, and their descriptions. This includes keys for setting material spacing (PITCH), switching material point speed, external printer output (PRINT), material quantity, forward/reverse start (LEFT/RIGHT), stop/clear (STOP/CLEAR), and leak detection (LOSS).
5.2 Display Information

Figure 5.2: The LCD display shows the current operating mode (A: Material delivery mode, M: Inventory mode), material spacing (PITCH), preset quantity in A mode, total number of points (count), and speed setting (L: low, M: medium, H: high speed).
5.3 Basic Counting Operation
- Power On: Flip the power switch to the ON position. The LCD display will illuminate.
- Select Mode: Use the "SELECT" key (up arrow) to switch between "A: Material delivery mode" and "M: Inventory mode".
- Set Material Spacing (PITCH): Press the "PITCH" key and use the number keys to input the correct spacing for your component tape. Press "ENTER" to confirm.
- Set Speed: Use the speed adjustment keys (usually integrated with other function keys or a dedicated switch) to select Low (L), Medium (M), or High (H) speed.
- Load Component Reel: Place the component reel onto the appropriate reel holder. Guide the tape through the counting mechanism.
- Start Counting: Press the "RIGHT" key to start counting in the forward direction. Press "LEFT" for reverse.
- Stop Counting: Press the "STOP/CLEAR" key (short press) to pause or stop the counting process.
- Reset Count: Long press the "STOP/CLEAR" key to reset the counted quantity to zero.
5.4 Leak Detection Function
The YS-802 features an enhanced leak detection model. If the machine detects a missing component (leakage) during counting, it will typically stop and indicate an error. Refer to the "LOSS" indicator on the control panel.
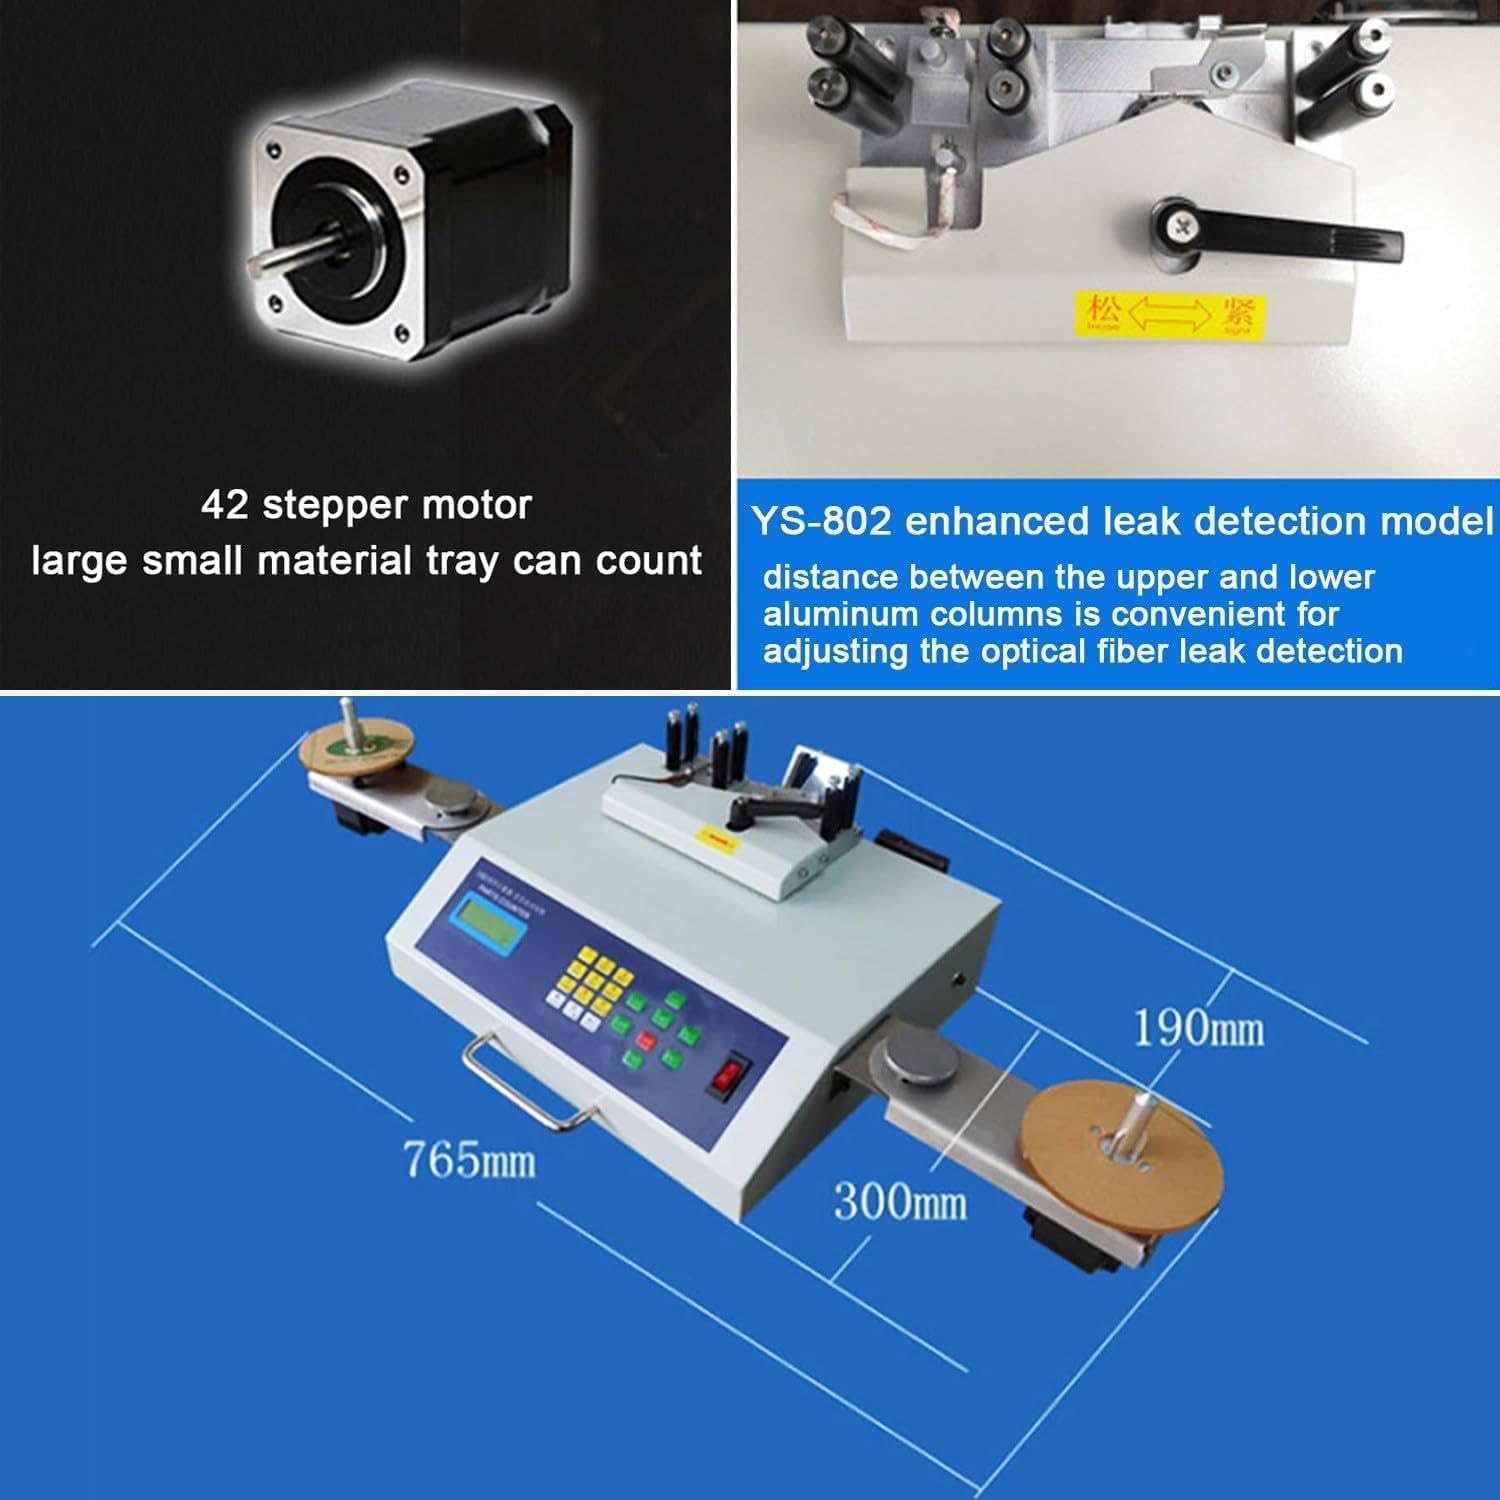
Figure 5.3: This image highlights the YS-802 as an enhanced leakage detection model, noting its all-steel body, real-time leakage detection function, imported fiber optic sensing device, and 42 stepper motor, making it suitable for all reel-mounted electronic materials.
6. Maintenance
6.1 Cleaning
- Regularly clean the exterior of the machine with a soft, dry cloth.
- Ensure the photoelectric sensors and tape path are free from dust and debris to maintain counting accuracy. Use a soft brush or compressed air if necessary.
- Do not use abrasive cleaners or solvents.
6.2 Optical Fiber Leak Detection Adjustment
The distance between the upper and lower aluminum columns can be adjusted for optimal optical fiber leak detection. This adjustment ensures accurate detection across various tape thicknesses.

Figure 6.1: This image illustrates the YS-802 enhanced leak detection model, specifically showing the adjustable distance between the upper and lower aluminum columns, which is crucial for adjusting the optical fiber leak detection mechanism.
7. Troubleshooting
| Problem | Possible Cause | Solution |
|---|---|---|
| Machine does not power on. | No power supply; power cord loose; power switch off. | Check power connection; ensure power switch is ON; test power outlet. |
| Inaccurate counting. | Sensors dirty; incorrect material spacing (PITCH) setting; damaged tape. | Clean sensors; verify and adjust PITCH setting; inspect component tape for damage. |
| Machine stops unexpectedly. | Component leakage detected; tape jam; power interruption. | Check for missing components; clear any tape jams; verify stable power supply. |
| Display not working. | Power issue; display malfunction. | Check power; if power is present, contact support. |
8. Specifications
| Parameter | Value |
|---|---|
| Model | YS-802 |
| Power | 50W |
| Power Supply | AC 220V/110V |
| Display | 3-digit LCD |
| Counting Range | -99999 ~ 99999 PCS |
| Running Speed | Fastest 25 seconds per 5000 components |
| Material | Aluminum, Steel |
| Power Cord Length | 1.5m / 4.9 feet |
| Product Size (L*W*H) | 76.5 * 30 * 19 cm (approx. 750*340*190mm) |
| Net Weight | 9.5 kg |
| Gross Weight | 10 kg |
| Supported Pitch | 1mm, 2mm, 4mm, 8mm, 10mm, 12mm, 16mm, 24mm, 32mm, 44mm, 56mm |
| Supported Width | 4mm, 6mm, 8mm, 12mm, 16mm, 24mm, 32mm, 44mm, 56mm |
9. Warranty and Support
For warranty information and technical support, please refer to the documentation provided with your purchase or contact your vendor. Keep your purchase receipt as proof of purchase.
If you encounter any issues not covered in this manual, please contact LYAYYDS customer service or your authorized distributor for assistance.