
1. Product Overview
This manual provides detailed instructions for the installation, operation, and maintenance of your YUNTX 9" Android14 Car Stereo. This advanced infotainment system is designed to enhance your driving experience with powerful processing, superior audio, and seamless connectivity features.

Figure 1.1: Front view of the YUNTX 9" Android14 Car Stereo unit.
Key features include an AutoChips AC8257L octa-core processor, 4GB RAM, 64GB storage, built-in wired/wireless CarPlay, Android Auto, Mirror Link, GPS navigation, FM/AM RDS radio, and support for rearview camera and steering wheel controls.
2. Setup and Installation
2.1. Package Contents
Before beginning installation, verify that all components are present in the package:
- Main Head Unit
- Rearview Camera
- External Microphone
- Power Socket Cable
- RCA Output Socket A Cable
- RCA Output Socket B Cable
- GPS Antenna
- USB Cables (2)
- Owner's Manual (this document)
- Air Conditioning Adapter Cable (if applicable for your vehicle model)
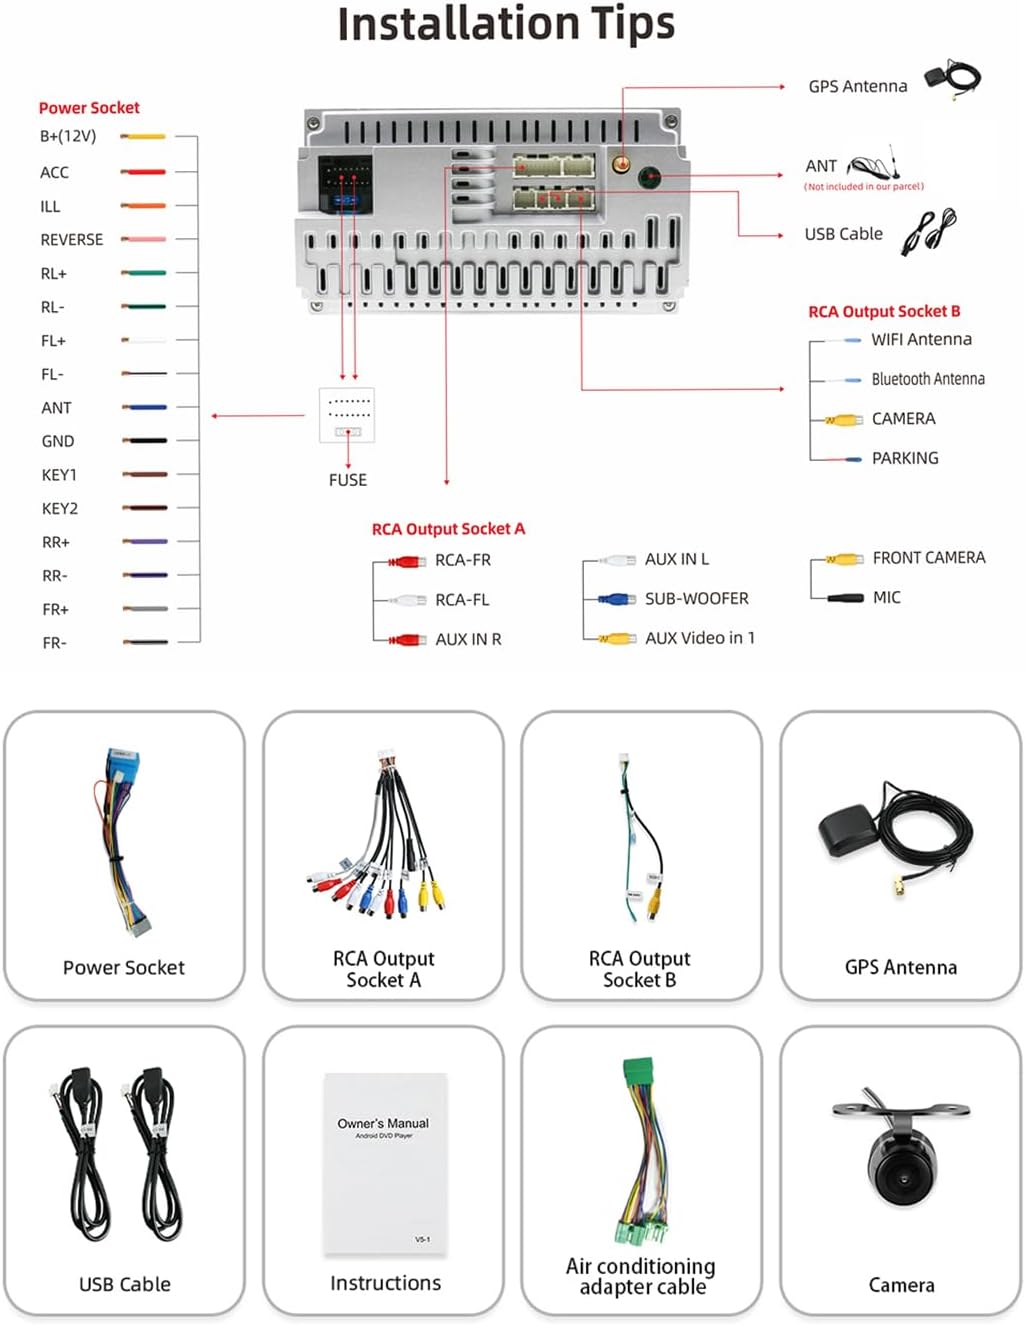
Figure 2.1: Diagram showing the rear connections of the head unit and included accessories.
2.2. Wiring Diagram and Connections
Refer to Figure 2.1 for a visual guide to the wiring connections. Ensure all cables are securely connected to their corresponding ports.
- Power Socket: Connect the main power harness to your vehicle's wiring.
- GPS Antenna: Connect the GPS antenna and place it in a location with a clear view of the sky for optimal signal reception.
- USB Cables: Connect USB devices such as flash drives or smartphones.
- RCA Output Sockets (A & B): For connecting external amplifiers, subwoofers, or additional video inputs/outputs.
- Camera Input: Connect the rearview camera cable to enable parking assistance.
- External Microphone: Connect the external microphone for improved call quality and voice command accuracy.
Note: For specific vehicle integration and wiring, it is recommended to consult a professional installer or refer to your vehicle's service manual. If you have adaptation concerns, send dashboard photos to HzBoxin@outlook.com for guidance.
3. Operating Instructions
3.1. System Power and Initial Boot
After proper installation, the system will power on with your vehicle's ignition. The unit features a fast boot-up time, typically under 3 seconds.
3.2. User Interface (UI) Navigation
The system operates on Android 14 with a user-friendly touchscreen interface. Navigate through applications and settings by tapping icons and swiping across the screen.

Figure 3.1: Example of the main user interface displaying various application icons.
3.3. Connectivity: CarPlay, Android Auto, Mirror Link
The unit supports wired and wireless Apple CarPlay and Android Auto for seamless smartphone integration. Mirror Link functionality is also available.
- CarPlay/Android Auto: Connect your compatible smartphone via USB or wirelessly (if supported by your phone and the unit). Follow on-screen prompts to enable the connection. This allows access to navigation, music, calls, and messages directly from the stereo display.
- Mirror Link: Project your smartphone screen onto the stereo display. Note: Screen mirror is only available for iOS devices, not for Android devices.

Figure 3.2: Illustration of wireless CarPlay and Android Auto connectivity.
Utilize voice commands (Siri or Google Assistant) for hands-free operation of navigation, calls, and music playback.
3.4. GPS Navigation
The system includes built-in GPS with dual-mode navigation, supporting both online and offline maps. An external GPS antenna is provided for accurate positioning.
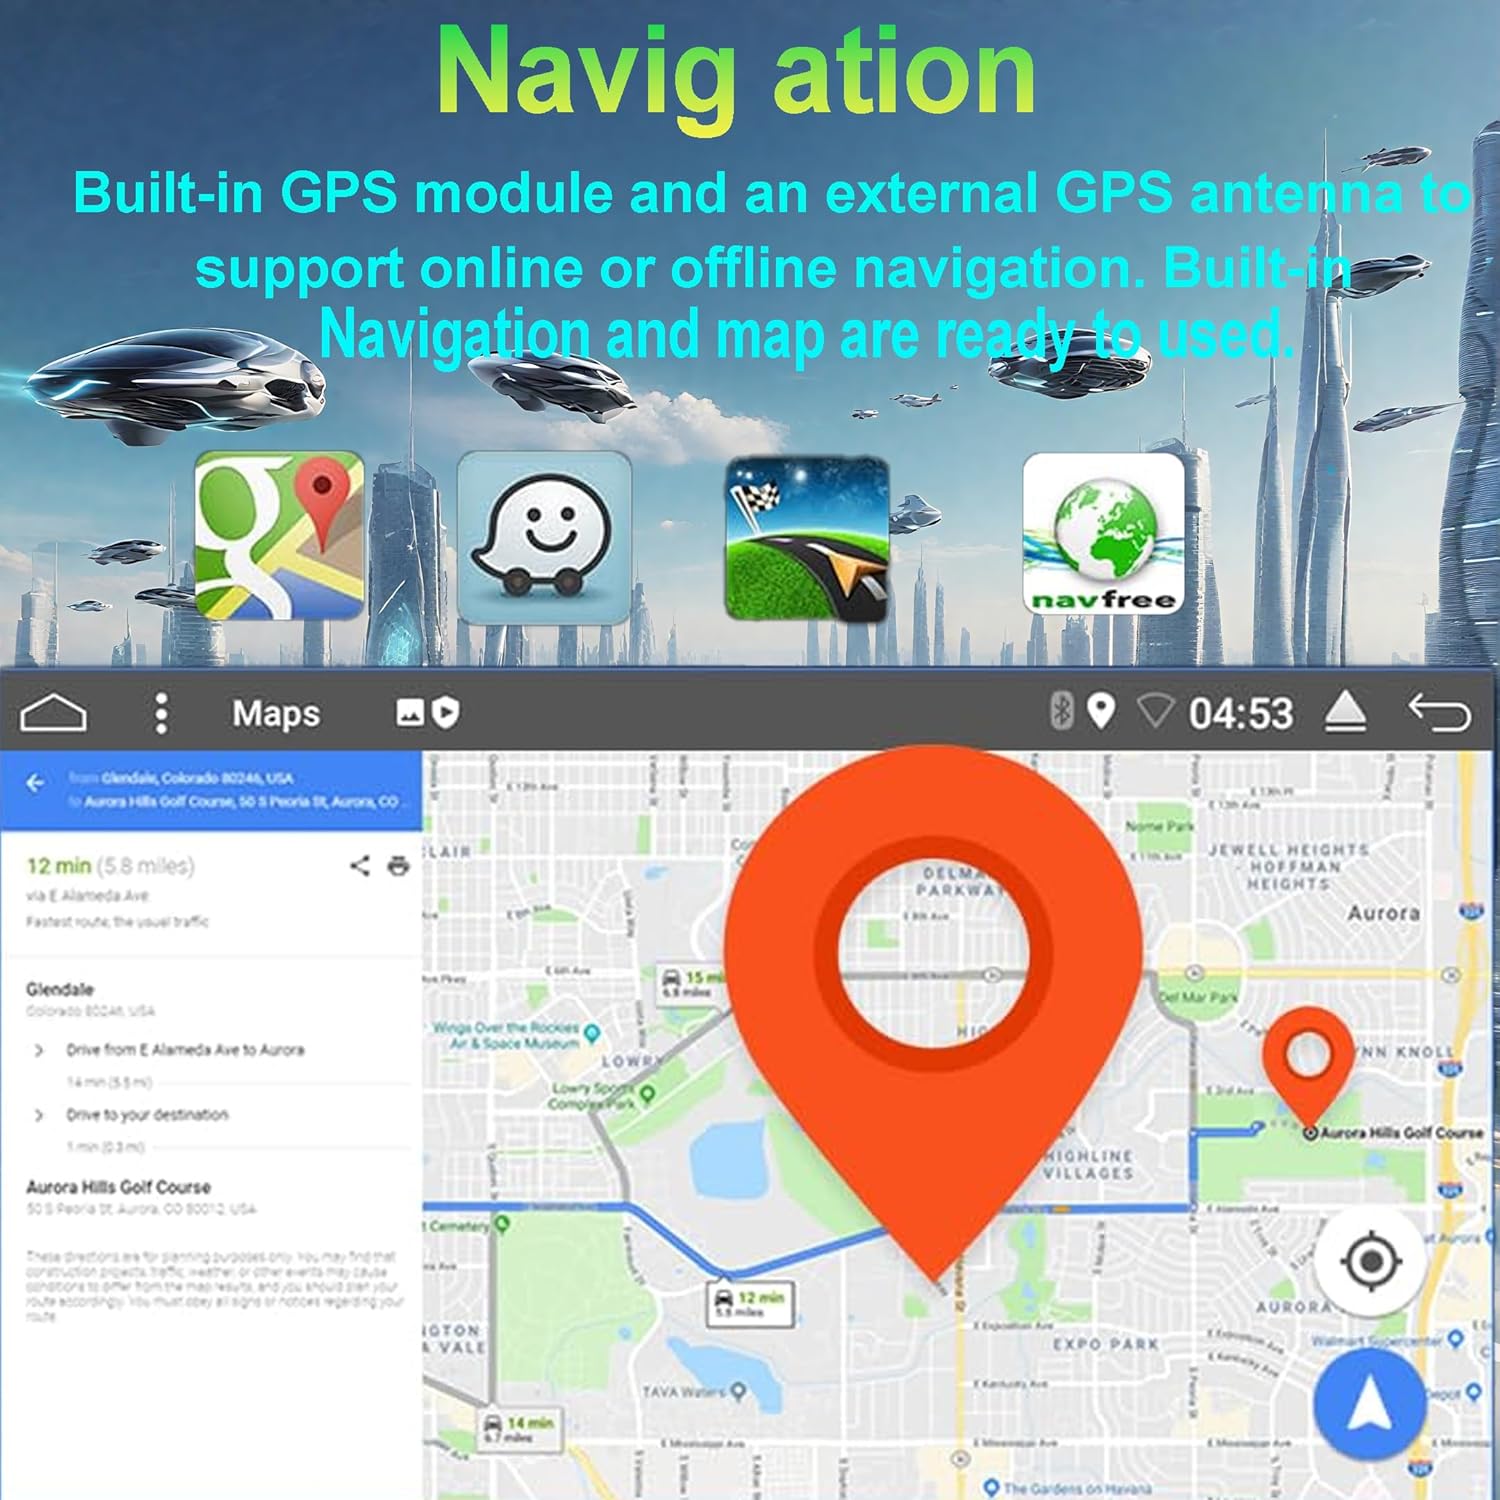
Figure 3.3: Display of the GPS navigation interface with map and route information.
To use offline maps, ensure the necessary map data is downloaded to the unit's 64GB internal storage.
3.5. Audio and Radio Functions
Experience high-quality audio with the TDA7786 radio chip and TDA7388 amplifier chip (4x50W output). The professional 64-bit dual precision DSP sound processing chip allows for personalized sound tuning.

Figure 3.4: DSP interface for adjusting sound equalization and audio settings.
The FM/AM RDS radio allows you to listen to news and traffic conditions. You can preset up to 18 radio stations.
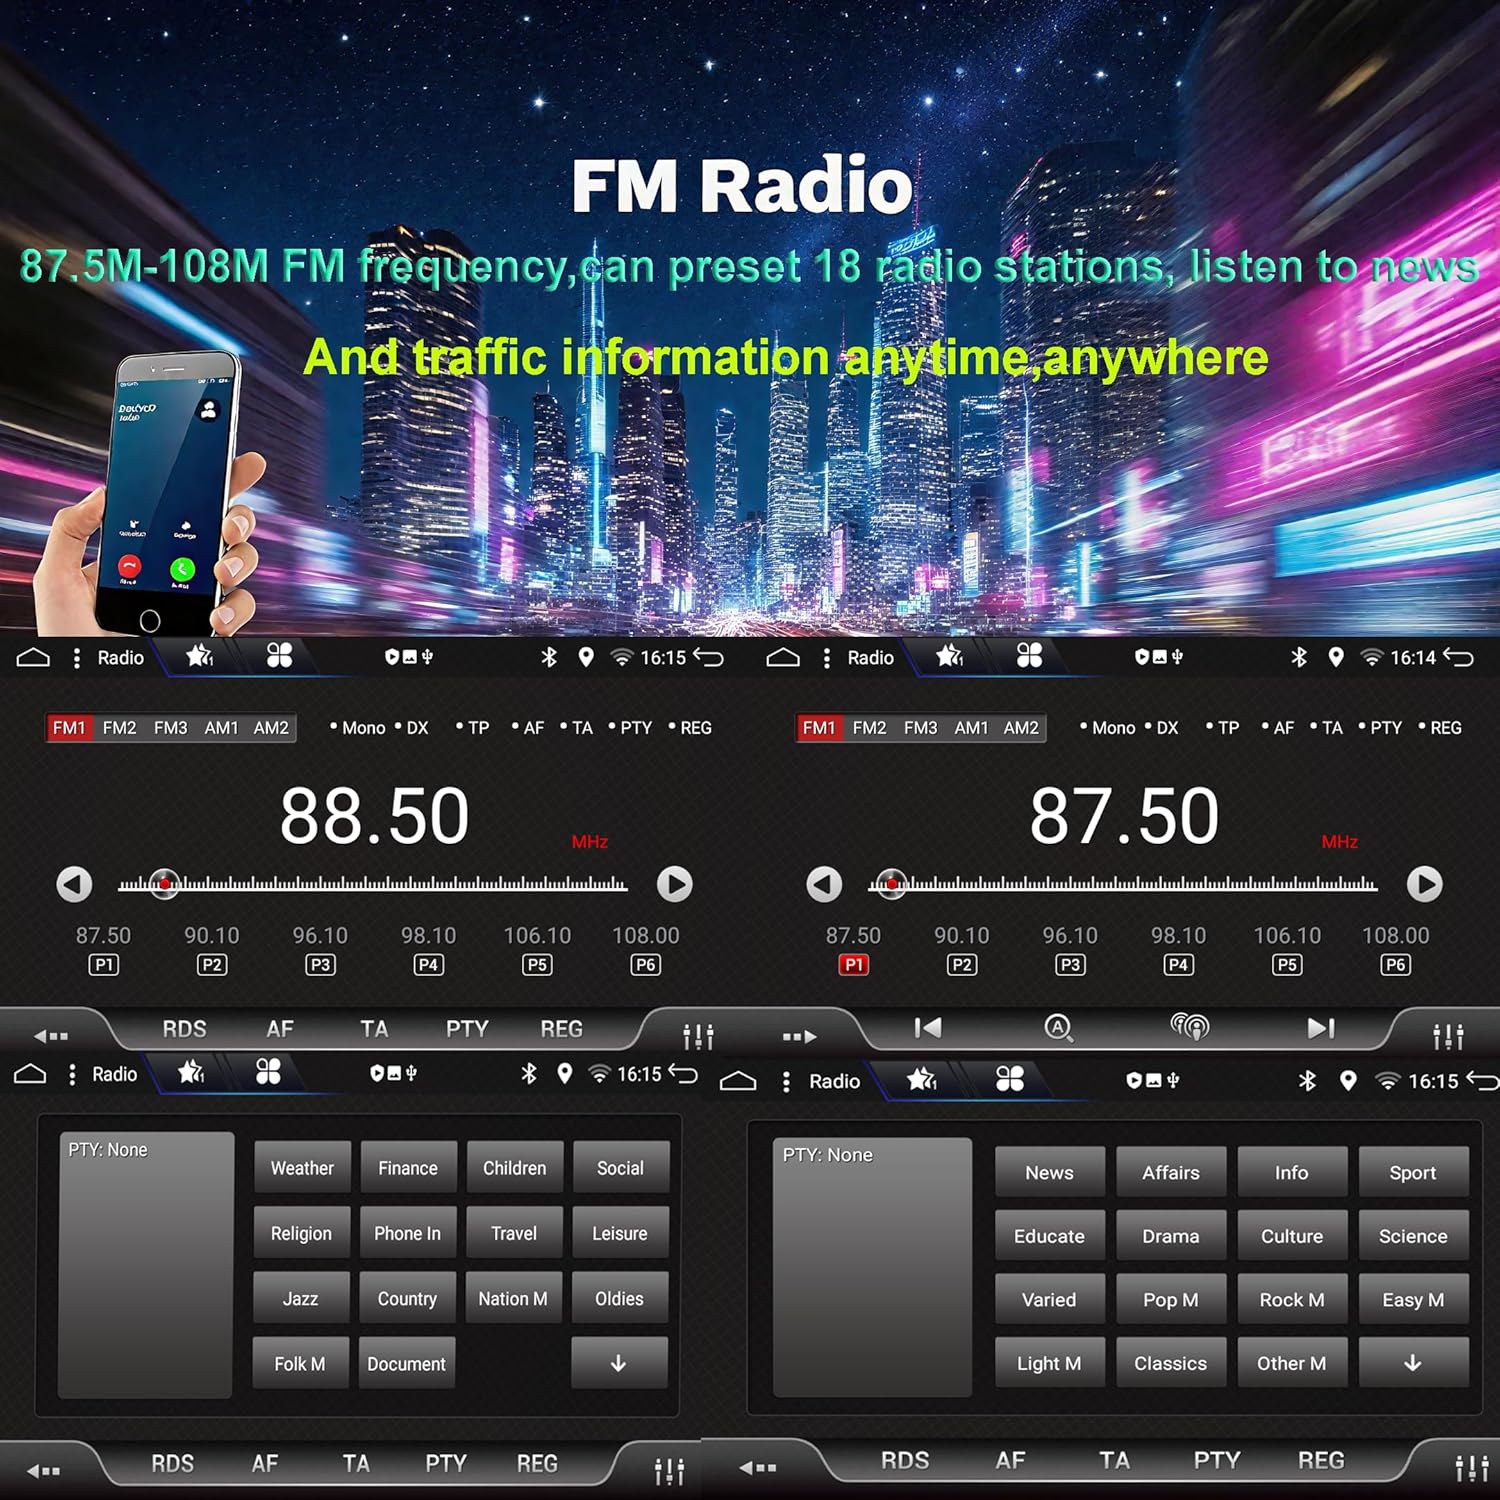
Figure 3.5: FM radio interface showing frequency tuning and preset options.
3.6. Rearview Camera and Steering Wheel Controls
The system supports a rearview camera input for enhanced safety during parking. Steering wheel controls can be integrated to manage audio and other functions without taking your hands off the wheel.

Figure 3.6: Visual representation of the rearview camera display and steering wheel control functionality.
4. Maintenance
4.1. Screen Cleaning
To clean the touchscreen, gently wipe it with a soft, lint-free cloth. For stubborn smudges, slightly dampen the cloth with water or a screen-safe cleaning solution. Avoid using abrasive cleaners or harsh chemicals, as these can damage the screen coating.
4.2. Software Updates
Periodically check for software updates to ensure optimal performance and access to new features. Updates can typically be found through the system's settings menu or the manufacturer's official website. Follow the on-screen instructions carefully during the update process.
4.3. General Care
Avoid exposing the unit to extreme temperatures, direct sunlight for prolonged periods, or excessive moisture. Ensure proper ventilation around the unit to prevent overheating. Do not attempt to disassemble the unit, as this will void the warranty.
5. Troubleshooting
This section addresses common issues you might encounter with your car stereo. If the problem persists, please contact customer support.
| Problem | Possible Cause | Solution |
|---|---|---|
| Unit does not power on. | Loose power connection, blown fuse, vehicle battery issue. | Check power cables and connections. Inspect vehicle's fuse box for a blown fuse and replace if necessary. Ensure vehicle battery is charged. |
| No sound from speakers. | Volume too low, mute activated, incorrect wiring, speaker issues. | Increase volume. Check if mute is enabled. Verify speaker wiring connections. Test with different audio sources. |
| GPS signal weak or inaccurate. | GPS antenna obstructed or improperly placed, outdated map data. | Ensure GPS antenna has a clear view of the sky. Check antenna connection. Update map data if available. |
| CarPlay/Android Auto not connecting. | Incorrect cable, phone settings, software incompatibility. | Use a certified USB cable. Check phone's CarPlay/Android Auto settings. Ensure phone and stereo software are up to date. Try restarting both devices. |
| Touchscreen unresponsive. | Temporary software glitch, screen damage. | Restart the unit (turn vehicle ignition off and on). If problem persists, contact support. |
6. Specifications
Detailed technical specifications for the YUNTX 9" Android14 Car Stereo:
| Feature | Specification |
|---|---|
| Display Size | 9 Inches |
| Operating System | Android 14 |
| Processor | AutoChips AC8257L Octa-core (2.6GHz) |
| RAM | 4GB |
| Internal Storage | 64GB |
| Audio Output Power | 4x50W (TDA7388 Amplifier Chip) |
| DSP | 64-bit Dual Precision DSP |
| Radio Tuner | TDA7786 (FM/AM RDS) |
| Connectivity | Bluetooth, WIFI, MirrorLink (Wired/Wireless CarPlay, Android Auto) |
| GPS | Built-in GPS dual-mode navigation (North America maps) |
| Included Components | Rearview Camera, External Microphone |
| Mounting Type | Dashboard Mount |
| Item Weight | 7 pounds |
| Package Dimensions | 10 x 8 x 8 inches |
7. Warranty and Support
7.1. Warranty Information
This YUNTX Car Stereo comes with a one-year warranty from the date of purchase, covering manufacturing defects and malfunctions under normal use. Please retain your proof of purchase for warranty claims.
7.2. Technical Support
YUNTX provides lifetime technical support for this product. If you encounter any issues or require assistance with installation, operation, or troubleshooting, please contact our support team:
- Email: HzBoxin@outlook.com
- Please include your product model and a detailed description of the issue when contacting support for faster assistance.