
1. Introduction
This manual provides comprehensive instructions for the installation, operation, and maintenance of the PLPFUDVDZZ SNS-2V 2 Axis Digital Readout (DRO) kit. This system is designed for precision measurement in milling and lathe applications, offering high accuracy and a range of features to enhance machining processes.
Key features of the SNS-2V DRO kit include:
- Comprehensive Accessory Package: Simplifies installation with all necessary components included.
- Versatility: Suitable for a wide range of industrial applications.
- Compact Design: The unit is compact, making it easy to install and integrate into various machine setups.
- Accurate Measurement: Supports multiple measurement lengths to suit different operational scenarios, providing high precision.
- Full-featured: Equipped with fast programming capabilities and a complete set of functions for efficient use.
2. Setup and Installation
Proper installation of the DRO display and linear scales is crucial for accurate performance. Ensure all components are securely mounted and connections are correct.
2.1 Components Overview
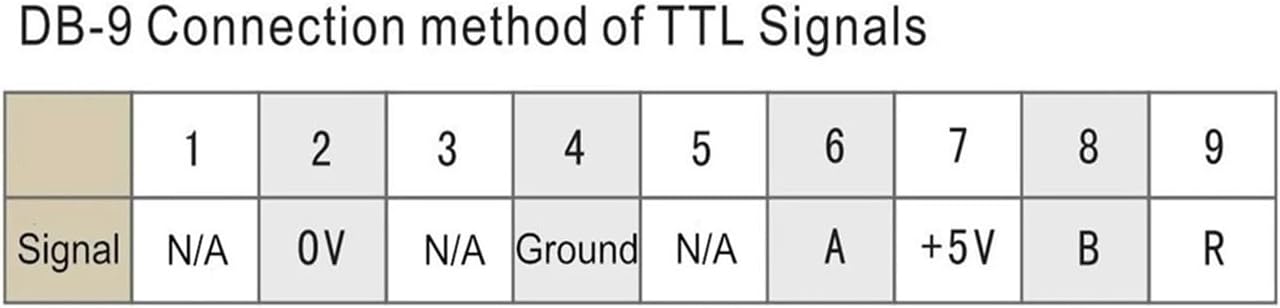
Figure 1: The SNS-2V Digital Readout (DRO) display unit. This unit processes signals from the linear scales and displays the measurements.

Figure 2: A PLPFUDVDZZ linear optical scale. These scales are mounted to the machine axes to provide precise position feedback to the DRO unit.
2.2 Linear Scale Mounting
Mount the linear scales parallel to the machine's axes of motion. Ensure the scale body and reading head are securely fastened and aligned to prevent binding or damage during machine operation. The provided mounting brackets and hardware should be used for installation.

Figure 3: Dimensional drawing of the linear optical scale, showing mounting points and overall length considerations. 'L' represents the available travel length.
Scale Dimensions:
- Scale available travel length: 50mm-1000mm
- Scale mounting instance: Travel +124mm
- Scale actual length: Travel +142mm
- Scale cable length: 3 meters
2.3 Electrical Connections (DB-9 TTL Signals)
Connect the linear scales to the DRO display unit using the provided cables. The SNS-2V system utilizes TTL signals via a DB-9 connector. Refer to the pinout diagram below for correct wiring.

Figure 4: DB-9 pinout diagram for TTL signal connections. Ensure correct pin assignments for proper functionality.
| Pin | Signal |
|---|---|
| 1 | N/A |
| 2 | 0V |
| 3 | N/A |
| 4 | Ground |
| 5 | N/A |
| 6 | A |
| 7 | +5V |
| 8 | B |
| 9 | R |
After connecting the scales, plug the DRO display unit into a suitable power source (AC80-250V 50/60HZ).
3. Operating Instructions
The SNS-2V DRO unit provides intuitive controls for various measurement functions. Familiarize yourself with the display and button layout.
3.1 Basic Operations
- Power On/Off: Press the power button to turn the unit on or off.
- Zeroing: To set the current position as zero for an axis, press the 'ZERO' button for that specific axis.
- Absolute/Incremental Modes: Switch between absolute (ABS) and incremental (INC) measurement modes as required for your machining task.
- Unit Conversion: Use the 'MM/INCH' button to toggle between metric (millimeters) and imperial (inches) units.
- Half Function: The '1/2' button allows for quick calculation of the center point, useful for workpiece setup.
3.2 Advanced Functions
The SNS-2V DRO is full-featured and supports fast programming. Consult the detailed programming guide (if provided separately) for advanced functions such as:
- Hole pattern calculations (PCD, linear array)
- Arc machining
- Tool compensation
- Taper measurement
4. Maintenance
Regular maintenance ensures the longevity and accuracy of your DRO system.
- Cleaning: Keep the display unit and linear scales clean. Use a soft, dry cloth to wipe surfaces. Avoid abrasive cleaners or solvents that could damage the display or scale surfaces.
- Scale Protection: Ensure the linear scales are protected from chips, coolant, and dust. Regularly check the integrity of any protective covers or seals.
- Cable Inspection: Periodically inspect all cables for signs of wear, cuts, or damage. Replace damaged cables immediately to prevent electrical issues or signal loss.
- Environmental Conditions: Operate the DRO system within its specified environmental conditions (temperature, humidity) to prevent malfunction.
5. Troubleshooting
If you encounter issues with your SNS-2V DRO kit, refer to the following common problems and solutions.
- Display Not Powering On:
- Check the power cable connection to the DRO unit and the wall outlet.
- Verify the power source is active and within the specified voltage range (AC80-250V).
- No Reading or Erratic Readings on an Axis:
- Ensure the linear scale cable for that axis is securely connected to both the scale and the DRO unit.
- Inspect the linear scale and reading head for any obstructions, damage, or excessive dirt. Clean if necessary.
- Check the alignment of the linear scale and reading head. Misalignment can cause reading errors.
- Inaccurate Measurements:
- Verify the resolution setting on the DRO matches the resolution of your linear scales (1/5um or 0.001mm/0.005mm).
- Ensure the linear scales are rigidly mounted and not flexing during machine movement.
- Perform a calibration check using a known standard.
If problems persist after attempting these solutions, contact customer support.
6. Specifications
Detailed technical specifications for the SNS-2V 2 Axis DRO kit.
| Feature | Detail |
|---|---|
| Model Number | SNS-2V |
| Input Voltage | AC80-250V 50/60HZ |
| Signal Type | TTL |
| Power Consumption | 25W |
| Scale Input Voltage | 5VDC |
| Resolution | 1/5um (0.001mm or 0.005mm set options) |
| Scale Available Travel Length | 50mm-1000mm |
| Scale Mounting Instance | Travel +124mm |
| Scale Actual Length | Travel +142mm |
| Scale Cable Length | 3 meters |
| Item Weight | 11.02 pounds (approx. 5 kg) |
| Manufacturer | PLPFUDVDZZ |
7. Warranty and Support
For warranty information, technical support, or service inquiries, please contact your vendor or the manufacturer directly. Keep your purchase receipt as proof of purchase.
Manufacturer: PLPFUDVDZZ